Jgood's 88 22re xcab Build Up thread
 10-03-2010, 06:36 PM
#1
Registered User
Thread Starter

Join Date: Apr 2010
Location: westminster, ma
Posts: 53
Likes: 0
Received 0 Likes
on
0 Posts
Jgood's 88 22re xcab Build Up thread
So, i started out with jeeps. YJ with waggy 44's, then a ZJ with a 4.5 stroker and 5 speed swap with some goodies. Then i bought a Cummins 3500, hit 502/1156 with it, then it just fell apart... so when i got my tax return this year, i decided it was toyota time! Reason being; my mom bought a 97 3.4 5 speed 4wd x-cab T-100 in 1998 with 13k miles on it...currently, its at 268k with nothing more then a clutch, brakes, timing belts, tires and shocks. That really says something.
I really like the 84-88 body style, especially the extra cab. It had to be a 5 speed, and had to be a 22re. Ditto with 4wd. I finaly stumbled upon a 88 white x-cab 22re/5spd/4wd with 67k original miles in Maine, about 220 miles from me. I called him that morning, 2 hours after it went on craigslist, i was the 4th caller, i grabbed my dealer plate and went on a drive!
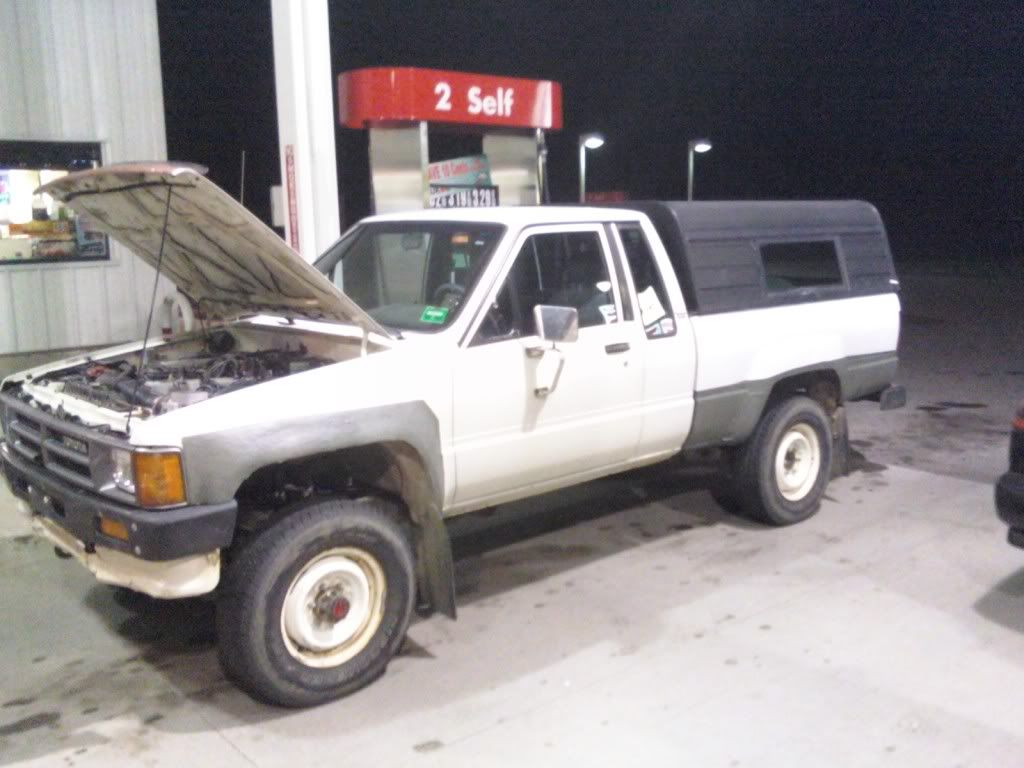
When i got there, the frame behind the gas tank and the other side was SOLID AS A ROCK! in freakin' new england nonetheless. Bed was junk, fenders were junk, gas tank was mint, and the rockers were all there, in great shape. I drove her home without a hitch. This is house she looked when i got to the gas station to fill up. The hood is open because the heater assembly was completely trashed, it was pretty chilly so i was opening the heater valve by hand.
SO, drove her for a month or so, and one day she started pinging a bit, i looked down and the temp was completely pegged! Shut her down, and from what i saw, and felt, she was fine. I tossed in a SR5 cluster so i had a tach, but the coolant gauge didnt work so good, so i swapped the stock back in, good thing i did too! Every few days it would randomly horrendously overheat. I couldn't find the reason, and still haven't. So i made the choise of full engine rebuild. I went through about 2 gallons of coolent every tank of gas, something is wrong!
Then... i just went nuts...
I really like the 84-88 body style, especially the extra cab. It had to be a 5 speed, and had to be a 22re. Ditto with 4wd. I finaly stumbled upon a 88 white x-cab 22re/5spd/4wd with 67k original miles in Maine, about 220 miles from me. I called him that morning, 2 hours after it went on craigslist, i was the 4th caller, i grabbed my dealer plate and went on a drive!
When i got there, the frame behind the gas tank and the other side was SOLID AS A ROCK! in freakin' new england nonetheless. Bed was junk, fenders were junk, gas tank was mint, and the rockers were all there, in great shape. I drove her home without a hitch. This is house she looked when i got to the gas station to fill up. The hood is open because the heater assembly was completely trashed, it was pretty chilly so i was opening the heater valve by hand.
SO, drove her for a month or so, and one day she started pinging a bit, i looked down and the temp was completely pegged! Shut her down, and from what i saw, and felt, she was fine. I tossed in a SR5 cluster so i had a tach, but the coolant gauge didnt work so good, so i swapped the stock back in, good thing i did too! Every few days it would randomly horrendously overheat. I couldn't find the reason, and still haven't. So i made the choise of full engine rebuild. I went through about 2 gallons of coolent every tank of gas, something is wrong!
Then... i just went nuts...
 10-03-2010, 06:49 PM
#2
Registered User
Thread Starter
Join Date: Apr 2010
Location: westminster, ma
Posts: 53
Likes: 0
Received 0 Likes
on
0 Posts
OH! and for the record, i have no idea what that green crap on the fenders is, but all i do know is that it is an evil substance. No chemical touches it, wire brush on a grinder smears it, you can't scrape it, its just evil. I'm quite sure it's something military, beucase of the color and its durability. Behind it, form what i could see, it was rotted to junk. The bed was completely unsalvageable, took the plastic bedliner out ande went WOAH! NO bed after the 3rd support, floors 3 ft wide litterally gone. Which is somewhat funny considering the rest of the truck was so clean. I ended up pickup up 2 ebay fenders for 75 a piece, and painted them factory white, paint code 095 i beleive? i forget, but they came out pretty good, even lined up better then i though.
I forgot to add the history of the truck too actually. It was owned by a late 60 something year old guy. He got it from someone who worked in New York City but had a house in upstate New York, near Plattsburg. He had a little commuter car he went back and forth in, and bought this truck brand new to park on his farm. So for 20 years it was only driven on the weekends. This guy i got it from bought it 3 years ago off him and absolutely loved it. But due to a leg injury he was unable to drive a clutch anymore so he sadly had to part with it. I told him she would look like new when i was done, if only i knew how right i would be...
I forgot to add the history of the truck too actually. It was owned by a late 60 something year old guy. He got it from someone who worked in New York City but had a house in upstate New York, near Plattsburg. He had a little commuter car he went back and forth in, and bought this truck brand new to park on his farm. So for 20 years it was only driven on the weekends. This guy i got it from bought it 3 years ago off him and absolutely loved it. But due to a leg injury he was unable to drive a clutch anymore so he sadly had to part with it. I told him she would look like new when i was done, if only i knew how right i would be...
10-03-2010, 07:15 PM
#3
Registered User
Solid truck from Maine, now thats a rarity. Good find. I have had my tuck from new (oct 87) and it grew up in Ma, n NH. I have had some rust, but not to bad. My trucks likin CA.
10-03-2010, 07:37 PM
#4
Registered User
Thread Starter
Join Date: Apr 2010
Location: westminster, ma
Posts: 53
Likes: 0
Received 0 Likes
on
0 Posts
I'm kind of known for overdoing everything. It's not that im anal, well it is, but it's more that i hate doing stuff twice, alot. I've learned by watching friends bang there heads enough times to know what works and what doesn't.
About 2 months of paychecks later, these started to arrive daily.
BASICALLY; this is what i got
ENGNBLDR;
261 cam
Headgasket (told his was best by most, maybe 80% of people)
Full Front End Kit. (Timing cover, timing gear set with metal backed sliders, oil pump, water pump, etc.)
New Valve Guides, Seals, and Valves
Trail Gear;
Full Rear Disc Swap
FJ80 Master Cyl
Marlin Crawler;
Bumpstops
1800lb Clutch w/ Pilot and Throwout Bearings
SKYs MFG;
Rear Driveline Parking Brake
Genuine Toyota;
Fuel Sensing Unit (stock rusted to crud)
Fuel Pump Mount (stock rusted almost completely off)
EGR Valve
PCV Valve
Dual Rate T-stat
Fuel Filter
O2 Sensor
Valve Tappets
Then from random people;
PaceSetter Header (80 bucks brand new! paint stripped off, thats all, never used, all bolts hardware and intermediate pipe!)
83 Supra MAF with full intake setup
2'' Lift Rear Leafs
Full Energy Suspension Rear Suspension Poly Kit
New Shackles (custom)
Reclocated Rear Brake Hose Mount (custom)
Remanufactured Injectors (from that dude everyone told me to go to)
ARP Head Studs
Full Fel-Pro Gasket Set
As for the head... I know i can get them pretty cheap from china and such, but i like genuine toyota stuff. I had a spare motor, so i took off the head. I put my new valves and guides in, new seals, had everything seated, lapped, decked and professionally assembled. At this time, i spend about 6 hours port n polishing the head as well (mostly polishing actually).
She should be a stone reliable little daily driver when all is said and done!
10-03-2010, 08:05 PM
#6
Registered User
Thread Starter
Join Date: Apr 2010
Location: westminster, ma
Posts: 53
Likes: 0
Received 0 Likes
on
0 Posts
These past few weekends i've been going to town, as im trying to finish before the snow falls! So far this is what i've gotten done.
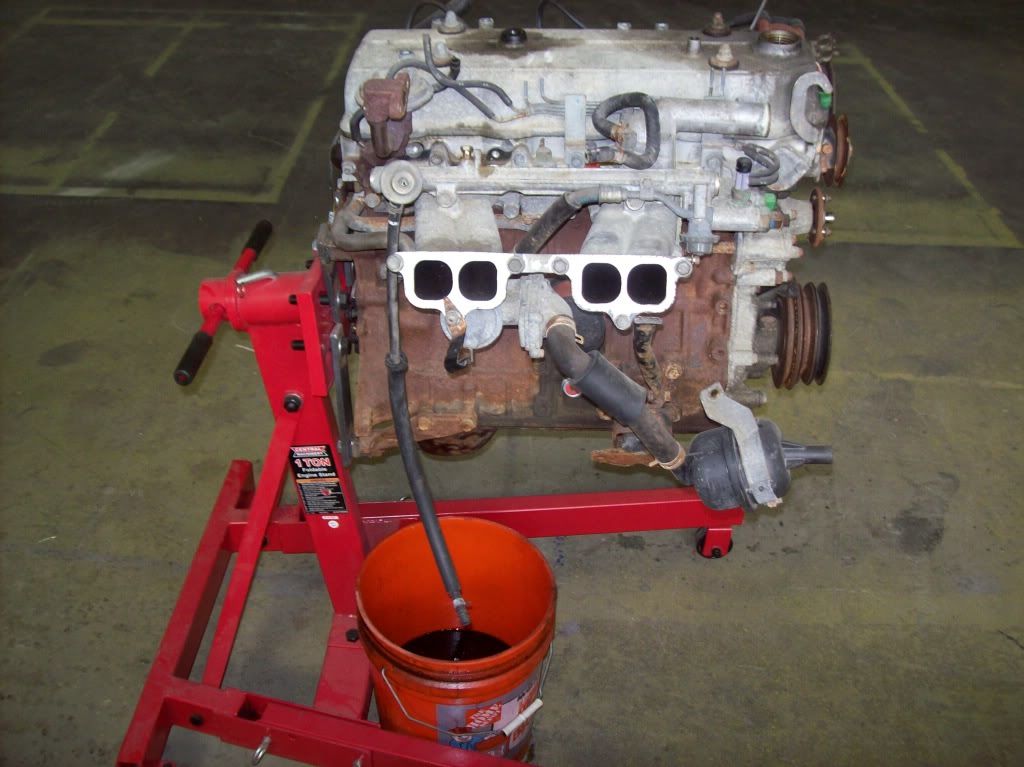
Motor is out in my shop waiting to get rebuilt
The entire frake was stripped and bed removed and the entire thing was wire brushed with a grider, then it was coated in rust converter where there was rust, then painted in SEM chassis coat, the semi flat style that matches factory toyota. Let me tell you, the frame looks NEW!
I ran all new brake and fuel lines all the way from the front to the back, so theres no more worries with popping lines from rust.
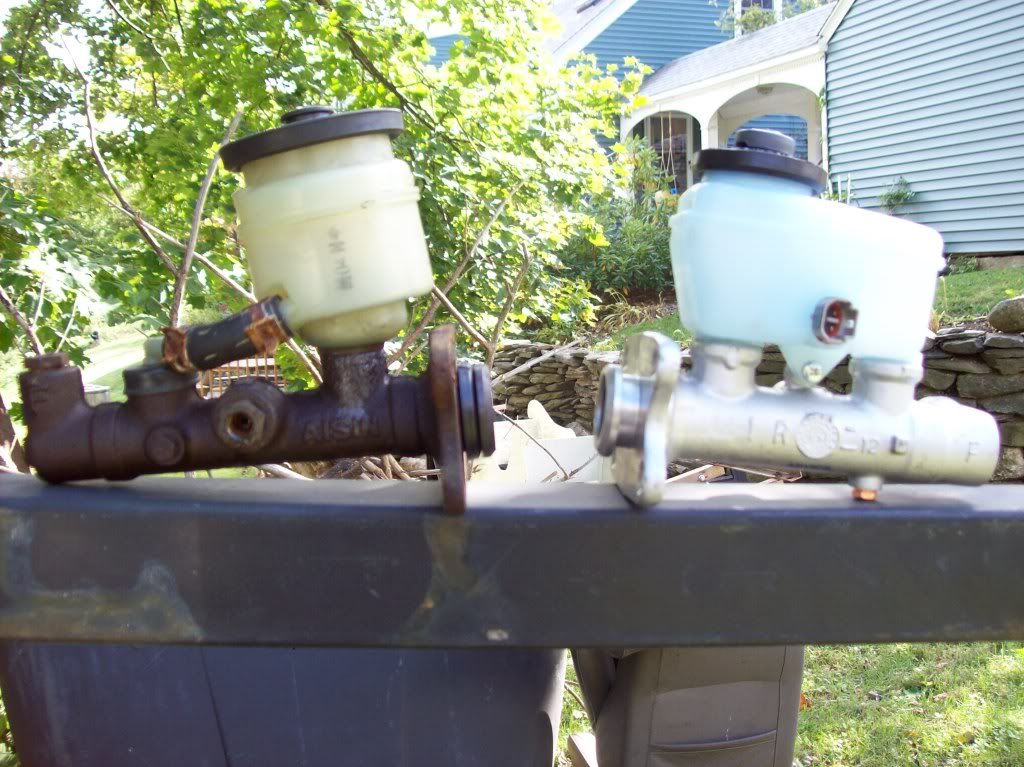
Just a shot of the difference from a stock master cyl to a FJ80 master
The gas tank was taken off, and sanded with my DA with 36 grit until al the fatory paint was gone (not much left anyways) and then with 220 to make it nice n smooth. I then painted the previously rusty places with rust converter again, then primed, painted, and even cleared. I reinstalled the pump and sender, and coated the tops of them with a thin coat of waterproof grease. If you live in new england, you would understand why!
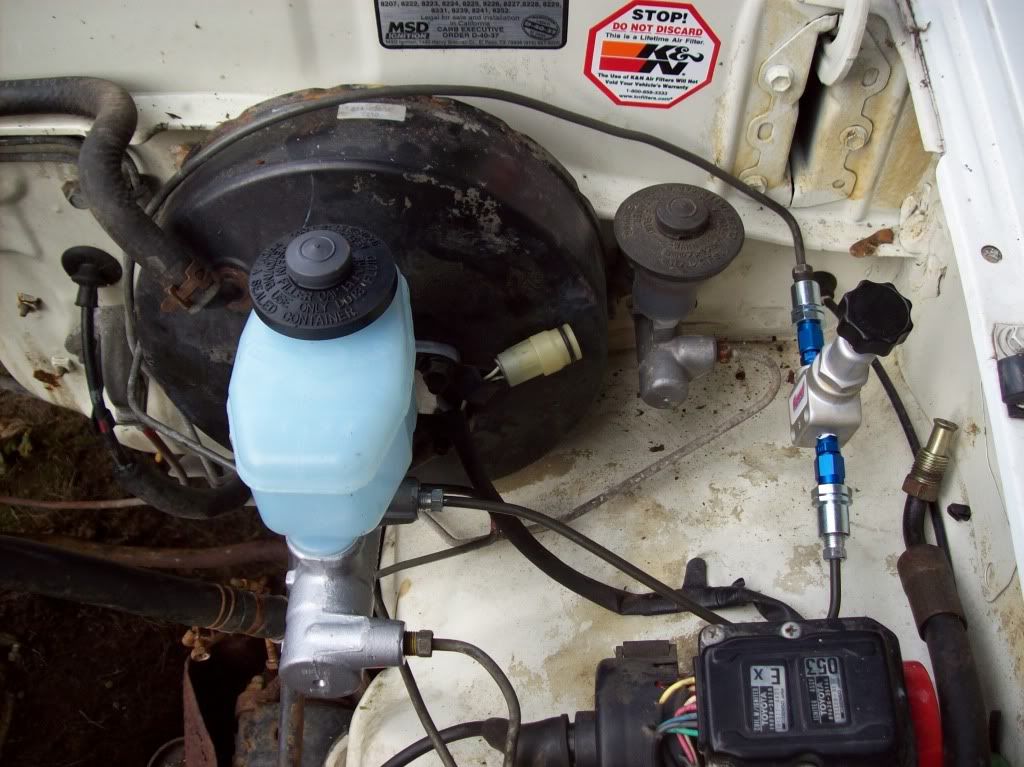
Today i finished brake line routing and LSPV removal. I also installed my FJ80 master and rear brake Prop valve. I was able to re-use the front brake line, and the rear one without cutting, just modifying bends, it came out very clean! (did i mention im anal?)

Tomorrow at work ill have to TIG a fitting closed to i can block the LSPV return hose hole, then its bleed time. Once the brakes are ok, gas tank install and fuel line final tightening.
Hopefully this coming 3 day weekend i will be able to get the top end re-built and have the motor back in the truck in about 3 weeks. I would really like the truck so be running for winter, thats my goal anyways.
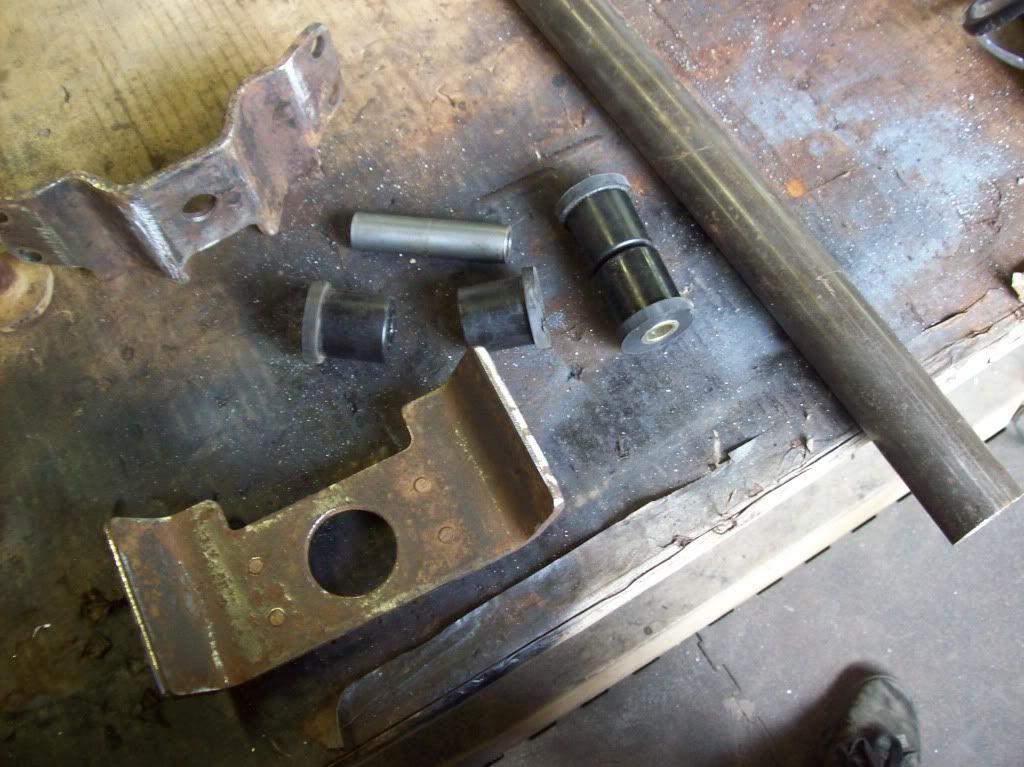
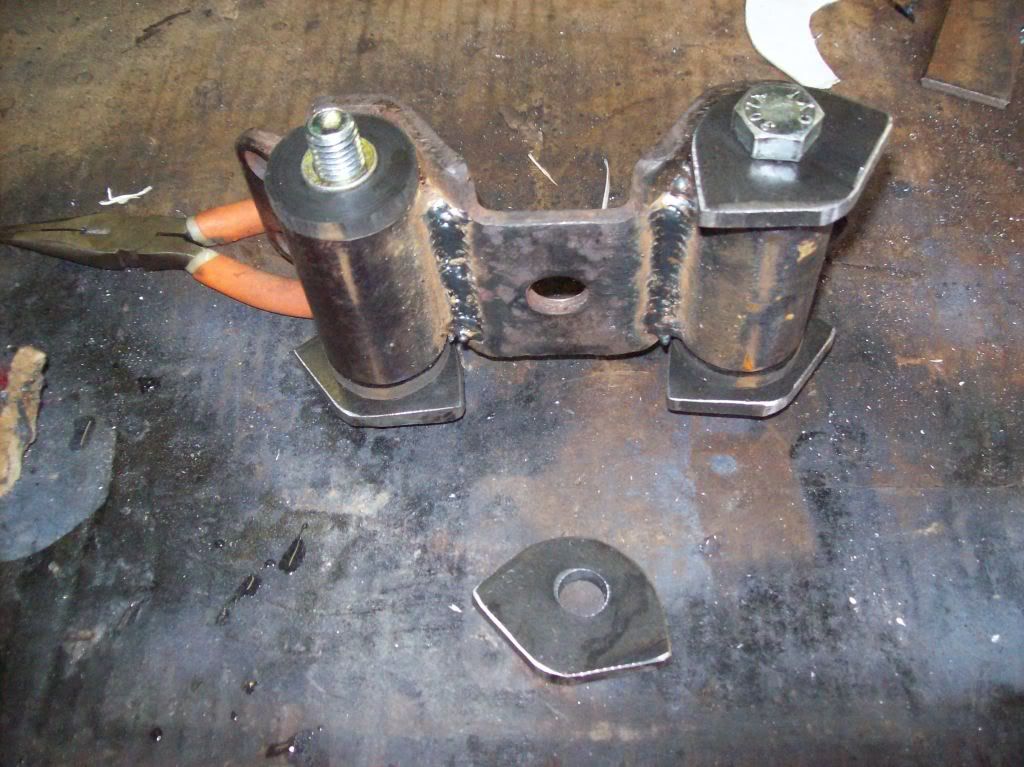
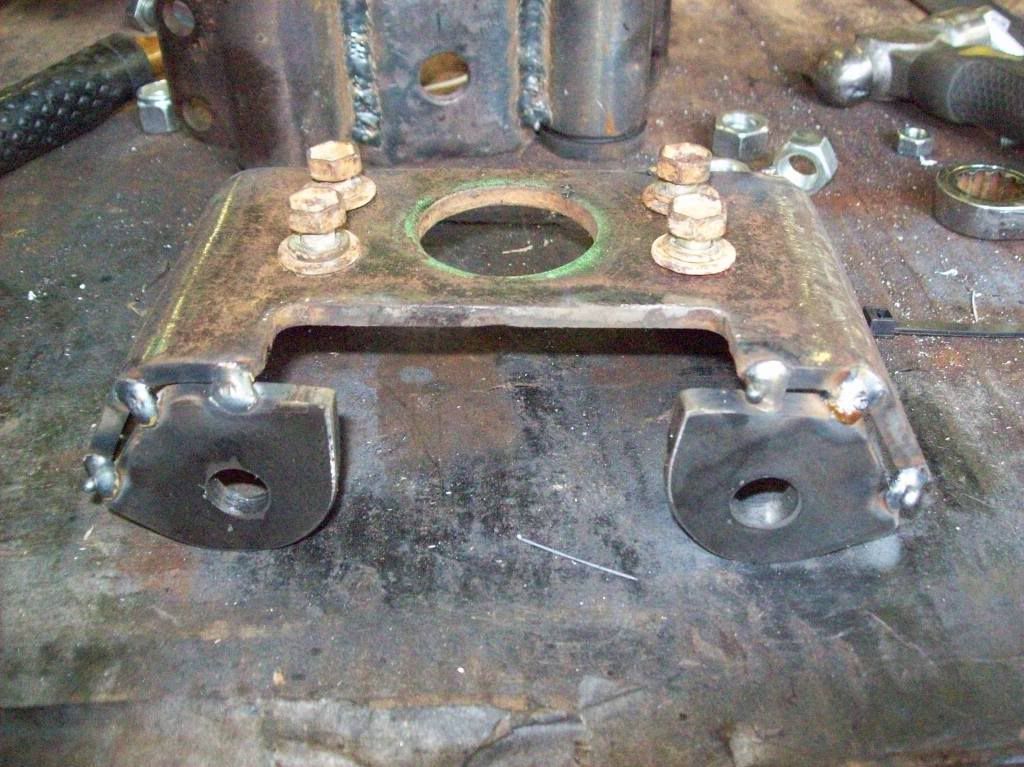
A few weeks ago i posted a build of my custom t case mount, becuase mine was completely wasted, heres a few teasers from the writeup!

stay tuned!
Motor is out in my shop waiting to get rebuilt
The entire frake was stripped and bed removed and the entire thing was wire brushed with a grider, then it was coated in rust converter where there was rust, then painted in SEM chassis coat, the semi flat style that matches factory toyota. Let me tell you, the frame looks NEW!
I ran all new brake and fuel lines all the way from the front to the back, so theres no more worries with popping lines from rust.
Just a shot of the difference from a stock master cyl to a FJ80 master
The gas tank was taken off, and sanded with my DA with 36 grit until al the fatory paint was gone (not much left anyways) and then with 220 to make it nice n smooth. I then painted the previously rusty places with rust converter again, then primed, painted, and even cleared. I reinstalled the pump and sender, and coated the tops of them with a thin coat of waterproof grease. If you live in new england, you would understand why!
Today i finished brake line routing and LSPV removal. I also installed my FJ80 master and rear brake Prop valve. I was able to re-use the front brake line, and the rear one without cutting, just modifying bends, it came out very clean! (did i mention im anal?)
Tomorrow at work ill have to TIG a fitting closed to i can block the LSPV return hose hole, then its bleed time. Once the brakes are ok, gas tank install and fuel line final tightening.
Hopefully this coming 3 day weekend i will be able to get the top end re-built and have the motor back in the truck in about 3 weeks. I would really like the truck so be running for winter, thats my goal anyways.
A few weeks ago i posted a build of my custom t case mount, becuase mine was completely wasted, heres a few teasers from the writeup!
stay tuned!
10-03-2010, 08:30 PM
#7
Registered User
Thread Starter
Join Date: Apr 2010
Location: westminster, ma
Posts: 53
Likes: 0
Received 0 Likes
on
0 Posts
OCdrop, thanks bud, but you spelled my forum name wrong.  Its Jgood not jood, lol. Sorry for the title screw up, long day.
...and Teuf, your yota is mint for a noreaster rig, my god cali has treated it well! I'm not a big fan of diamond plate alum, but yours is really tastefully done, i like it! nice rig bud.
Its Jgood not jood, lol. Sorry for the title screw up, long day....and Teuf, your yota is mint for a noreaster rig, my god cali has treated it well! I'm not a big fan of diamond plate alum, but yours is really tastefully done, i like it! nice rig bud.
Trending Topics
10-03-2010, 09:24 PM
#9
Registered User
Thread Starter
Join Date: Apr 2010
Location: westminster, ma
Posts: 53
Likes: 0
Received 0 Likes
on
0 Posts
thanks buuuuddy 
Lovin the b4runner btw, been keeping up with it for a while now, those things are so sick. When i was younger i was junkyard surfin for jeep crap when that was my forte, and came across a coleman edition toyota pickup. It was really really rough, almost unsalvageable, but i raided it and found a bunch of the original paperwork from it. That includes the coleman conversion emblem, priceless trophys of mine.
Lovin the b4runner btw, been keeping up with it for a while now, those things are so sick. When i was younger i was junkyard surfin for jeep crap when that was my forte, and came across a coleman edition toyota pickup. It was really really rough, almost unsalvageable, but i raided it and found a bunch of the original paperwork from it. That includes the coleman conversion emblem, priceless trophys of mine.
10-03-2010, 10:09 PM
#10
Registered User
nice project you got going there.
EDIT: just noticed, nice rear disk brake conversion.
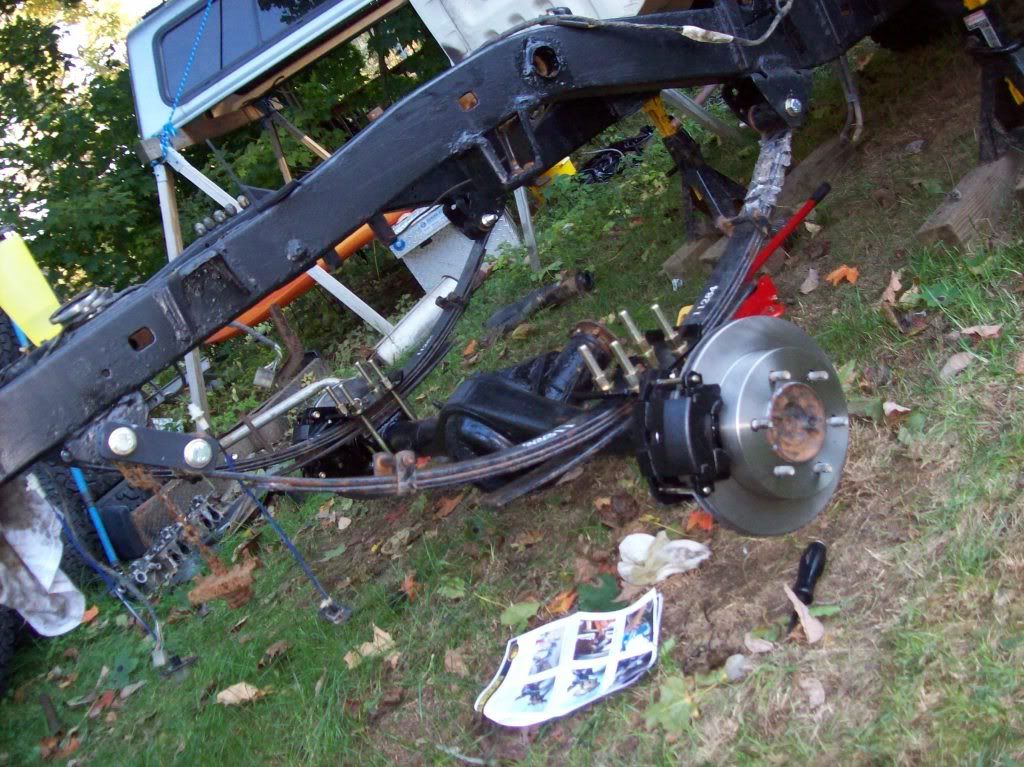
just one little question/comment though more for my benefit because I have no idea, but does anyone know if this shackle angle is a little too far forward or the springs look like they are too short or is it supposed to be that way.
EDIT: just noticed, nice rear disk brake conversion.
just one little question/comment though more for my benefit because I have no idea, but does anyone know if this shackle angle is a little too far forward or the springs look like they are too short or is it supposed to be that way.
Last edited by xxxtreme22r; 10-03-2010 at 10:11 PM.
10-03-2010, 10:18 PM
#11
Registered User
Thread Starter
Join Date: Apr 2010
Location: westminster, ma
Posts: 53
Likes: 0
Received 0 Likes
on
0 Posts
ehh, its a little more foreward then i would have liked. there brand new rancho 2" leafs. there really old and have been sitting for ages in a garage in the original box. my god are they stiff. They need to be broken in so naturally they will pull the shackle foreward due to there huge arch.
Also, this truck is supported by the frame mid truck, so the axle is fully un-loaded. Im going to hold off on the final torque until i take her for a maiden run, if the leafs dont move at all, ill take the center leaf out and replace it with my stock one, that should drop it back down to a manageable height and ride quality.
btw, The shackles are also about 3/4 of an inch longer then stock.
10-03-2010, 11:54 PM
#12
Registered User
I'd be willing to bet that harsh ride isn't due to the spring itself, but simply because the shackle isn't moving much when the spring flattens out. Almost looks like they are the wrong springs. But I could be completely wrong, but I remember a recent thread talking about a harsh ride and shackle angle.
Last edited by xxxtreme22r; 10-03-2010 at 11:55 PM.
10-04-2010, 05:12 PM
#13
Registered User
Thread Starter
Join Date: Apr 2010
Location: westminster, ma
Posts: 53
Likes: 0
Received 0 Likes
on
0 Posts
Yea, i mean, this is no where near my first vehicle with shackles... I checked the part number son the springs and they are for this truck and are a 2" spring. I think jsut from sitting so long there just stuck together, a test drive should free them up, if not, its custom pack time
10-05-2010, 10:03 PM
#15
Registered User
Thread Starter
Join Date: Apr 2010
Location: westminster, ma
Posts: 53
Likes: 0
Received 0 Likes
on
0 Posts
...am i missing something? im under the impression as a leaf spring travels up, it lengthens, hense why a shackle is needed? As i said, i will take it on a drive to see if they decide to develop a little more before i modify them. Also, remember the axle is at full droop hanging by jackshands behind the cab, as you can see in the picture. it is now sitting on its wheels, and the shackle is at a much mroe relaxed angle.
10-23-2010, 04:21 PM
#17
Registered User
Thread Starter
Join Date: Apr 2010
Location: westminster, ma
Posts: 53
Likes: 0
Received 0 Likes
on
0 Posts
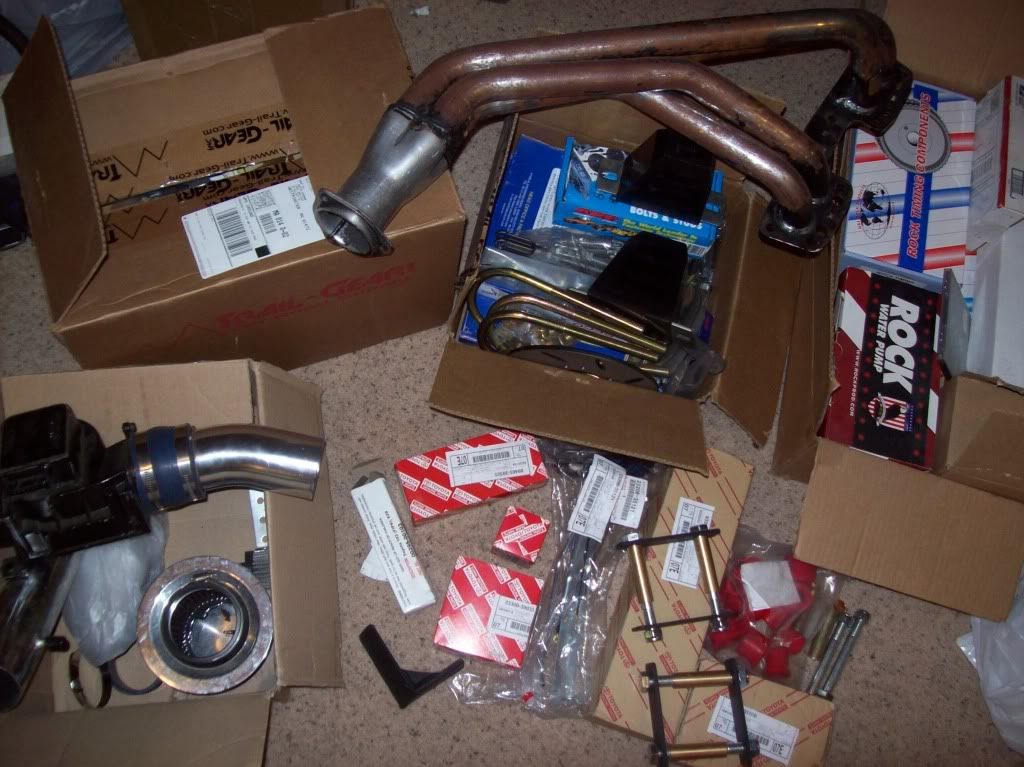
So, i talked to Engnbldr and he told me of the high failure rate on the Fel-Pro head gaskets, wich puzzled me. Mainly, beucase i know Fel-Pro as one of the best gasket mfg there is. I ended up getting on of his in the end, just beucase he sold me on it, and it was 30 bucks, and i figured id compare the two side by side.
When next to eachother, its amazing the differance. The one from engnbldr is clearly the better choise, and im very glad i got his gasket in the end.
You can see the small steel rings on the fel pro on the right, and the much larger and thicker on the Engnbldr on the left. Much more metal for compression and a sturdy seal. I feel MUCH better using his.
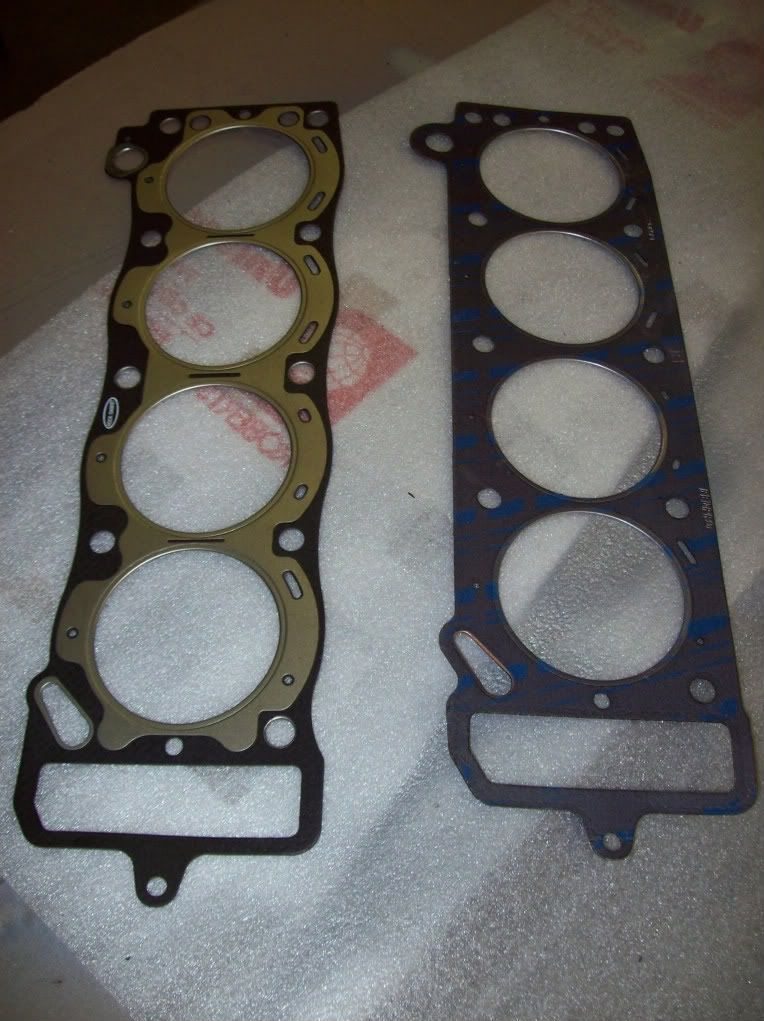
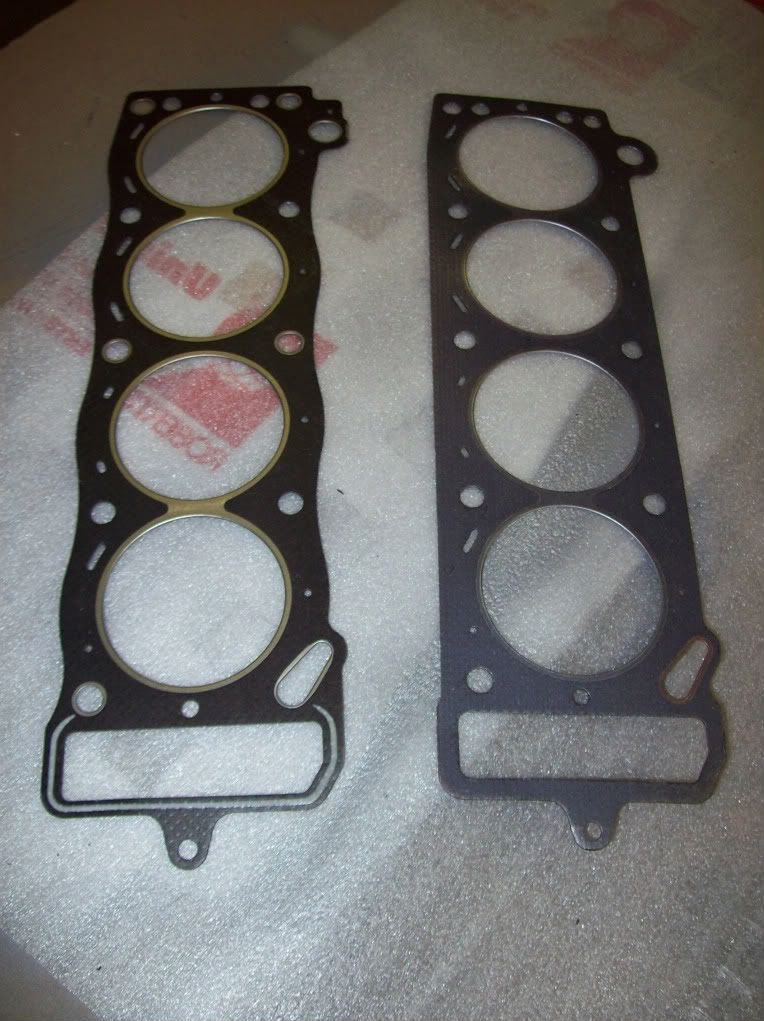
10-24-2010, 06:29 PM
#18
Registered User
Thread Starter
Join Date: Apr 2010
Location: westminster, ma
Posts: 53
Likes: 0
Received 0 Likes
on
0 Posts
So, sorry for no updates in a few weeks, i had to build this for the release of the new Tony Hawk Pro Skater game real quick...

Its a 1.5 inch thinwall aluminum frame that is skinned in 1/2 inch plywood. The top is painted in black bedliner that has a 50lb bag of black beauty in it, very realistic. 2 weeks and over 300 feet of weld total. I've been busy to say the least.
The Monday after, Columbus Day, it was time ot tear down!
10-24-2010, 06:37 PM
#19
Registered User
Thread Starter
Join Date: Apr 2010
Location: westminster, ma
Posts: 53
Likes: 0
Received 0 Likes
on
0 Posts
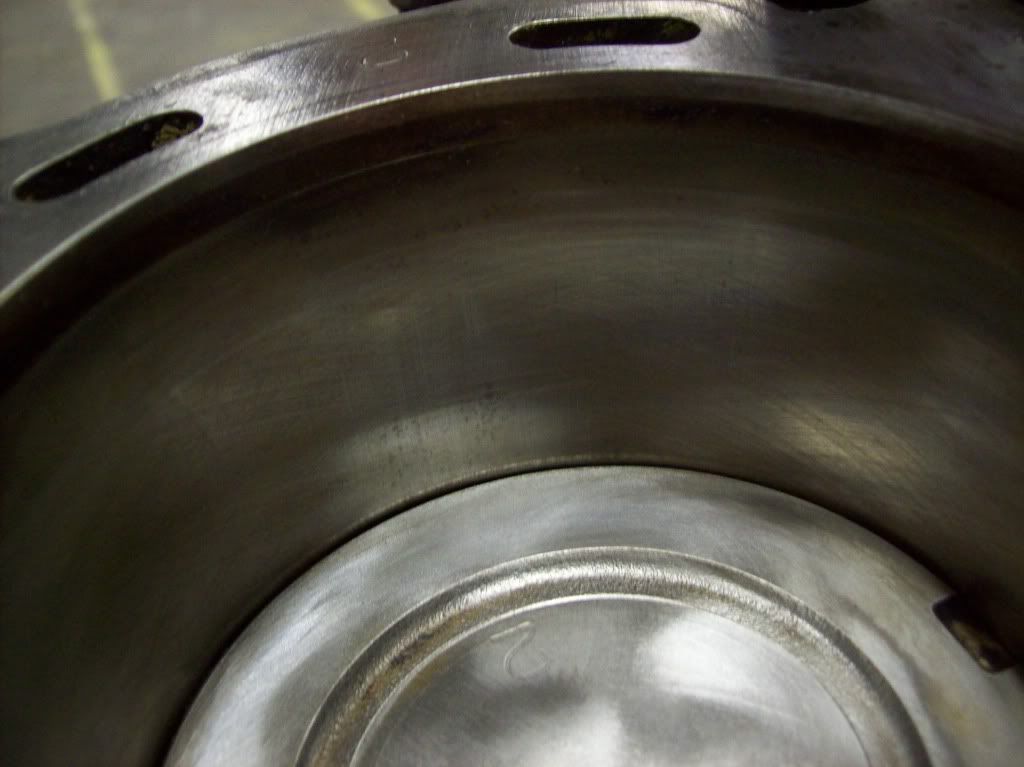
I was pleasantly surprised upon head removal. The cylander walls still had the factory hone pattern! There wasn't even a ridge i could feel by hand, and a internal caliper re-assured my hands feeling. no new bottom end for this bad boy! I had a machinist buddy of mine take a peek at her, and he said i'd be stupid to mess with factory components in that condition. Good to hear!
Then, it was tear off, apart, and start the re-assembly. Heres a good pic just for the sake of cool factor.

woohoo! ARP studs! Worked with them alot, as im coming from a diesel background, never had a bad thing to say about them. Im a little happier abou the even torque on the cylander head now, and with the fact that its at 90 ft lbs instead of 58.
Then, it was tear off, apart, and start the re-assembly. Heres a good pic just for the sake of cool factor.
woohoo! ARP studs! Worked with them alot, as im coming from a diesel background, never had a bad thing to say about them. Im a little happier abou the even torque on the cylander head now, and with the fact that its at 90 ft lbs instead of 58.
10-24-2010, 06:59 PM
#20
Registered User
Thread Starter
Join Date: Apr 2010
Location: westminster, ma
Posts: 53
Likes: 0
Received 0 Likes
on
0 Posts
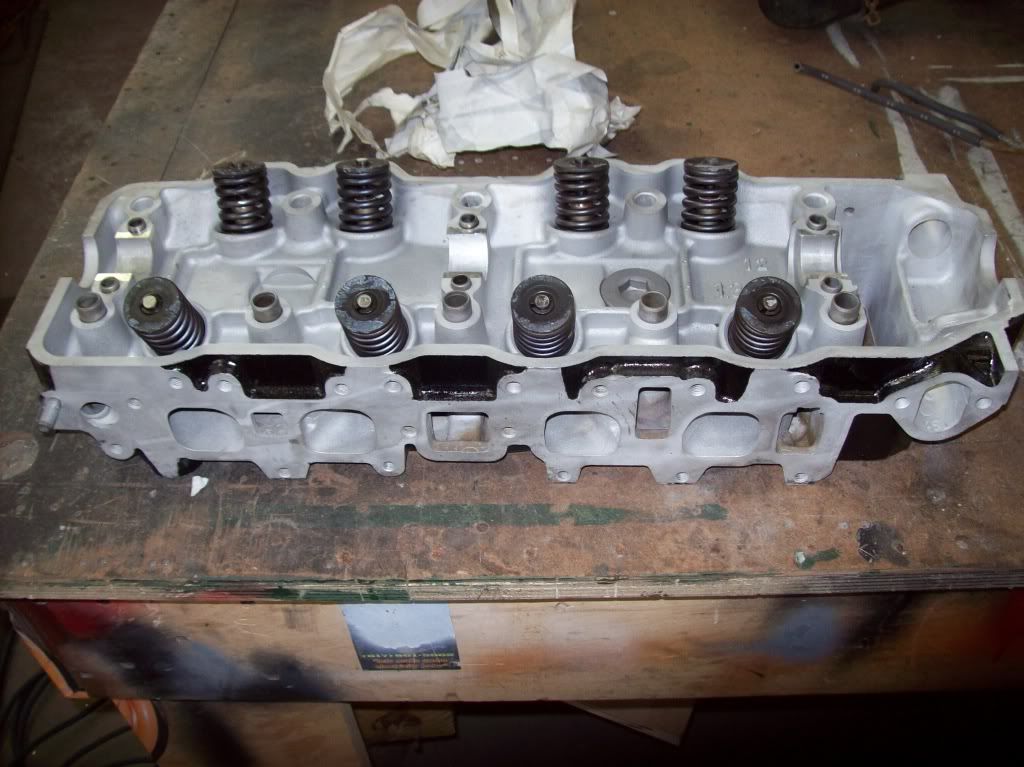
This is the used head i had rebuilt. Factory guides were in good enough shape to re-use, but it has new valves, valve springs, retainers, its been de-burred (poor man port n polish), and its been decked, woohoo!
Intake manifold bolted on and ready to go!

and then finished!

As expected, the header fit like ˟˟˟˟˟. It hit on the tranny mount and on the bolt in the block. A few "modifications" and it fit. (I wailed on it with my body hammer for a big, a slight massage if you will.) I also made a mount for the air injection tube (yes, i'm keeping it) and the block mounted coolant tube, on the header.
Biggest bummer of it was the stupid stripped exhaust stud. I TOLD the guy who redid my head to make sure there were no bad thread holes, guess he missed it. In his defense, i did too, they looked fine, but had been pulled out. It looked as it the PO had tried to put a bolt of the wrong thread in, and ruined it. Anyhow, i re-tapped it for 7/16ths fine thread, and put threaded rod in with some JB Weld. I'm not proud of the fit, but for now, it will work, she has to be running again soon! The 7/16ths rod is smaller then the hole needed for the proper heli-coil for the stud. If the JB and rod holds, it will stay, if not, i will fix it the right way. I was bummed as all hell when i was torqueing the header and the last damn stud kept spinning
Intake manifold bolted on and ready to go!
and then finished!
As expected, the header fit like ˟˟˟˟˟. It hit on the tranny mount and on the bolt in the block. A few "modifications" and it fit. (I wailed on it with my body hammer for a big, a slight massage if you will.) I also made a mount for the air injection tube (yes, i'm keeping it) and the block mounted coolant tube, on the header.
Biggest bummer of it was the stupid stripped exhaust stud. I TOLD the guy who redid my head to make sure there were no bad thread holes, guess he missed it. In his defense, i did too, they looked fine, but had been pulled out. It looked as it the PO had tried to put a bolt of the wrong thread in, and ruined it. Anyhow, i re-tapped it for 7/16ths fine thread, and put threaded rod in with some JB Weld. I'm not proud of the fit, but for now, it will work, she has to be running again soon! The 7/16ths rod is smaller then the hole needed for the proper heli-coil for the stud. If the JB and rod holds, it will stay, if not, i will fix it the right way. I was bummed as all hell when i was torqueing the header and the last damn stud kept spinning


