dark_fairytales 1986 Pickup Build-Up Thread
 10-24-2011, 02:54 PM
#61
Registered User
Thread Starter
Join Date: Oct 2008
Location: Sacramento, Crawlifonia
Posts: 1,621
Likes: 0
Received 7 Likes
on
4 Posts
when is your truck going to be done. It will depend on what I am doing at the time for me to decide to go or not. I have been very busy lately and I do not expect that to stop any time soon.
 10-25-2011, 04:32 PM
#63
Registered User
Thread Starter
Join Date: Oct 2008
Location: Sacramento, Crawlifonia
Posts: 1,621
Likes: 0
Received 7 Likes
on
4 Posts
finally got my truck back from FireStone after a wheel alignment and the brake lines being replaced.
The brakes feel great now that I can actually get the truck to stop worth a damn.
I did notice that the alignment is very off. It wants to pull to the left now. I will have to make another appointment to have the alignment checked once again. This time I will take it to a different FireStone though.
10-25-2011, 05:12 PM
#65
Registered User
Thread Starter
Join Date: Oct 2008
Location: Sacramento, Crawlifonia
Posts: 1,621
Likes: 0
Received 7 Likes
on
4 Posts
I am going to be swapping in some 63" chevy's for the rear. I will balance it out then. As I continue with the build, I will most likely adjust the suspension along with the changes I make.
10-25-2011, 11:05 PM
#66
Registered User
Thread Starter
Join Date: Oct 2008
Location: Sacramento, Crawlifonia
Posts: 1,621
Likes: 0
Received 7 Likes
on
4 Posts
I took a brisk drive tonight on some winding roads, and wow. The truck feels more stable then ever before. When I first got my truck in stock condition, it did not feel as planted to the road as it does today and that was with the Anti-sway-bar on. I flogged the old yota a little and if feels like a classic mustang in the bends, just with out any real power. Now I truly understand why TechTim says " Over all we're extremely happy and can't ever see doing another SAS conversion unless we were building a F-Toy for WeRock/Cal-Rocks; the difference the LT IFS makes in ride comfort and trail ability is big".
I can not wait to take this thing out again. I really am dreaming of a 7mge now. LOL.
I can not wait to take this thing out again. I really am dreaming of a 7mge now. LOL.
10-26-2011, 09:04 AM
#68
Registered User
Thread Starter
Join Date: Oct 2008
Location: Sacramento, Crawlifonia
Posts: 1,621
Likes: 0
Received 7 Likes
on
4 Posts
Well, for those who know how I drive. Brisk is not really in my repertoire of driving skill, that I practice often. I am more of a hyper-mileage kind of guy. I drive like an old man, who barely sees over the dash-board and past the front bumper.
Last edited by dark_fairytales; 10-26-2011 at 11:31 PM.
10-26-2011, 09:48 PM
#69
Registered User
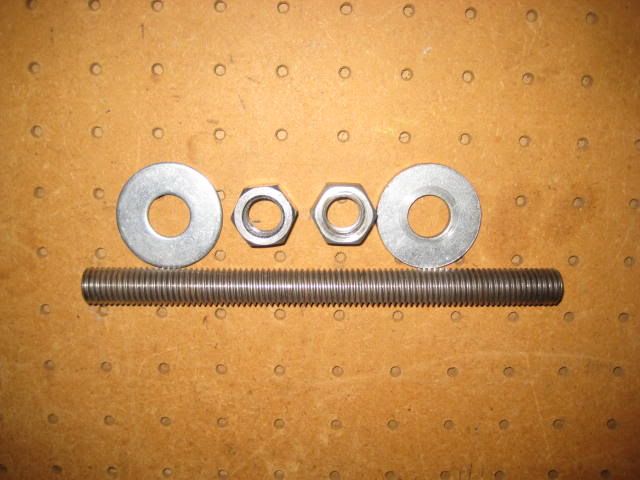
A trick I learned to install the LCAs a bit more smoothly is to spread the pivot pockets with a length of 5/8" all thread, some washers, and some nuts. Once the (4) pockets have been spread open the LCAs will just slide right in. When you tighten everything down it will collapse the pocket to fit.
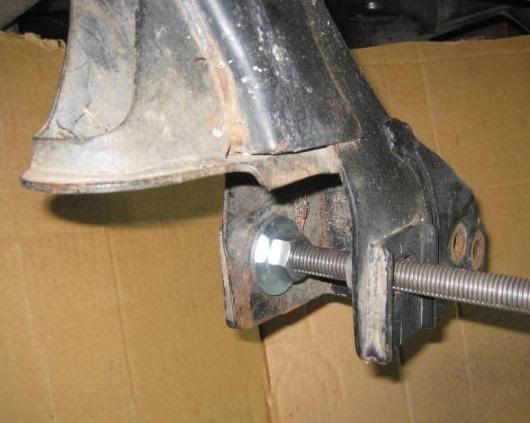
It was starting to get dark and I had to carry on. So I picked up the driver side lower control arm and attempted to mount it in place. I found out the frame mounts looked to be bent apart by 1/8" and the new arm would not fit. I then went to the passenger side and found the same issue. Now I knew the mounts were not bent as both sides had the same issue. I am guessing the Jig Blazeland uses is a bit different then my frame. This is not surprising as my truck is truly a very early IFS truck. The truck was built in 85 and my guess would be the specs. changed just a little over the years as IFS came into full swing. The solution I came up with worked quite well. I put the arm in a vice and crushed the poly bushing some. This did the trick just barely and I was able to fit both lower control arms with little trouble. The uppers has no issues, bolted right up as meant too. Here are the pics. of all four control arms mounted.
It was starting to get dark and I had to carry on. So I picked up the driver side lower control arm and attempted to mount it in place. I found out the frame mounts looked to be bent apart by 1/8" and the new arm would not fit. I then went to the passenger side and found the same issue. Now I knew the mounts were not bent as both sides had the same issue. I am guessing the Jig Blazeland uses is a bit different then my frame. This is not surprising as my truck is truly a very early IFS truck. The truck was built in 85 and my guess would be the specs. changed just a little over the years as IFS came into full swing. The solution I came up with worked quite well. I put the arm in a vice and crushed the poly bushing some. This did the trick just barely and I was able to fit both lower control arms with little trouble. The uppers has no issues, bolted right up as meant too. Here are the pics. of all four control arms mounted.
10-27-2011, 07:32 PM
#71
Registered User
Its not just your truck! I've measured a dozen or so frames over the years and there is a plus / minus in the measurment. And when I construct the LCAs I take a baseline, a couple of intermediaries, and a final as part of the process. To begin with there is variants in the baseline in the cores I recieve. Then as the arms are welded they tend to move with the heat warpage. The fabricator I use will pre-stress as much as .120" during the welding, so when the arm is removed from the jig it springs back to the baseline. Sometimes it moves a bit more, sometimes less. In any case its not a big deal. The bushings will accomodate the variant as you discovered. When you tighten down the cam bolts the frame tabs will also flex.
Last edited by BlazeN8; 10-27-2011 at 07:33 PM.
10-27-2011, 10:45 PM
#72
Registered User
Thread Starter
Join Date: Oct 2008
Location: Sacramento, Crawlifonia
Posts: 1,621
Likes: 0
Received 7 Likes
on
4 Posts
Thanks for posting that info. N8. I hope it can help others in the future, when they come across the same situation.
N8 your Long-travel kit is awesome. I am having to much fun going around the corners with speed behind me. I am really excited to match the LT with the 63's.
N8 your Long-travel kit is awesome. I am having to much fun going around the corners with speed behind me. I am really excited to match the LT with the 63's.
10-29-2011, 02:43 PM
#73
Registered User
Thread Starter
Join Date: Oct 2008
Location: Sacramento, Crawlifonia
Posts: 1,621
Likes: 0
Received 7 Likes
on
4 Posts
Did some more welding practice this afternoon. I was working on dialing in the settings on the welder. I was practicing the specific welds I will need to preform, so I can mount the Spring/ Shackle-hangers. I am planing on building the Jig for the Spring hangers tomorrow.
I may try to get the springs mounted on the weekend of the 12th.
I may try to get the springs mounted on the weekend of the 12th.
10-30-2011, 12:31 PM
#76
Registered User
I hear ya man, i still havent finished mounting my bumper, let alone mounting and hooking up the winch, lol or finishing my cage or the other long list of stuff. 
Just giv'n ya a hard time!
Just giv'n ya a hard time!
10-30-2011, 12:35 PM
#77
Registered User
I did the Chevy 63 swap about 4 months ago. I need to do a write up. The basics are use a 5" shackle instead of the 6" and remove the overloads. I found the setup to have a ton of axle wrap and wheel hop under hard acceleration, so I installed traction bars. The chevy spring pack is a bit oversprung for a light yota. If you carry 300-400 lbs of gear in the bed it works better. I didn't get nearly as much flex as I was expecting. From full stuff to full drop it was around 12". A longer shackle (12" or so) with the hanger bracket mounted on top of the frame (need a 2" body lift) would allow the spring to flex in the 14" travel range. If I were to do it over I'd probably go with the Deaver f67 spring under conversion. The Deaver configuration is better suited for a desert pre-runner. A multi-purpose trail rig may be better suited if you stay with a spring over.
Frankly, I got as much travel and a better more progressive ride with the 3" Downey lift spring, a Deaver Mini-Pack, and a 6" shackle. And there was no fabrication! I'll try to post a build thread in the next few days.
Frankly, I got as much travel and a better more progressive ride with the 3" Downey lift spring, a Deaver Mini-Pack, and a 6" shackle. And there was no fabrication! I'll try to post a build thread in the next few days.
10-30-2011, 01:05 PM
#78
Registered User
Thread Starter
Join Date: Oct 2008
Location: Sacramento, Crawlifonia
Posts: 1,621
Likes: 0
Received 7 Likes
on
4 Posts
I have read and heard that each set of 63's will be a little different, such as ride quality and flex. The consensus still seems to be the same though. Swapping to 63's has too do more with the price then anything thing else.
As I mess with mine, I will find out if I want to keep the overload in place or remove it all together. I am even going to try to use the shackles I currently have. The holes are a larger diameter with the current shackles I have. So I will need make a copper bushing or something to shim the difference for the 9/16" bolt. I can not wait to have the suspension all dialed in.
As I mess with mine, I will find out if I want to keep the overload in place or remove it all together. I am even going to try to use the shackles I currently have. The holes are a larger diameter with the current shackles I have. So I will need make a copper bushing or something to shim the difference for the 9/16" bolt. I can not wait to have the suspension all dialed in.
10-30-2011, 04:37 PM
#79
Registered User
Yeah, thanks for reminding me about the price aspect. I agree the spring for $100 and a hanger kit from Sky Mfg or TG $120 is the most economical way go. Even less if you peace it together like you are.
I looked around for photos of my 63 spring install (to start a write up with) and realized I didn't take any....oops! But, I found some finished product action photos. I uploaded them to the Blazeland website. Here is the link.
http://www.blazeland.us/Home_Page.php
I looked around for photos of my 63 spring install (to start a write up with) and realized I didn't take any....oops! But, I found some finished product action photos. I uploaded them to the Blazeland website. Here is the link.
http://www.blazeland.us/Home_Page.php
Last edited by BlazeN8; 10-30-2011 at 04:41 PM.


