541SR5's 1981 Pickup Build-Up Thread
 03-03-2012, 02:36 AM
#41
Registered User
Thread Starter
Join Date: Dec 2010
Location: Houston, TX
Posts: 114
Likes: 0
Received 0 Likes
on
0 Posts
 03-03-2012, 06:22 AM
#42
Registered User
very nice, why didnt you just do the ubolt flip kit instead of factory? to me it looks cleaner and theres less of a chance of your ripping your ubolt off, just an idea bud, love the first gens!
03-05-2012, 06:05 AM
#43
Registered User
Thread Starter
Join Date: Dec 2010
Location: Houston, TX
Posts: 114
Likes: 0
Received 0 Likes
on
0 Posts
Thanks man! The main reason for not doing the flip kit, was because I want to keep it stock. I could be wrong, but I think you have to put on a lift for the flip kit. I know the flip kit requires cross over steering too (which makes me think a lift is required). Besides, about the only thing this truck will get into is some mud at the deer lease, so I'm not too worried about snagging the factory stuff.
03-05-2012, 05:08 PM
#45
Registered User
iTrader: (2)
Join Date: Oct 2007
Location: colorado
Posts: 1,308
Likes: 0
Received 0 Likes
on
0 Posts
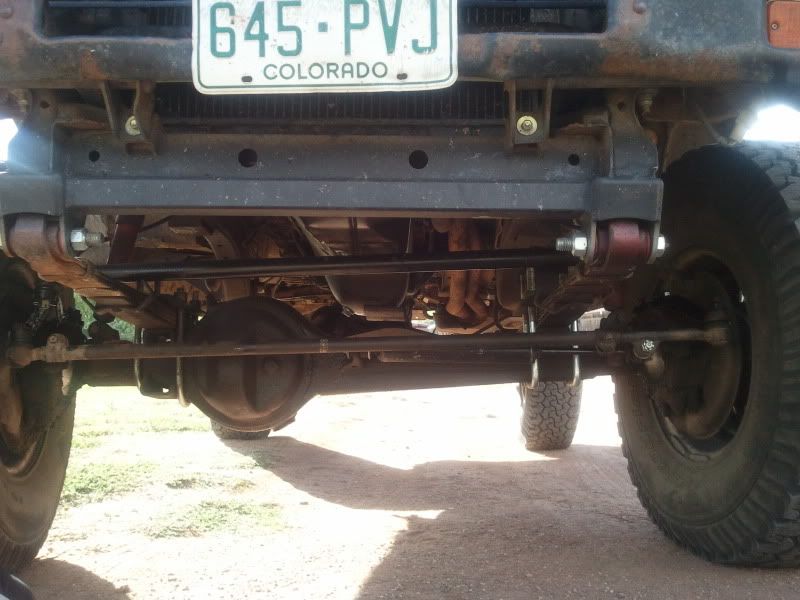
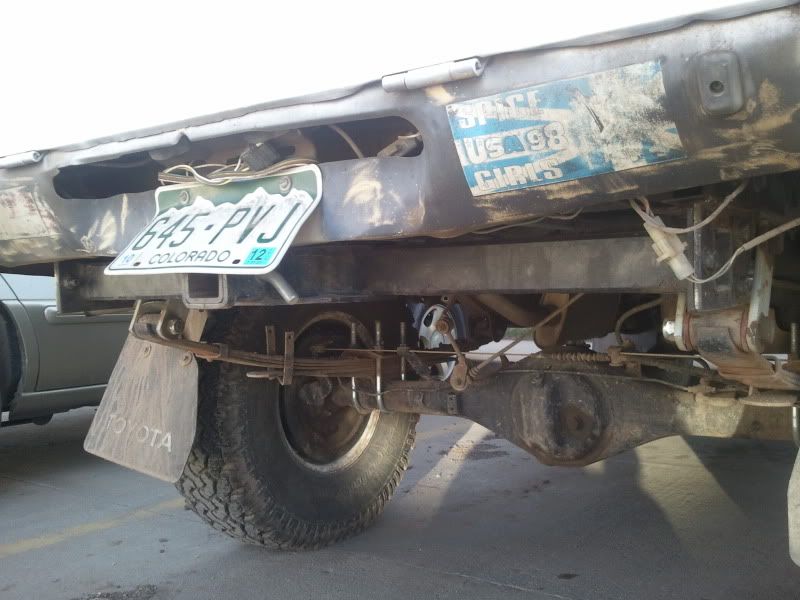
Im running u bolt flip kits front/rear and crossover steering on stock suspension on my 81...
only down side to the rear is no more shock mounts... and the front does require crossover steering to use it on the drivers side...
only down side to the rear is no more shock mounts... and the front does require crossover steering to use it on the drivers side...
Last edited by 4x4YOTA; 03-05-2012 at 05:12 PM.
03-12-2012, 03:11 PM
#46
Registered User
Thread Starter
Join Date: Dec 2010
Location: Houston, TX
Posts: 114
Likes: 0
Received 0 Likes
on
0 Posts
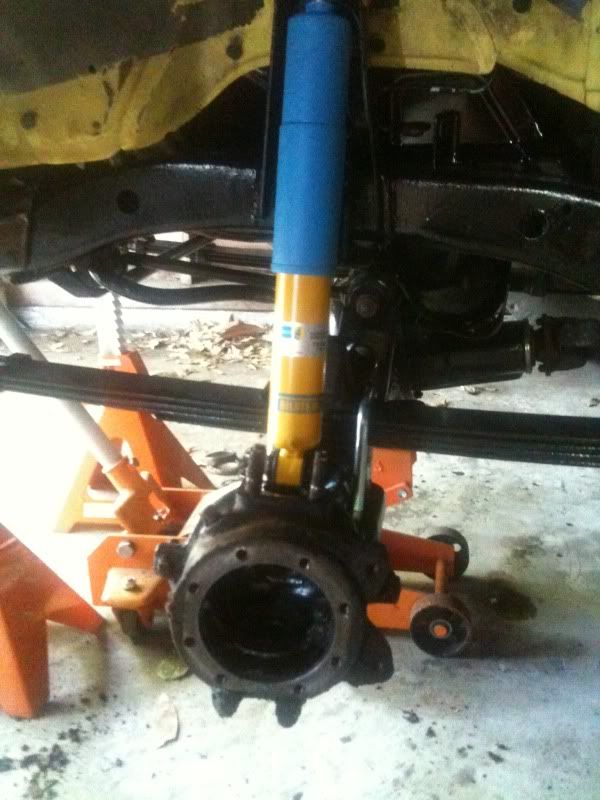
Knuckle Rebuild
Once I had the front axle back under the truck, I figured it was a good time to go ahead and rebuild the knuckles. With all the grease and oil I found while cleaning up the axle, I figured the seals needed to be replaced. Plus, being how old the truck was and how long it sat up, it just gives me more piece of mind when I finally get the truck out on the road.
Following the FSM, I began taking the hubs, rotors, brake dust covers and everything else apart. (Sorry for the lack of pictures, but its a messy job and I didn't want to get my phone full of grime). I can tell you, the toughest part about taking the whole thing apart was removing the cone washers from the hub body. It took some beating and "words of encouragement" but they all came out finally.
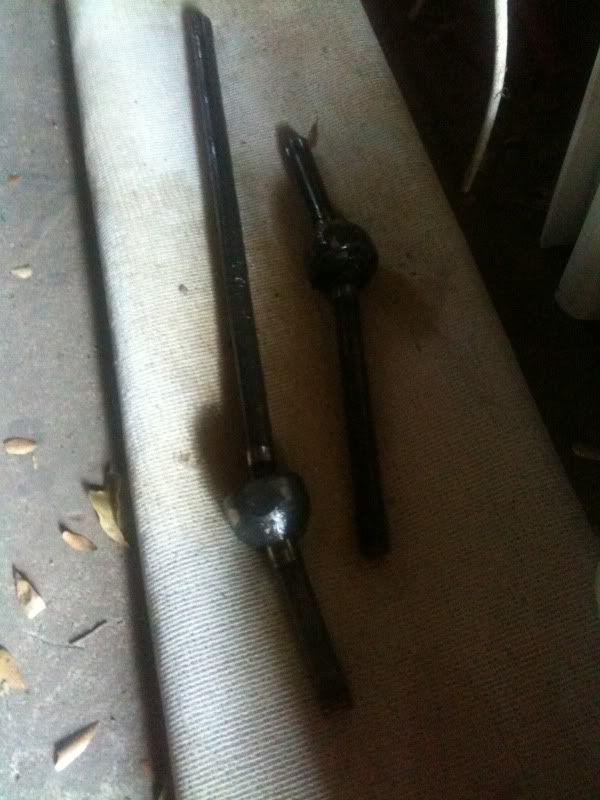
Out came the axles with no problem and I sat them out of the way...
Then I was left with a bare knuckle...
You can see some of the mud, grease, oil, and grime that was left (I already removed about 90% of it when I took this picture).
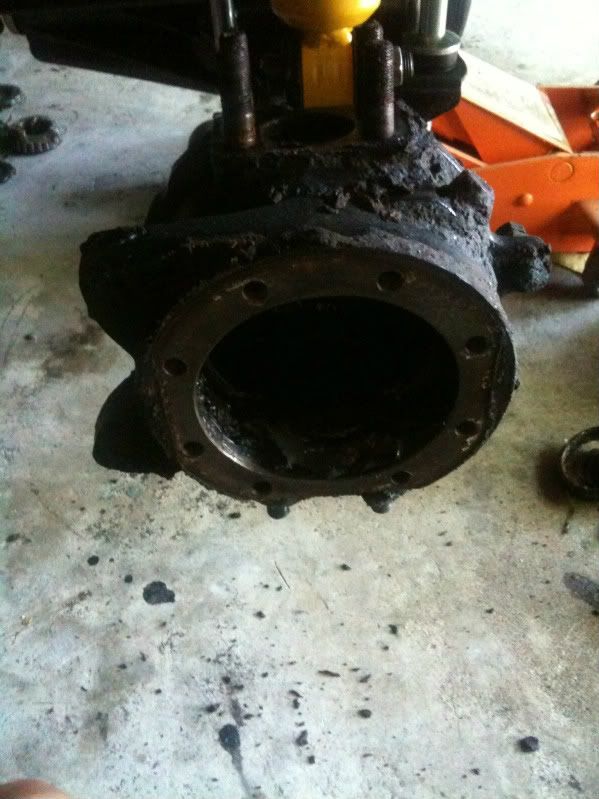
Then off came the knuckle to expose the knuckle ball...
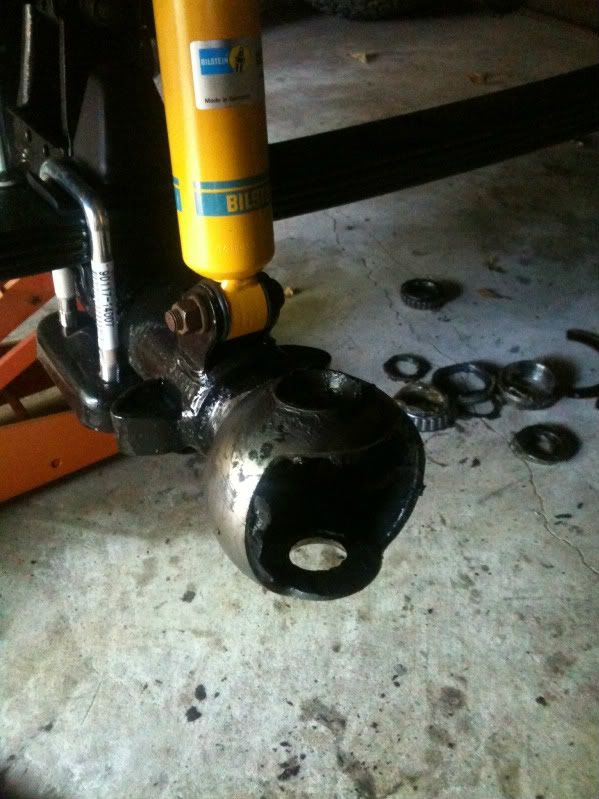
While I had everything apart, I cleaned and powerwashed the knuckles, steering arms, dust covers, etc. and hit them with a couple coats of primer followed by a couple coats of gloss black engine enamel. I also cleaned the knuckle ball and spindles just so I could get rid of all the old grease and go back with new "clean" grease.
Following the FSM again and using a knuckle rebuild kit I got from Trail-Gear, I was able to put the knuckles back together in about 4 hours. I replaced all the seals inside and out, put fresh grease where it needed to go, and torqued everything back to factory specs.
Rebuilt, new, and clean
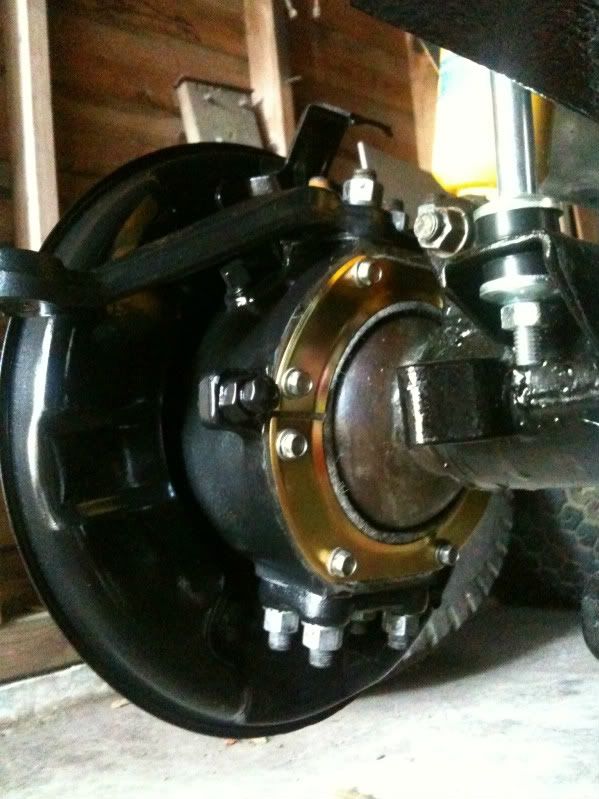
It took me a few hours over a couple weekends to do the entire job, but only because I wanted to repaint the parts clean everything. Honestly, a knuckle rebuild only takes about half a day at most to do. My biggest piece of advice to a newbie, would but to follow the FSM step by step. I thought it was going to be a major job, but it was a piece of cake. I need to say thanks to 451POP for helping me out on the job, it makes life a lot easier to have a buddy help you along.
For now, I'll leave with this photo
And for those you wondering, yes I did upgrade the brakes while I had everything apart. I'll cover the complete IFS front brake upgrade next...
Following the FSM, I began taking the hubs, rotors, brake dust covers and everything else apart. (Sorry for the lack of pictures, but its a messy job and I didn't want to get my phone full of grime). I can tell you, the toughest part about taking the whole thing apart was removing the cone washers from the hub body. It took some beating and "words of encouragement" but they all came out finally.
Out came the axles with no problem and I sat them out of the way...
Then I was left with a bare knuckle...
You can see some of the mud, grease, oil, and grime that was left (I already removed about 90% of it when I took this picture).
Then off came the knuckle to expose the knuckle ball...
While I had everything apart, I cleaned and powerwashed the knuckles, steering arms, dust covers, etc. and hit them with a couple coats of primer followed by a couple coats of gloss black engine enamel. I also cleaned the knuckle ball and spindles just so I could get rid of all the old grease and go back with new "clean" grease.
Following the FSM again and using a knuckle rebuild kit I got from Trail-Gear, I was able to put the knuckles back together in about 4 hours. I replaced all the seals inside and out, put fresh grease where it needed to go, and torqued everything back to factory specs.
Rebuilt, new, and clean
It took me a few hours over a couple weekends to do the entire job, but only because I wanted to repaint the parts clean everything. Honestly, a knuckle rebuild only takes about half a day at most to do. My biggest piece of advice to a newbie, would but to follow the FSM step by step. I thought it was going to be a major job, but it was a piece of cake. I need to say thanks to 451POP for helping me out on the job, it makes life a lot easier to have a buddy help you along.
For now, I'll leave with this photo
And for those you wondering, yes I did upgrade the brakes while I had everything apart. I'll cover the complete IFS front brake upgrade next...
 03-13-2012, 04:03 AM
#48
Registered User
Thread Starter
Join Date: Dec 2010
Location: Houston, TX
Posts: 114
Likes: 0
Received 0 Likes
on
0 Posts
You can start a thread over in the truck and suv tech section of the forum and ask the question...there should be a "new thread" button on the upper left hand side of the year range you have a question on.
Hope this helps
03-15-2012, 05:46 PM
#50
Registered User
How much experience did you have, with restoring trucks, prior to this rebuild? I'm looking to buy a project truck soon. What were some good resources you used that helped during the rebuild?
03-16-2012, 04:45 AM
#51
Registered User
Thread Starter
Join Date: Dec 2010
Location: Houston, TX
Posts: 114
Likes: 0
Received 0 Likes
on
0 Posts
As far as resources that have helped me, I bought a Haynes repair manual from the local auto parts store. I also downloaded a copy of the FSM, and I've done a lot of research and reading online. Also, I've asked a lot of questions on this forum and have gotten a lot of good information.
Good luck on your project!
03-16-2012, 06:52 AM
#52
Registered User
looking good, ill prob do my axle this weekend along with my front springs, also need to patch my frame which will get done this weekend, looking good! love to know more about the ifs brakes
03-16-2012, 07:02 AM
#53
Registered User
Thread Starter
Join Date: Dec 2010
Location: Houston, TX
Posts: 114
Likes: 0
Received 0 Likes
on
0 Posts
You can find all the IFS grake update grade info on the forum. I left the rear drums stock (just put in all new parts), but I upgraded the front to vented rotors, and IFS calipers. I also upgraded to a 1" master cylinder, and dual diaphram brake booster. I'll have a full write up of the conversion in a week or so.
03-16-2012, 08:00 AM
#54
Registered User
This is the first automotive rebuild I've done. The way I've looked at the whole thing, is if I take off to replace or rebuild a part, it's got to go back on the same way it came off. I've also taken my time and just worked on it when I had the time or the extra funds. I don't work on it everyday and some weeks I might just work on it for a couple hours. By doing this, I haven't lost interest or been discouraged during the build. But, the truck has some sentimental value to me, and that's helped keep me going too for the past couple years.
As far as resources that have helped me, I bought a Haynes repair manual from the local auto parts store. I also downloaded a copy of the FSM, and I've done a lot of research and reading online. Also, I've asked a lot of questions on this forum and have gotten a lot of good information.
Good luck on your project!
03-16-2012, 09:15 AM
#55
Registered User
sweet man any plans for the disc brake upgrade in the rear in the future? ive heard nothing but good things, ill be doing my brakes soon, im doing a good lift so our will be different, the yellow is growing on me though.......
03-17-2012, 03:42 AM
#56
Registered User
Thread Starter
Join Date: Dec 2010
Location: Houston, TX
Posts: 114
Likes: 0
Received 0 Likes
on
0 Posts
 03-17-2012, 08:35 AM
#57
Registered User
I would like to buy one before I move. I'm from Central CA, and the DMV sucks in CA. It's difficult to transfer registration from different states. It would be better if I bought one with a CA title.
I'm not in a rush though. I waiting until the right buy presents itself. I want one that needs a lot of work.
Do you guys know anything about putting Dana 60s on a yota pickup? I've read that some Jeep Wagoneers used to have narrow 60s. Some guys with Jeeps modified the axles by cutting the full size axles down to size. Is it common for Toyota guys to put 60s on their trucks?
03-19-2012, 04:31 AM
#58
Registered User
Thread Starter
Join Date: Dec 2010
Location: Houston, TX
Posts: 114
Likes: 0
Received 0 Likes
on
0 Posts
I would like to buy one before I move. I'm from Central CA, and the DMV sucks in CA. It's difficult to transfer registration from different states. It would be better if I bought one with a CA title.
I'm not in a rush though. I waiting until the right buy presents itself. I want one that needs a lot of work.
Do you guys know anything about putting Dana 60s on a yota pickup? I've read that some Jeep Wagoneers used to have narrow 60s. Some guys with Jeeps modified the axles by cutting the full size axles down to size. Is it common for Toyota guys to put 60s on their trucks?
I'm not in a rush though. I waiting until the right buy presents itself. I want one that needs a lot of work.
Do you guys know anything about putting Dana 60s on a yota pickup? I've read that some Jeep Wagoneers used to have narrow 60s. Some guys with Jeeps modified the axles by cutting the full size axles down to size. Is it common for Toyota guys to put 60s on their trucks?
Shouldn't be too hard to find one in Cali, and I good one at that (rust free).
Seems I've read something somewhere about putting Dana 60s in these trucks, but I can't remember where. I know people say the stock Toyota axles are pretty good and a lot of people use them in their rockcrawler buggies.
03-19-2012, 07:58 AM
#59
Registered User
Shouldn't be too hard to find one in Cali, and I good one at that (rust free).
Seems I've read something somewhere about putting Dana 60s in these trucks, but I can't remember where. I know people say the stock Toyota axles are pretty good and a lot of people use them in their rockcrawler buggies.
Seems I've read something somewhere about putting Dana 60s in these trucks, but I can't remember where. I know people say the stock Toyota axles are pretty good and a lot of people use them in their rockcrawler buggies.
03-27-2012, 12:15 PM
#60
Registered User
Thread Starter
Join Date: Dec 2010
Location: Houston, TX
Posts: 114
Likes: 0
Received 0 Likes
on
0 Posts
Brakes
While I had the front axle apart for the knuckle rebuild, I decided to go ahead and do the IFS brake upgrade. The main reason I did the upgrade is because I read it gave a little more stopping power and because the vented rotors wouldn�t warp (as bad) as the stock solid rotors.
Stock brakes (minus the stock calipers and hubs):
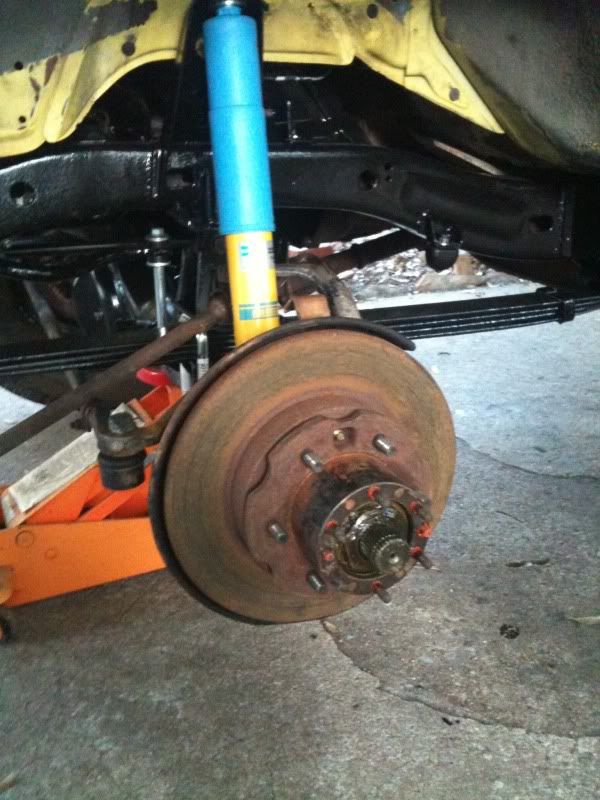
Once I had everything apart, I knocked all the wheel studs out of old rotors and axle hub. Then once I removed the two retaining bolts, I was able to separate the rotor from the axle hub. While I had everything apart, I went ahead and cleaned up the axle hub and sprayed it with a couple coats of primer and couple coats of gloss engine black like I did the knuckles and brake dust covers.
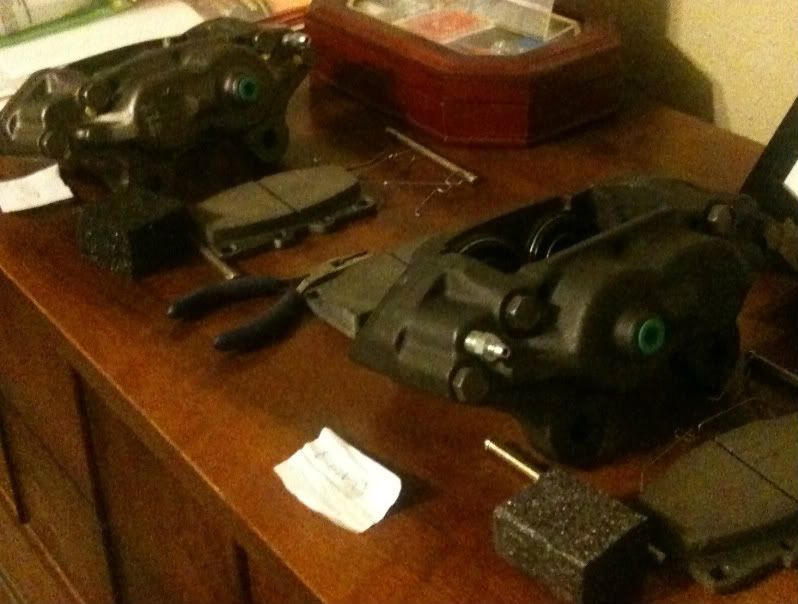
While that the paint was drying, I did some internet shopping and checked the local auto parts stores to see who had the best deal on all the parts I would need for the upgrade. I picked �86 calipers from O�Reilly�s, (part #17826, 17827) along with new rubber brake hoses and clips and I picked �81 Landcruiser rotors from Autozone, (part #3237). I also ordered a couple new caliper hard lines from the dealership because the stock ones were toast.
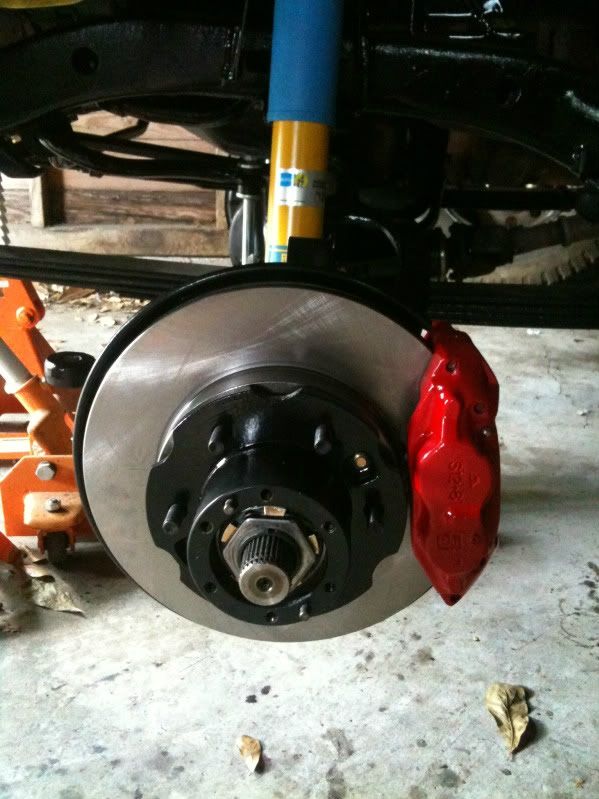
Before I started putting everything back together, I decided to paint the calipers with some red caliper paint. I figured this would look good with the red hub dial faces, the black wheels I plan on having on the truck and it would tie in the red TOYOTA letters on the tailgate.
Calipers Before:
Calipers After:
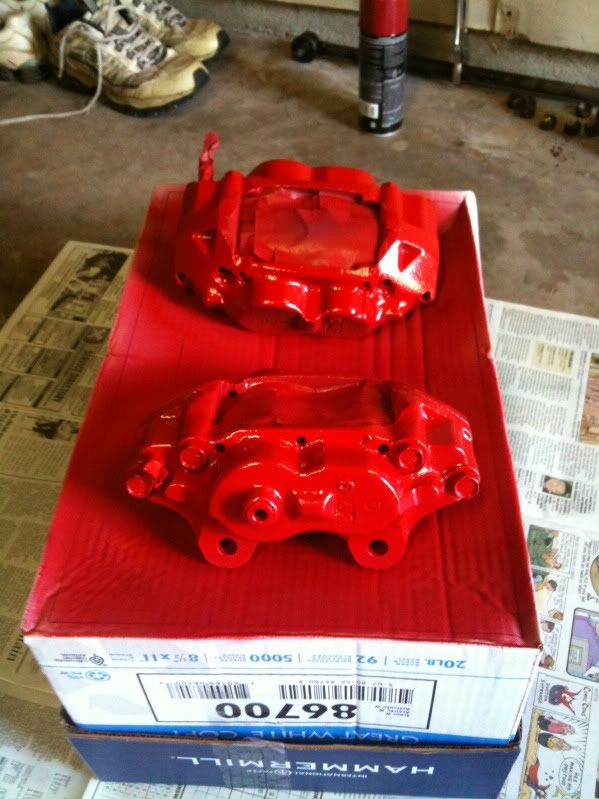
Some have probably noticed that I went with 4 cylinder calipers instead of 6 cylinder calipers. I did this simply because I didn�t want to run wheel spacers. Personal preference, but everything I�m writing pertains to either 4 or 6 cylinder calipers.
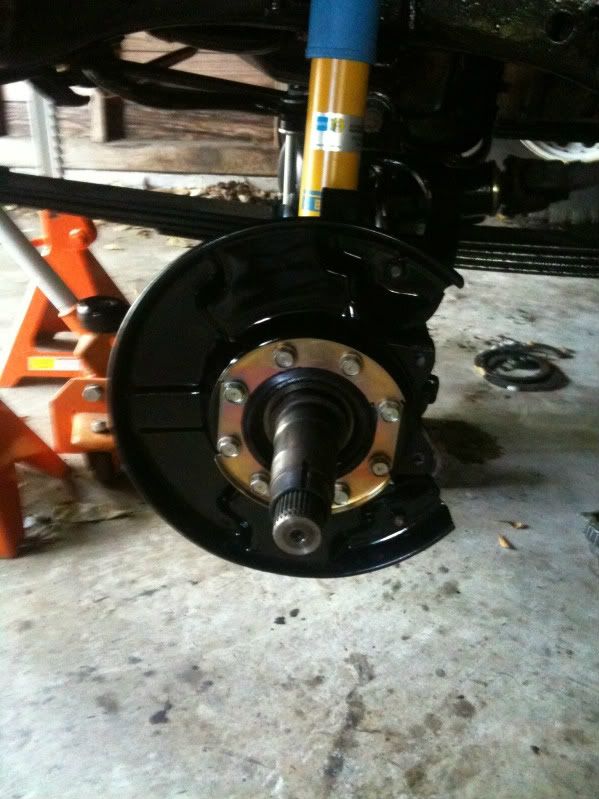
Once the paint had dried on all the parts, the re-assembly was just the reverse of the tear down. I threaded the retaining bolts back onto the rotor and hub body and torqued them down. Then I pounded the stock wheel studs back through the rotor and axle hub with a brass drift and BFH. The calipers, hard lines, rubber brakes hoses, and clips all went into the stock locations and I torqued everything down.
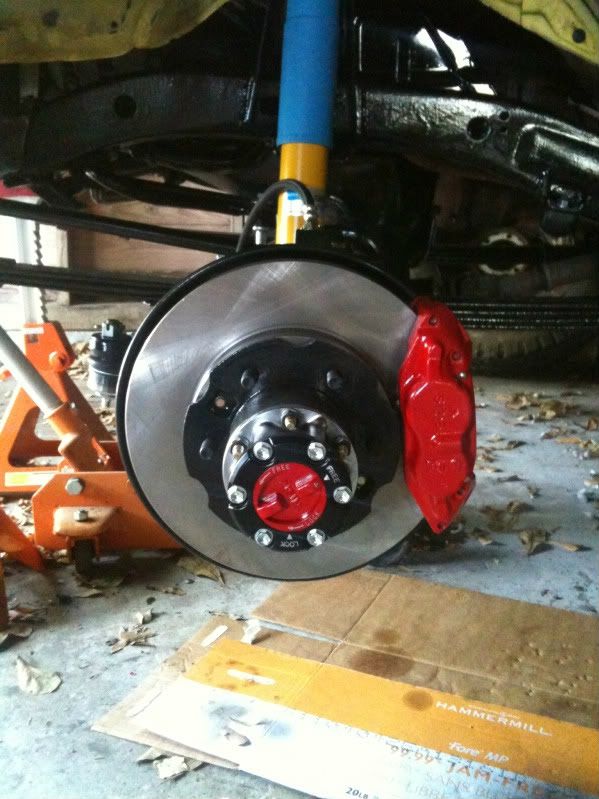
Upgraded rotors and calipers (minus the hubs):
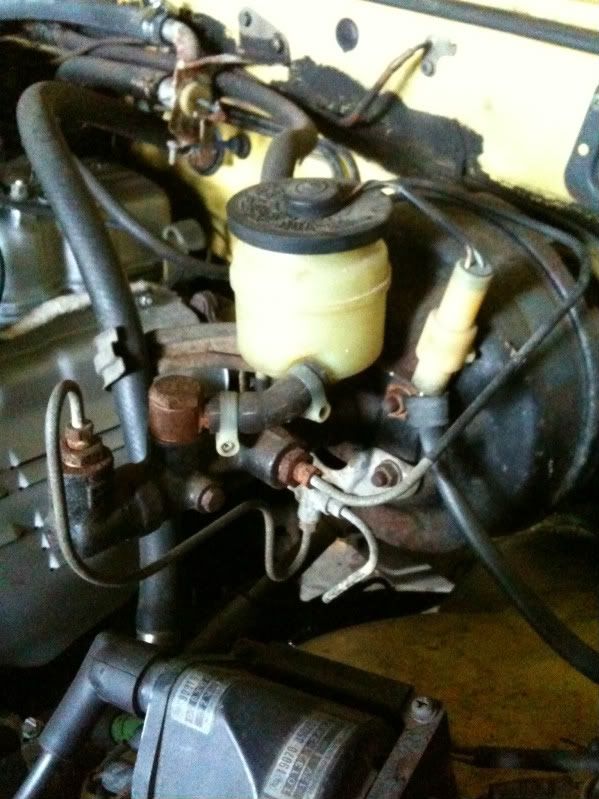
To complete the brake upgrade, I swapped out the stock master cylinder and single diaphragm brake booster:
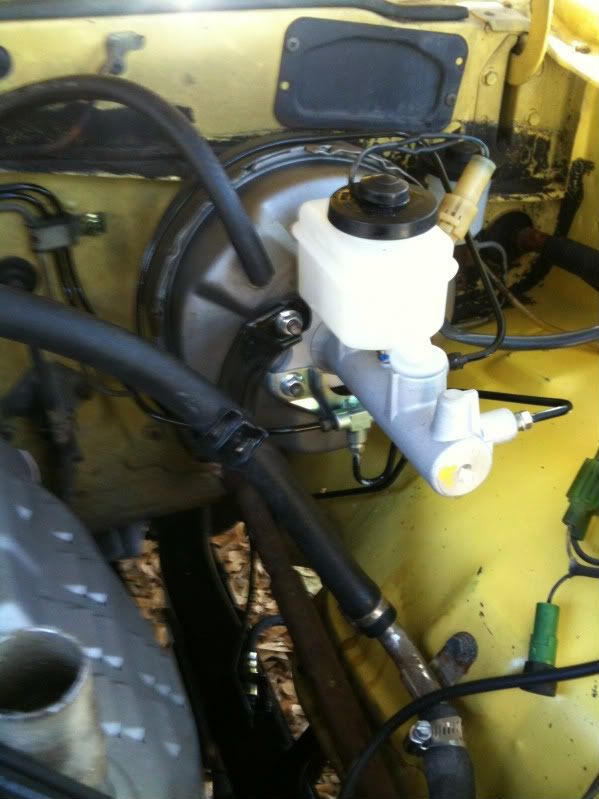
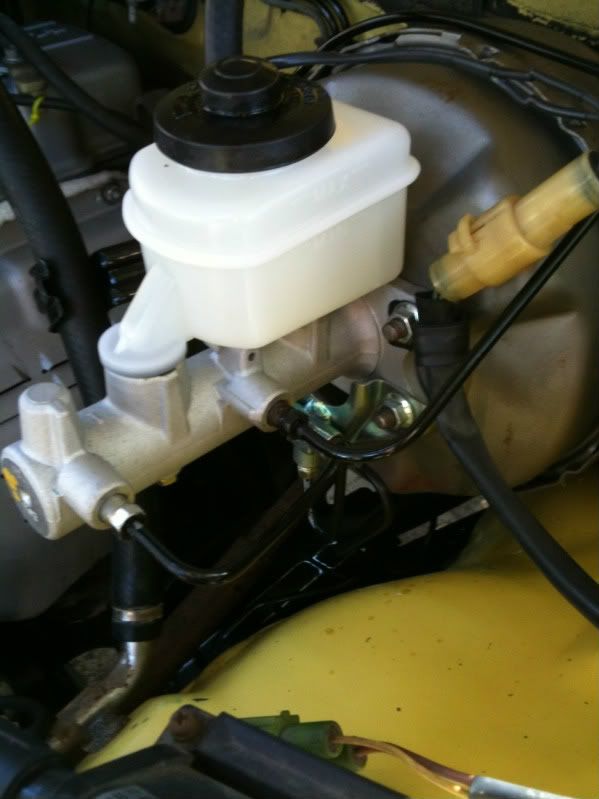
I picked up a larger 1� bore master cylinder for a �94 V6 Pickup from Autozone (part #NM52713) and I found a new dual diaphragm brake booster for an �86 turbo pickup online (sorry can�t remember the website) (part #532460). The swap was a direct bolt in. I removed the old master cylinder from the stock booster, then unbolted the booster from the firewall...just that simple Note, behind the stock booster there is an aluminum spacer�if you do this swap, don�t use the spacer with the new booster because the bolts on the back of the booster won�t be long enough to go through the spacer and the firewall. I did buy some gasket material to make a couple gaskets before I bolted the new booster back to the firewall (because it didn�t come with new gaskets). Also, I replaced the brake fluid level indicator plug on the new master cylinder with the original one. Nothing to that, just a couple splices and some heat shrink. All the stock brake hard lines will thread directly into the new master cylinder with the exception of the front one. I picked up a 12� brake hard line from Napa (part # 8131271) and used the old line as a template to bend the new one to fit the 1� master. The first line I bent was pretty crude, so I picked up another hard line from Napa and it turned out a lot nicer. Then I painted it to match the rest of the stock brakes lines and it was done.
1� Master Cylinder and Dual Diaphragm Booster:
I won�t bore anyone with the details, but for the rear brakes, I kept it simple and went with a stock rebuild. I basically tore it down to the hub and replaced everything�new shoes, drums, hardware, wheel cylinders, LSPV, rubber hoses, etc. I just followed the manuals. Same for the parking brake�cleaned and painted the misc. stock metal parts that were rusty and replaced the parking brake cables.
The last thing I did was fill the master with fluid and bleed the brakes. The upgrade was finished and it was pretty simple.
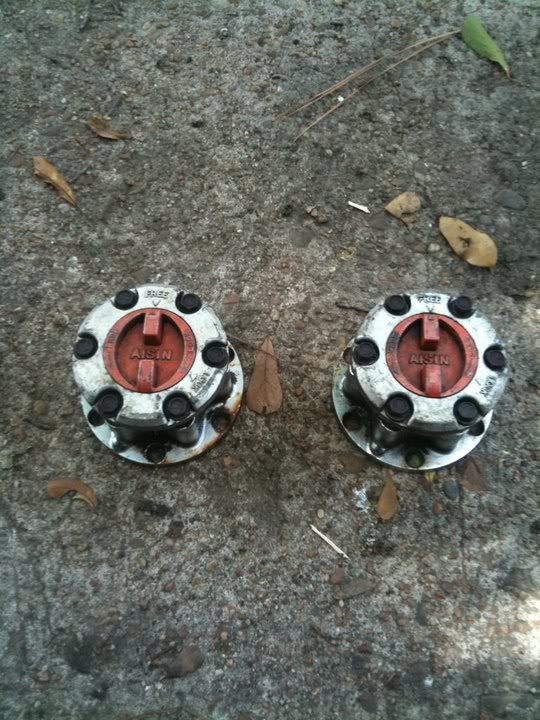
While I was doing the brake upgrade I sent my hubs to WabFab to have them refurbished.
Hubs Before I sent them off:
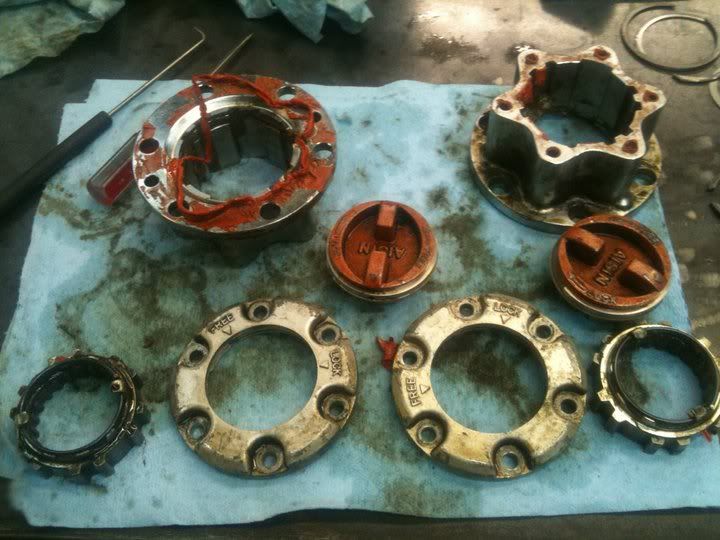
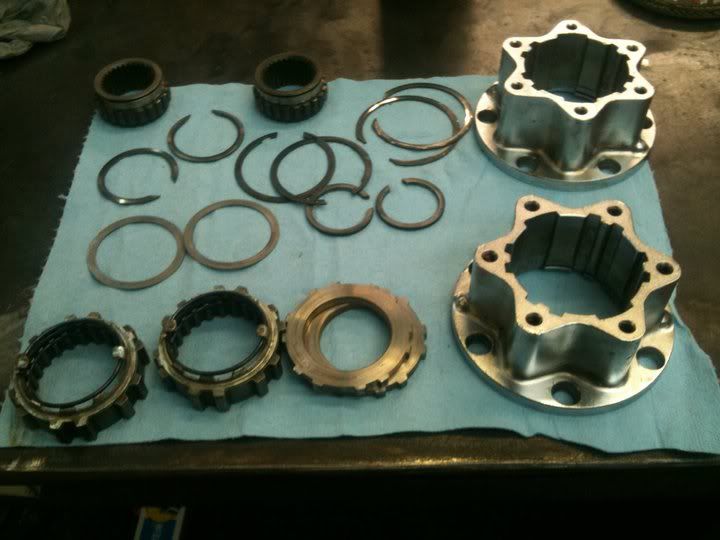
Here�s a few pictures Wabbit sent to me while he and Weasel were rebuilding them:
Hubs After:
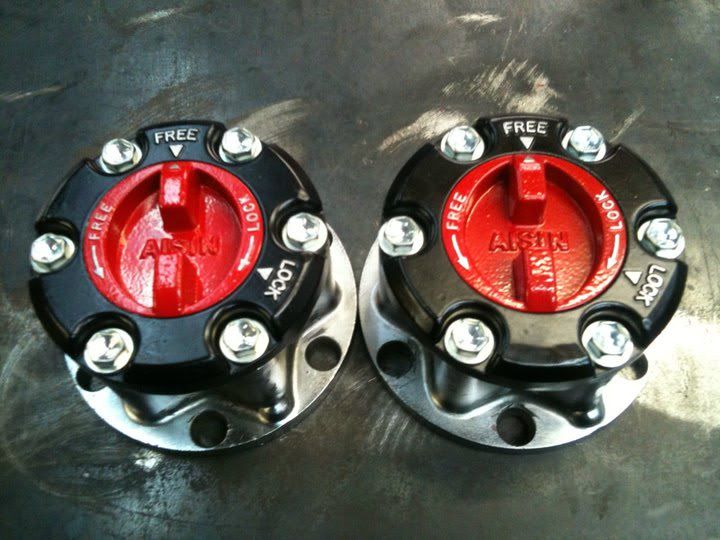
And here are the hubs back on the truck (Big Thanks Wabbit!):
Stock brakes (minus the stock calipers and hubs):
Once I had everything apart, I knocked all the wheel studs out of old rotors and axle hub. Then once I removed the two retaining bolts, I was able to separate the rotor from the axle hub. While I had everything apart, I went ahead and cleaned up the axle hub and sprayed it with a couple coats of primer and couple coats of gloss engine black like I did the knuckles and brake dust covers.
While that the paint was drying, I did some internet shopping and checked the local auto parts stores to see who had the best deal on all the parts I would need for the upgrade. I picked �86 calipers from O�Reilly�s, (part #17826, 17827) along with new rubber brake hoses and clips and I picked �81 Landcruiser rotors from Autozone, (part #3237). I also ordered a couple new caliper hard lines from the dealership because the stock ones were toast.
Before I started putting everything back together, I decided to paint the calipers with some red caliper paint. I figured this would look good with the red hub dial faces, the black wheels I plan on having on the truck and it would tie in the red TOYOTA letters on the tailgate.
Calipers Before:
Calipers After:
Some have probably noticed that I went with 4 cylinder calipers instead of 6 cylinder calipers. I did this simply because I didn�t want to run wheel spacers. Personal preference, but everything I�m writing pertains to either 4 or 6 cylinder calipers.
Once the paint had dried on all the parts, the re-assembly was just the reverse of the tear down. I threaded the retaining bolts back onto the rotor and hub body and torqued them down. Then I pounded the stock wheel studs back through the rotor and axle hub with a brass drift and BFH. The calipers, hard lines, rubber brakes hoses, and clips all went into the stock locations and I torqued everything down.
Upgraded rotors and calipers (minus the hubs):
To complete the brake upgrade, I swapped out the stock master cylinder and single diaphragm brake booster:
I picked up a larger 1� bore master cylinder for a �94 V6 Pickup from Autozone (part #NM52713) and I found a new dual diaphragm brake booster for an �86 turbo pickup online (sorry can�t remember the website) (part #532460). The swap was a direct bolt in. I removed the old master cylinder from the stock booster, then unbolted the booster from the firewall...just that simple Note, behind the stock booster there is an aluminum spacer�if you do this swap, don�t use the spacer with the new booster because the bolts on the back of the booster won�t be long enough to go through the spacer and the firewall. I did buy some gasket material to make a couple gaskets before I bolted the new booster back to the firewall (because it didn�t come with new gaskets). Also, I replaced the brake fluid level indicator plug on the new master cylinder with the original one. Nothing to that, just a couple splices and some heat shrink. All the stock brake hard lines will thread directly into the new master cylinder with the exception of the front one. I picked up a 12� brake hard line from Napa (part # 8131271) and used the old line as a template to bend the new one to fit the 1� master. The first line I bent was pretty crude, so I picked up another hard line from Napa and it turned out a lot nicer. Then I painted it to match the rest of the stock brakes lines and it was done.
1� Master Cylinder and Dual Diaphragm Booster:
I won�t bore anyone with the details, but for the rear brakes, I kept it simple and went with a stock rebuild. I basically tore it down to the hub and replaced everything�new shoes, drums, hardware, wheel cylinders, LSPV, rubber hoses, etc. I just followed the manuals. Same for the parking brake�cleaned and painted the misc. stock metal parts that were rusty and replaced the parking brake cables.
The last thing I did was fill the master with fluid and bleed the brakes. The upgrade was finished and it was pretty simple.
While I was doing the brake upgrade I sent my hubs to WabFab to have them refurbished.
Hubs Before I sent them off:
Here�s a few pictures Wabbit sent to me while he and Weasel were rebuilding them:
Hubs After:
And here are the hubs back on the truck (Big Thanks Wabbit!):


