When you click on links to various merchants on this site and make a purchase, this can result in this site earning a commission. Affiliate programs and affiliations include, but are not limited to, the eBay Partner Network.
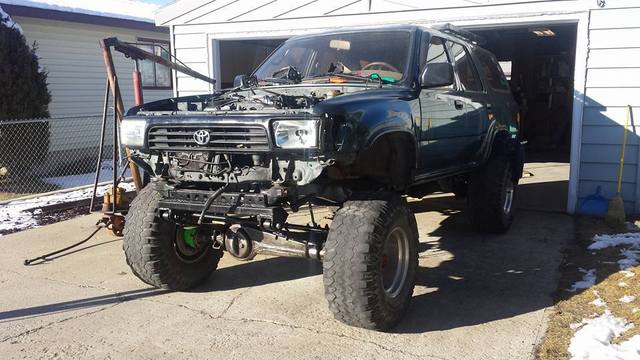
So, trying to do a write up on my 1uz swap. 1uz 92 ls400(26 16 22 26) into my 94 4runner (3.0/ r150f 4x4) I also just finished my sas so for you ifs guys things could be different.
If anyone has body harness pin outs for these two vehicles it would help at the moment.
Pull 3vz. Keep the 2 body harness plugs if youd like to do a clean wiring job with no solder/ crimps. I have most the Toyota pins left over from my lexus is300 wire tuck. Just so happens I don’t have the particular pins in the lexus ls400 ecu. So I will have to solder as I’m not waiting for pins. You can usually find them at eastern beaver or what used to be newunitedracetech.
I will start with what needs to happen with the trans.
Bell housing: Youll need a bell housing to adapt trans to motor. I used ksracing ebay one. I had to cut the bellhousing where the slave mounts because it pushed the slave too far away from the fork. I cut about an inch off and redrilled / tapped the bolt holes. The bellhousing came with a pilot bearing and a sleeve that goes on the end of the input shaft of the trans to fit the bearing. Sleeve fit wayyy too tight. I will never get it off again. this is the part i cut
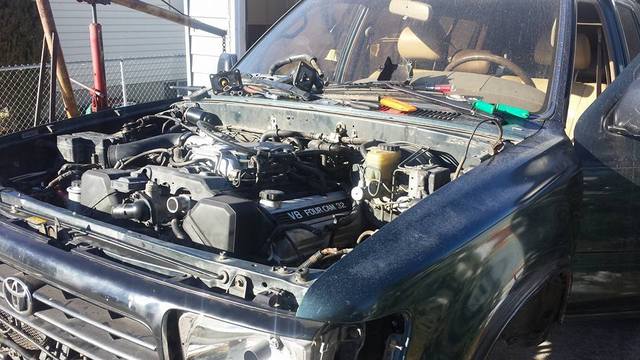
Flywheel: I brought the 3vz flywheel to a machine shop along with the spacer from the 1uz torque converter that had the center bore and bolt pattern for the flywheel. I had them bore out the bolt pattern and center bore to match the spacer so the 3vz flywheel will fit on the 1uz. I also had them take off 5/16 from the back of the flywheel where it bolts on so it moves closer to the engine to help with starter engagement. For all that plus a flywheel resurface it was 130 I believe. I used the 3vz clutch. I have a friend that has this same setup and he used the original 4runner throw out bearing. Mine was not working for some reason so I had to use a 3.4 tob. It’s a bit too much but I think it will work. Took some work installing the slave though.
so ran into issues. clutch is not working. slave is pushing a good inch but clutch is not disengaging. heard that sometimes the clutch rusts to the flywheel and you can start it in high gear to dislodge it. gonna try that. slave was hard to install because the 3.4 tob was a slight bit too big so i had to push the fork a bit to get the slave on. ive tried shorter shafts on the slave so the fork had a little play and got nothing.
update:
got clutch sorted. not sure exactly what happened to begin with. i dont think i disconnected the slave til after the clutch wasnt working but when i did eventually disconect it i was also bleeding the powers steering and after 3 days of bleeding the clutch slave realized i was using ps fluid :/ been a long build. changed that out and now the clutch is working great.
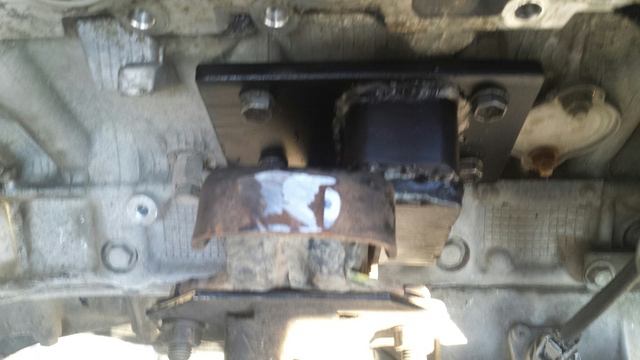
Transmission: got moved back 2 inches to make the motor fit. When 1uz valve cover hits ebrake bolts is where I stopped. You can get a bracket that slides the trans mount back. I believe from lowrange offraod(need to check that). Its basically a 3/8 thick plate that bolts to frame crossmember with slots that allow you to bolt the trans in anywhere back to like 4 inches.
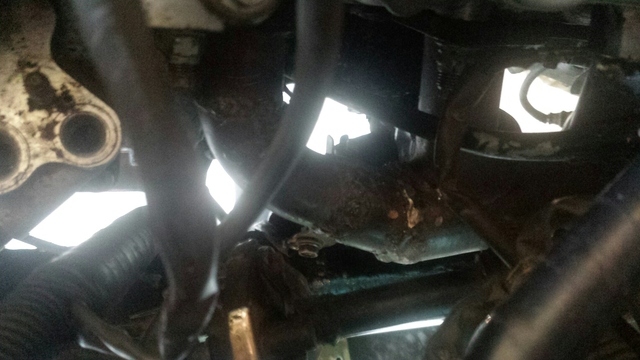
Driveline: ended up being long. Original driveline length it 48 � collapsed or so and im measuring 46 � from trans yoke to diff yoke. I know another guy that has done this swap and he said he used the stock driveshaft somehow even though we have almost the same setup. But mine wont work so im looking into a shorter driveline. A 3gen pickup manual shortbed came out to the right length. 45 � trans to diff. unfortunately it was a nasty rollover and has a dent in it so im still looking.
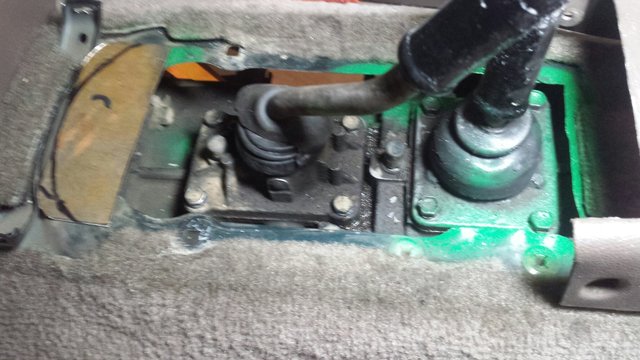
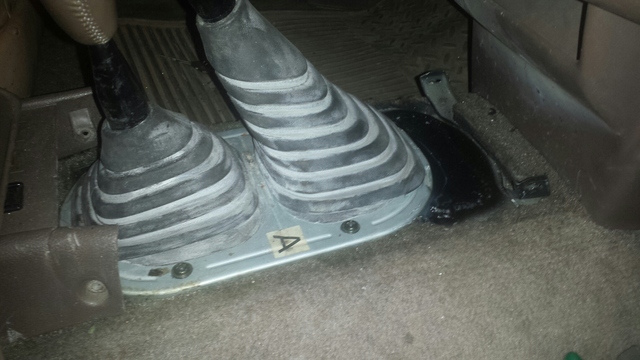
Inside the cab: I had to cut the floorboard at the shifter about 2 inches to the rear and weld a plate on the front to make the rubber shifter seal boots work.
Motor mounts: ended up being about 2 � inches tall using the original 4runner rubbers to mount too.
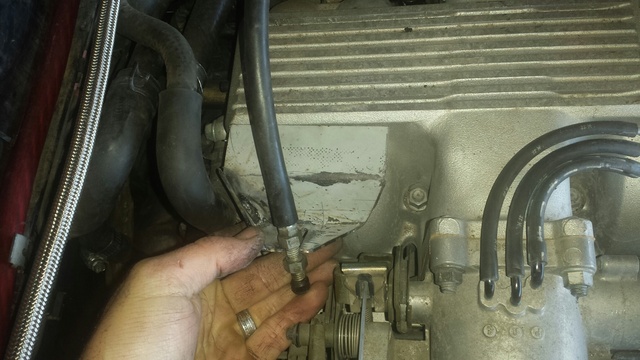
Fuel line for 1uz is on opposite side as the hardline for the truck. I got a 3 foot steel braided -6an line to fill in the gap and connected it to the 1 ft rubber hose coming off the fuel rail. Was a challenge finding the right fittings because I couldn’t find the right info on google. A lot of people just cut the fitting and clamp a hose on. If you don’t want to do that the fitting size is m14 1.5 inverted flare. i currently have the hardline m14 1.5 inverted directly into the -6 an hose on the one end. it screwed on but i doubt its going to seal. we will see. stock hardline fitting(m14 1.4 inverted flare, male) to 6an female seems to be holding up. no leaking. you will also need to run a return line back to the fuel tank. I used a male nipple 6 an to 6an inside tank up through the top of the fuel pump hanger plate. Tied that to a 6an female to 3/8" barb 90 degree. Make sure you don't get the nipple inside too close to the edge. It still has to fit inside the hole in the tank
Cruise control: has the same motor so I just used the cruise control cable from 1uz and connected it to the cruise control motor from the truck
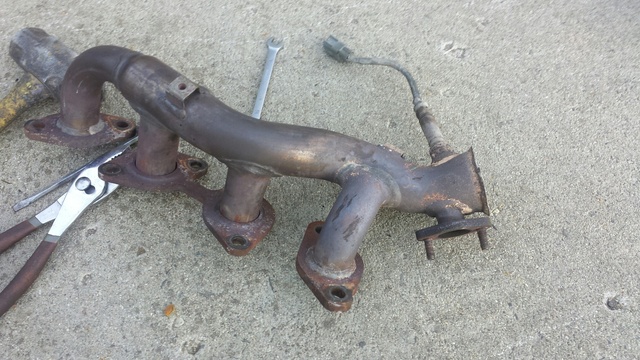
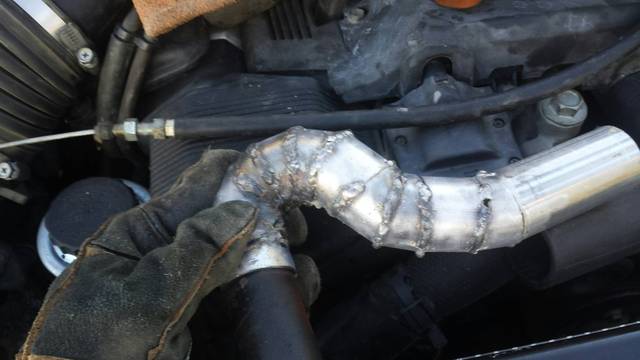
Exhaust: I used ls400 manifolds. Cut the flanges to the cats off and they fit except at the steering shaft. I cut and pie cut the tubing from the first cylinder til it missed the rag joint/ steering.
ugly from here but i used pieces i cut out because budget
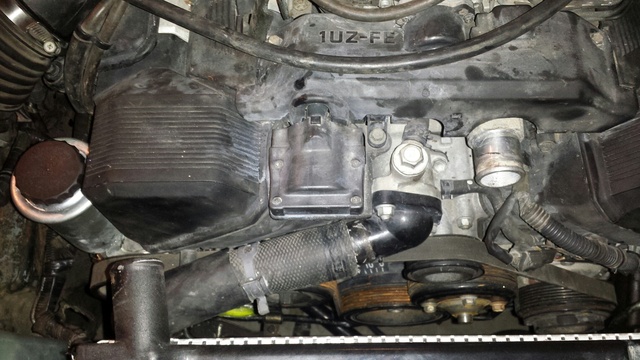
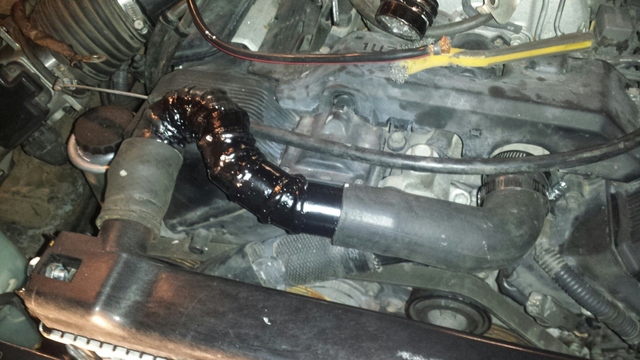
Coolant: using 4runner radiator is a bit tricky. Obviously you cant run the mechanical fan if your already pushing the trans back to make room upfront unless you push the motor way back with some other modifications. There is not quite enough room to run a radiator hose between the radiator and pulleys and theres not enough room to run a hose down the drivers side of the motor so the one hose has to run over to the pass side from the middle of the motor then down to the bottom of the radiator then back to the pass side and 90 in. one of the lexus hoses will get you over and down, then I used 1 � exhaust pipe and welded a bead on the end to keep the hose from slipping off and used it to join a couple hoses. The top was a tight fit and weird angle so I used 2 hoses and some pie cutting on the exhaust pipe. As for the heater hoses I was able to make those work. Youll have to figure them out. The small hose coming off the thermostat housing can be capped.
Throttle cable: I pulled the lex throttle cable then left it in the car when I sold it so I had to use the 4runner cable. It is very long for the application and wont fit the throttle cable bracket so I had to make a new throttle cable bracket.
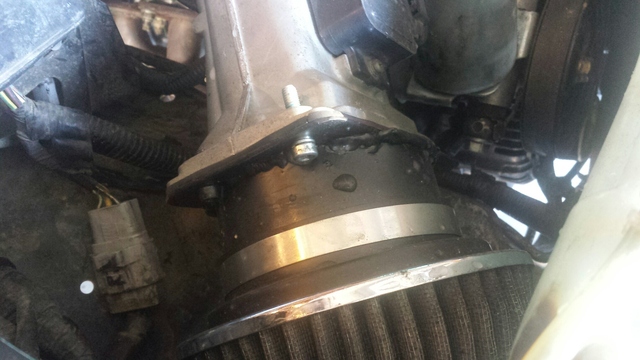
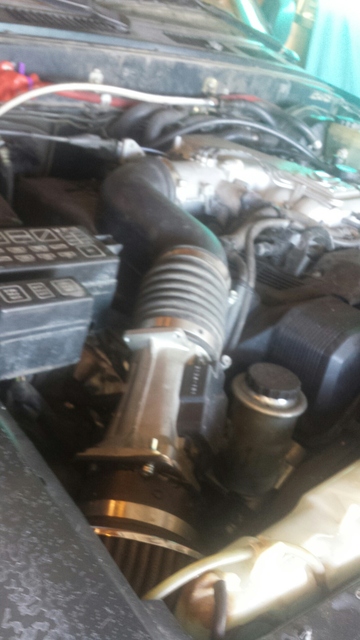
Intake box: air box wouldn’t fit without extensive mods. I had an extra cone filter some 4 inch tubing and some plate. So I made an adapter and bolted it to the afm tube. 4 inch was tretching it. Had to use allen bolts but I got it to work. Battery will need relocated.
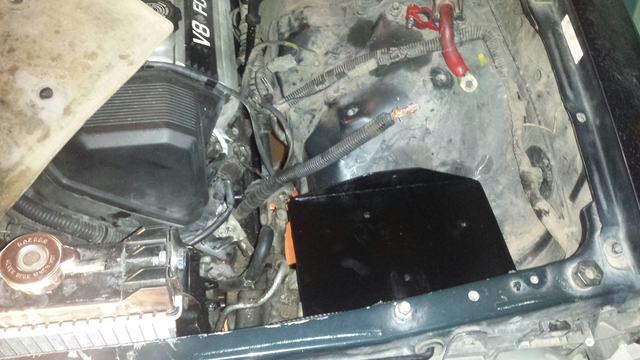
Battery relocation: 4runner has battery on pass side. Lex/1uz has battery on drivers. Air intake made the decision easy. Had to move the battery to drivers side. Made a battery tray. welded some nuts on the bottom and ran bolts up through into it.
oil filter: oil filter hits frame rail where im at. i bought a summit oil filter relocation but they used straight fitting coming off the block off plate. i have a regular 90 and a 2 piece 90 on the way. the 2 piece 90 is 1/2 npt to 5/8 barb which i need 1/2 npt to 1/2 barb so its gonna be some work getting it to fit the hose if i even can. I ended up getting 5/8 hose for the 2 piece fitting.
Power wires: fuse box in engine bay needs to run to battery that is on the drivers side now and its only about 8 inches long. So I cut the wire off of the plate that connects the abs and alt fuses and ran my own wire and just used a terminal to one of the bolts. The wire I ran to the fire wall. I also have a 2/0 power wire for my amps I ran to the same spot on the fire wall where I installed a battery stud. From the battery stud I ran a 2/0 wire to a fuse right before the battery, then to the battery. starter power wire runs to battery now that its on the drivers side but it’s a bit short. Threw in a fuse and added about a foot of wire. Alternator you could run into this same fuse but since the alternator plug wiring and oil level wiring are grouped with it I just ran it toward the firewall where I put my post
Psteering: cant remember on this too much. I believe I used the 4runner ps lines. I bent them but now I need them moved back in the direction they originally were so you might not need to even bend them.
Wiring: Im working on the wiring now so ill have to update later. I ran the 1uz harness through the same place the 3vz harness went through. I had to slide the firewall seal a little and tape it back up. I pulled the wire harness for the manual trans out of the 3vz wire harness before I sold it so ill have to tie that back in when I get there.
alternator wires i ran the ls400 plug over to the drivers side like on the ls400. the 3.0 alt plug is right there also. so i hooked them together.
the lex wht/blu(s) goes to toyota wht(s)
lex blk/yel(ig) goes to toyota red(ig)
lex yel(l) goes to toyota yell(l)
if someone can please check these and confirm for me thatd be great. for some reason all i can find is 40/40/40 ecus or 28 16 22 34 even though it seems like most people get the 26 16 22 26 ecus(the one i have)
issue fixed, see below; also going to update post with wiring. for some reason, the first day i tried starting it i didnt have the il1 # 3 and il1 #13 hooked up so it cranked but wouldnt start. figured that out then tried starting it and the starter wouldnt disengage. ended up taking the starter relay out and just jumping pins 3 and 5 to start it. now im not getting any signal from the starter pins il1#7 and the toyota ih1 #22 but i can start it by jumping the pins. dont have wiring diagrams just pieces of wiring pinouts so im a bit lost at the second. new starter relay didnt work either
update:
so evidentally i didnt make my harness long enough to my aftermarket alarm when i put the lexus electronic seats in. i moved the seat too far forward and it unplugged it. plugged it back in and my starter works now?
wiring i have
lexus
il1 #2, #3 #12 #13 all going to toyota ih1 #14 (igsw)blk/rd
il1 #7 (Blk) going to toyota ih1 #22 (sta)black/w
e11 #4(blk/or) going to toyota ih1 #16 (mrel)wht/rd
e11 #5(yel/rd) going to toyota ih1 #3 (cel)v
e11 #6(grn/rd) going to toyota ih1 #6 (FPR)blue
e11 #7(wht) going to toyota ih1 #7 (acmg)blu/ blk a/c not need to start
e11 #8(grn/blk) going to toyota ih1 #23 (fc)grn/y
e11 #19(grn/wht) going to toyota ih1 #5 (brake)grn/wht not need to start
e11 #26(blk/yel) going to toyota ih1 #10 (Batt)blk/ or
il1 #4(y/g) should run to ih2 #14(y/g) if im not mistaken. seems a little on the cold side. theres 3 temp sensors so its either this one or the other one for temp gauge to work. do not run the ecu temp gauge on e10. it will have starting issues as that temp sensor is used for temp based fuel trims.
tach: il1 #6(blk) run to ih2 #20(blk) you will then need to adjust your tach. i will update with pictures at some point. but remove gauges. remove plastic clear part and the black plastic part under that surrounding the gauges. there is 4 screws in the back right behind the speedo that when removed will allow you to remove speedo. now you can look back behind the tach and will see a white plastic knob with a phillips pattern cut into it. theres a couple ways to adjust it. hook up an aftermarket tach and match revs or test with a multimeter(did work good for me). i got the rpms set around 5-600 at idle. then rapped it out with the screw driver in position. let it bounce off rev limit just long enough to get the rpms at 6500 at rev limit..
issue fixed see below; truck is running. dies at idle unless im very careful with it. need to heel toe it. found out my 02 sensor got broke somehow so im running no o2 on the one bank. could be the cause i still have to figure out oil pressure, oil level, tempurature, a/c. i ran the existing transmission plugs up through the firewall today so i think that should make my speedo work but the clutch situation i cant check it.
update(12/26/16): my wiring pin out i had were wrong. i had pin 16 and pin 10 on ih1 reversed so my batt was assumed to be pin 16 and 10 was mrel. not the case. 10 is batt and 16 is mrel. took a couple starts to learn but now it starts and idles good. i now have a cel which i havent read but im assuming it is the secondary o2 not being hooked up. im also assuimng thats why its going through so much gas.
wire harness to trans means speed and reverse lights work
update to the update (1/3/16): i got it sorted. I checked my primary o2 sensors and one of them was getting a funny reading. 120 ohms across the heater circuit. tested the signal circuit and it fluctuated at start and fluctuated from 1.2v to 2.5v. switched it out with my 2jz o2 and it is running great so far. no cel and i had it running for 30 minutes and drove it 5-10 miles.
Any questions feel free to ask. Im still working on the finishing touches so ill try to update this when I can. With pictures and wiring pinouts and any issues if they arise. I do recommend getting a radiator specific for this. It would be cleaner, easier and cool the vehicle better.
if someone can please check these and confirm for me thatd be great. for some reason all i can find is 40/40/40 ecus or 28 16 22 34 even though it seems like most people get the 26 16 22 26 ecus(the one i have)
so ran into issues. clutch is not working. slave is pushing a good inch but clutch is not disengaging. heard that sometimes the clutch rusts to the flywheel and you can start it in high gear to dislodge it. gonna try that. slave was hard to install because the 3.4 tob was a slight bit too big so i had to push the fork a bit to get the slave on. ive tried shorter shafts on the slave so the fork had a little play and got nothing.
update:
got clutch sorted. not sure exactly what happened to begin with. i dont think i disconnected the slave til after the clutch wasnt working but when i did eventually disconect it i was also bleeding the powers steering and after 3 days of bleeding the clutch slave realized i was using ps fluid :/ been a long build. changed that out and now the clutch is working great.
also going to update post with wiring. for some reason, the first day i tried starting it i didnt have the il1 # 3 and il1 #13 hooked up so it cranked but wouldnt start. figured that out then tried starting it and the starter wouldnt disengage. ended up taking the starter relay out and just jumping pins 3 and 5 to start it. now im not getting any signal from the starter pins il1#7 and the toyota ih1 #22 but i can start it by jumping the pins. dont have wiring diagrams just pieces of wiring pinouts so im a bit lost at the second. new starter relay didnt work either
update:
so evidentally i didnt make my harness long enough to my aftermarket alarm when i put the lexus electronic seats in. i moved the seat too far forward and it unplugged it. plugged it back in and my starter works now?
wiring i have
lexus
il1 #2, #3 #12 #13 all going to toyota ih1 #14 (igsw)blk/rd
il1 #7 (Blk) going to toyota ih1 #22 (sta)black/w
e11 #4(blk/or) going to toyota ih1 #10 (mrel)blk/g
e11 #5(yel/rd) going to toyota ih1 #3 (cel)v
e11 #6(grn/rd) going to toyota ih1 #6 (FPR)blue
e11 #7(wht) going to toyota ih1 #7 (acmg)blu/ blk a/c not need to start
e11 #8(grn/blk) going to toyota ih1 #23 (fc)grn/y
e11 #19(grn/wht) going to toyota ih1 #5 (brake)grn/wht not need to start
e11 #26(blk/yel) going to toyota ih1 #16 (Batt)wht/red
the ecu plug e10 pin #5 should run to ih2 #149y/g) if im not mistaken.
truck is running. difficult to start. seems to do good first start of the day then i have to crank it about 4 times for long periods before it will start. when cold it can stutter but then it runs great when warmed up. I still have to figure out tach, oil pressure, oil level, tempurature, a/c. i ran the existing transmission plugs up through the firewall today so i think that should make my speedo work but the clutch situation i cant check it.
wire harness to trans means my speed works and reverse.
yeah, he sells harnesses though. i dont want to ask him to give me free advice about something he makes money off. im pretty sure my starting issue is my ignition switch. If i could get a hold of some wiring diagrams i could figure it out. i tried a couple weeks ago paying for one of those online access to wiring diagrams. didnt work out, maybe ill try again
yeah, trucks doing great! starting issue was the alarm got unplugged ironically. still have some cleaning up to do. still have that issue with idle. i have to start it up with my foot on the gas for a while til i can ease my foot off. its about 0 degrees here so it takes about 10 mins til it will idle on its own. then if i rod it, it will sometimes start over and ill have to hold rpms at 500 til it picks it up.
i cleaned the iacv. then was going to pull the ect to see if it was corroded and ended up breaking it so i got a new ect. im fairly confident it is going to be wiring at this point.
I have so far done the wiring off pieces of pin outs ive found in google. sometime soon i will take another shot at doing the whole, purchase a subscription wiring schemtics thing. everything is hooked up except oil level/pressure and a/c system. im thinking there is a wire i missed that needs to be hooked up to the iacv.
ordered an electirc fan. and some tires lol. once i get the idle issue sorted i will update the post.
code is a 26.(rich afr) ive heard that on this car the secondary o2 can cause poor gas mileage if not installed. im going to start there i guess. dont want to throw anymore money into this at the moment. motor was running great before so it is most likely a secondary o2 or wiring. havent really worked on obd1 before. this should be interesting. my idle is low at the moment also....700 rpm when cold....i guess next step after that would be to find wiring diagram and check my sensors to make sure they are all getting power.
possible causes(just to keep things organized in my head)
secondary o2
main o2
maf
tps
iacv
i got it sorted. been keeping an eye on how it runs. there was a higher idle today. I checked my o2 sensors and one of them was getting a funny reading. 120 ohms across the heater circuit. tested the signal circuit and it fluctuated at start and fluctuated from 1.2v to 2.5v. switched it out with my 2jz o2 and it is running great so far. no cel and i had it running for 30 minutes and drove it 5-10 miles.
yeah, i live in mt. only thing id need for smog would be some cats and hook up my secondary o2 but i dont need smog here.
i did no body lift. pretty tight between radiator and pulleys 2.5 inches but its in, running great no issues. my new tires came in so this weekend im going to be doing some sliders and tub on the rear. get my oil level hooked up and my fan wires ran so i can mount my ecu up out of the way. then all i have left is oil pressure and a/c lines. still do need to hook up charcoal canister but thats just two air lines that are practically ran already. i havent updated in a bit so ill try to get on that this weekend
don't feel like editing original post. I got some new tires, worked on bumpers a bit more, stock clutch i got working. I put it in 5the and started it and it popped in. It spun the 36s for a bit then eventually started slipping. ended up replacing the clutch with a northwest toys clutch. And got an aluminum summit radiator 2 row 1 inch cores. Clutch is great. Still over heating. I think it's from running a 10" fan. Just got some other fns but haven't got them installed. I'd recommend the Sc400 oil filter mount. Relocation kit kinda sucks. Too many other parts. Now it's elocker rear too. And square front driveline
Looking good. I am glad the clutch is working out great for you! As for the fan situation I would rcommend a 16" slim boy fan. We sell Spal fans but flex a lite makes a good unit too. They run 2500 CFM and will take care of cooling the engine with a good high flow radiator.
yeah, i originally ran the v6 rad so i had less then 2" clearance. i ordered a 10" with 2300cfm figuring the cfm would keep me covered but now that im running an aluminum rad i had to push it forward so i have more room. picked up a taurus pull fan for stupid cheap. gonna fit that. also have the ls400 push fan if i have too. if i need the push though im assuming i have something else wrong. everything is new though. new red fluid, new metal waterpump, new rad cap, new rad, new t stat. i did find out the fan i had was shorting out somehow. running slow at times but ran good when stopped lol. for a while anyway
I am sure you have it set up right but want to double check. I have had a lot of rigs come into the shop over heating. I have found more electric fan installs that are spinning the wrong direction then I can count.
yeah, im sure the fan was spinning correctly. i checked about 300 times. i was thinking more along the lines of heater hoses backwards(if thats possible) or a small leak. I pressure tested the system and it bled off very slowly. slowly enough it couldve been the tester. held in the 17-20 range for 10 minutes. shouldve checked on a working system i guess. i am running a 13 cap which i should jump up.
 11-27-2015, 07:47 AM