
Alternator '86 SR5 Plow Truck
 01-13-2012, 06:37 AM
#1
Registered User
Thread Starter

Alternator '86 SR5 Plow Truck
I searched thread titles here using 'alternator 86 sr5' and found nothing but I doubt I'm the first SR5 plow truck owner to experience this. I'm now on my third alternator in 12 months. At $100+ each I'm in need of advice. As most of us here know, swapping alternators in an '86 SR5 is no walk in the park. That, coupled with the expense, has darkened my enthusiasm for plowing snow.
My plow set-up is electric/hydraulic and it does dim the lights a bit on the up stroke. The standard Yota alternator is only 60a so I'm wondering if installing a GM 100a or 150a alternator will solve the problem of have I just been buying low quality alternators. The first was [ug] Autozone, the second was an Internet supplier [Auto Parts Warehouse] and now I'm looking at number three. Although it would be at least a two day job for me, I'm willing to swap in a GM alternator if you folks with more Yota experience than me think it will solve the problem.
My plow set-up is electric/hydraulic and it does dim the lights a bit on the up stroke. The standard Yota alternator is only 60a so I'm wondering if installing a GM 100a or 150a alternator will solve the problem of have I just been buying low quality alternators. The first was [ug] Autozone, the second was an Internet supplier [Auto Parts Warehouse] and now I'm looking at number three. Although it would be at least a two day job for me, I'm willing to swap in a GM alternator if you folks with more Yota experience than me think it will solve the problem.
 01-13-2012, 06:44 AM
#2
may not entirely solve it, but it'll definitely help. i have a gm140 in there, and it works great. you may want to add an idle-up switch, too, to give the alternator a fighting chance.
the wiring is plug-and-play with an adapter (i'll get the link in just a sec), and the bracket can be had for ~$40.
great upgrade, even if you don't plow
the wiring is plug-and-play with an adapter (i'll get the link in just a sec), and the bracket can be had for ~$40.
great upgrade, even if you don't plow
01-13-2012, 06:53 AM
#3

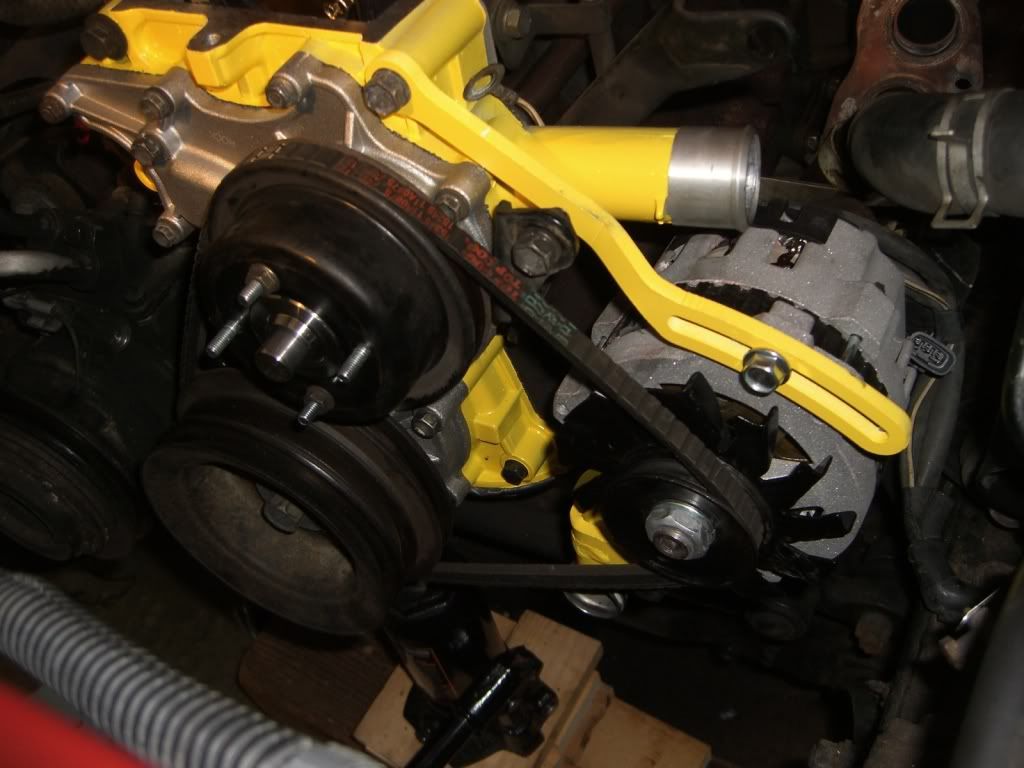
my upgraded wiring
here's the links-
i have a 140 amp under the hood, and it works great. the stock toyota alt would be considered a "1 wire" as well
alternator: (12 o'clock housing, v-belt. 1/3 wire and 1 wire are the styles advertised)
http://motors.shop.ebay.com/i.html?_...ire+alternator
adapter: (whichever one matches your stock plug. i used the first one, you might need the second)
http://store.alternatorparts.com/partno4618061.aspx
http://store.alternatorparts.com/partno461804.aspx
bracket:
http://www.pirate4x4.com/forum/showthread.php?t=830388
(pm the guy, he'll take a little while to get back to you, but he's prompt once you get a hold of him)
if you need any other info, let me know. i got more links and stuff.
Last edited by irab88; 01-13-2012 at 06:56 AM.
01-13-2012, 06:58 AM
#5
Registered User
Thread Starter
Ira, you are a true craftsman. I envy your attention to detail and expert workmanship. Thanks for the links. I'm on it [as soon as I get my next retirement check anyway].
01-13-2012, 07:04 AM
#7
not entirely. only 2 bolts, though it is a snug fit. it might be helpful to prop the engine up to take some load off the engine mounts
edit: i don't know if toolbox guy is still that active. you might also try trail-gear, lc engineering, or someplace else for the bracket
edit: i don't know if toolbox guy is still that active. you might also try trail-gear, lc engineering, or someplace else for the bracket
Last edited by irab88; 01-13-2012 at 07:09 AM.
Trending Topics
01-13-2012, 07:22 AM
#8
Registered User
Thread Starter
not entirely. only 2 bolts, though it is a snug fit. it might be helpful to prop the engine up to take some load off the engine mounts
edit: i don't know if toolbox guy is still that active. you might also try trail-gear, lc engineering, or someplace else for the bracket
edit: i don't know if toolbox guy is still that active. you might also try trail-gear, lc engineering, or someplace else for the bracket
Radiator and air box out to do the job it appears. Anything else I should know before I start? I just need to be prepared. The shop I'm working in is unheated and it's predicted to be frigid here in New Hampshire next week so I'll need to work fast before my finners freeze and fall off.
01-13-2012, 07:33 AM
#9
radiator can stay in. it's a squeeze, but you can get to it through the bottom of the engine compartment. the air box can stay in, too.
at least you have a garage to work in... be thankful for that
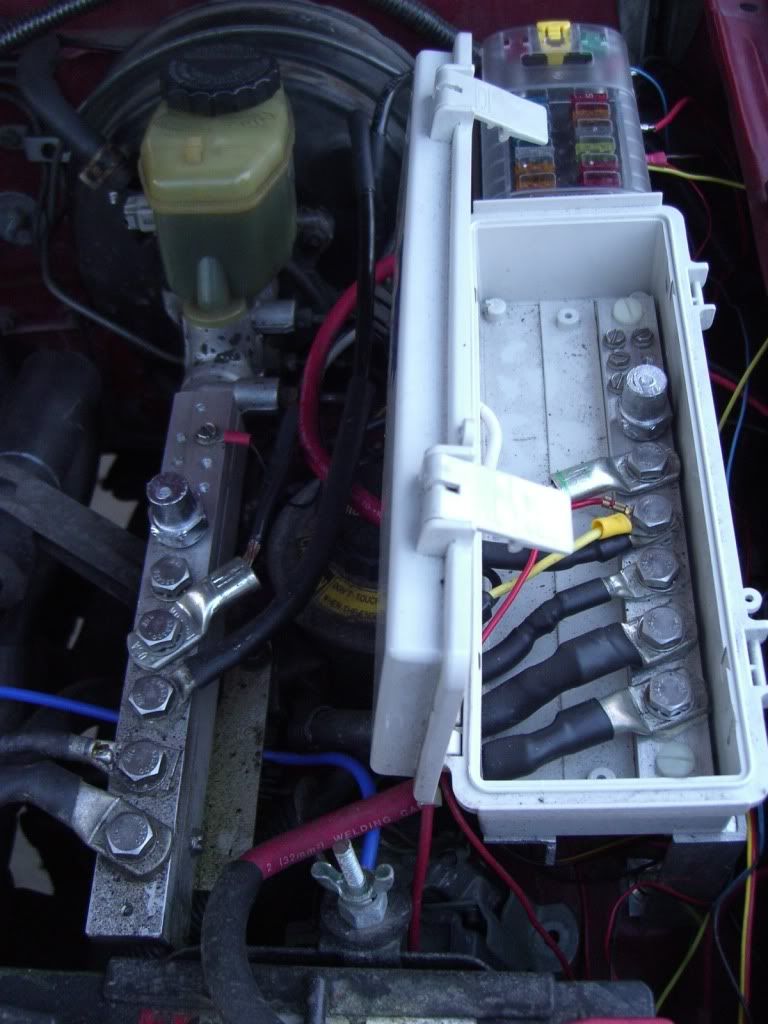
and my wiring set-up consists of 2 bus bars: one positive and one negative. the positive is in the box, to avoid shorts. i drilled and tapped aluminum bar, and added bolts. that way, if i need to add or remove something, i can easily dis/attach it. on the positive side, the items bolted in are (top-to-bottom):
-jump lug
-trailer harness
-electric fan, fog lights, aux fuse box
-stock fuse box/starter
-alternator
-battery
the fuse box above the positive bar is the aux fuse box. there, i can add switched accessories, like cb radio, lights, or anything else up to 30 amps (each circuit).
at least you have a garage to work in... be thankful for that
and my wiring set-up consists of 2 bus bars: one positive and one negative. the positive is in the box, to avoid shorts. i drilled and tapped aluminum bar, and added bolts. that way, if i need to add or remove something, i can easily dis/attach it. on the positive side, the items bolted in are (top-to-bottom):
-jump lug
-trailer harness
-electric fan, fog lights, aux fuse box
-stock fuse box/starter
-alternator
-battery
the fuse box above the positive bar is the aux fuse box. there, i can add switched accessories, like cb radio, lights, or anything else up to 30 amps (each circuit).
01-13-2012, 04:20 PM
#10
Registered User
iTrader: (3)
Join Date: Apr 2007
Location: Cheshire county, NH
Posts: 509
Likes: 0
Received 0 Likes
on
0 Posts
Radiator and air box out to do the job it appears. Anything else I should know before I start? I just need to be prepared. The shop I'm working in is unheated and it's predicted to be frigid here in New Hampshire next week so I'll need to work fast before my finners freeze and fall off.
As far as the low quality alternators are concerned, I never had an issue with my stock unit on my 86.
01-14-2012, 06:49 AM
#11
Have you looked at or has anybody had experience with these guys out of Van Nuys Ca?
http://www.ebay.com/itm/380397551700...84.m1423.l2649
They advertise a stock appearing alternator for the truck/4runner with 130amp output for about $100 shipped with a 12 month warranty. If it works I think it would be a no brainer stock replacement bolt in. My only input would be that the factory alternator wire is WAY TOO SMALL for 130amps.
01-14-2012, 07:22 AM
#12
Registered User
Thread Starter
They advertise a stock appearing alternator for the truck/4runner with 130amp output for about $100 shipped with a 12 month warranty. If it works I think it would be a no brainer stock replacement bolt in. My only input would be that the factory alternator wire is WAY TOO SMALL for 130amps.
01-14-2012, 08:40 AM
#14
Registered User
Thread Starter
Thanks for the input but I leaning towards the GM. It's not that much more $$.
01-14-2012, 01:02 PM
#15
I don`t think these alternators are hard to change .
I just pull off the bottom radiator hose gives me lots of room. the alternator harness is long enough once it is loose to remove it.
I am also wondering if you don`t have other issues also like poor grounds and the wire off the alternator B terminal is not fried from the thermal cycling over the years.
I have had the plugs on the alternator corroded not enough to cause the light to come on but to reduce output
Adam at 4x innovations makes the best looking mounts for the GM conversion I have seen
01-16-2012, 08:22 AM
#16
Registered User
Thread Starter
01-26-2012, 07:46 AM
#17
Registered User
Thread Starter
may not entirely solve it, but it'll definitely help. i have a gm140 in there, and it works great. you may want to add an idle-up switch, too, to give the alternator a fighting chance. The wiring is plug-and-play with an adapter (i'll get the link in just a sec), and the bracket can be had for ~$40. Great upgrade, even if you don't plow
I'm wondering if I can prolong the alternator's life but disabling it while I'm using the plow lift. Is there a way to electrically cut it out? I guess I can put a continuous duty starter solenoid in series with the battery wire and open it when I lift the plow. They're short money at [$17.50] from Bailey. Will that hurt the alternator?
02-11-2012, 09:49 AM
#18
Registered User
Thread Starter

 Task accomplished but it took me ten hours.
 Issue #1; The original adjuster bracket is held on in two planes and the side screw is under the power steering pump bracket. Therefore I had to remove the power steering pump and then the bracket to get at it. The power steering pump bracket is help on on in FOUR planes and with FIVE screws. Why kind of a perverted sadist would design a bracket with such rigidity as to withstand a nuclear explosion whose only function is to hold the power steering pump? ....or was I just getting tired and frustrated already?
Issue #2; the adjuster bracket mounting hole was punched offset so, no being able to see, hold the bracket and hold the screw all at the same time, I couldn't tell why I was unable to get the mounting screw into the block until I wire tied the bracket to the something above it [can't remember now what it was] and looked through the grill after removing the radiator. Ground off the top of it a bit and got it in OK. Time lost on that one = 2 hours.
Issue #3; the same adjuster bracket was not bent right so after screwing around with #2, I was unable to get it on to the right side [front] of the boss on the alternator. Therefore, I had to take it off again and re-bend it. Fortunately, I guessed right on the bend the first time and got it all back together again. Time lost on that one = 1 hour. So, after five hours on Thursday and five hours on Friday, I now have a 105/130 ampere alternator that alternates just fine ....for now anyway.
Only two boo-boo's; #1: I forgot that my warning light is too high to get into my garage and I sheared it off. #2: I forgot to tighten the fan hub and it loosened up during my road test.
Thank you all for the advice and links to the parts I needed.

Thread
Thread Starter
Forum
Replies
Last Post
bigblue82
General Electrical & Lighting Related Topics
10
07-06-2015 08:27 AM
dirtrider0129
Buying & Selling Advice - Feeler/Gauging Interest
10
06-24-2015 12:24 PM


