
Starter fix
 03-15-2009, 03:30 PM
#1
Registered User
Thread Starter
Starter fix
I've worked on two Toyota starters. Both worked most of the time, then every once in a while, they would just make a clank sound. Both were fixed in the same way. Incidentally, Nippondenso makes pretty much the same starters for Toyota, Mitsubishi and Chrysler. The pictures are off Expedition Portal of a Chrysler minivan (why is that on ExPo?). as I didn't take any pictures this time as I was hurrying.
Removing the starter is a pain in the butt but can be done without jacking the truck or even removing a tire.. ALWAYS DISCONNECT THE BATTERY BEFORE REMOVING THE STARTER- IT IS ALWAYS HOT. Its located on the passenger side of the engine where it mates with the bell housing. I got funny looks in the grocery store as I have more scratches and cuts on my wrist than a teen punk rocker. There's a little access hatch in the passenger wheel well (at least in 4wd models) but its still difficult to reach the two bolts that hold the starter to the bell housing. You must also undo the hot wire to the starter and the clip that connects the wire from the starter relay to the solenoid- both are easy to spot from the access hatch. One bolt and one stud connect the starter to the bell housing. The bolt on the bottom isn't too hard to undo through the access hatch, but you'll want a 10" extension and you'll need pipe to give more leverage to break it loose. The nut on the stud is easiest accessed from the top (through the engine bay) if you remove the charcoal canister and the nut holding the fuel or brake lines (sorry, can't recall) to the fire wall.
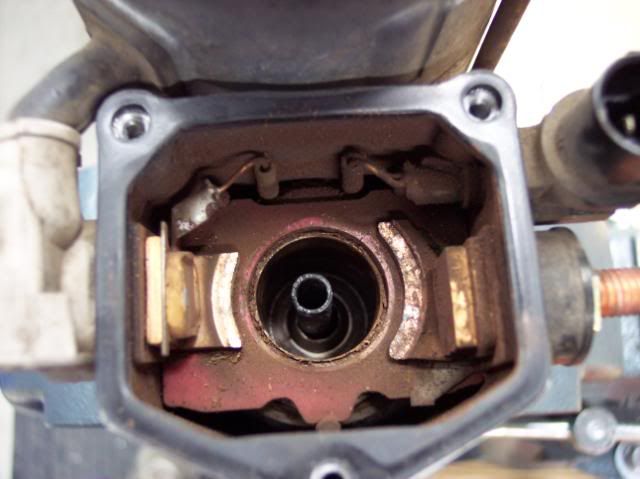
When you turn the ignition key, current is send through the starter relay (5spd) to the "starter solenoid". This solenoid works just like a relay to complete the battery-starter motor circuit. There are two copper contact in the starter that are bridged by a big copper washer to complete the circuit. the copper washer is located on the plunger and the contacts are visible inside the starter.
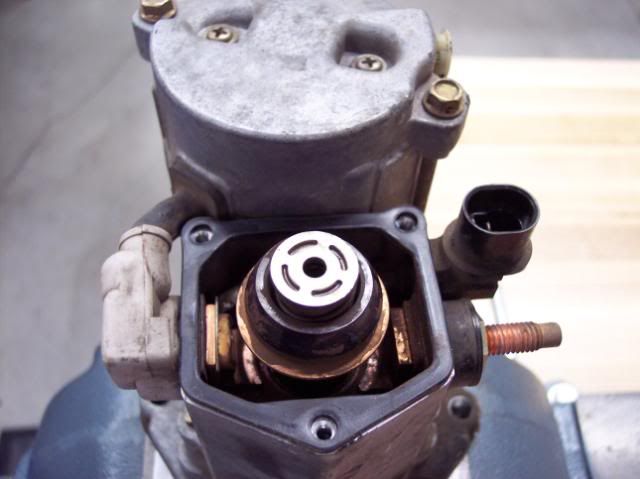
Some contact sets are both square, other have one square, one crescent. You should replace the square contact that has been "eaten" the most with a crescent-shaped contact from the kit I listed as it will not wear out as fast.

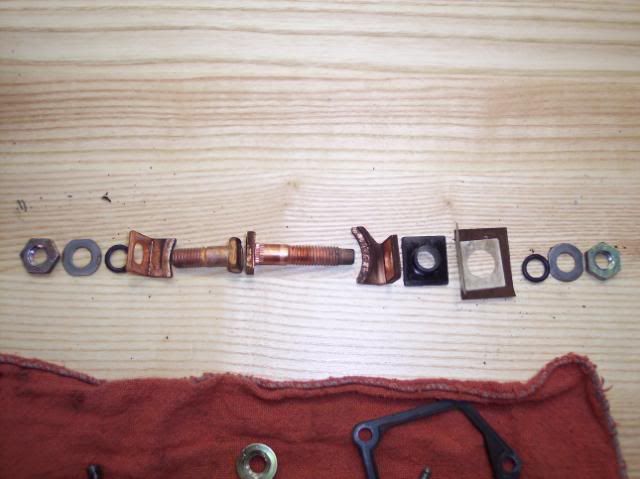
It seems like it is always the larger crescent-shaped contact that wears out first (due to the direction of current). My square-shaped contact seemed to have no significant wear, whereas the other side was really eaten up. The generic brand "starter kit" came with two starter contacts that looked like the contact on the left. The Toyota starter kit (part number 28226-72010) came with the crescent-shaped contact. This has more surface are and won't wear as fast. As the started s a mother to pull on an IFS truck, spend the $20 and get the Toyota part instead of the generic.
My starter (NOT the one pictured) seems to have been repaired before with the cheap starter kit, as it two identical smaller contacts. The crescent-shaped contact bolted right in and the truck is starting just fine, so I'm going to say they are interchangeable.
Here is the order in which the parts come off the copper studs.
Once you have the starter out, its a pretty simple and logical process of R&R'ing the contacts. But, if you're having trouble, have a look here: http://www.4x4wire.com/toyota/maintenance/starter/ and http://www.expeditionportal.com/foru...ad.php?t=12746 .
I sprayed down the inside of the housing with electrical parts cleaner as well.
Bolting the starter back in took a lot less time that removing it. Careful not to drop any bolts or tools into the bell housing, that would be really crappy as you'd basically have to separate the engine and bellhousing unless you were really handy with a magnetic pickup tool.
Removing the starter is a pain in the butt but can be done without jacking the truck or even removing a tire.. ALWAYS DISCONNECT THE BATTERY BEFORE REMOVING THE STARTER- IT IS ALWAYS HOT. Its located on the passenger side of the engine where it mates with the bell housing. I got funny looks in the grocery store as I have more scratches and cuts on my wrist than a teen punk rocker. There's a little access hatch in the passenger wheel well (at least in 4wd models) but its still difficult to reach the two bolts that hold the starter to the bell housing. You must also undo the hot wire to the starter and the clip that connects the wire from the starter relay to the solenoid- both are easy to spot from the access hatch. One bolt and one stud connect the starter to the bell housing. The bolt on the bottom isn't too hard to undo through the access hatch, but you'll want a 10" extension and you'll need pipe to give more leverage to break it loose. The nut on the stud is easiest accessed from the top (through the engine bay) if you remove the charcoal canister and the nut holding the fuel or brake lines (sorry, can't recall) to the fire wall.
When you turn the ignition key, current is send through the starter relay (5spd) to the "starter solenoid". This solenoid works just like a relay to complete the battery-starter motor circuit. There are two copper contact in the starter that are bridged by a big copper washer to complete the circuit. the copper washer is located on the plunger and the contacts are visible inside the starter.
Some contact sets are both square, other have one square, one crescent. You should replace the square contact that has been "eaten" the most with a crescent-shaped contact from the kit I listed as it will not wear out as fast.
It seems like it is always the larger crescent-shaped contact that wears out first (due to the direction of current). My square-shaped contact seemed to have no significant wear, whereas the other side was really eaten up. The generic brand "starter kit" came with two starter contacts that looked like the contact on the left. The Toyota starter kit (part number 28226-72010) came with the crescent-shaped contact. This has more surface are and won't wear as fast. As the started s a mother to pull on an IFS truck, spend the $20 and get the Toyota part instead of the generic.
My starter (NOT the one pictured) seems to have been repaired before with the cheap starter kit, as it two identical smaller contacts. The crescent-shaped contact bolted right in and the truck is starting just fine, so I'm going to say they are interchangeable.
Here is the order in which the parts come off the copper studs.
Once you have the starter out, its a pretty simple and logical process of R&R'ing the contacts. But, if you're having trouble, have a look here: http://www.4x4wire.com/toyota/maintenance/starter/ and http://www.expeditionportal.com/foru...ad.php?t=12746 .
I sprayed down the inside of the housing with electrical parts cleaner as well.
Bolting the starter back in took a lot less time that removing it. Careful not to drop any bolts or tools into the bell housing, that would be really crappy as you'd basically have to separate the engine and bellhousing unless you were really handy with a magnetic pickup tool.
 03-15-2009, 03:37 PM
#2
Contributing Member
Join Date: Apr 2006
Location: TENN Native Languishing in Virginia
Posts: 4,787
Likes: 0
Received 34 Likes
on
14 Posts
I did the same thing with mine with about 200k miles on the odo. Replaced the copper contacts & buffed down the contact point with some fine sandpaper; works like a charm. I expect to get another 200k miles out of it.....nice writeup~
The hardest thing about it is getting the DAMN STARTER OUT OF THE TRUCK~

The hardest thing about it is getting the DAMN STARTER OUT OF THE TRUCK~
 03-15-2009, 03:42 PM
#4
03-15-2009, 04:20 PM
#7
Contributing Member
my BRAND NEW STARTER did the ol "click..... nothing" a little while ago... tapped on it with a big ol 6" C-clamp, and it turned over and started  I'm debating weather to just warantee it out, or try this first... it hasn't given me a problem since though
I'm debating weather to just warantee it out, or try this first... it hasn't given me a problem since though
Trending Topics
03-15-2009, 04:26 PM
#8
Registered User
Thread Starter
You could. Mine looked alright after a little sand paper. It is free-spinning so there is a lot of surface area and it all wears at the same rate. The problem with one contact wearing and not the other is that the washer only then makes contact with the higher of the two contacts.
03-15-2009, 05:13 PM
#11
Registered User
Thread Starter

Last edited by Matt16; 03-15-2009 at 05:32 PM.
03-15-2009, 05:20 PM
#13
Registered User
Join Date: Jul 2008
Location: Grew up in S.C.V, So Cal.....now in Hampstead, NC
Posts: 4,592
Likes: 0
Received 0 Likes
on
0 Posts
I know. That why I said what I did. You can diffidently tell that both were not written by you.....lol! It's all good, tho 
03-15-2009, 05:38 PM
#17
Registered User
Thread Starter
I did all the writing. Its just a much less difficult process- the first time, i pulled a starter off a Camry with an intermittent starting problem and figured it out myself, without ever having seen a starter motor (or diagram) before. As a result, I wrote it up like this instead to give an idea of the process, instead of step-by-step like the alignment, the third member, locker install etc...
03-15-2009, 05:42 PM
#18
Registered User
Thread Starter
Used a cheap brand of "electrical contact cleaner"- any auto part store should have it. You could probably use "throttle body cleaner" as its meant to be gentle enough to clean the hot wire on a MAF. Here were not talking about delicate little wires either.
03-15-2009, 05:48 PM
#19
Registered User
yyyeeeep, Just did this on the taco a couple weeks back.
Fixed my starting problems...And alot cheaper then a new aisin starter.
didnt even think once about a remaned one from vatozone..

Fixed my starting problems...And alot cheaper then a new aisin starter.
didnt even think once about a remaned one from vatozone..
03-15-2009, 05:53 PM
#20
Registered User
Join Date: Jul 2008
Location: Grew up in S.C.V, So Cal.....now in Hampstead, NC
Posts: 4,592
Likes: 0
Received 0 Likes
on
0 Posts
Relax Matt, just messin with ya.....lol....you canadians......jeez!
Last edited by a4runnerfreak; 03-15-2009 at 06:03 PM.


