
Reviving a long-dormant, low-mile 22RE
 09-12-2011, 12:27 PM
#41
Registered User
Thread Starter
Join Date: Dec 2010
Location: Torrance, CA
Posts: 53
Likes: 0
Received 0 Likes
on
0 Posts
Pulled the #4 piston & rod last night, and lo & behold - the rod bearing is severely grooved and there's some bearing material smeared onto the crank journal. A new set of rod bearings is definitely needed. I'll post more after I take a look at the last two rod bearings and the mains.
 09-12-2011, 12:39 PM
#42
Registered User
Duder, thanks so much for all these posts and pics. It's a fascinating thread. Bizarre that there is bearing damage already - and kudos to you for discovering it. This thread should come with popcorn! 
09-12-2011, 01:40 PM
#43
Registered User
Join Date: Jan 2005
Location: Leadville Colorado
Posts: 1,600
Likes: 0
Received 0 Likes
on
0 Posts
If it were me, I would leave the original chain guides in there. My driver's side guide has been broken at that top bolt hole and has been able to move back and forth since I bought the truck 2 years and 45K miles ago, and it's still holding up fine. Just sayin'.
Or you could err on the side of caution and replace it while it's torn apart. I think as long as you maintain good oil pressure you should be fine, maybe swap a new OEM tensioner in there though, just throwing out some options for you.
Or you could err on the side of caution and replace it while it's torn apart. I think as long as you maintain good oil pressure you should be fine, maybe swap a new OEM tensioner in there though, just throwing out some options for you.
09-12-2011, 03:51 PM
#44
Registered User
Thread Starter
Join Date: Dec 2010
Location: Torrance, CA
Posts: 53
Likes: 0
Received 0 Likes
on
0 Posts
The bearing wear on #1 is interesting, but the damage is pretty severe on #4... some sort of large particle made its way through the crank and in between the journal and the bearing. I'm hoping that the crank can be cleaned up without having to re-grind.
If it were me, I would leave the original chain guides in there. My driver's side guide has been broken at that top bolt hole and has been able to move back and forth since I bought the truck 2 years and 45K miles ago, and it's still holding up fine. Just sayin'.
Or you could err on the side of caution and replace it while it's torn apart. I think as long as you maintain good oil pressure you should be fine, maybe swap a new OEM tensioner in there though, just throwing out some options for you.
Or you could err on the side of caution and replace it while it's torn apart. I think as long as you maintain good oil pressure you should be fine, maybe swap a new OEM tensioner in there though, just throwing out some options for you.
09-13-2011, 10:29 PM
#45
Registered User
Thread Starter
Join Date: Dec 2010
Location: Torrance, CA
Posts: 53
Likes: 0
Received 0 Likes
on
0 Posts
Pictures of the other three sets of rod bearings:
#2:


#3:


...aaaand #4:


#2 and #3 look similar to #1 in terms of wear. #4 is entirely destroyed. Fascinating.
The #4 crank rod journal has some bearing material on it as I said, but I can also feel the groove with my fingernail. Whatever killed the bearing was tough enough to gouge the crank as well. It would be swell if I could get away with just a light polish on this one journal.
And just for grins, here's the worst of the piston skirt wear; not even wear really, more like a few very fine scratches. This piston has not been cleaned at all, by the way

#2:
#3:
...aaaand #4:
#2 and #3 look similar to #1 in terms of wear. #4 is entirely destroyed. Fascinating.
The #4 crank rod journal has some bearing material on it as I said, but I can also feel the groove with my fingernail. Whatever killed the bearing was tough enough to gouge the crank as well. It would be swell if I could get away with just a light polish on this one journal.
And just for grins, here's the worst of the piston skirt wear; not even wear really, more like a few very fine scratches. This piston has not been cleaned at all, by the way
09-14-2011, 07:54 AM
#46

Since it's a low mile motor and if your going to reuse the timing set just got to auto zone and get there chain damper which is a rubber coated steel guide.
Auto Zone sells steel backed rubber coated guide they call a damper on there site seporatly for $12.99 for the left hand straight one.
http://www.autozone.com/autozone/par.../N-j02mdZ8znm2
I bought one to use with the new set previous owner put on to replace that plastic one, but decided to go with a new set all together with steel guide from engnbldr and now keeping other guide/damper as a spare and the newer plastic one I took off from previous owner as a spares spare ;}LOL, YOU NEVER KNOW!!!!
Part Number: 7133S
Warranty: 3 MO
Notes:
Left hand
09-15-2011, 11:45 AM
#47
Registered User
Thread Starter
Join Date: Dec 2010
Location: Torrance, CA
Posts: 53
Likes: 0
Received 0 Likes
on
0 Posts
Cool; thanks for the info man. I'd like to replace both guides with steel so I'll probably shop around to see where I can get the left & right as a set.
09-15-2011, 07:01 PM
#48
Registered User
Join Date: Jan 2005
Location: Leadville Colorado
Posts: 1,600
Likes: 0
Received 0 Likes
on
0 Posts
you might as well just get an engnbldr set, in all reality that's probably what I'd do. I was just trying to prove a point that since your guides are intact and not broken at all right now, as long as you maintain good oil pressure and the tensioner is in good shape the guides could potentially last for 200K miles.
But, since it's already taken apart, I agree it would be foolish to not put new parts in.
But, since it's already taken apart, I agree it would be foolish to not put new parts in.
Last edited by pruney81; 09-15-2011 at 07:02 PM.
09-21-2011, 07:44 PM
#49
Registered User
Thread Starter
Join Date: Dec 2010
Location: Torrance, CA
Posts: 53
Likes: 0
Received 0 Likes
on
0 Posts
Agreed on all points, and thanks for the input.
I've now got the bottom end torn down to the bare block. Looks like new bearings all around. All the mains show similar wear to the #1-3 rod bearing pictures I posted. The crank has a bit of discoloration and a few light gouges on the rod journals too.
It's a shame about the damage since everything else is so cherry, but on the other hand I'm glad I tore it down all the way and discovered it. I did remember that my dad told me that the guys at the dismantler yard started it up for him before they pulled it from the wrecked truck, all those years ago. Maybe that's what killed the bearings, but I can only hypothesize.
Part of me was tempted to try running the longblock as-is back when I got it, but fortunately wisdom and patience got the better of me.
09-26-2011, 09:04 PM
#50
Registered User
Thread Starter
Join Date: Dec 2010
Location: Torrance, CA
Posts: 53
Likes: 0
Received 0 Likes
on
0 Posts
Progress marches on…
Before I pulled the main bearing caps and crank I measured crank thrust clearance, AKA axial float. Set up the dial indicator magnetic base on the front of the block, pried the crank back and forth with a screwdriver against one of the counterweights and measured less than 0.001 inch of movement. The limit is 0.012 so we’re golden there.
Pulled the main caps and found bearing wear on the mains as well as I posted before. Here’s a closeup of #3 but they are all worn the same, give or take a little.


Here’s the #3 cylinder showing the worst of the minor scratches (at the 12:00 position in the picture). I can’t feel these with my fingernail.

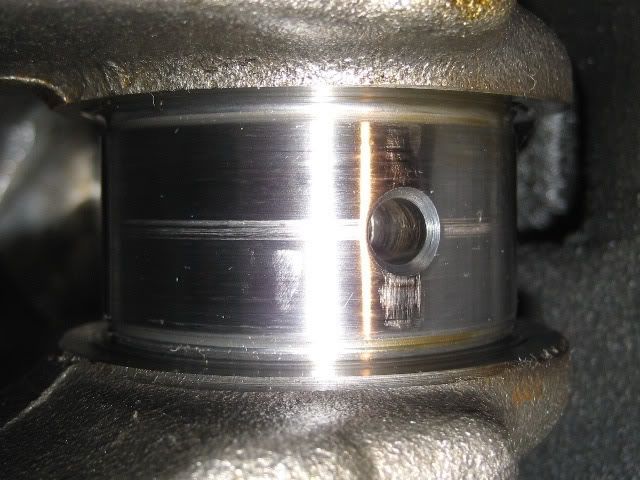
Crank main journals are discolored in a few places, like this dark spot on #5. Not sure what would cause this but the bearings are discolored to match:

Closeup of one of the better crank journals:

As a bonus, I found some lovely brown schmoo after removing the coolant drain plug. Block will be thoroughly cleaned out – but the rest of the water jacket is pretty clean.

Pistons were cleaned by letting them soak in a little plastic container lid full of purple power degreaser, scraping with a tongue depressor cut at a 45 deg angle to make a straight but soft tool, then repeating until clean of all carbon buildup. All that carbon dissolved and purple power became black power (but not in a racial way):

Lately I've been doing some extensive block cleaning as well. Here's what it looked like to begin with:

A shot from earlier showing rust around the oil pan flange (lower right)

Scrape scrape scrape...oh, what's this? Bearing sizes! Mains on top, rods on bottom.

Lots of wire-wheel action, scrubbing and scotch brite, followed by more wire wheel work left me with a pretty respectable-looking block.

I'll get to the final de-rusting in the next day or two, then off to the machine shop I go for block & head cleaning and some crank repair. Allright!
Before I pulled the main bearing caps and crank I measured crank thrust clearance, AKA axial float. Set up the dial indicator magnetic base on the front of the block, pried the crank back and forth with a screwdriver against one of the counterweights and measured less than 0.001 inch of movement. The limit is 0.012 so we’re golden there.
Pulled the main caps and found bearing wear on the mains as well as I posted before. Here’s a closeup of #3 but they are all worn the same, give or take a little.
Here’s the #3 cylinder showing the worst of the minor scratches (at the 12:00 position in the picture). I can’t feel these with my fingernail.
Crank main journals are discolored in a few places, like this dark spot on #5. Not sure what would cause this but the bearings are discolored to match:
Closeup of one of the better crank journals:
As a bonus, I found some lovely brown schmoo after removing the coolant drain plug. Block will be thoroughly cleaned out – but the rest of the water jacket is pretty clean.
Pistons were cleaned by letting them soak in a little plastic container lid full of purple power degreaser, scraping with a tongue depressor cut at a 45 deg angle to make a straight but soft tool, then repeating until clean of all carbon buildup. All that carbon dissolved and purple power became black power (but not in a racial way):
Lately I've been doing some extensive block cleaning as well. Here's what it looked like to begin with:
A shot from earlier showing rust around the oil pan flange (lower right)
Scrape scrape scrape...oh, what's this? Bearing sizes! Mains on top, rods on bottom.
Lots of wire-wheel action, scrubbing and scotch brite, followed by more wire wheel work left me with a pretty respectable-looking block.
I'll get to the final de-rusting in the next day or two, then off to the machine shop I go for block & head cleaning and some crank repair. Allright!
Last edited by Duder; 09-26-2011 at 09:08 PM.
10-11-2011, 02:47 PM
#51
Registered User
Thread Starter
Join Date: Dec 2010
Location: Torrance, CA
Posts: 53
Likes: 0
Received 0 Likes
on
0 Posts
Just got my block and crank back from the machine shop yesterday. Cylinders were given a light hone on a Sunnen machine, freeze plugs installed, and the crank was ground 0.010" on all rod & main journals. Will have pictures soon.
11-30-2011, 07:59 PM
#52
Registered User
Thread Starter
Join Date: Dec 2010
Location: Torrance, CA
Posts: 53
Likes: 0
Received 0 Likes
on
0 Posts
We are long overdue for an update on this 22RE's re-birth as a 22R. I've been working on it off and on, making slower progress than I'd like (of course) but getting there nonetheless.
Let's start with the block...I took it to a machine shop recommended by a friend, for inspection, cylinder honing, hot tanking and freeze plug replacement. Well, they did 3 out of those 4; they don't have a hot tank so I asked the guy to make sure the block was clean internally when he replaced the freeze plugs. When I got it back the cylinders looked great and he said the block was clean. At home though, I took a closer look and discovered about 1/2" of crusty old coolant and rust sitting at the bottom of the water passage. Maybe the machinist didn't notice because it was all uniformly spread out and looked like it was just the iron floor of the passage. He did a good job otherwise but I was frustrated.
After considering options I decided to try cleaning out the shmutz myself. I didn't think it would be a good idea to hot-tank a freshly honed block. Another means of removal was in order. So I scraped and scraped with a long screwdriver to gradually break the crud loose. I got most of the big chunks out by turning the block upside down and blowing compressed air into the coolant passages. There was quite a bit left over though, and I had little patience remaining to scrape it all out. So I worked up a block-off plate for the front coolant passage to the water pump, reinstalled the drain plug, and filled up the block with a mixture of boiling water and CLR. This was left to sit until the water was cold and then sucked out with my shop vac. Another round of pure boiling water to rinse it out, and I was basically done. So that worked out OK.
Fresh block back from the shop. Almost looks too nice in this shot.

My improvised coolant block-off plate, which was a steel plate smeared with form-a-gasket, clamped on the left and bottom with c-clamps and on the right with another scrap steel plate securely bolted to the front of the block. It didn't leak.

The block full of water and CLR; you can see it through the individual passages in the deck.

Closeup of the #1 cylinder, showing the freshly honed surface, and after cleaning out the water jacket.

Let's start with the block...I took it to a machine shop recommended by a friend, for inspection, cylinder honing, hot tanking and freeze plug replacement. Well, they did 3 out of those 4; they don't have a hot tank so I asked the guy to make sure the block was clean internally when he replaced the freeze plugs. When I got it back the cylinders looked great and he said the block was clean. At home though, I took a closer look and discovered about 1/2" of crusty old coolant and rust sitting at the bottom of the water passage. Maybe the machinist didn't notice because it was all uniformly spread out and looked like it was just the iron floor of the passage. He did a good job otherwise but I was frustrated.
After considering options I decided to try cleaning out the shmutz myself. I didn't think it would be a good idea to hot-tank a freshly honed block. Another means of removal was in order. So I scraped and scraped with a long screwdriver to gradually break the crud loose. I got most of the big chunks out by turning the block upside down and blowing compressed air into the coolant passages. There was quite a bit left over though, and I had little patience remaining to scrape it all out. So I worked up a block-off plate for the front coolant passage to the water pump, reinstalled the drain plug, and filled up the block with a mixture of boiling water and CLR. This was left to sit until the water was cold and then sucked out with my shop vac. Another round of pure boiling water to rinse it out, and I was basically done. So that worked out OK.
Fresh block back from the shop. Almost looks too nice in this shot.
My improvised coolant block-off plate, which was a steel plate smeared with form-a-gasket, clamped on the left and bottom with c-clamps and on the right with another scrap steel plate securely bolted to the front of the block. It didn't leak.
The block full of water and CLR; you can see it through the individual passages in the deck.
Closeup of the #1 cylinder, showing the freshly honed surface, and after cleaning out the water jacket.
Last edited by Duder; 11-30-2011 at 08:01 PM.
11-30-2011, 08:20 PM
#53
Registered User
Thread Starter
Join Date: Dec 2010
Location: Torrance, CA
Posts: 53
Likes: 0
Received 0 Likes
on
0 Posts
With the block finally cleaned, cylinders honed, freeze plugs installed and the damaged crank ground to 0.010" undersize, it was finally time to start the fun and get this sucker back together.
First order of business: parts. Lots of parts. From Toyota. I know; I could have spent less if I shopped on ebay or ordered these bits from one of the usual 22R rebuild vendors. But my more meticulous tendencies took over and made me go with all OE Toyota. My logic went something like this: since this is such a low-mileage factory engine and so many of the original parts are reusable, why not keep it all consistent and not sully it with aftermarket Chinese crap? I also saved quite a bit that I may have spent otherwise getting the complete engine as a gift from my dad and being able to use so much of it. So it all balances out, and I'm happy.
Here's the main parts order. All gaskets, all rubber seals and o-rings, small coolant hoses, valve springs, valve stem seals, oil pump relief valve parts, piston rings, main bearings, rod bearings, filters, exhaust studs and nuts are all having a party on my floor.

The new OE replacement bearings are 0.010" (0.25mm) undersize, all around.

I plasti-gaged all of the main and rod bearing clearances to make sure they were all under 0.004". Good to go, so the bottom end was buttoned up.

My dad had a crusty old piston ring compressor that he gave me for the project, and I spent about 45 minutes with Kroil, Scotch-Brite and a wire wheel to get it clean and usable. Made in the USA, looks great now, and does the job well.

Installed all the new rings on the pistons carefully by hand (without the use of a spreader...who needs 'em). Painted the block with black Eastwood high-temp ceramic engine block paint for good measure as well. Here's the bottom end back together as the 22R gods and the Toyoda family intended.

First order of business: parts. Lots of parts. From Toyota. I know; I could have spent less if I shopped on ebay or ordered these bits from one of the usual 22R rebuild vendors. But my more meticulous tendencies took over and made me go with all OE Toyota. My logic went something like this: since this is such a low-mileage factory engine and so many of the original parts are reusable, why not keep it all consistent and not sully it with aftermarket Chinese crap? I also saved quite a bit that I may have spent otherwise getting the complete engine as a gift from my dad and being able to use so much of it. So it all balances out, and I'm happy.
Here's the main parts order. All gaskets, all rubber seals and o-rings, small coolant hoses, valve springs, valve stem seals, oil pump relief valve parts, piston rings, main bearings, rod bearings, filters, exhaust studs and nuts are all having a party on my floor.
The new OE replacement bearings are 0.010" (0.25mm) undersize, all around.
I plasti-gaged all of the main and rod bearing clearances to make sure they were all under 0.004". Good to go, so the bottom end was buttoned up.
My dad had a crusty old piston ring compressor that he gave me for the project, and I spent about 45 minutes with Kroil, Scotch-Brite and a wire wheel to get it clean and usable. Made in the USA, looks great now, and does the job well.
Installed all the new rings on the pistons carefully by hand (without the use of a spreader...who needs 'em). Painted the block with black Eastwood high-temp ceramic engine block paint for good measure as well. Here's the bottom end back together as the 22R gods and the Toyoda family intended.
11-30-2011, 08:34 PM
#54
Registered User
Thread Starter
Join Date: Dec 2010
Location: Torrance, CA
Posts: 53
Likes: 0
Received 0 Likes
on
0 Posts
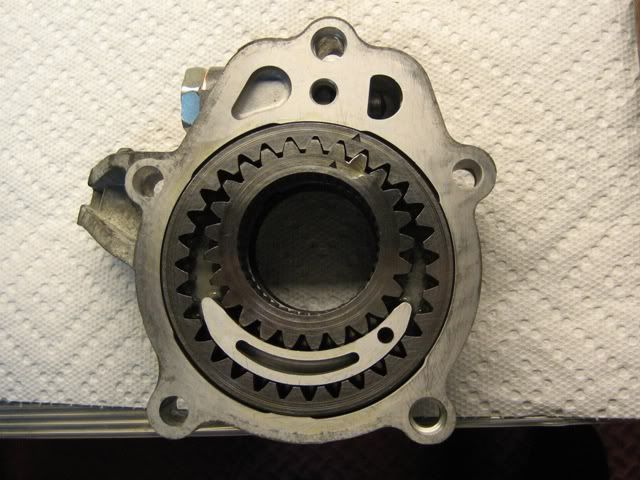
The oil pump measured out perfectly. Gear clearances to the housing are all way under spec, as is the side clearance measured from the back face of the housing to the back face of the gears. The housing was a bit oxidized on the outside so some scrubbing and wire brush action got it looking decent again. A new oil seal was installed, with a new pressure relief piston, spring, cap and crush washer as well for good measure.

I hemmed and hawed about using the original timing set or replacing it with a double-row chain, steel guide kit. My final decision was made in the interest of originality and expedience more than anything, but since all of these parts are almost dead-nuts perfect I decided to re-use them. The plastic guides are grooved only about 0.001" from the main surface and the chain length measured in at way under the maximum for 17 links, fully stretched. If it's not broken, run it, right?. I will keep an eye on the plastic guides but I'm sure they will give me many trouble-free miles before they start to pose any issue.
I never removed the chain from the sprockets this whole time since dissasembly; some carefully placed zip ties have kept it all together in the factory orientation. So I don't have to worry much about timing during reassembly. Of course, I'll triple-check it all anyways.

The front cover was internally clean but externally butt-ugly. Time and the elements were not kind to its formerly clean shiny die-cast aluminum surface. I do have a cheap bead blaster though, and after about 20 minutes of careful work I had erased most of the oxidation and got it looking presentable again. Not perfect, but good enough for a driver.
Here's the inside of the OE cover, cleaned of all gasket material and ready to go.

Cover installed, including oil pump. The exterior looks all right to me. Also visible here is the 22R 4WD oil pan (original to the truck) cleaned and temporarily bolted on. Now this thread is caught up to current progress...this is how the engine currently sits in my garage. Sunday I'll be back at it, starting on cleaning and reassembling the head. I will probably do some light gasket match porting while I'm at it.

I hemmed and hawed about using the original timing set or replacing it with a double-row chain, steel guide kit. My final decision was made in the interest of originality and expedience more than anything, but since all of these parts are almost dead-nuts perfect I decided to re-use them. The plastic guides are grooved only about 0.001" from the main surface and the chain length measured in at way under the maximum for 17 links, fully stretched. If it's not broken, run it, right?. I will keep an eye on the plastic guides but I'm sure they will give me many trouble-free miles before they start to pose any issue.
I never removed the chain from the sprockets this whole time since dissasembly; some carefully placed zip ties have kept it all together in the factory orientation. So I don't have to worry much about timing during reassembly. Of course, I'll triple-check it all anyways.
The front cover was internally clean but externally butt-ugly. Time and the elements were not kind to its formerly clean shiny die-cast aluminum surface. I do have a cheap bead blaster though, and after about 20 minutes of careful work I had erased most of the oxidation and got it looking presentable again. Not perfect, but good enough for a driver.
Here's the inside of the OE cover, cleaned of all gasket material and ready to go.
Cover installed, including oil pump. The exterior looks all right to me. Also visible here is the 22R 4WD oil pan (original to the truck) cleaned and temporarily bolted on. Now this thread is caught up to current progress...this is how the engine currently sits in my garage. Sunday I'll be back at it, starting on cleaning and reassembling the head. I will probably do some light gasket match porting while I'm at it.
Last edited by Duder; 11-30-2011 at 08:36 PM.
11-30-2011, 08:39 PM
#55
steel-backed timing chain guide? the problem isn't with them wearing through, it's with them shattering. mine had only a slight groove from the chain before it shattered.
anyway, looking really good! you're lucky to have such a nice area to work.
anyway, looking really good! you're lucky to have such a nice area to work.
Last edited by irab88; 11-30-2011 at 08:41 PM.
11-30-2011, 09:06 PM
#56
Registered User
Thread Starter
Join Date: Dec 2010
Location: Torrance, CA
Posts: 53
Likes: 0
Received 0 Likes
on
0 Posts
Yeah I was considering using a steel guide set as available from LC Engineering, ENGNBLDR, etc. I retrofitted the LCE kit to the original '86 22R in my truck, including their dual-row chain and sprockets. Those guides were broken though and the motor had about 190k on it at the time. I wonder if the age of my plastic guides (despite the low miles) could cause them to break prematurely? In any case I suppose I could still swap to the steel guides before I get too far along, if there is compelling evidence to suggest these plastic ones won't last another 100k miles as-is.
I just have a little 2-car (more like 1.5-car) attached garage at the house I'm renting but I try to keep it clean and organized. Makes mechanical work much more enjoyable. Thanks for the compliments!
I just have a little 2-car (more like 1.5-car) attached garage at the house I'm renting but I try to keep it clean and organized. Makes mechanical work much more enjoyable. Thanks for the compliments!
12-01-2011, 06:10 AM
#58
Looks great! I realize that you're on the opposite coast from me, but care to post what you paid for machine work? I'm weighing the cost of having my tired 22RE rebuilt vs. buying a remaned or new long block right now.
12-01-2011, 06:35 AM
#59
I just recently finished rebuilding my 22re. I spent 300ish for the engnbldr master kit w/ 368 cam. Machine work I spent around 360. They Boiled the block, bored 20 over, installed new pin bushings and honed them. and Decked my block and timing cover polished crank. I ended up having to buy a new head, Mine had a bad crack in it from #2 exhaust valve to water jacket. So that was 450, I got the engnbldr street rv head with the os ss valves. Add stuff like fipg and paint and I got it done around 1100. I know I could have done it cheaper. And for about 100 dollars more I could have bought a brand new long block from attarco. But I'm glad I got it done. Very good power so far in the 250ish miles driven thus far.
12-01-2011, 08:02 AM
#60
Registered User
Join Date: Aug 2010
Location: Rogersville, TN
Posts: 229
Likes: 0
Received 0 Likes
on
0 Posts
Great thread and info. I have been thinking about trying to find another engine and do a complete teardown and rebuild. If I do, this thread will be of great help. Keep up the good work! Looks like you'll be turning the key before too much longer! 


