
A-arm bushing replacement
 04-29-2011, 05:21 PM
#21
I got all 8 OEM(as in TOYOTA-Manufactured) CONTROL ARM bushings(2 on each of 4 arms) from dealerdirectparts.com..."... that what you're asking? I also got the sway bar bushings from them as well, ...they were CHEAP! All have the toyota print on the plastic bags with their receipts, etc. I also got the AC drier from them for 38$, flat. Plus, shipping is free on orders over 100$.
BTW, I have NO IDEA on Moog, other than my Idler arm was one, and it busted in 10K, ...so I got an, hmmmmm, SNK or whatever the japanese one is, from Napa, ...... it's still in there 100K later. Some love moog, some hate them, ...I'm no expert, AT ALL! lol. Just sharing what I got and where. I think I paid 300$ for all 8 CArm Bushings, upper and lower, both sides. 38$ each or so for the lower Ball Joints, .... 24$ for the 8 Sway Bar Bushings, ... all OEM and all from that site.
BTW, I have NO IDEA on Moog, other than my Idler arm was one, and it busted in 10K, ...so I got an, hmmmmm, SNK or whatever the japanese one is, from Napa, ...... it's still in there 100K later. Some love moog, some hate them, ...I'm no expert, AT ALL! lol. Just sharing what I got and where. I think I paid 300$ for all 8 CArm Bushings, upper and lower, both sides. 38$ each or so for the lower Ball Joints, .... 24$ for the 8 Sway Bar Bushings, ... all OEM and all from that site.
Last edited by ChefYota4x4; 04-29-2011 at 05:22 PM.
 04-29-2011, 05:24 PM
#22
PS> dealerdirectparts.com is just a 'reseller' for Toyota. Like toyotapartsonline.com, etc. I just like their FREE SHIPPING! lol. Also, they were really great on the phone. I just think Toyota made really good quality stuff, from the beginning, ...which is why some shops wont even install anything else.... But I know, MANY disagree, and EQUALLY MANY hate IFS, hahahaha, so, yeah, .... take my info with a grain of salt, ya know? Just throwing out some things that I found in my parts hunting journey.
04-29-2011, 05:27 PM
#23
Registered User
Join Date: Mar 2010
Location: Peoria, AZ
Posts: 504
Likes: 0
Received 0 Likes
on
0 Posts
$8 LCA/UCA bushing removal/installtool if you have the 2-1/8" hub nut socket, an air compressor and a good impact gun.
It took me less than a half hour to remove and replace the bushings once the LCA's were out of the 4Runner.
Go to Home Depot / Lowes and buy a 5/8" threaded rod, (qty 4) 5/8" hole flat washers, (qty 2) 3/4" flat washers, and (qty 4) 5/8" nuts.
1. Thread a two nuts (jam nut them when you get the right location after step 4) and two of the 5/8" washers down the rod about 8".
2. Slide the socket over the rod (open end out) down to the washers.
3. Slide the rod through the LCA bushing from the outboard side
4. Slide the 3/4" then the remaining 5/8" washers over the end of the rod sticking through the LCA bushing and thread one nut on the end.
5. Hit the inboard nut with the impact and the force on the washers will eventually drive the bushing into the socket.
To install the bushings, do the exact opposite so the socket is on the inboard side, etc. I put the edge of a separate socket that was the same length as the distance between the LCA outer bushing area 'ears' to avoid them from collapsing together or at all when driving in the new bushing.
EDIT - I did throw all of the new bushings in the freezer overnight and grabbed them one by one out of the freezer immediately before installation. Temporarily shrinks the ass'y and every little bit helps.
WAY BETTER than a typical bench vise with an 8' cheater bar with you and your fat uncle standing on it for installation. WAY BETTER than a gear/bushing/whatever puller for removal because the impact does all the work and when the bushing breaks free, it is captured inside the socket...not your face.
If this doesn't make sense, I'll see if I can snap a pic or two tomorrow.
OH - and don't use grease on the bushings to aide in the installation. Its just not a good idea.
Last edited by angrybob; 04-29-2011 at 05:55 PM.
 04-29-2011, 05:43 PM
#25
Stock Rubber bushings Really???????????
I would just like to point out that this thread is mainly leaning towards the topic of replacing your front suspension bushings with better, tougher and more easily changed polyurethane bushing inserts reusing the metal "core's, shells and end washers" from the stock rubber bushings
Why go rubber when ploy's last longer and are plug and play once you salvage a set of cores?
for me I have converted every bushing that i have needed to change on my 2 Toyota's to poly's, stock rubber just plain sucks for off-road use and on road longevity
Wii
you should consider getting a poly set for your truck, you leave the shells in the arms (no pressing) and burn, gauge, scrap, wire wheel the parts clean of left over rubber and just add the bushing inserts, once you do this all future replacements can be done without needing to completely remove the arms from the truck, polys will last about 4 times longer then rubber, but will shrink a bit from friction stress if not greased with a long lasting compound.
04-29-2011, 05:50 PM
#26
Registered User
Join Date: Mar 2010
Location: Peoria, AZ
Posts: 504
Likes: 0
Received 0 Likes
on
0 Posts
I went with rubber OEM type bushings because I did not want to mess with burning/cutting out the old rubber to reuse the bushing sleeves. The poly bushing kits require you to reuse the OE sleeves. I helped a guy do this with his Jeep bushings and it was a total PITA. No thanks.
Yes they are more durable, but I got 23 years out of mine OEM rubber ones. Only one UCA bushing was shot, the rest were aged but not torn and in OK condition.
I got all of my bushings (2 front sets and 2 rear sets) from amazon.com in Dec 2010 for about $80. They were Moog brand and the LCA bushings were $8/set! UCA's were $30/set.
Last edited by angrybob; 04-29-2011 at 05:57 PM.
04-29-2011, 06:42 PM
#27
To each there own, I burn through bushings because I tend to haul heavy loads over old mine roads that haven not been maintained in over 100 years sometimes 20 miles or more, and i drive 4 miles or more every day on wash board dirt to and from my house so i guess that makes me bias............
http://www.panoramio.com/photo/7389901
This happens to be one of the best segments of a road I travel often in my spare hobby time carrying upto 1000 lbs.
it must depend on where you live and what you do, I live on dirt roads and have been plagued by rubber bushing failures all my life, from just driving the 2 miles from my house to the paved road daily makes changing rubber bushings an unending affair, add in my activities as an armature miner and its game over for rubber, every vehicle I own has been refitted with ploy as needed, problem solved............
however I have noticed over the years that only the bushings at the stress points need to be changed frequently for example on my 00 tacoma the lower bushings need to be changed a lot because of the attachment points of the of the front coil over strut because it transfers its pressure from frame to the lower control arm while on my 88 truck having torsion bars all of the stress is directly transfered to the upper bushing set because they pad most of force being transfered to the torsion bar, so i have been lazy and only changed those 2 points, as i am awaiting the rubber on the non stressed points to wear out enough to make easier to change them as well, still have the bushings standing by for when they fail may take another 2 - 5 years they seem to last 5 times longer not being pressured on a continues bias. might save you some time and money to just change the stress points.
04-30-2011, 06:40 AM
#28
Registered User
Join Date: Mar 2010
Location: Peoria, AZ
Posts: 504
Likes: 0
Received 0 Likes
on
0 Posts
Good points.
If I had a heavy duty usage like yours, where they may need to be swapped out more frequently, then I would probably go the poly bushing route too. Mine is a toy that I drive on weekends and play on th trails, so I went the easy route.
If I had a heavy duty usage like yours, where they may need to be swapped out more frequently, then I would probably go the poly bushing route too. Mine is a toy that I drive on weekends and play on th trails, so I went the easy route.
04-30-2011, 04:22 PM
#29
Registered User
Join Date: Mar 2010
Location: Peoria, AZ
Posts: 504
Likes: 0
Received 0 Likes
on
0 Posts
I need to clarify/correct a few things after looking through my spare parts.
Both UCA smaller bushings were loose and did not need to be pulled out by a shop. With the tool below I was able to remove and install 6/8 total (UCA & LCA) bushings. I used a vise for the reinstall of the final two UCA bushings.
This is the bushing removal setup
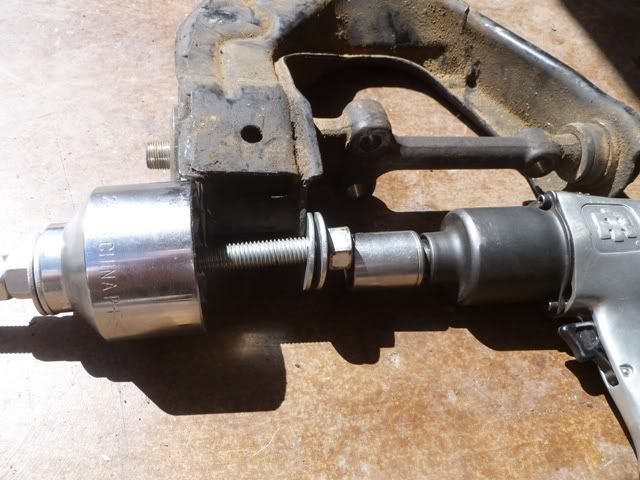
NOTE: These instructions are specifically for the LCA bushings and I used a UCA in the pic because thats all I had handy. The LCA does not have the shaft going through the two bushings.
1. Thread a two nuts (jam nut them when you get the right location after step 4) and two of the 5/8" washers down the rod about 8".
2. Slide the socket over the rod (open end out) down to the washers.
3. Slide the rod through the LCA bushing from the outboard side
4. Slide the 3/4" then the remaining 5/8" washers over the end of the rod sticking through the LCA bushing and thread one nut on the end.
5. Hit the inboard nut with the impact and the force on the washers will eventually drive the bushing into the socket.
This is the bushing install setup
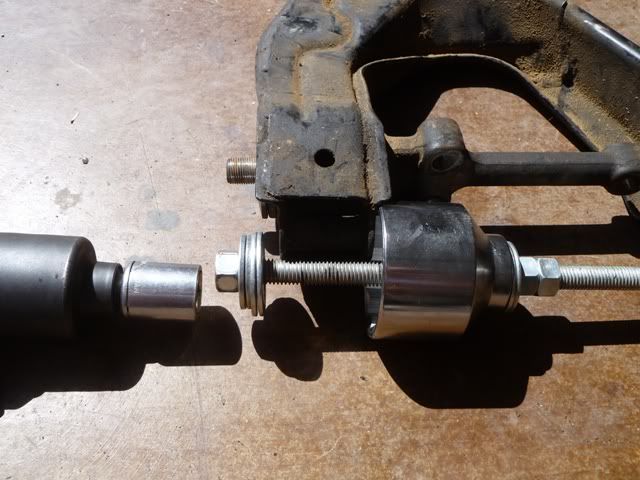
To install the bushings, do the exact opposite so the socket is on the inboard side, etc. I put the edge of a separate socket that was the same length as the distance between the LCA outer bushing area 'ears' to avoid them from collapsing together or at all when driving in the new bushing.
EDIT - I did throw all of the new bushings in the freezer overnight and grabbed them one by one out of the freezer immediately before installation. Temporarily shrinks the ass'y and every little bit helps.
Hard to explain, easy to do and see with parts in front of you. I do not have a spare LCA for pics.
Hope this helps
Both UCA smaller bushings were loose and did not need to be pulled out by a shop. With the tool below I was able to remove and install 6/8 total (UCA & LCA) bushings. I used a vise for the reinstall of the final two UCA bushings.
This is the bushing removal setup
NOTE: These instructions are specifically for the LCA bushings and I used a UCA in the pic because thats all I had handy. The LCA does not have the shaft going through the two bushings.
1. Thread a two nuts (jam nut them when you get the right location after step 4) and two of the 5/8" washers down the rod about 8".
2. Slide the socket over the rod (open end out) down to the washers.
3. Slide the rod through the LCA bushing from the outboard side
4. Slide the 3/4" then the remaining 5/8" washers over the end of the rod sticking through the LCA bushing and thread one nut on the end.
5. Hit the inboard nut with the impact and the force on the washers will eventually drive the bushing into the socket.
This is the bushing install setup
To install the bushings, do the exact opposite so the socket is on the inboard side, etc. I put the edge of a separate socket that was the same length as the distance between the LCA outer bushing area 'ears' to avoid them from collapsing together or at all when driving in the new bushing.
EDIT - I did throw all of the new bushings in the freezer overnight and grabbed them one by one out of the freezer immediately before installation. Temporarily shrinks the ass'y and every little bit helps.
Hard to explain, easy to do and see with parts in front of you. I do not have a spare LCA for pics.
Hope this helps
Last edited by angrybob; 04-30-2011 at 04:25 PM.
05-02-2011, 05:14 AM
#31
Registered User
Join Date: Mar 2010
Location: Peoria, AZ
Posts: 504
Likes: 0
Received 0 Likes
on
0 Posts
Possible? Yeah, but it would be a total PITA. If you know a good shop I would probably go that route w/o an impact.
The reason I made my own is that the guys at the local Fletcher's ˟˟˟˟ up my LCA's removing/pulling the bushings. I don't know what kind of claws they used but the races in the LCA were totally hacked up. They tried to hide one of them by using a Dremel to smooth it over...nice. Then they greased all the bushings to make it easier to install. I found a cheap used set locally from someone doing an SAS luckily.
It was the first (and now only) time I had someone else work on my truck/parts. Never again. I'll buy a puller and press next time...

Thread
Thread Starter
Forum
Replies
Last Post
TURBOrunnerNM
86-95 Trucks & 4Runners
4
07-22-2015 11:01 AM
rushw
General Electrical & Lighting Related Topics
4
07-18-2015 01:46 PM


