

 Apr 5, 2016, 11:16 AM
Last edit by: IB Advertising
See related guides and technical advice from our community experts:
Browse all: Toyota 4Runner Interior Guides
- Toyota 4Runner 1996-2002: How to Install Car Stereo
Step by step instructions for do-it-yourself repairs.
Browse all: Toyota 4Runner Interior Guides

2002 4Runner Stereo install
May 22, 2007 | 08:08 AM
#1
Thread Starter
Contributing Member
iTrader: (1)
Joined: May 2006
Posts: 2,262
Likes: 1
From: B'ham, AL
2002 4Runner Stereo install
I wanted to upgrade my door speakers in my 2002 4Runner, yet retain my oem HU. However, never having attempted a complete stereo install before, this was new territory to me.
With the help of many members here and others abroad, I was able to complete this install by myself. A big thanks to Tron for all his help . I could not have learned as much as I did, as quickly as I did without his help. Tron, you helped me a ton! Hopefully I can repay the favor.
I purchased the following:
Front Door Speakers: JBL GTO607C 6.5" 2-Way Component - 70W RMS
Rear Door Speakers: JBL GTO527 5.25" 2-Way Coaxial - 45W RMS
I had originally attempted to integrate a 4-channel amp into this mix, but was unable to do so. I might try adding an amp at a later date, but for now, I am just glad to be done with this endeavor.
To read where this all started, check out this thread: Original Thread
For the rear door speakers, I purchased a set of 5.25" speaker adapter plates and a set of .25" speaker spacers from Car Speaker Adapters. Not only are these great products, the prices are very reasonable and they have great customer service.
Front Speakers:
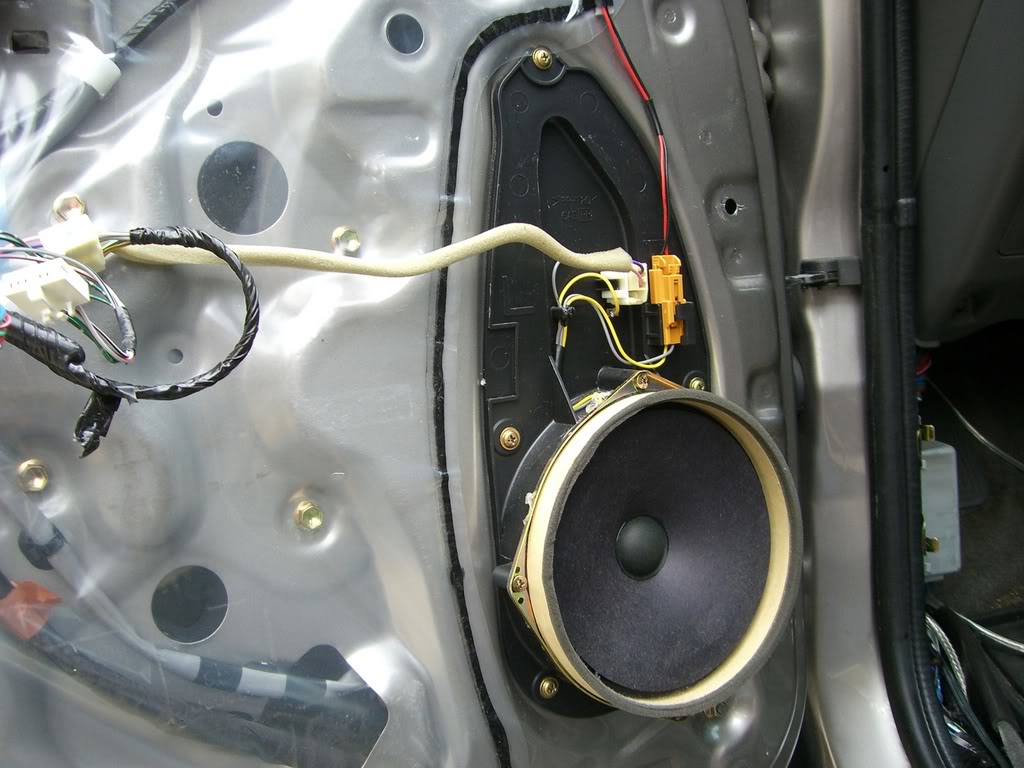
Here is a shot of the oem driver side front speaker:

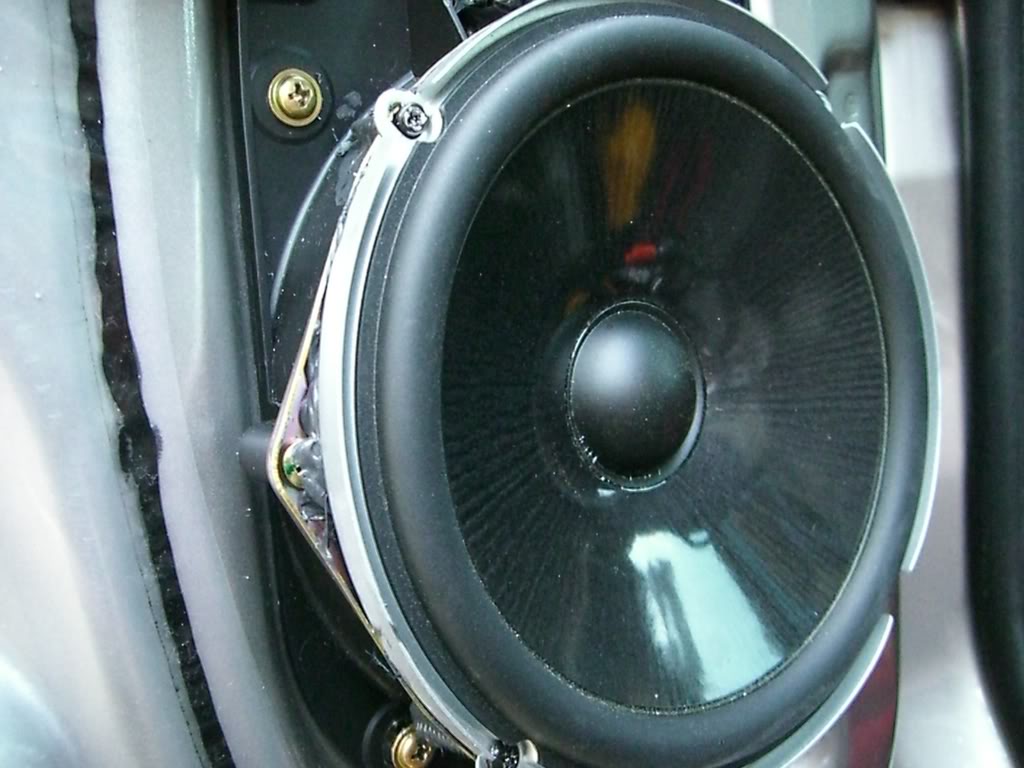
I removed the stock speaker, cut off the gold ring housing and used the ring as the mounting plate to mount the new JBLs to the speaker housing. I also placed a bead of silicone between the gold plate and speaker itself. No spacers were needed for the fronts:
Crossover installed in the door:

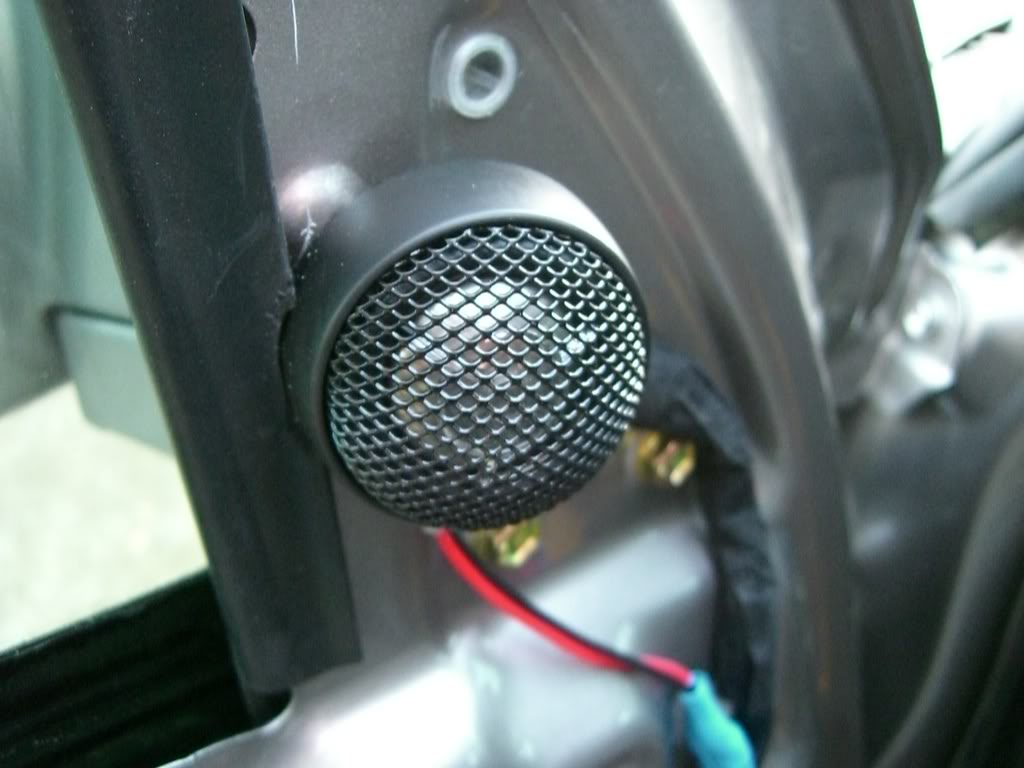
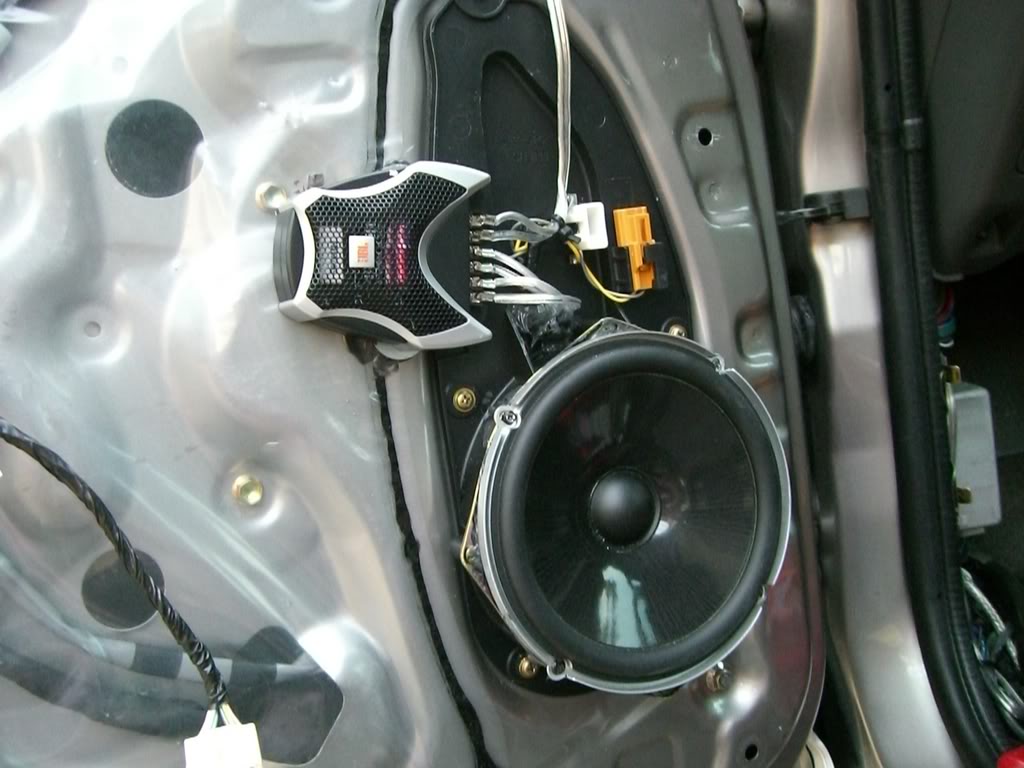
New JBL tweeter installed. This took only a small amount of trimming to fit:
Rear Speakers:
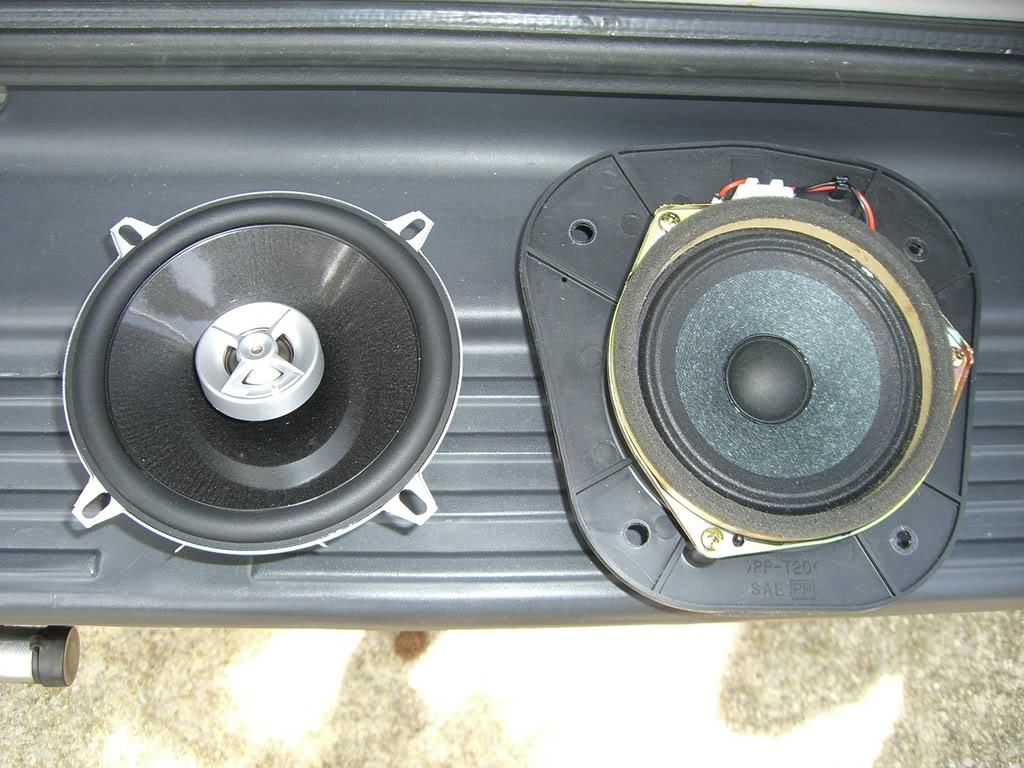
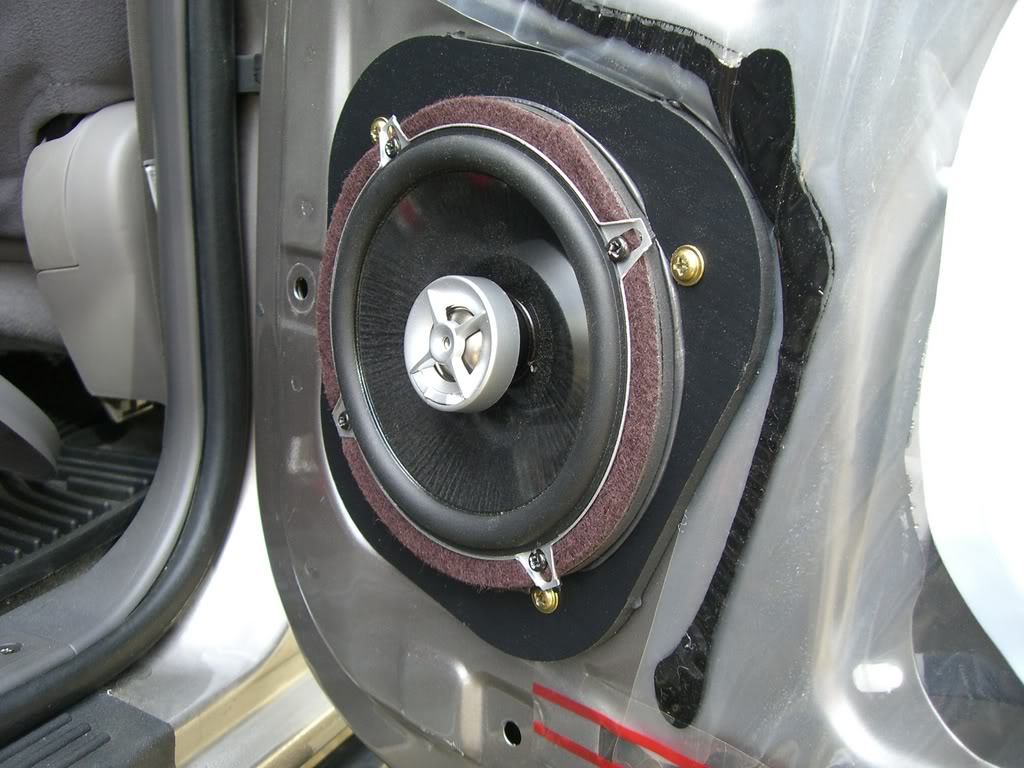
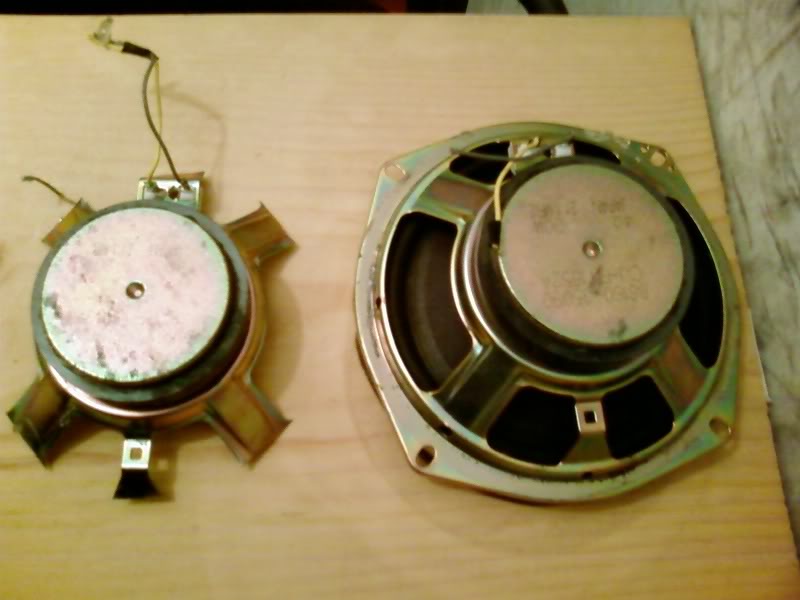
Here is a shot of the new JBL 5.25" on the left and the oem 4.25" on the right:
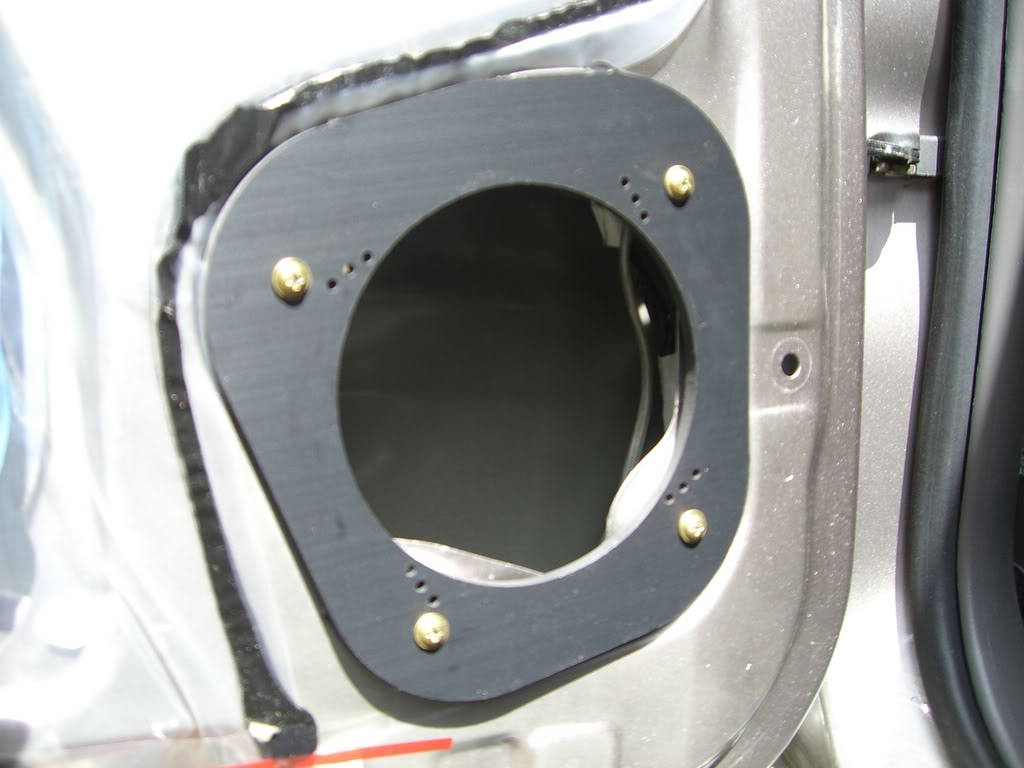
Speaker Adapter plate installed:
However, to get the new JBLs to sit out far enough so the glass would not hit the magnets when rolled down, I had to do the following:
1. First, install the adapter.
2. Next, apply a bead of silicone around the hole and place the .25" spacer on.
3. Still the speaker did not sit out far enough, so I purchased a roll of 1/8" thick, 1/4" wide felt with an adhesive backing from Lowe's and then placed that on the spacer.
4. Finally was able to mount the speaker.
Had I just purchased a set of 1/8" speaker spacers with my original order, I would not have had to buy the roll of felt.
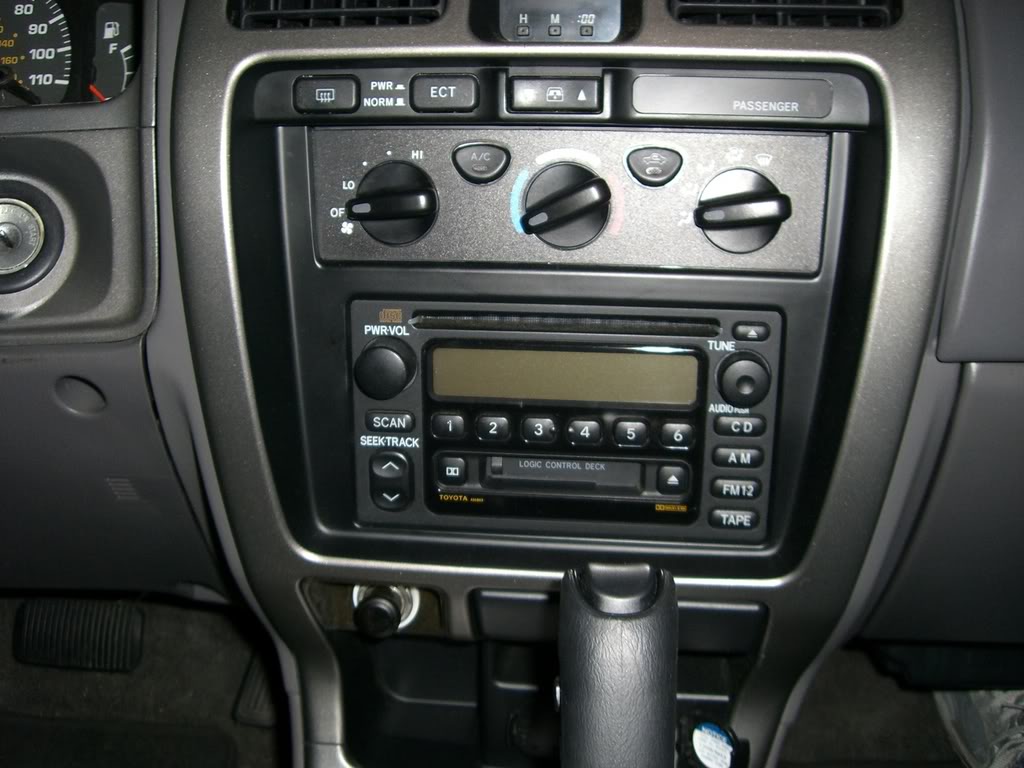
And of course, the stock HU:
I might consider upgrading my HU with an aftermarket one in a few years or so, but until then, this setup works just fine for me.
I'm still considering adding an amp to my current setup, but until I find a perfect match between speaker-to-amp-to-stock HU, I will not worry with it. From reading past threads, I'm aware some of you have already been able to accomplish this and will definitely keep you in mind when I get ready to redo my own again.
EDIT 10/3/09:
I finally got around to upgrading my stock HU to the Pioneer 4100 and added a few cameras. . Check out the write up here: https://www.yotatech.com/forums/f2/p...ameras-193146/
**
With the help of many members here and others abroad, I was able to complete this install by myself. A big thanks to Tron for all his help
. I could not have learned as much as I did, as quickly as I did without his help. Tron, you helped me a ton! Hopefully I can repay the favor.I purchased the following:
Front Door Speakers: JBL GTO607C 6.5" 2-Way Component - 70W RMS
Rear Door Speakers: JBL GTO527 5.25" 2-Way Coaxial - 45W RMS
I had originally attempted to integrate a 4-channel amp into this mix, but was unable to do so. I might try adding an amp at a later date, but for now, I am just glad to be done with this endeavor.
To read where this all started, check out this thread: Original Thread
For the rear door speakers, I purchased a set of 5.25" speaker adapter plates and a set of .25" speaker spacers from Car Speaker Adapters. Not only are these great products, the prices are very reasonable and they have great customer service.
Front Speakers:
Here is a shot of the oem driver side front speaker:
I removed the stock speaker, cut off the gold ring housing and used the ring as the mounting plate to mount the new JBLs to the speaker housing. I also placed a bead of silicone between the gold plate and speaker itself. No spacers were needed for the fronts:
Crossover installed in the door:
New JBL tweeter installed. This took only a small amount of trimming to fit:
Rear Speakers:
Here is a shot of the new JBL 5.25" on the left and the oem 4.25" on the right:
Speaker Adapter plate installed:
However, to get the new JBLs to sit out far enough so the glass would not hit the magnets when rolled down, I had to do the following:
1. First, install the adapter.
2. Next, apply a bead of silicone around the hole and place the .25" spacer on.
3. Still the speaker did not sit out far enough, so I purchased a roll of 1/8" thick, 1/4" wide felt with an adhesive backing from Lowe's and then placed that on the spacer.
4. Finally was able to mount the speaker.
Had I just purchased a set of 1/8" speaker spacers with my original order, I would not have had to buy the roll of felt.
And of course, the stock HU:
I might consider upgrading my HU with an aftermarket one in a few years or so, but until then, this setup works just fine for me.
I'm still considering adding an amp to my current setup, but until I find a perfect match between speaker-to-amp-to-stock HU, I will not worry with it. From reading past threads, I'm aware some of you have already been able to accomplish this and will definitely keep you in mind when I get ready to redo my own again.
EDIT 10/3/09:
I finally got around to upgrading my stock HU to the Pioneer 4100 and added a few cameras.
. Check out the write up here: https://www.yotatech.com/forums/f2/p...ameras-193146/**
Last edited by Rock Slide; Jul 11, 2010 at 10:21 AM.
 May 22, 2007 | 08:46 AM
#3

Registered User
Joined: Apr 2007
Posts: 56
Likes: 0
From: Arvada
Nice Write up. I changed mine out as well with some Polk Audios and an Alpine HU. Sounds awesome.
You should just do the HU upgrade, checkout Crutchfield, they send you all the harnesses and the adapters for free. The HU install is super simple, there is alot of good head units, under $200, that will make your system sound tons better than the OEM HU, that thing blows. Especially since you have nice speakers now, you will totally hear the difference.
You should just do the HU upgrade, checkout Crutchfield, they send you all the harnesses and the adapters for free. The HU install is super simple, there is alot of good head units, under $200, that will make your system sound tons better than the OEM HU, that thing blows. Especially since you have nice speakers now, you will totally hear the difference.
Last edited by Motayota; May 22, 2007 at 08:49 AM.
May 22, 2007 | 10:02 AM
#4
Thread Starter
Contributing Member
iTrader: (1)
Joined: May 2006
Posts: 2,262
Likes: 1
From: B'ham, AL
Nice Write up. I changed mine out as well with some Polk Audios and an Alpine HU. Sounds awesome.
You should just do the HU upgrade, checkout Crutchfield, they send you all the harnesses and the adapters for free. The HU install is super simple, there is alot of good head units, under $200, that will make your system sound tons better than the OEM HU, that thing blows. Especially since you have nice speakers now, you will totally hear the difference.
You should just do the HU upgrade, checkout Crutchfield, they send you all the harnesses and the adapters for free. The HU install is super simple, there is alot of good head units, under $200, that will make your system sound tons better than the OEM HU, that thing blows. Especially since you have nice speakers now, you will totally hear the difference.
As far as the HU goes, read my "Original Thread" link at the top of this thread. That will explain my situation.
Also, here's a comment I made to another member a few months back concerning the Kenwood 302 HU I tried out, but ended up returning:
When I installed all new door speakers, I wanted a new HU as well, (or at least "thought" I did) and upgraded w/ a Kenwood DPX302 as seen here:
http://www.crutchfield.com/S-nkClt2U...02&i=113DPX302
Let me just say, looks can be deceiving. I purchased this unit, installed it and after 2 days sent it back. Everything sounded great, but I could not get past the overall appearance of it. It's hard to tell in the picture, but both knobs and the piece of trim inbetween them both is all chrome. Too flashy for my taste. Second, the HU itself sits .25" - .50" further out than the stock deck does. IMO, a HU is much more appealing to the eye tucked in like the OEM unit is, rather than protuding out like this unit does. Lastly, the backlight color...everything is either blue or red. Again, I prefer to maintain a stock look and have all green lights on my HU.
Therefore, the long and short of it is, this DPX-302 HU is nice, just not my cup of tea (for lack of a better expression). If the above mentioned concerns I had with it does not bother you, then try it out. Otherwise, do not buy it.
My suggestion if you are unsure on which HU you want is, purchase one from a company that will gladly allow you to return it even if you simply don't like the look of it installed. I purchased that 302 from Crutchfield, kept it for a week and Crutchfield let me return it simply b/c I did not like how it looked installed. They even paid the shipping cost to return it.
There are a few more DPX models to choose from that might "fit" and "look" cleaner installed than the 302 does, but I did not try any of them. I simply went back with my OEM unit and could not have been more pleased. So what it's underpowered, that's why I have an aftermarket amp hooked to it.
However, if I ever decide to install another double din unit again, I'd probably go with something like this instead:
http://www.crutchfield.com/S-QqIm2Wv...rs&i=130AVICD3
Last edited by Rock Slide; May 22, 2007 at 10:05 AM.
May 23, 2007 | 09:03 AM
#6
Registered User
Joined: Apr 2007
Posts: 56
Likes: 0
From: Arvada

Trending Topics
May 23, 2007 | 11:00 AM
#8
Thread Starter
Contributing Member
iTrader: (1)
Joined: May 2006
Posts: 2,262
Likes: 1
From: B'ham, AL
Yeah, if your worried about theft or like the stock look keep it that way, I guess I like the sound of aftermarket HU, rather then their looks, most do stick out and don't match the Toyota interiors very well. A must is also having a functional IPOD interface like the Alpines.
Maybe one day though.
This was my very first stereo install...the cool thing was, it was fairly easy to do. The hardest part was making everything look "clean".
May 23, 2007 | 05:06 PM
#9

Contributing Member
Joined: Dec 2004
Posts: 2,057
Likes: 1
From: Tempe, AZ
Im trying to install components in my taco and im having a HELL of a time doing so.
Can you go into more detail of how you mounted the woofer in the front door? I tried using the supplied adaptor kit with my speakers (alpine type -rs) but the door panel wont fit back on right. I tried triimming everything and im just not having any luck. I think the speaker adaptor is too thick and is causing the problem..
Can you go into more detail of how you mounted the woofer in the front door? I tried using the supplied adaptor kit with my speakers (alpine type -rs) but the door panel wont fit back on right. I tried triimming everything and im just not having any luck. I think the speaker adaptor is too thick and is causing the problem..
May 23, 2007 | 05:16 PM
#10
Registered User
Joined: Jul 2006
Posts: 371
Likes: 0
From: Lake Ontario
Question: did you keep the stock speaker covers/grilles? If not, what do you think one can do to keep it looking stock?
I've been following your thread(s) very closely and have been saving them on my PC as they progress. You and the folks that contribute information get a huge thank you and thumbs up from me. I'm a complete novice in regards to audio installs and this is priceless...and while I don't have the money right now, I'm looking to upgrade my sound system in the future, all while keeping a completely OEM look.
Why?
See where I live Vehicles get broken into ALL the time around here just for the HU alone, usually there's no time for the speakers. Smash window, rip out headunit, flee. Repeat.
If it looks stock, they'll leave it alone.
I've been following your thread(s) very closely and have been saving them on my PC as they progress. You and the folks that contribute information get a huge thank you and thumbs up from me. I'm a complete novice in regards to audio installs and this is priceless...and while I don't have the money right now, I'm looking to upgrade my sound system in the future, all while keeping a completely OEM look.
Why?
See where I live
Vehicles get broken into ALL the time around here just for the HU alone, usually there's no time for the speakers. Smash window, rip out headunit, flee. Repeat.If it looks stock, they'll leave it alone.
Last edited by nick-m; May 23, 2007 at 05:17 PM.
May 24, 2007 | 05:39 AM
#11
Thread Starter
Contributing Member
iTrader: (1)
Joined: May 2006
Posts: 2,262
Likes: 1
From: B'ham, AL
Im trying to install components in my taco and im having a HELL of a time doing so.
Can you go into more detail of how you mounted the woofer in the front door? I tried using the supplied adaptor kit with my speakers (alpine type -rs) but the door panel wont fit back on right. I tried triimming everything and im just not having any luck. I think the speaker adaptor is too thick and is causing the problem..
Can you go into more detail of how you mounted the woofer in the front door? I tried using the supplied adaptor kit with my speakers (alpine type -rs) but the door panel wont fit back on right. I tried triimming everything and im just not having any luck. I think the speaker adaptor is too thick and is causing the problem..
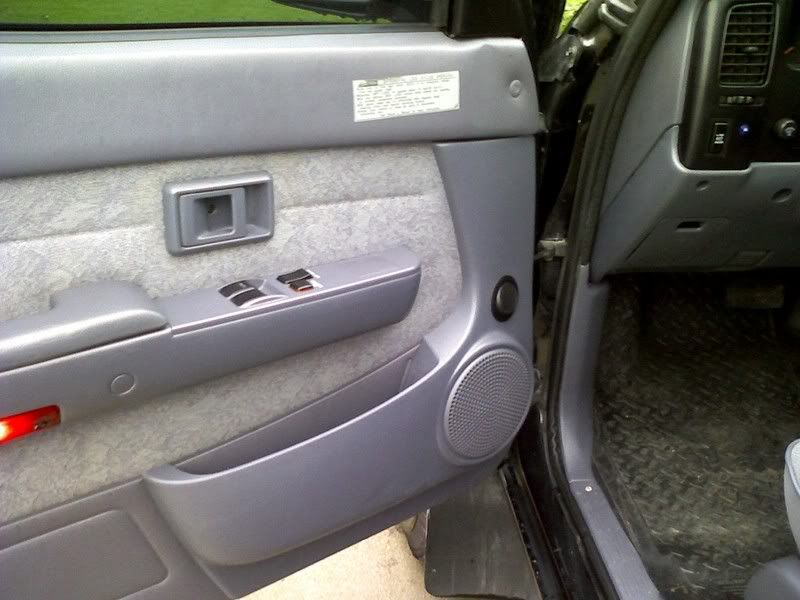
This of course is the stock photo. Everything is factory in this picture:
This is what I did:
1. I removed that big black oem speaker housing.
2. I removed the oem speaker from the black housing.
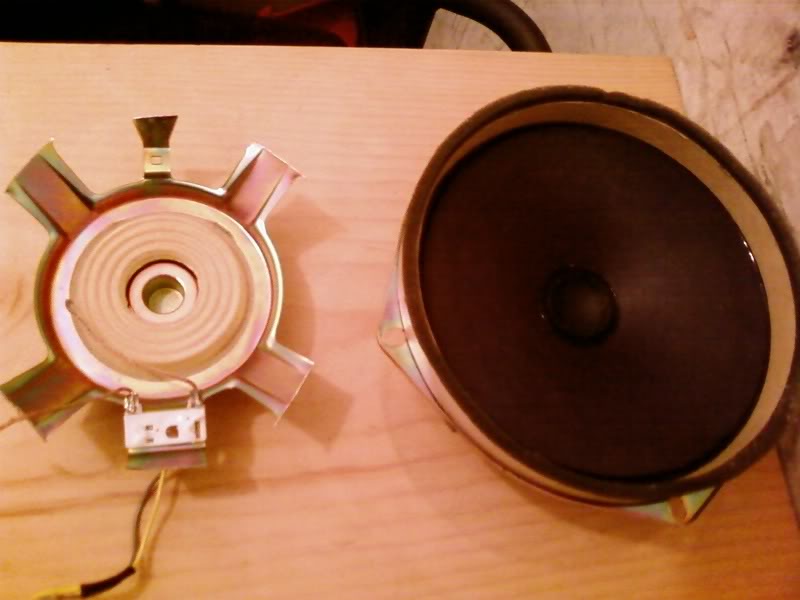
3. I lliterally cut off the gold ring of the oem speaker using a pair of snips. (This gold ring is actually part of the entire speaker.) This ring will now be the mounting point for the new JBLs.
4. I drilled 4 small holes in the gold ring that would line up with the 4 holes already in the new speakers.
5. Now that the gold ring was finished, I placed a bead of silicone between the gold ring and black speaker housing and then screwed the gold ring into the same holes on the housing where it originally sat.
6. I let that dry, then placed a bead of silicone on the top of the gold ring, mounted the speaker on the ring and then screwed it down in the new mounting holes I previously drilled in the gold ring.
Now look at this picture...you can actually see 2 black screws going into 2 of the new holes I drilled into the gold ring. (Top of picture & bottom of picture) The gold screw is the oem screw. This hole was already there. As you can see at the very bottom of the picture, the black screw does not actually screw into the black housing. It is just to hold the speaker to the gold ring. That is how the other 3 black screws are set. That's also another reason for all the silicone. I did not want this speaker falling out:

Fortunately, the new JBLs were very similar in size to the old speakers, so I did not need any spacers to keep the window from hitting it. I did do a little trimming to the inside of the door panel, but it was more for precaution. Wanted to make sure that panel did not touch the speaker.
Again, here is a picture from the first post w/ everything installed:
If you need me to, I can take a picture tonight of how my old speakers now look to give you a better idea what I snipped off if that helps. I still have them laying around somewhere.
And for a picture of the ring, check out Steve's write up on his install: Steve's install
May 24, 2007 | 05:57 AM
#12
Thread Starter
Contributing Member
iTrader: (1)
Joined: May 2006
Posts: 2,262
Likes: 1
From: B'ham, AL
Question: did you keep the stock speaker covers/grilles? If not, what do you think one can do to keep it looking stock?
I've been following your thread(s) very closely and have been saving them on my PC as they progress. You and the folks that contribute information get a huge thank you and thumbs up from me. I'm a complete novice in regards to audio installs and this is priceless...and while I don't have the money right now, I'm looking to upgrade my sound system in the future, all while keeping a completely OEM look.
Why?
See where I live Vehicles get broken into ALL the time around here just for the HU alone, usually there's no time for the speakers. Smash window, rip out headunit, flee. Repeat.
If it looks stock, they'll leave it alone.
I've been following your thread(s) very closely and have been saving them on my PC as they progress. You and the folks that contribute information get a huge thank you and thumbs up from me. I'm a complete novice in regards to audio installs and this is priceless...and while I don't have the money right now, I'm looking to upgrade my sound system in the future, all while keeping a completely OEM look.
Why?
See where I live
Vehicles get broken into ALL the time around here just for the HU alone, usually there's no time for the speakers. Smash window, rip out headunit, flee. Repeat.If it looks stock, they'll leave it alone.
Nick, thanks for the complements! I enjoy modding my 4Runner and any chance I get to help others out, I try my best to do my part.
I'm sure you do get a lot of break ins where you live...which really sucks. I live in a fairly "theft free" area, but still, theives live everywhere and I like to take every precaution I can. Thus the decision I made to keep my oem HU.
You said:
Question: did you keep the stock speaker covers/grilles? If not, what do you think one can do to keep it looking stock?
Not sure what you mean. The stock speaker grilles are actually made into the door panels. Therefore, the only way to take them off is to cut them out.
So what I did was chunk the new JBL speaker covers and just slap the door panels back on. You'd never know I had aftermarket speaker just by looking at the door panel. You'd have to actually remove the the door panel to see them.
As far as the tweeters go, the new JBL tweets were able to fit in the same black speaker cover that the oem ones sat in. Again, you would not know I had aftermarket tweets just by looking at those black, triangluar covers.
Hope that helps
May 24, 2007 | 06:11 PM
#13
Contributing Member
Joined: Dec 2004
Posts: 2,057
Likes: 1
From: Tempe, AZ
So i followed your advice and cut off the gold ring on the stock speaker..How did you manage to get the wooden piece and the rest of the speaker coke off of the speaker? with a heatgun or what?
May 25, 2007 | 06:11 AM
#14
Thread Starter
Contributing Member
iTrader: (1)
Joined: May 2006
Posts: 2,262
Likes: 1
From: B'ham, AL
Don't worry about having to save this wood piece for later...you will not need it. You have already cut up your speaker in such a way, that your speaker cannot be be reused anway.
Good question though.
For anyone who is unsure what the gold ring is we are discussing, here are 2 comparison photos. These were taken when I had cut only one gold ring off:
 May 26, 2007 | 04:01 PM
#15
Contributing Member
Joined: Dec 2004
Posts: 2,057
Likes: 1
From: Tempe, AZ
Rock Slide..thanks a million for your help i would have NEVER finished this without your handy tip about cutting the stock speakers apart.
not to hijack your thread but heres my finished install in my taco:
Specs:
Alpine Type-R 6.5" Components
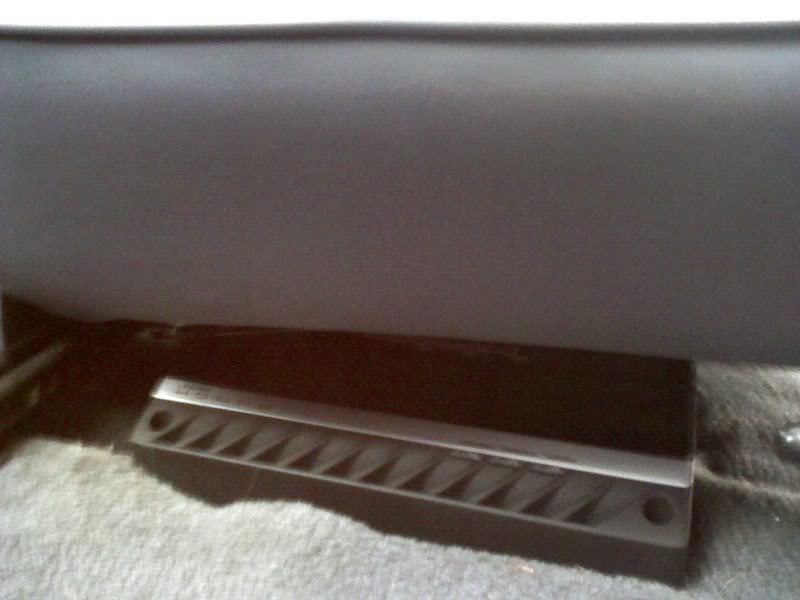
Rockford Fostage P400-2 Amp (100 watts RMS x2)
The amp fit PERFECTLY under the seat great choice for mounting there.
The tweeters are in the door panel becauase I have a taco and have no stock tweeter location. They fit perfectly there and dont look too bad IMO
thanks again for your help!
not to hijack your thread but heres my finished install in my taco:
Specs:
Alpine Type-R 6.5" Components
Rockford Fostage P400-2 Amp (100 watts RMS x2)
The amp fit PERFECTLY under the seat great choice for mounting there.
The tweeters are in the door panel becauase I have a taco and have no stock tweeter location. They fit perfectly there and dont look too bad IMO
thanks again for your help!
May 27, 2007 | 11:36 AM
#17

Registered User
Joined: Apr 2007
Posts: 53
Likes: 0
From: Milwaukee, WI
Rock Slide,
How do you like the overall sound quality of the JBL speakers? Ive been thinking about a simlar upgrade, along with a Scion headunit. Just trying to gauge how those particular speakers sound since no stores around me have them in stock to listen to. Ive been quite happy with other JBL products in the past.
How do you like the overall sound quality of the JBL speakers? Ive been thinking about a simlar upgrade, along with a Scion headunit. Just trying to gauge how those particular speakers sound since no stores around me have them in stock to listen to. Ive been quite happy with other JBL products in the past.
May 29, 2007 | 06:08 AM
#18
Thread Starter
Contributing Member
iTrader: (1)
Joined: May 2006
Posts: 2,262
Likes: 1
From: B'ham, AL
Rock Slide,
How do you like the overall sound quality of the JBL speakers? Ive been thinking about a simlar upgrade, along with a Scion headunit. Just trying to gauge how those particular speakers sound since no stores around me have them in stock to listen to. Ive been quite happy with other JBL products in the past.
How do you like the overall sound quality of the JBL speakers? Ive been thinking about a simlar upgrade, along with a Scion headunit. Just trying to gauge how those particular speakers sound since no stores around me have them in stock to listen to. Ive been quite happy with other JBL products in the past.
That being said, I've been very pleased with the JBLs...much better than stock. For the price, they could not be beat. Got them for half what Crutchfield wanted for them.
Unless you already know of a place you can purchase a set of JBLs, shop around online for them. I was able to save close to $150 buying both front and rear sets from different online stores rather than buying them both from Crutchfield.
Last edited by Rock Slide; May 29, 2007 at 06:10 AM.
May 30, 2007 | 08:35 AM
#19
Registered User
Joined: Nov 2005
Posts: 1,072
Likes: 0
From: NOW, Havasu!
What did you do with the original tweeters? Or did you not have them? I'm doing this soon and I was wondering if people disconnect them or just keep them in line? I saw that you were going to go through Crutchfield. The only thing with them is that they give you the adapeters for free "well not really when you consider speaker cost" when you purchase from them. I guess it wouldn't matter if you can fab it yourself.
May 30, 2007 | 09:46 AM
#20
Thread Starter
Contributing Member
iTrader: (1)
Joined: May 2006
Posts: 2,262
Likes: 1
From: B'ham, AL
What did you do with the original tweeters? Or did you not have them? I'm doing this soon and I was wondering if people disconnect them or just keep them in line? I saw that you were going to go through Crutchfield. The only thing with them is that they give you the adapeters for free "well not really when you consider speaker cost" when you purchase from them. I guess it wouldn't matter if you can fab it yourself.
When I purchased my door speakers, I went to Crutchfield to get an idea on reviews, specs and so on. Crutchfield wanted $200 for the fronts and $100 for the rears. I shopped around online and found the fronts for $120 and rears for $55. I've used Crutchfield in the past and had a great experience with them...however, it also pays to shop around.

As far as the spacers and rear door adapters are concerned, I got everything for around $15 shipped from: http://mjmautoinnovations.com/
Last edited by Rock Slide; May 30, 2007 at 09:47 AM.


