2002 LT Taco Build-Up
 03-15-2007, 06:18 AM
#101
Contributing Member
Thread Starter
Join Date: Oct 2005
Location: Smoky San Diego
Posts: 2,346
Likes: 0
Received 0 Likes
on
0 Posts
It's done......
The only change I wound up getting to my shocks was a flutter shim on the compression side which has smoothed out the small stuff so it the road contact is much better. The rear tire carrier wasn't what I was expecting but it's pretty stout and still have a closeable tailgate.
The belly pan is BEEFY 3/16" plate under the engine up to the steering rack and the second part stretches from there to my transfercase. I feel protected now.
The sliders are back on, looks pretty good IMO. No pictures because I don't have personal computer access, but check out www.weldtecdesigns.com and see if Jeremy put some pics of my truck up there. I'll take a look at his site and try and get direct links to the pics today.
The only change I wound up getting to my shocks was a flutter shim on the compression side which has smoothed out the small stuff so it the road contact is much better. The rear tire carrier wasn't what I was expecting but it's pretty stout and still have a closeable tailgate.
The belly pan is BEEFY
3/16" plate under the engine up to the steering rack and the second part stretches from there to my transfercase. I feel protected now.The sliders are back on, looks pretty good IMO. No pictures because I don't have personal computer access, but check out www.weldtecdesigns.com and see if Jeremy put some pics of my truck up there. I'll take a look at his site and try and get direct links to the pics today.


 03-24-2007, 09:57 AM
#105
Contributing Member
Thread Starter
Join Date: Oct 2005
Location: Smoky San Diego
Posts: 2,346
Likes: 0
Received 0 Likes
on
0 Posts
Got a couple when my I dropped the truck off in Pennsylvania today...
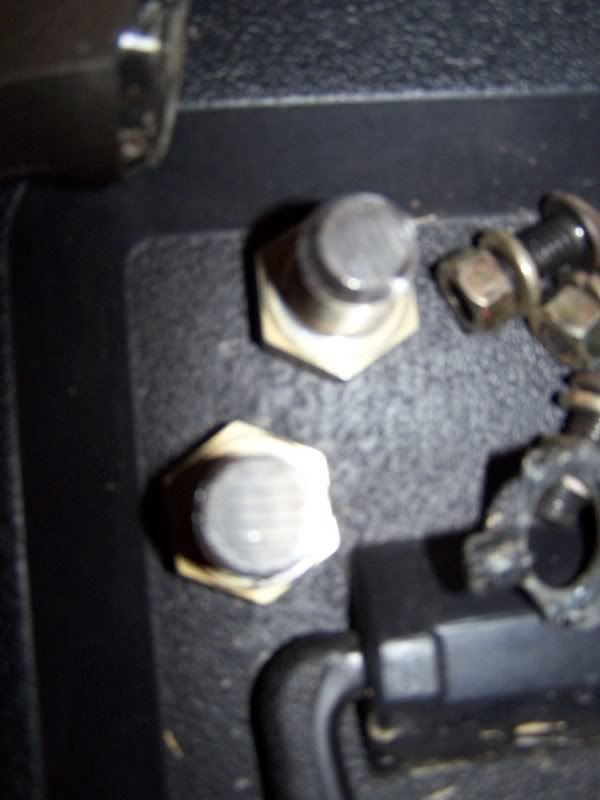
BEEFY bolts to hold both plates to the crossmember.
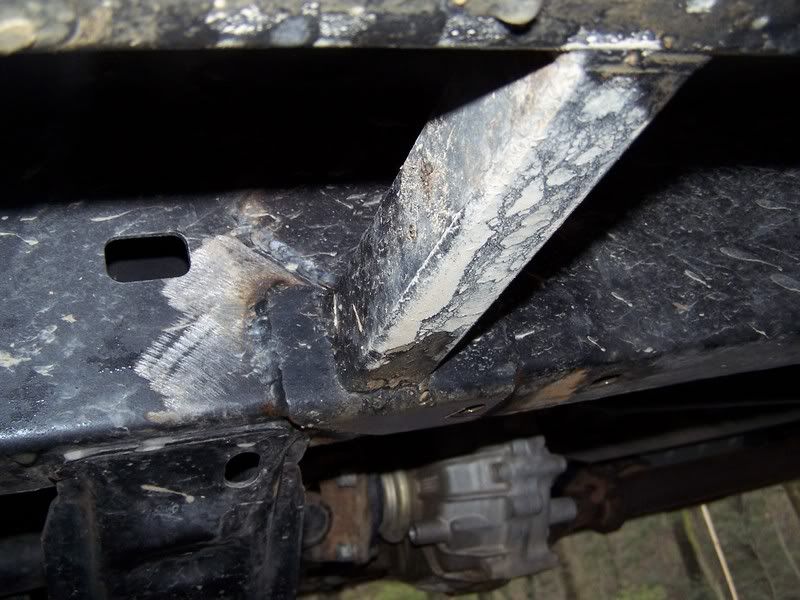
The smaller one goes from the front bumper to just forward of the steering rack and is 3/16" steel. The larger one is 1/8" and slightly overlaps the first one and then attaches to the very back of the transfercase.
You can still see where the old scab plates are for when I had my 2" body lift
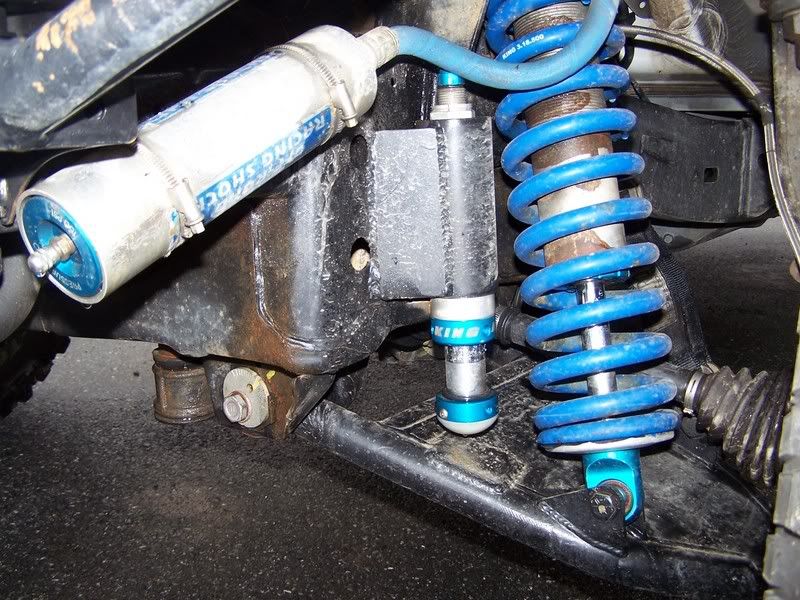
King 2" air bumps and new resevoir brackets
BEEFY bolts to hold both plates to the crossmember.
The smaller one goes from the front bumper to just forward of the steering rack and is 3/16" steel. The larger one is 1/8" and slightly overlaps the first one and then attaches to the very back of the transfercase.
You can still see where the old scab plates are for when I had my 2" body lift
King 2" air bumps and new resevoir brackets
 03-29-2007, 11:22 PM
#108
Contributing Member
Thread Starter
Join Date: Oct 2005
Location: Smoky San Diego
Posts: 2,346
Likes: 0
Received 0 Likes
on
0 Posts
I'll ask my Dad to bolt it up and snap a couple pictures for me.
For anyone just joining this thread, the truck is not physically near me at the time, hence the reason why I need someone else to do it for me right now.
For anyone just joining this thread, the truck is not physically near me at the time, hence the reason why I need someone else to do it for me right now.

Thread
Thread Starter
Forum
Replies
Last Post
Toys4parts
86-95 Trucks & 4Runners (Build-Up Section)
2
09-26-2015 01:56 PM


