

 Mar 31, 2016, 03:51 PM
Last edit by: IB Advertising
See related guides and technical advice from our community experts:
- Toyota Tundra How to Install HID Headlights<br>Step by step instructions for do-it-yourself repairs.
- Toyota Tundra How to Install Halo Headlights<br>Step by step instructions for do-it-yourself repairs.

2005 Tundra HID Retrofit Progress
Sep 26, 2008 | 03:29 PM
#1
Thread Starter
Contributing Member
Joined: Nov 2004
Posts: 1,748
Likes: 0
2005 Tundra HID Retrofit Progress
This is copied from tundrasolutions.com  Figured I would share it here, and hopefully convince people to do a retrofit instead of the "Plug and play blindness" kits.
Here is the thread on tundrasolutions, in case anyone is curious of other user comments and discussion http://www.tundrasolutions.com/forum...ofit-progress/
Ballasts: eBay, Nissan OEM - $135 for a pair
Bulbs: eBay, 4300k D2S - $50 for a pair
Potting Compound: mouser.com, Part Number 590-832-TC-450ML - $32.95
Temp OEM Toyota headlights: eBay, $85 (This price includes both the passenger and drivers side)
The ballasts I bought are from a Nissan Altima (or pretty much any other Nissan with HID's). When installed in the original vehicle they are sealed inside the headlight housing and are not subject to the engine bay at all. In my situation they will be mounted on the left and right inner fenders (next to battery, and next to airbox). I regularly wash out my engine bay with a pressure washer so I wanted to make sure they would not be ruined, or have the potential to shock or cause a fire. This is where potting comes in. Potting fills the entire ballast enclosure with a thermal conducting / electrical insulating epoxy. Fill the enclosure with epoxy so it won't fill up with water
Here is one ballast as it comes from the factory. Power connection on the side, bulb igniter connection on the flat face.


Notice how there is an open gap along the plug, and the plug itself is not weather resistant.
First things first, open up the enclosure. Only three screws around the perimeter of the case, and then I had to pull the two pieces apart. It took a lot of force, Nissan had applied some really strong sealant to weather proof these. I found out these ballasts are already potted from the factory, but notice that not all the electrical components are covered. Also notice that this ballast had already leaked, so even what Nissan did to prevent water intrusion did not work.

In order to get the best possible seal I needed to drill a few holes in the bottom side of the enclosure. This way the epoxy will fill all the crevices inside.

I screwed it all back together

Then I mix up the epoxy and pour it in the enclosure. I do not have any pictures of this process because I did not want the camera to get dirty. The epoxy is a mess to deal with. To speed up drying time I stuck them in the oven at 180 degrees for an hour.
I also sealed the ignitors (the silver connector in the pictures) using the same process.
Here is what it looks like all finished. And yes, after being in the oven, both ballasts still work fine. The directions on the bottle of epoxy say to wait 30 minutes before pouring to get rid of air bubbles, they mean it If you look at my pictures below, you can see the surface bubbles. Not the cleanest look, but they will be facing the fender so I really don't care.


Just for reference, this is what a D2S HID bulb looks like.

Ok, well I finally got my truck back from the body shop today (getting fixed after an accident). So I got to work on installing the ballasts. I used #8 1 1/2 inch zinc screws with nylon spacers, and nylon screw grommets. Some of the pictures are a bit fuzzy, I need play with my camera settings more and find a way to manually focus.
First I cut the holes for the screw grommets.

Here are the three grommets for the drivers side installed.

What it looks like from behind.

And the drivers side ballast mounted.


The passengers side ballast mounted.

I have still not found out a way to get the high beam indicator to light up when I have both the high and low beams on. But I'll deal with it until a solution is found.
Figured I would share it here, and hopefully convince people to do a retrofit instead of the "Plug and play blindness" kits.Here is the thread on tundrasolutions, in case anyone is curious of other user comments and discussion
http://www.tundrasolutions.com/forum...ofit-progress/Ballasts: eBay, Nissan OEM - $135 for a pair
Bulbs: eBay, 4300k D2S - $50 for a pair
Potting Compound: mouser.com, Part Number 590-832-TC-450ML - $32.95
Temp OEM Toyota headlights: eBay, $85 (This price includes both the passenger and drivers side)
The ballasts I bought are from a Nissan Altima (or pretty much any other Nissan with HID's). When installed in the original vehicle they are sealed inside the headlight housing and are not subject to the engine bay at all. In my situation they will be mounted on the left and right inner fenders (next to battery, and next to airbox). I regularly wash out my engine bay with a pressure washer so I wanted to make sure they would not be ruined, or have the potential to shock or cause a fire. This is where potting comes in. Potting fills the entire ballast enclosure with a thermal conducting / electrical insulating epoxy. Fill the enclosure with epoxy so it won't fill up with water
Here is one ballast as it comes from the factory. Power connection on the side, bulb igniter connection on the flat face.
Notice how there is an open gap along the plug, and the plug itself is not weather resistant.
First things first, open up the enclosure. Only three screws around the perimeter of the case, and then I had to pull the two pieces apart. It took a lot of force, Nissan had applied some really strong sealant to weather proof these. I found out these ballasts are already potted from the factory, but notice that not all the electrical components are covered. Also notice that this ballast had already leaked, so even what Nissan did to prevent water intrusion did not work.
In order to get the best possible seal I needed to drill a few holes in the bottom side of the enclosure. This way the epoxy will fill all the crevices inside.
I screwed it all back together
Then I mix up the epoxy and pour it in the enclosure. I do not have any pictures of this process because I did not want the camera to get dirty. The epoxy is a mess to deal with. To speed up drying time I stuck them in the oven at 180 degrees for an hour.
I also sealed the ignitors (the silver connector in the pictures) using the same process.
Here is what it looks like all finished. And yes, after being in the oven, both ballasts still work fine. The directions on the bottle of epoxy say to wait 30 minutes before pouring to get rid of air bubbles, they mean it
If you look at my pictures below, you can see the surface bubbles. Not the cleanest look, but they will be facing the fender so I really don't care.Just for reference, this is what a D2S HID bulb looks like.
Ok, well I finally got my truck back from the body shop today (getting fixed after an accident). So I got to work on installing the ballasts. I used #8 1 1/2 inch zinc screws with nylon spacers, and nylon screw grommets. Some of the pictures are a bit fuzzy, I need play with my camera settings more and find a way to manually focus.
First I cut the holes for the screw grommets.
Here are the three grommets for the drivers side installed.
What it looks like from behind.
And the drivers side ballast mounted.
The passengers side ballast mounted.
I have still not found out a way to get the high beam indicator to light up when I have both the high and low beams on. But I'll deal with it until a solution is found.
Last edited by dibble9012; Sep 26, 2008 at 03:33 PM.
Sep 26, 2008 | 03:31 PM
#2
Thread Starter
Contributing Member
Joined: Nov 2004
Posts: 1,748
Likes: 0
All I have left to do is actually get the headlights retrofitted I will be using FX bi-xenon projectors with gatling gun shrouds. It will look like this when finished, except I will leave my housings chrome. I got the design idea from kaleo's retrofit here: http://www.tundrasolutions.com/forum...-05-tundra-dc/
I will be using FX bi-xenon projectors with gatling gun shrouds. It will look like this when finished, except I will leave my housings chrome. I got the design idea from kaleo's retrofit here: http://www.tundrasolutions.com/forum...-05-tundra-dc/
 Sep 30, 2008 | 07:30 AM
#4
Thread Starter
Contributing Member
Joined: Nov 2004
Posts: 1,748
Likes: 0
Just made the harnesses for the ballasts. The H4 connector (bottom of picture) connects to my upgraded harness that I installed earlier. The connector in the middle of the picture will connect to the projector solenoid, and finally the top connector connects to the Nissan Ballast. These make install quick and clean. I have designed all of my electrical add-ons in the engine compartment to be removable. If I ever needed or wanted to remove the aux fuse box, HID's, circuit breakers, relays, and driving lights; it would be as simple as unscrewing a few screws and unplugging the connectors from the stock wiring. NONE of the stock wiring has ever been cut into at all

Sep 30, 2008 | 07:30 AM
#5
Thread Starter
Contributing Member
Joined: Nov 2004
Posts: 1,748
Likes: 0
Have not gotten the projectors yet, but I wanted to play around and see how I would seal up the back of the headlight so moisture does not come into contact with the projector bowl (which will stick out the back). Found this at home depot, and it looks like it will do the job well. May have to shorten it a bit because the projector should not stick out that far. The stock bulb seal fits on the end
EDIT: Ended up not needing these!
EDIT: Ended up not needing these!
Last edited by dibble9012; Oct 22, 2008 at 10:30 AM.
Oct 3, 2008 | 10:23 AM
#6
Thread Starter
Contributing Member
Joined: Nov 2004
Posts: 1,748
Likes: 0
Tested the electrical part of the project today. Worked as planned The wires/fuses on my upgraded harness are rated for 20 amps for low beam, and 20 amps for high beam. It's really convenient the way this is set up. It took me less than 10 minutes to plug in the ballast harness to the upgraded harness from before, plug in the bulbs, take a picture, and reconnect the stock halogens/take HID bulbs out.
Now all I need are the projector headlights I really like the start up sound of these things too. m-o-r-e power!

Tonight I worked on getting the HID's to stay on with the high beams, and getting the high beam indicator on the dash to light up properly. I finally succeeded after some trial and error. I needed an extra relay to add resistance on the high beam wire. Anyways, I'm writing up a small diagram for my own reference, and I'll post that as well
Here's a diagram I wrote up, I'll double check it tomorrow (it's almost midnight, I'm tired). It's quite complicated because I have other driving lights, let me know if there are any questions. With this setup the high beam indicator will light, and the HID's will stay on while the high beams are on. I added a switch in the engine bay so I could be able to switch between "halogen" and "HID" modes (Halogen, the low beams turn off when the highs are turned on; HID, the low beams stay on when the high beams are turned on.) This could come in useful if my truck won't pass inspection with the HID's. Just plop in my old headlights and bulbs, flip the switch, and get it re-inspected.
LINK
The wires/fuses on my upgraded harness are rated for 20 amps for low beam, and 20 amps for high beam. It's really convenient the way this is set up. It took me less than 10 minutes to plug in the ballast harness to the upgraded harness from before, plug in the bulbs, take a picture, and reconnect the stock halogens/take HID bulbs out.Now all I need are the projector headlights
I really like the start up sound of these things too. m-o-r-e power!Tonight I worked on getting the HID's to stay on with the high beams, and getting the high beam indicator on the dash to light up properly. I finally succeeded after some trial and error. I needed an extra relay to add resistance on the high beam wire. Anyways, I'm writing up a small diagram for my own reference, and I'll post that as well
Here's a diagram I wrote up, I'll double check it tomorrow (it's almost midnight, I'm tired). It's quite complicated because I have other driving lights, let me know if there are any questions. With this setup the high beam indicator will light, and the HID's will stay on while the high beams are on. I added a switch in the engine bay so I could be able to switch between "halogen" and "HID" modes (Halogen, the low beams turn off when the highs are turned on; HID, the low beams stay on when the high beams are turned on.) This could come in useful if my truck won't pass inspection with the HID's. Just plop in my old headlights and bulbs, flip the switch, and get it re-inspected.
LINK
Trending Topics
Oct 14, 2008 | 03:39 PM
#8
Thread Starter
Contributing Member
Joined: Nov 2004
Posts: 1,748
Likes: 0
Ok, well I figured I'd give it a shot on one of my extra headlights. I was surprised how easily the headlight comes apart. I put it in the oven at 250F for 8 minutes, on a piece of cardboard. Pulled the lense off with a putty knife and a straight edge screwdriver. There are also 2 #15 torx screws to remove. The aiming bolts are a #8 socket.
The bulb shield is removed by squeezing the two prongs of the shield, and unsnapping it. No screws.
So my first step has worked well, next I will be mounting the projectors probably on Thursday.
As a side note, I plan on adding a raintracker automatic headlight and wiper control system as a part of the HID system. Hopefully integrating the stock Sequoia light stalk that has the "auto" switch.
Last edited by dibble9012; Oct 14, 2008 at 04:00 PM.
Oct 16, 2008 | 09:31 PM
#9
Thread Starter
Contributing Member
Joined: Nov 2004
Posts: 1,748
Likes: 0
OK, been working on the project tonight, pictures soon The passenger side headlight is pretty much done. I Just need to do a little cosmetic stuff, and put it all back together. Road tested, and it seems like a good beam pattern, I need to go to a side of a building to make sure it's right. The pictures I took are not much of a "step by step" approach because this was all new to me. When I do the driver side headlight I will take detailed pictures. I'm really happy how it has turned out so far, REALLY happy. I was nervous I was going to screw one of the projectors or headlights up.
Now my plan of action is to retrofit my extra headlight reflectors (there are no modifications needed to the rear housing). Then once I am done, I will take apart the original headlamps and replace the reflector, and put them back together. My extra headlights have broken mounting tabs, otherwise I would just retrofit them completely.
The passenger side headlight is pretty much done. I Just need to do a little cosmetic stuff, and put it all back together. Road tested, and it seems like a good beam pattern, I need to go to a side of a building to make sure it's right. The pictures I took are not much of a "step by step" approach because this was all new to me. When I do the driver side headlight I will take detailed pictures. I'm really happy how it has turned out so far, REALLY happy. I was nervous I was going to screw one of the projectors or headlights up.Now my plan of action is to retrofit my extra headlight reflectors (there are no modifications needed to the rear housing). Then once I am done, I will take apart the original headlamps and replace the reflector, and put them back together. My extra headlights have broken mounting tabs, otherwise I would just retrofit them completely.
Oct 16, 2008 | 09:31 PM
#10
Thread Starter
Contributing Member
Joined: Nov 2004
Posts: 1,748
Likes: 0
Projectors and shrouds. I cut off all non-essential mounts on the projectors. (the pictures show the stock projectors, not trimmed)


I can use the stock bulb seal!

I can use the stock bulb seal!
Last edited by dibble9012; Oct 25, 2008 at 05:35 PM.
Oct 20, 2008 | 07:22 PM
#11
Thread Starter
Contributing Member
Joined: Nov 2004
Posts: 1,748
Likes: 0
Test fit passenger side. Tonight I will test beam pattern again, with both new headlights installed. One of the projectors I am going to try to exchange at the place I bought them. (They gave me two with different cutoff shields).
I'm thinking of removing the light bar once I have the HID's installed. I think with the projectors there are too many round lights on the front, I'll see once it's all done.
I'm thinking of removing the light bar once I have the HID's installed. I think with the projectors there are too many round lights on the front, I'll see once it's all done.
Last edited by dibble9012; Oct 25, 2008 at 05:36 PM.
Oct 20, 2008 | 07:23 PM
#12
Thread Starter
Contributing Member
Joined: Nov 2004
Posts: 1,748
Likes: 0
Busy this week so I probably won't be working on it that much. I got both projectors installed, now I just have to tweak the projector alignment. The driver side is a tilted a little, so I need to fix that. I'm glad I could use the stock bulb seal, I did have to trim it a bit though. Just because the size of an H4 connector is a bit smaller than the ignitor connector. I have clear lenses coming in tomorrow. This will give a sharper cutoff and more color in the cutoff.
I also got a chance to really test my harness. Everything works as expected, high beams don't deactivate the ballasts, and the high beam indicator lamp works as it should.
Here you can see the difference between the two cutoffs. The yellow cutoff is a "pre recall" projector.

I also got a chance to really test my harness. Everything works as expected, high beams don't deactivate the ballasts, and the high beam indicator lamp works as it should.
Here you can see the difference between the two cutoffs. The yellow cutoff is a "pre recall" projector.
Last edited by dibble9012; Oct 25, 2008 at 05:38 PM.
Oct 20, 2008 | 07:23 PM
#13
Thread Starter
Contributing Member
Joined: Nov 2004
Posts: 1,748
Likes: 0
The replacement projector shield should be here later this week, so both projectors will have the same cutoff.
This is where I bought my projectors and lenses: The Retrofit Source (U.S.) -- Welcome to The Retrofit Source Store - The Retrofit Source
They were very helpful and fixed my shield issue quickly
Worked on the beam color and cutoff a little bit tonight. I installed the clear lenses onto both projectors, I'm shocked at the difference it made! Now I'm second guessing myself. I asked the place I bought these to swap out my shield that is pre recall to a post recall shield. Now after I install the clear lense, it looks like the pre recall shield produces the best cutoff. I'll see if I can send them back the replacement shield which should be here tomorrow, for a pre recall shield. Hey I'll pay for the shipping, I just want that nice cutoff
Before clear lenses, pre-recall shield left, post-recall shield right
"Pre recall" shield with clear lense


"Post recall" shield with clear lense, see how much worse the cutoff is? It's a whole lot more fuzzier.


This is where I bought my projectors and lenses: The Retrofit Source (U.S.) -- Welcome to The Retrofit Source Store - The Retrofit Source
They were very helpful and fixed my shield issue quickly
Worked on the beam color and cutoff a little bit tonight. I installed the clear lenses onto both projectors, I'm shocked at the difference it made! Now I'm second guessing myself. I asked the place I bought these to swap out my shield that is pre recall to a post recall shield. Now after I install the clear lense, it looks like the pre recall shield produces the best cutoff. I'll see if I can send them back the replacement shield which should be here tomorrow, for a pre recall shield. Hey I'll pay for the shipping, I just want that nice cutoff
Before clear lenses, pre-recall shield left, post-recall shield right
"Pre recall" shield with clear lense
"Post recall" shield with clear lense, see how much worse the cutoff is? It's a whole lot more fuzzier.
Last edited by dibble9012; Oct 22, 2008 at 01:08 PM.
Oct 21, 2008 | 09:33 PM
#14
Thread Starter
Contributing Member
Joined: Nov 2004
Posts: 1,748
Likes: 0
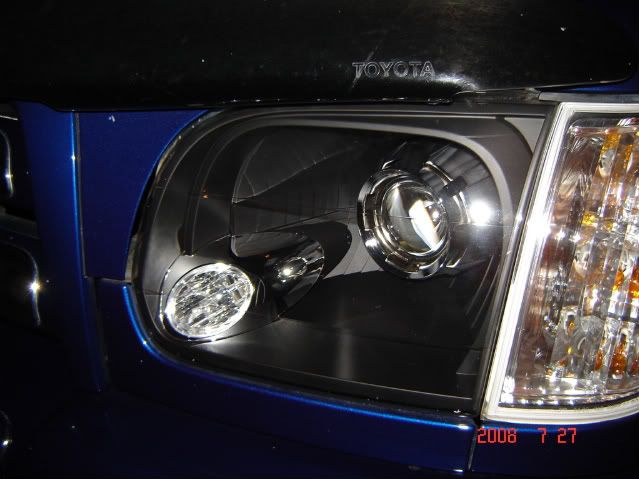
Ok, The drivers side is finished!! Matt at retrofitsource said he would exchange the shield again (he has been a great help throughout the project!) So tomorrow I will return my shield and get a "pre-recall" shield later this week.
So here are the finished pictures for the drivers side. I might change the bulbs out to real philips D2S bulbs vs the ebay bulbs to see if there is a difference in light output. These really light up the road (up to 5 lanes). They won't overpower other vehicle lights in those lanes, but you can still see the cutoff. I drove a while tonight with both headlights in and did not get flashed at all, passed by a few police cruisers and they didn't budge


No light leaking!


So here are the finished pictures for the drivers side. I might change the bulbs out to real philips D2S bulbs vs the ebay bulbs to see if there is a difference in light output. These really light up the road (up to 5 lanes). They won't overpower other vehicle lights in those lanes, but you can still see the cutoff. I drove a while tonight with both headlights in and did not get flashed at all, passed by a few police cruisers and they didn't budge
No light leaking!

 Oct 22, 2008 | 02:03 PM
#17
Thread Starter
Contributing Member
Joined: Nov 2004
Posts: 1,748
Likes: 0
If you look really hard from the side you can see my mount, it is not intrusive at all. That big streak on the top right hand side is a bug Second picture shows the reflection from behind the projector. I covered the back of the projector with aluminum tape to block out the light and to create a shiny surface.


Second picture shows the reflection from behind the projector. I covered the back of the projector with aluminum tape to block out the light and to create a shiny surface.
Oct 25, 2008 | 05:40 PM
#19
Thread Starter
Contributing Member
Joined: Nov 2004
Posts: 1,748
Likes: 0
It's done! The Philips bulbs are much better! The old aftermarket bulbs lit up five lanes but could not overpower other vehicles lights. These overpower all other vehicles with halogen bulbs.


Last edited by dibble9012; Nov 28, 2008 at 07:39 AM.


