My lift
 11-03-2006, 09:14 PM
#1
Guest
Thread Starter
Join Date: Jun 2006
Location: Cal Poly Pomona or Redlands, CA
Posts: 1,273
Likes: 0
Received 0 Likes
on
0 Posts
My lift
sonoran steel system 1.
pictures are here:
http://s103.photobucket.com/albums/m...omputers/Lift/
so here are a couple of thing ive learned today:
harbor freight spring compressors, SUCK. i blew the drive nut off of both with in seconds of eachother, while the spring was still compressed. luckly it lodged it self together, so i covered it in sandbags, and hit it with a BFH. exploded apart but the sand controlled it.
air drive tools are a god send. it would have taken me twice as long with out them... at least.
check your hardware. one of my tokico shocks had the wrong nut on the top. it was a coarse thread instead of a fine thread nut. i had to go find a replacement. deff not steve's fault, just one of those things...
spring compressors SUCK!!! they take forever and they are a bitch... i hate them, this is one part of the job id have someone else do.
now, my right side is on, but the shock is a bit rotated, not horribly but took a bit of persuasion to get it in there... now how the hell do i get them straight? is there some trick im missing? the left one is about 20 degrees off, so im going to have to recompress and rotate them...
so thats one thing for tomorrow, after that its the rear axle!!!
 11-04-2006, 04:59 AM
#3
Registered User
Join Date: Mar 2006
Location: Orlando, FL
Posts: 208
Likes: 0
Received 0 Likes
on
0 Posts
Even the good quality spring compressors are unnerving to operate - I can't imagine using a Harbor Freight compressor! If you have Autozones in your area they will let you borrow a compressor if you leave them a deposit. The quality of the compressor I borrowed was good although the heads of the nuts were rounded off from all the use.
As you are now aware, orientation of the top plate to the bottom shock mount is important. For my rig, the two front top plate studs must be perpendicular to the bottom shock mount. I have seen scanned copies of the FSM that say just the opposite (parallel), but that is how mine is.
To align: With the strut removed and spring compressed I stuck a long, 1/2" drive extension through the lower shock eye to serve as a pointer. I then placed a straight-edge against two of the top plate studs and rotated the plate until the straight-edge was perpendicular (eyeballing) to the 1/2" drive extension. Once aligned, remove spring compressor and reinstall.
You might want to play around and test fit the shock assembly and top plate without the spring installed so you can get a feel for what has to be aligned.
11-04-2006, 05:33 AM
#4
Contributing Member
The spring compressors I use come from Sears.....they look identical to the ones you are using in your first pic (looks like you went out and bought the same ones after the ones from HF exploded). One other thing is that if people are using the manual spring compressors like that, it helps to put alot of bearing grease all over the threaded portions on both sides and work it through its full cycle a few times. This will help prevent galling that can cause thread failure like the pics show. Also people need to make sure they keep both sides compressed as evenly as possible because if one gets too cockeyed it can be game over pretty quickly. I am happy at least you didn't get hurt and knew what to do when the situation went awry. If people don't have the proper tools and skill they should definately take this stuff out and bring it to a shop to have them do that step. Few dollars saved just isn't worth risking injury.
seanz0rz, nice Craftsman airgun! That is the same as what I have except mine's an Ingersoll Rand 2131 (they make the high end air guns for the Craftsman line). I really don't know how people have to patience to do mods like this without airtools either.
seanz0rz, nice Craftsman airgun! That is the same as what I have except mine's an Ingersoll Rand 2131 (they make the high end air guns for the Craftsman line). I really don't know how people have to patience to do mods like this without airtools either.
Last edited by MTL_4runner; 11-04-2006 at 05:37 AM.
11-04-2006, 05:42 AM
#5

https://www.yotatech.com/forums/f2/problems-front-bilstein-install-37295/
Originally Posted by bamachem
you can slide a long 3/8" ratchet extension through the lower eyelet, then put a cheater bar (high-lift jack handle) on it and give it a tug when the top plate is mounted and you can spin the strut to where you want it...
11-04-2006, 07:22 AM
#6
Guest
Thread Starter
Join Date: Jun 2006
Location: Cal Poly Pomona or Redlands, CA
Posts: 1,273
Likes: 0
Received 0 Likes
on
0 Posts
thanks bamchem, ill try that today. the one should work, however my left side is wayyyy out. only problem i see is the bushings that are there. ill try to remove them maybe, but they seemed like they were well placed in there.
as for the compressors. i went to autozone and got the loaner tools. the description was with the pictures... sorry for not explaining that clearer.
it is a 2inch lift up front, the OEM, so tundra springs up front, fzj80's in the rear.
one more thing to add, luckly i have my dad helping me today. yesterday was a solo affair. it went so slow because everytime i needed a socket or wrench, or anything else, i had to get up and get it
it goes so much faster if there is someone who can hand you stuff, or help hold stuff. etc.
anyway, off to go work, post up suggestions as ill likely check this in a few hours time. thanks so much for youre help guys.
edit, i also have to add that steve's kit is awesome! i was expecting to have to paint all the hardware that he makes... nope, already done for me,
Last edited by seanz0rz; 11-04-2006 at 07:23 AM.
11-04-2006, 07:30 AM
#7
Contributing Member
I missed the fact that you didn't have them totally installed. Like Andy said, all you need to do is losely attach the 3 bolts on the top of the mounting plate and then slide something that fits through the bottom shock bushing (like a ratchet handle or a socket extension and then use a pipe extension over it.....the pipe can be the handle on your floor jack which I see you have in your pics). Don't be afraid to crank on the shock, it will spin around and no, you don't need to recompress them to line the eye for the bolt up.
Trending Topics
11-04-2006, 08:31 PM
#9
Guest
Thread Starter
Join Date: Jun 2006
Location: Cal Poly Pomona or Redlands, CA
Posts: 1,273
Likes: 0
Received 0 Likes
on
0 Posts
http://s103.photobucket.com/albums/m...omputers/Lift/
ok, so its fricken done!!!! well all cept bleeding the brakes... but that will have to wait until first light tomorrow
one spring i had to recompress for the front, the top plate had moved on me when i rotated it. ohwell.
the rear was.... easy and a bitch all in one...
beyond that, its done...
ok, so its fricken done!!!! well all cept bleeding the brakes... but that will have to wait until first light tomorrow
one spring i had to recompress for the front, the top plate had moved on me when i rotated it. ohwell.
the rear was.... easy and a bitch all in one...
beyond that, its done...
Last edited by seanz0rz; 11-04-2006 at 08:33 PM.
 so 2-1/2'' or ?
11-05-2006, 03:34 AM
so 2-1/2'' or ?
11-05-2006, 03:34 AM
#12
11-05-2006, 11:31 AM
#13
Guest
Thread Starter
Join Date: Jun 2006
Location: Cal Poly Pomona or Redlands, CA
Posts: 1,273
Likes: 0
Received 0 Likes
on
0 Posts
ok, last set of pics are up.
edit: all measurements are with my stock 265/70r16 street tires.
the rear is REALLY high, but, it doesnt have a spare under it right now, and i might reduce the length on panhard bar. well see after i get new tires.
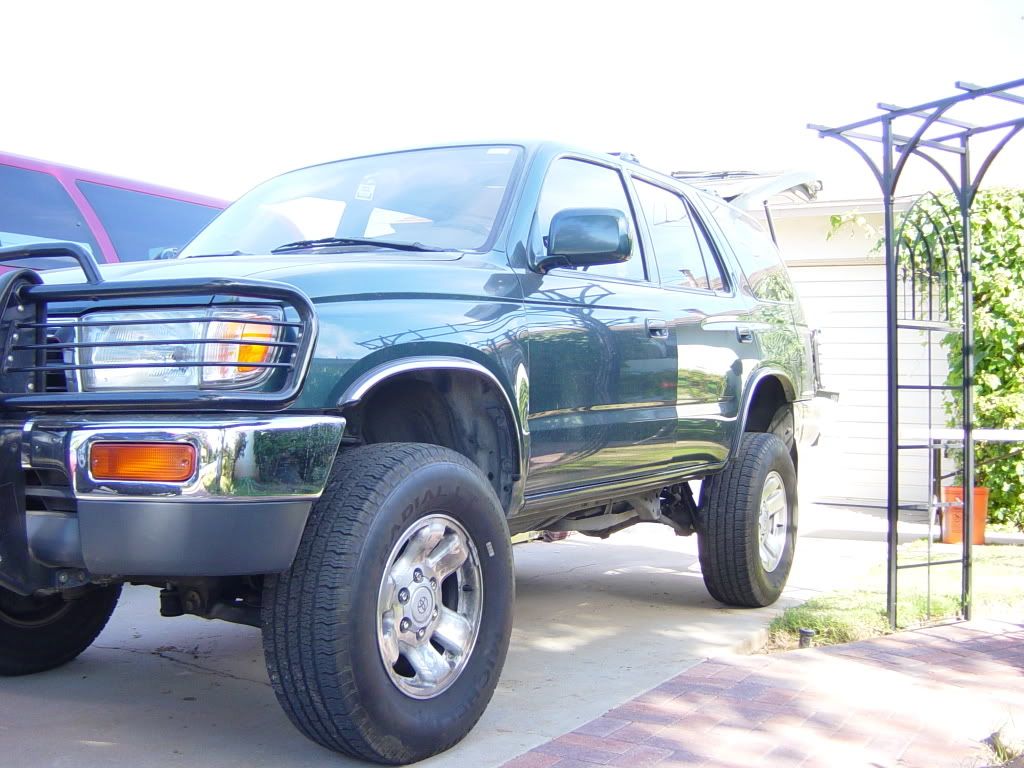
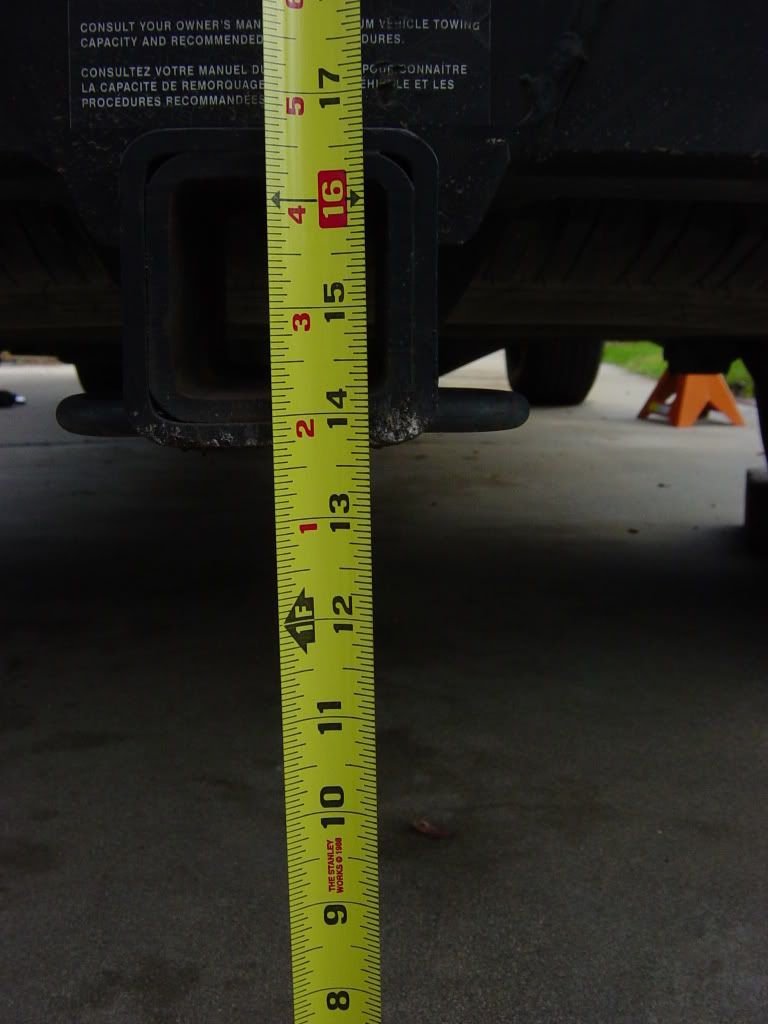
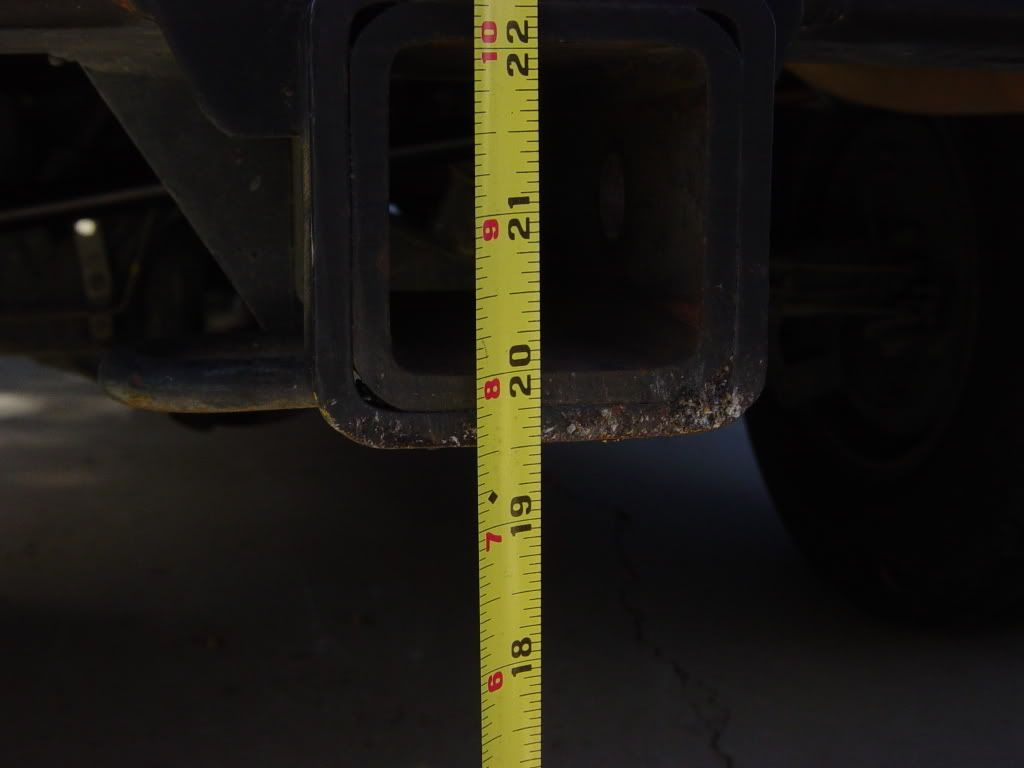
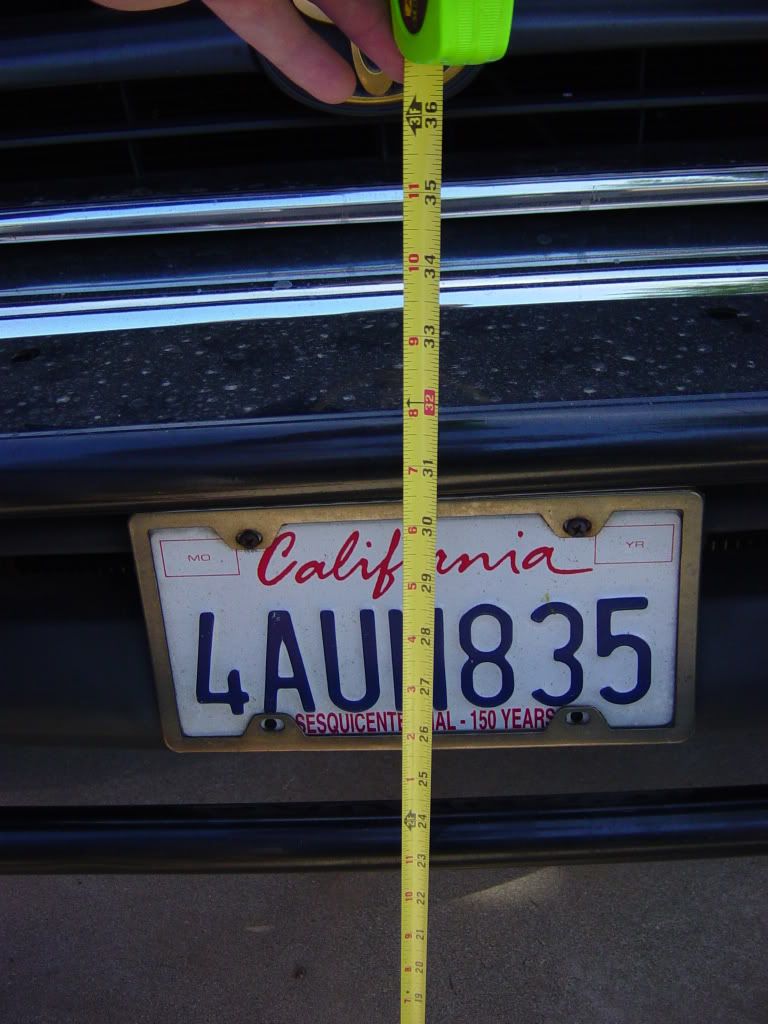
total lift in the front, at the brush guard (take into account the rake) is about 1.5-2 inches. on the front wheelwell, its 2 inches. rear wheelwell is about 5 inches, which doesnt seem right, but we will see with a spare on there later. at the hitch, its about 7inches. ill drive it for a while and see if it settles down a bit.
so ill post up a few select pictures here in case you are way too lazy to click on the fricken link!
Finished Product:
Stock hitch:
Lifted hitch:
Stock grill guard:

Lifted grill guard:
remember the other pictures are here:
http://s103.photobucket.com/albums/m...omputers/Lift/
so, total cost: 1133 for the lift, shipped from www.sonoransteel.com
broken spring compressors: 12 bucks
bleeding fingers: totally free...
so, realistically, this could be done cheeper. its the all oem lift. but, i went with steve's kit because i know its rock tested, i dont have to worry about breaking anything, and it all works together.
oh, and i forgot, its not streetable quite yet. i still have to bleed the brakes from inserting that extended brake like. so once i get that done (maybe next weekend when im home) ill bleed the brakes, get an alignment, and get some tires on it.
edit: all measurements are with my stock 265/70r16 street tires.
the rear is REALLY high, but, it doesnt have a spare under it right now, and i might reduce the length on panhard bar. well see after i get new tires.
total lift in the front, at the brush guard (take into account the rake) is about 1.5-2 inches. on the front wheelwell, its 2 inches. rear wheelwell is about 5 inches, which doesnt seem right, but we will see with a spare on there later. at the hitch, its about 7inches. ill drive it for a while and see if it settles down a bit.
so ill post up a few select pictures here in case you are way too lazy to click on the fricken link!
Finished Product:
Stock hitch:
Lifted hitch:
Stock grill guard:
Lifted grill guard:
remember the other pictures are here:
http://s103.photobucket.com/albums/m...omputers/Lift/
so, total cost: 1133 for the lift, shipped from www.sonoransteel.com
broken spring compressors: 12 bucks
bleeding fingers: totally free...
so, realistically, this could be done cheeper. its the all oem lift. but, i went with steve's kit because i know its rock tested, i dont have to worry about breaking anything, and it all works together.
oh, and i forgot, its not streetable quite yet. i still have to bleed the brakes from inserting that extended brake like. so once i get that done (maybe next weekend when im home) ill bleed the brakes, get an alignment, and get some tires on it.
Last edited by seanz0rz; 11-05-2006 at 11:40 AM.
11-05-2006, 04:01 PM
#16
Guest
Thread Starter
Join Date: Jun 2006
Location: Cal Poly Pomona or Redlands, CA
Posts: 1,273
Likes: 0
Received 0 Likes
on
0 Posts
thinking about it, i think it might be way to high in back, imma have to work out why that is. i may have mismeasured the panhard bar, even tho i measured it like 457483902 times.
reason i bought this lift, its the best money can buy (from what steve says, and what ive heard on this board). not that i need that kind of performance now, but its nice to know i can keep the truck like it is until i need to do a sas.
reason i bought this lift, its the best money can buy (from what steve says, and what ive heard on this board). not that i need that kind of performance now, but its nice to know i can keep the truck like it is until i need to do a sas.
12-04-2006, 10:37 PM
#18
Banned
Join Date: May 2006
Posts: 0
Likes: 0
Received 0 Likes
on
0 Posts
i saw your pics site
your rear is wayy to high. im sitting at 41 inchs from ground to fender well with OME springs and 2 inch bl, Looks like you got 5 inchs of lift in the rear from stock to that. id get that fixed
your rear is wayy to high. im sitting at 41 inchs from ground to fender well with OME springs and 2 inch bl, Looks like you got 5 inchs of lift in the rear from stock to that. id get that fixed
12-05-2006, 07:54 AM
#19
Registered User
Join Date: Jan 2005
Location: Vancouver, British Columbia
Posts: 575
Likes: 0
Received 0 Likes
on
0 Posts
Hey seanz0rz;
Yes; the LC coils will give you a lot of lift in the rear!! I did my SS Lift about 2 months ago and all the springs have settled.. the rear droped down about an 1.5"!! Yeah Some guys like the 'raked' look and some don't... IMO it gives the 4Runner an even more agressive look!!
But good job on the Lift!! Did you put a Front Diff drop kit in???
12-05-2006, 08:41 AM
#20
Guest
Thread Starter
Join Date: Jun 2006
Location: Cal Poly Pomona or Redlands, CA
Posts: 1,273
Likes: 0
Received 0 Likes
on
0 Posts
yes there is a diff drop up front.
i must have measured the panhard bar wrong when i put it in the first time. i took it out and remeasured, it was a good half inch out. so i readjusted and reinstalled. when i get home tomorrow ill get new pictures with new measurements (with my new wheels and tires of course)
however, regardless of appearance, it performs out on the trail and performed very very well.
ill get more pics this weekend when shes all cleaned up.

Thread
Thread Starter
Forum
Replies
Last Post
justdifferentials
Vendors Build-Ups (Build-Up Section)
0
09-05-2015 06:52 PM
joeynational
86-95 Trucks & 4Runners
1
09-05-2015 01:54 PM


