
Finally! DIN inclinometer and gauges!
 Nov 28, 2007 | 06:02 PM
#1
Finally! DIN inclinometer and gauges!
well, after what has felt like forever, i finally got my project done. i have had my dash apart for a little over a year, yes you read that correctly, trying to get this project completed. with some setbacks, working insane hours every week for almost a year, some head scratching here and there, and bad midwest weather (miserable humidity in summer and bone shattering cold in winter); this is finally done with pics.
"Dash Gash"
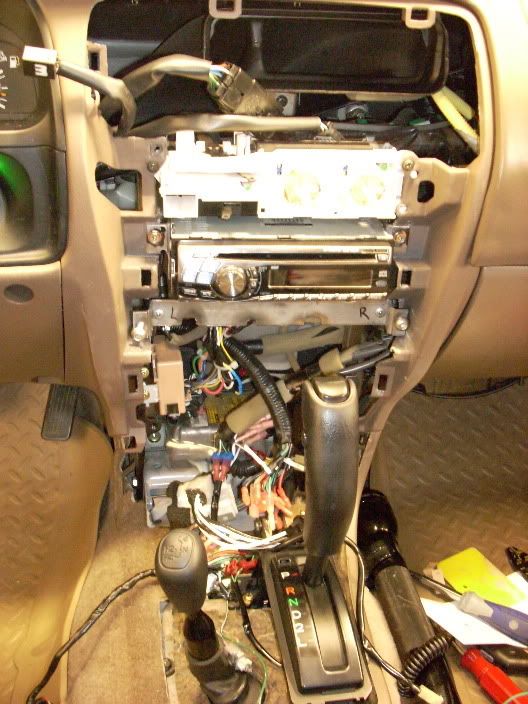
this is a picture of the dash "stock" with my stereo installed right before the project began:
i initially set out to just do a DIN modded 2nd gen inclinometer under my stereo, but then it morphed into doing gauges and relocating the cig lighter and adding another one both for power outlets. a few pics first to wet your whistles!

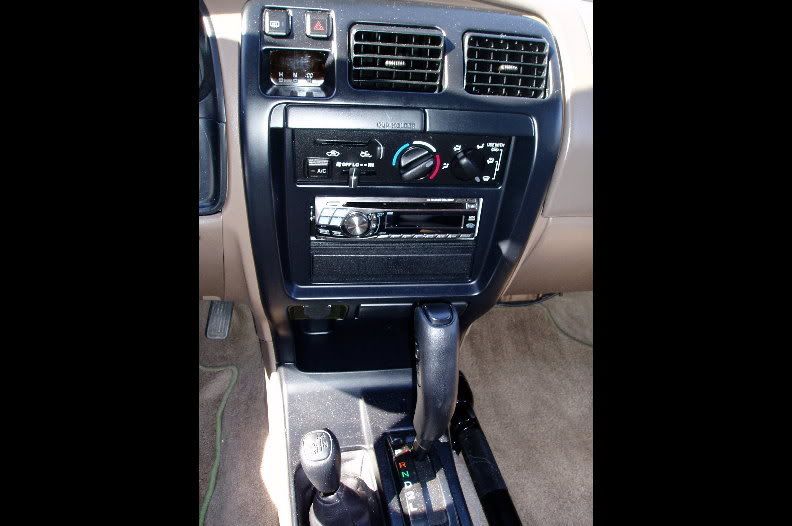
link to bigger pic
link to bigger pic
i'll just say that if i had known it was going to be so time consuming, money consuming, and such a PITA i would have opted never to do this; but with it all behind me now i'm very happy with the results. let me just say that i am now intimate friends with Bondo, JB Weld, and my Dremmel.
here is a quick run down on how i did this, not saying it's the best way, just what i did. this most certainly can be improved on with the use of fiberglass which i tried and failed at miserably.
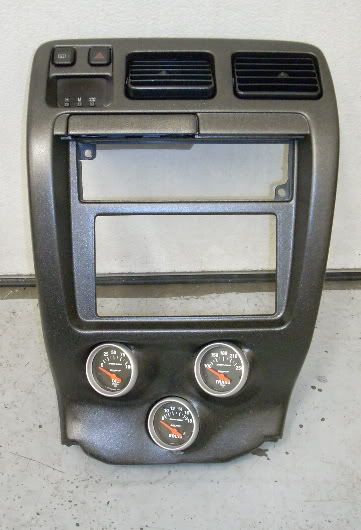
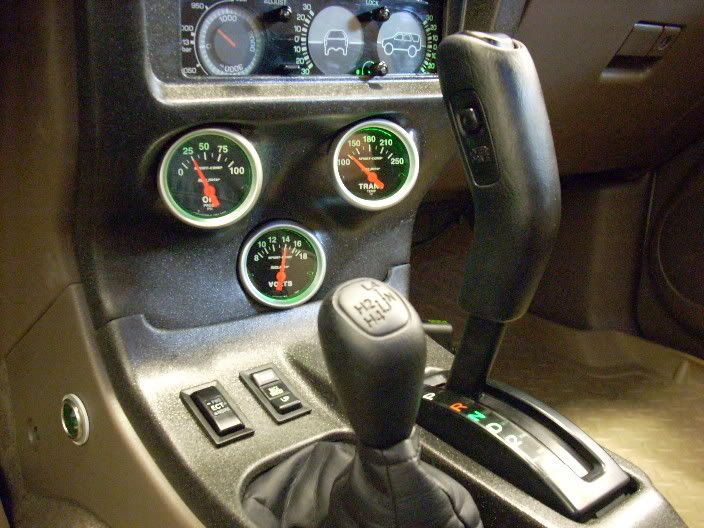
with my dremmel, i cut out the section with the cigarette lighter, ash tray, and that worthless little cubbie hole. roughed up the edges and cleaned. then i took some gutter guard mesh i had and cut it to fit the section with a little lip to fold over the back. mixed up some JB weld and put a bead of it around the edge to lock it in. when that set, i took my tin snips and cut some holes (3) to set some PVC pipe (cut to a certain size and roughed up the outside of the pipe) in the right angle to face me, the driver. then i mixed up some more JB Weld and slathered it over the pipe and the mesh to lock those in place. once that set up, i put several layers of bondo around the pvc to futher lock it in place and also build it up to the outside edge of the bezel itself. once i built it up enough, i used a few air tools and a dremmel to shape it into a rough version of the three "pods" you see in the picture, and i mean they looked like a rough shape of a pod. then i sanded like a mad man for days, first with some 60 grit to start smoothing the rough bondo out, then up to 120 to shape, then 220 to further shape, then 320 to clean it up. i did have to add bondo here and there where i took too much down, level areas out, and just touch up where i messed up cutting around the pvc for the gauges to fit. then a couple layers of finishing putty and glaze to get rid of the pinholes in the bondo. after that was all done and the edges were blended into the plastic of the bezel, i roughed up the rest of the bezel with a scotch brite pad and cleaned with some body prep solvent i bought at autozone. once cleaned, i sprayed it down with a couple light coats of a product called "Bulldog" adhesion promoter, let sit for about 10 minutes and then put 3 coats of paint on top. the paint i chose has a texture to it and a little (not a lot) of sparkle to it. it's one of those Fusion paints that is for plastic. it's called Krylon Fusion "textured shimmer", it's mostly black with a little sparkle in it. i chose this for a few reasons, 1) so it would stick to what i was painting, 2) the sparkle would pick up some of the "oak" color of my interior and wouldn't look so different like a flat black would, and 3) the texture would cover up any little imperfections of my sanding and blending from bondo to plastic; believe me it isn't perfect. after a day of paint drying, i used a satin polyurethane to seal and protect the paint since it would be getting some use in the car. i also did this same paint on the shifter bezel, and next year when it warms up, i will probably continue this on my '99 center console section with the cupholders, but not actually inside the cupholders themselves; just for some continuity.
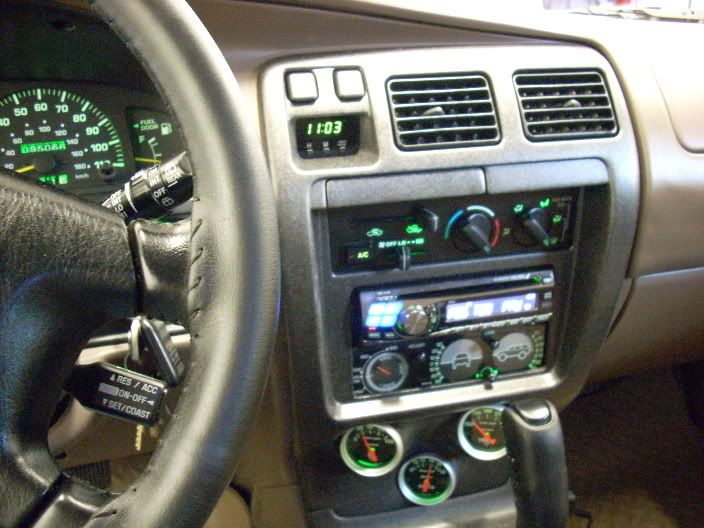
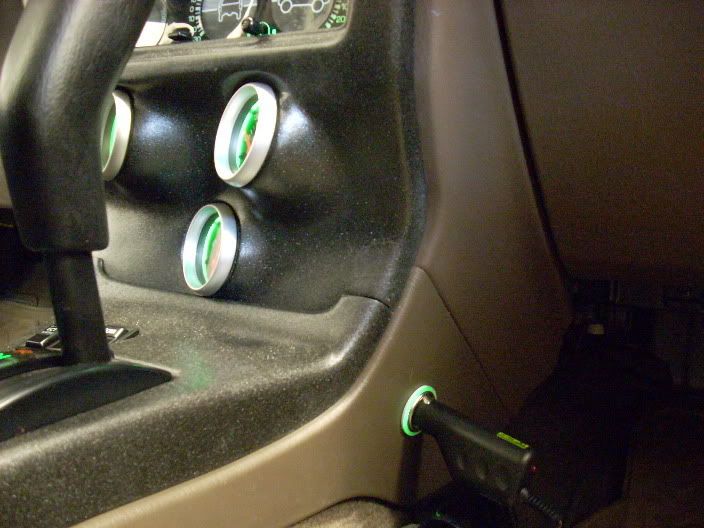
the gauges are Autometer Sport Comp electric gauges. Volts, Trans Temp, and Oil Pressure. oil pressure was easy, just popped it in next to the stock sender and ran the wire through the firewall. trans temp was a little more involved. i installed a B&M transmission cooler up front and while i was at it i bought a new SEN-04-3 sender from Dakota digital and one of their SEN-04-11 aluminum sender blocks. i mounted it to the frame close to the soft transmission lines and just spliced it into the soft hoses with some male 3/8" fittings on the block instead of the crush fittings for the hard line that it came with. ran the wire from the sender and a ground back along the frame and up to the driver's fender and through the firewall with the oil pressure sender wire. for volts, i took my voltmeter and found the 12v switched wire from the ignition and tapped into it, i also used this to power the other two gauges as they needed a switched 12v power source as well. ran a couple ground wires and made my own quick disconnect with some parts from radio shack. lighting, just tapped into the light from the ashtray that i no longer was using and now i have lit gauges that dim with the knob on the dash.
link to bigger pic

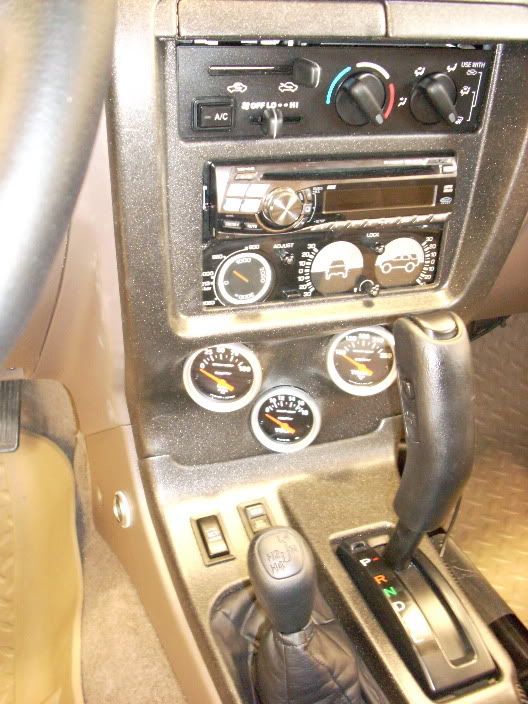
so, that's it in a nutshell. the inclinometer was the same way, chop it down and build back up with some bondo, sand and shape until it fit pretty good, then slap the faceplate on it and mod that to fit, a touch of black RTV to fill in any gaps, then make some brackets. i had to make some brackets for my cd player too so i could get as much room for the inclinometer to fit; otherwise it wouldn't have shown nearly as much with the generic cd player mounting kit i bought at best buy. i just hope my next cd player will have the same threaded holes on the sides for the brackets i made, otherwise it won't be an easy install. i would suggest chopping the bottom of the inclinometer, mounting above the stereo, and working from that end for anyone who is considering this. i feel it might fit better and you'll be able to see more of the inclino and altimeter gauges, but that's just a guess. i didn't modify the DIN hole for the cd player and inclinometer for fear it would look weird, but if you trim it a little on the top and bottom it would probably show a lot more than what mine is showing.
i also bought LEDs to put in my dash and gauges. i destroyed a few of the little green bulb covers for the inclinometer and the heat/AC controls so i just opted to put LEDs in. and i know i'm weird for saying this but i wanted to keep the green look so i bought all green LEDs. i will say that the green LEDs are much more of a true green than that pale yellow/green from stock. i bought the inverted cone type for the instrument cluster and they are great, not hot spots. the little 74 LEDs used in the inclinometer, heat/AC, and misc other places did not come in the inverted cone style and i didn't want to get the bulbs with the multiple LEDs firing in all different directions for fear they would not fit since there is very little clearance in some spots. the LED bulbs are actually longer than a regular 74 bulb so a couple spots had to be modified for them to fit, eg. the lighted key ring, and i had to get creative and make my own outlet for the cig lighters since the old were hard wired in, just used a stock 74 socket and JB Welded it in there where the old bulb was.
and before i forget, since i don't smoke i had no use for the ash tray and rarely the cig lighter; but i wanted to retain the lighter for a power outlet to charge my cell phone and for mp3 players etc. i added one on the drivers side and one on the pass side on the little trim pieces on the sides of the shifter bezel and radio bezel. the driver's side is not super convenient but it's there if i need a second one in a pinch. they are both lit up for easy viewing in the dark too.
so, this has been a long arduous task and it's done, WHEW!! just glad the "dash gash" as i called it, is now filled with beauty!
link to bigger pic
this week i'll be installing my Sonoran Steel 7.1 lift kit and next week i'll have my new sport hood painted and installed. and then i can sit back and finally enjoy my 4runner since i have no plans of mods until spring. besides, i'm going back to school so i need to devote my time to studying, if i spend as much time studying as i do on my 4runner i should ace my classes

thanks for reading, hope i inspired someone to improve on their dash as well.
misc other pics and angles of the dash, enjoy!
patrick
link to bigger pic
another big pic bezel center view
"Dash Gash"
this is a picture of the dash "stock" with my stereo installed right before the project began:
i initially set out to just do a DIN modded 2nd gen inclinometer under my stereo, but then it morphed into doing gauges and relocating the cig lighter and adding another one both for power outlets. a few pics first to wet your whistles!
link to bigger pic
link to bigger pic
i'll just say that if i had known it was going to be so time consuming, money consuming, and such a PITA i would have opted never to do this; but with it all behind me now i'm very happy with the results. let me just say that i am now intimate friends with Bondo, JB Weld, and my Dremmel.
here is a quick run down on how i did this, not saying it's the best way, just what i did. this most certainly can be improved on with the use of fiberglass which i tried and failed at miserably.
with my dremmel, i cut out the section with the cigarette lighter, ash tray, and that worthless little cubbie hole. roughed up the edges and cleaned. then i took some gutter guard mesh i had and cut it to fit the section with a little lip to fold over the back. mixed up some JB weld and put a bead of it around the edge to lock it in. when that set, i took my tin snips and cut some holes (3) to set some PVC pipe (cut to a certain size and roughed up the outside of the pipe) in the right angle to face me, the driver. then i mixed up some more JB Weld and slathered it over the pipe and the mesh to lock those in place. once that set up, i put several layers of bondo around the pvc to futher lock it in place and also build it up to the outside edge of the bezel itself. once i built it up enough, i used a few air tools and a dremmel to shape it into a rough version of the three "pods" you see in the picture, and i mean they looked like a rough shape of a pod. then i sanded like a mad man for days, first with some 60 grit to start smoothing the rough bondo out, then up to 120 to shape, then 220 to further shape, then 320 to clean it up. i did have to add bondo here and there where i took too much down, level areas out, and just touch up where i messed up cutting around the pvc for the gauges to fit. then a couple layers of finishing putty and glaze to get rid of the pinholes in the bondo. after that was all done and the edges were blended into the plastic of the bezel, i roughed up the rest of the bezel with a scotch brite pad and cleaned with some body prep solvent i bought at autozone. once cleaned, i sprayed it down with a couple light coats of a product called "Bulldog" adhesion promoter, let sit for about 10 minutes and then put 3 coats of paint on top. the paint i chose has a texture to it and a little (not a lot) of sparkle to it. it's one of those Fusion paints that is for plastic. it's called Krylon Fusion "textured shimmer", it's mostly black with a little sparkle in it. i chose this for a few reasons, 1) so it would stick to what i was painting, 2) the sparkle would pick up some of the "oak" color of my interior and wouldn't look so different like a flat black would, and 3) the texture would cover up any little imperfections of my sanding and blending from bondo to plastic; believe me it isn't perfect. after a day of paint drying, i used a satin polyurethane to seal and protect the paint since it would be getting some use in the car. i also did this same paint on the shifter bezel, and next year when it warms up, i will probably continue this on my '99 center console section with the cupholders, but not actually inside the cupholders themselves; just for some continuity.
the gauges are Autometer Sport Comp electric gauges. Volts, Trans Temp, and Oil Pressure. oil pressure was easy, just popped it in next to the stock sender and ran the wire through the firewall. trans temp was a little more involved. i installed a B&M transmission cooler up front and while i was at it i bought a new SEN-04-3 sender from Dakota digital and one of their SEN-04-11 aluminum sender blocks. i mounted it to the frame close to the soft transmission lines and just spliced it into the soft hoses with some male 3/8" fittings on the block instead of the crush fittings for the hard line that it came with. ran the wire from the sender and a ground back along the frame and up to the driver's fender and through the firewall with the oil pressure sender wire. for volts, i took my voltmeter and found the 12v switched wire from the ignition and tapped into it, i also used this to power the other two gauges as they needed a switched 12v power source as well. ran a couple ground wires and made my own quick disconnect with some parts from radio shack. lighting, just tapped into the light from the ashtray that i no longer was using and now i have lit gauges that dim with the knob on the dash.
link to bigger pic
so, that's it in a nutshell. the inclinometer was the same way, chop it down and build back up with some bondo, sand and shape until it fit pretty good, then slap the faceplate on it and mod that to fit, a touch of black RTV to fill in any gaps, then make some brackets. i had to make some brackets for my cd player too so i could get as much room for the inclinometer to fit; otherwise it wouldn't have shown nearly as much with the generic cd player mounting kit i bought at best buy. i just hope my next cd player will have the same threaded holes on the sides for the brackets i made, otherwise it won't be an easy install. i would suggest chopping the bottom of the inclinometer, mounting above the stereo, and working from that end for anyone who is considering this. i feel it might fit better and you'll be able to see more of the inclino and altimeter gauges, but that's just a guess. i didn't modify the DIN hole for the cd player and inclinometer for fear it would look weird, but if you trim it a little on the top and bottom it would probably show a lot more than what mine is showing.
i also bought LEDs to put in my dash and gauges. i destroyed a few of the little green bulb covers for the inclinometer and the heat/AC controls so i just opted to put LEDs in. and i know i'm weird for saying this but i wanted to keep the green look so i bought all green LEDs. i will say that the green LEDs are much more of a true green than that pale yellow/green from stock. i bought the inverted cone type for the instrument cluster and they are great, not hot spots. the little 74 LEDs used in the inclinometer, heat/AC, and misc other places did not come in the inverted cone style and i didn't want to get the bulbs with the multiple LEDs firing in all different directions for fear they would not fit since there is very little clearance in some spots. the LED bulbs are actually longer than a regular 74 bulb so a couple spots had to be modified for them to fit, eg. the lighted key ring, and i had to get creative and make my own outlet for the cig lighters since the old were hard wired in, just used a stock 74 socket and JB Welded it in there where the old bulb was.
and before i forget, since i don't smoke i had no use for the ash tray and rarely the cig lighter; but i wanted to retain the lighter for a power outlet to charge my cell phone and for mp3 players etc. i added one on the drivers side and one on the pass side on the little trim pieces on the sides of the shifter bezel and radio bezel. the driver's side is not super convenient but it's there if i need a second one in a pinch. they are both lit up for easy viewing in the dark too.
so, this has been a long arduous task and it's done, WHEW!! just glad the "dash gash" as i called it, is now filled with beauty!
link to bigger pic
this week i'll be installing my Sonoran Steel 7.1 lift kit and next week i'll have my new sport hood painted and installed. and then i can sit back and finally enjoy my 4runner since i have no plans of mods until spring. besides, i'm going back to school so i need to devote my time to studying, if i spend as much time studying as i do on my 4runner i should ace my classes
thanks for reading, hope i inspired someone to improve on their dash as well.
misc other pics and angles of the dash, enjoy!
patrick
link to bigger pic
another big pic bezel center view
Last edited by pattycakes77; Dec 1, 2007 at 10:45 AM. Reason: spelling and grammar errors fixed, added links
Nov 28, 2007 | 06:18 PM
#4
Contributing Member
Joined: Nov 2006
Posts: 1,434
Likes: 0
From: GSU/ATL/SD
i think that you should reproduce and sell! or offer to do the same for others who ship their units in....
oh and PLEASE tell me where you got that steering wheel cover, looks extremely flush and i'm in desperate need of one
oh and PLEASE tell me where you got that steering wheel cover, looks extremely flush and i'm in desperate need of one
Last edited by MillerPKA; Nov 28, 2007 at 06:19 PM.
Nov 28, 2007 | 06:22 PM
#5
 ha!
ha!as for the wheel cover, it's a "Wheelskins" cover, i got it on ebay a couple years ago and i love it. it's just kinda getting grimy now from all the chemicals i use at work so i'll have to replace soon, but it's held up great and looks good too!
and thanks for the the nice comments so far


Trending Topics


 Nov 29, 2007 | 11:52 AM
#19
i IM'd this to idayota and he suggested i post it in the thread for others as well. the question was "what would you do differently" and this was my response. if anyone else has any questions or their own suggestions for improvements, post away for anyone else that would like to give this a shot!
as far as what i would do differently... this is the second one of these i've made so i did make a lot of my mistakes on the first one. i tried putting in 4 spots for gauges and didn't angle them and it was not practical for viewing from the driver's angle. so, i would stick with 3 or less, you can always get a pillar for extra gauges. the only thing i would say is take your time and test fit the pvc and make sure you have them where you can see them. you might consider bringing them out a bit more than where i had mine since i had to cut some notches out for the gauges to sit into, and make sure they are all angled in the same direction. the bottom one doesn't seem to be lined up angle-wise with the upper two and it is sitting a little more the left than center as well. i'm a perfectionist but after a year of working on this i just wanted it done so i left it. that's all i would suggest, take your time, maybe get one of the bezels off ebay so you don't have to look at the "dash gash" like i did for so long.
if you have more questions just let me know.
thanks for the positive comments
patrick
Nov 29, 2007 | 12:20 PM
#20
Registered User
Joined: Apr 2007
Posts: 104
Likes: 0
From: Missoula, MT
Very nice job. When I got my inclinometer I thought it would be a piece of cake. I forgot one thing. 4Runners in Japan are right hand drive. I mounted it on my dash anyway, after modding it but still need to work on finishing the bottom of it. Maybe bondo is the way.


