Dual Batteries: Installed
 12-13-2009, 03:30 PM
#1
Registered User
Thread Starter
Join Date: Jan 2009
Posts: 166
Likes: 0
Received 0 Likes
on
0 Posts
I Finished my dual battery setup this afternoon. I only have one picture now but there will be more to come.
I used a sure power battery isolator so i dont have to ever worry about selecting a battery with a switch.
I moved the radiator overflow to the side, and rotated the batteries 90 deg. from their original position so i could squeeze in 2 batteries . I did not use 2 optima batteries because the one i already had was free, due to my old battery failing. and i just got it 2 weeks ago. So i used a optima d51, and my existing battery.

More to come and feel free to ask me questions.
I used a sure power battery isolator so i dont have to ever worry about selecting a battery with a switch.
I moved the radiator overflow to the side, and rotated the batteries 90 deg. from their original position so i could squeeze in 2 batteries . I did not use 2 optima batteries because the one i already had was free, due to my old battery failing. and i just got it 2 weeks ago. So i used a optima d51, and my existing battery.
More to come and feel free to ask me questions.
 12-13-2009, 04:39 PM
#2
Contributing Member
Yeah I'd like to know more about the wiring from the alternator. Pix of the isolator? How easy is the wiring? Are the batteries run in parallel or conected any way, or seperate?
12-13-2009, 05:36 PM
#4
Registered User

Join Date: Nov 2007
Posts: 99
Likes: 0
Received 0 Likes
on
0 Posts
sc4runner - they would have to be in parallel, series would give you 24V... assuming they are connected which is what it looks like in the pic.
,
I'm not sure that using two different batteries is the best idea, they will charge / discharge at different rates. I can't remember the exact issues but you might want to look into it. Maybe you already researched it.
Anyway seems cool.
,
I'm not sure that using two different batteries is the best idea, they will charge / discharge at different rates. I can't remember the exact issues but you might want to look into it. Maybe you already researched it.
Anyway seems cool.
12-13-2009, 06:21 PM
#5
Registered User
Thread Starter
Join Date: Jan 2009
Posts: 166
Likes: 0
Received 0 Likes
on
0 Posts
Allright.
Well first off the battery isolator is a Sure Power 9523A. It has 4 terminals on it, and it is made for toyotas and other vehicles with an internally regulated alternator. (trust me use this because i tried a normal 3 post design first and it caused the battery light to turn on) An isolator allows the alternator to charge both batteries (main and aux.) and will not allow one to drain the other. It is very simple, has no moving parts, and relatively cheap. Rv's use these all the time
Here is a picture from an online store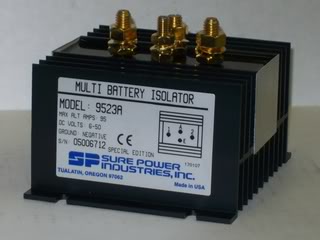
This has a post for the alternator in, 2 posts for battery outs, and one called the E terminal. This E terminal is essential and it connects to the ignition wire on the alternator wire harness. Sure Power provides detailed instructions for toyotas and it is about $35
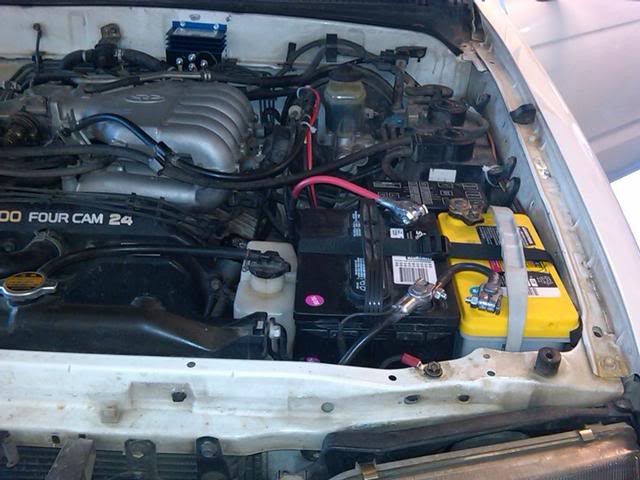
here it is in my truck.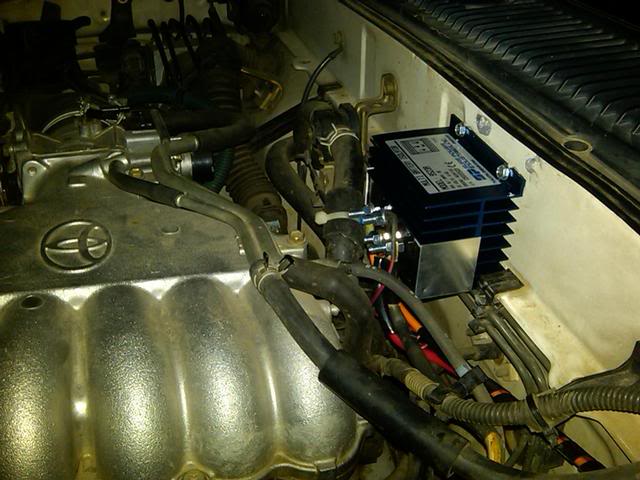
Here is another angle. I mounted it conveniently to the fire wall. (Note how i cut the fins off one side so it would fit under the hood) It is normally too big to fit on the firewall. This is the only Ghetto thing i did. O well it works great
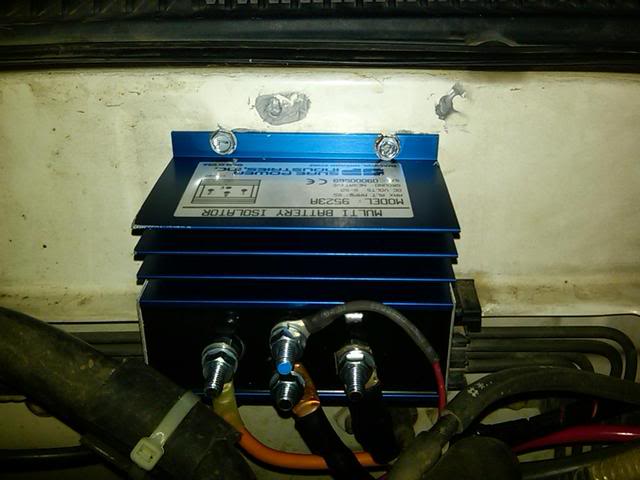
Top view
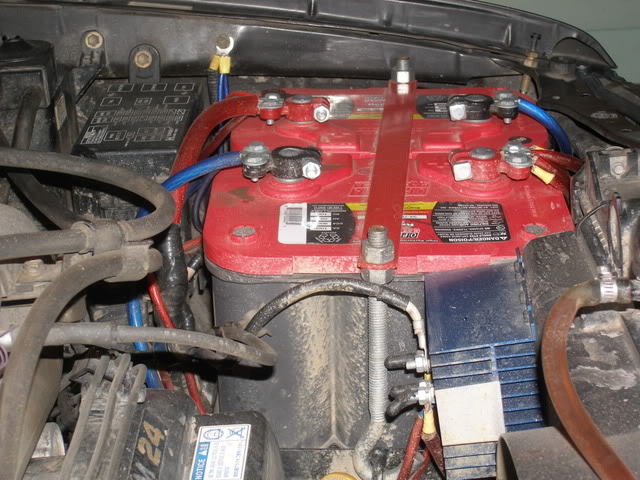
Here are two shots of the batteries. i used a strap to hold them down, and i built a new battery box to hold them out of some 1 1/2 angle iron and some expanded metal. I will take detailed pics tomorrow of the box when there is some daylight. I used some thick sheet metal to make brackets that hold the Overflow tank in its new location.
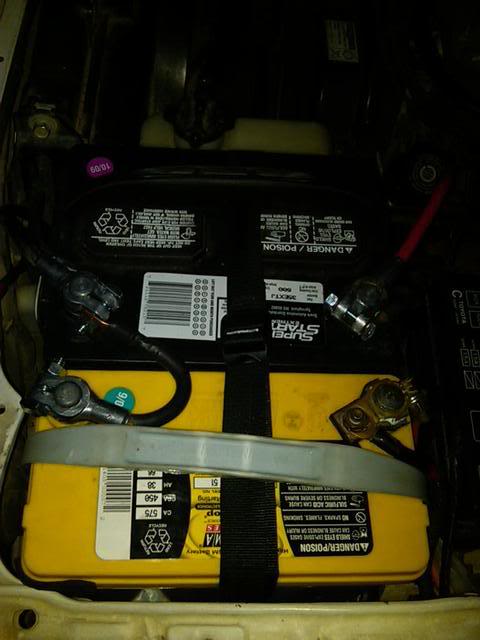
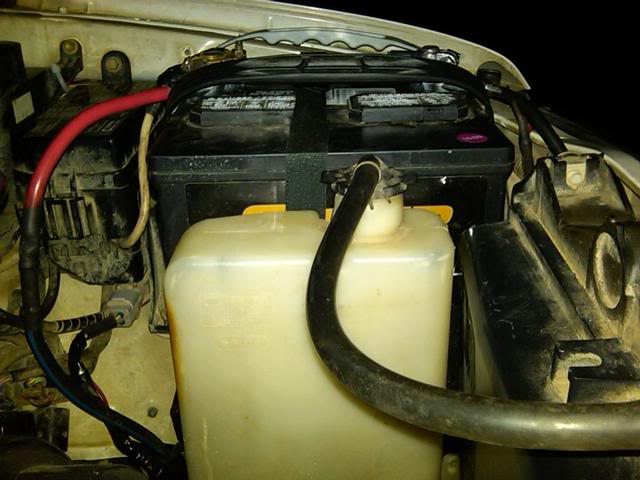
The final pic is the same as the first, but it may help to visualize what is going on. YOu can see the isolator's location and the new spot for the over flow tank. More to come tomorrow with pics of the battery box.
http://i282.photobucket.com/albums/k...91213-1329.jpg
Well first off the battery isolator is a Sure Power 9523A. It has 4 terminals on it, and it is made for toyotas and other vehicles with an internally regulated alternator. (trust me use this because i tried a normal 3 post design first and it caused the battery light to turn on) An isolator allows the alternator to charge both batteries (main and aux.) and will not allow one to drain the other. It is very simple, has no moving parts, and relatively cheap. Rv's use these all the time
Here is a picture from an online store
This has a post for the alternator in, 2 posts for battery outs, and one called the E terminal. This E terminal is essential and it connects to the ignition wire on the alternator wire harness. Sure Power provides detailed instructions for toyotas and it is about $35
here it is in my truck.
Here is another angle. I mounted it conveniently to the fire wall. (Note how i cut the fins off one side so it would fit under the hood) It is normally too big to fit on the firewall. This is the only Ghetto thing i did. O well it works great
Top view
Here are two shots of the batteries. i used a strap to hold them down, and i built a new battery box to hold them out of some 1 1/2 angle iron and some expanded metal. I will take detailed pics tomorrow of the box when there is some daylight. I used some thick sheet metal to make brackets that hold the Overflow tank in its new location.
The final pic is the same as the first, but it may help to visualize what is going on. YOu can see the isolator's location and the new spot for the over flow tank. More to come tomorrow with pics of the battery box.
http://i282.photobucket.com/albums/k...91213-1329.jpg
12-13-2009, 06:42 PM
#7
Registered User
Thread Starter
Join Date: Jan 2009
Posts: 166
Likes: 0
Received 0 Likes
on
0 Posts
sc4runner - they would have to be in parallel, series would give you 24V... assuming they are connected which is what it looks like in the pic.
,
I'm not sure that using two different batteries is the best idea, they will charge / discharge at different rates. I can't remember the exact issues but you might want to look into it. Maybe you already researched it.
Anyway seems cool.
,
I'm not sure that using two different batteries is the best idea, they will charge / discharge at different rates. I can't remember the exact issues but you might want to look into it. Maybe you already researched it.
Anyway seems cool.
And the grounds are wired together, but that is it. common ground
Thanks for the feedback
Trending Topics
12-13-2009, 06:47 PM
#8
Registered User

Join Date: Mar 2007
Location: Dayton, OH
Posts: 721
Likes: 0
Received 0 Likes
on
0 Posts
sc4runner - they would have to be in parallel, series would give you 24V... assuming they are connected which is what it looks like in the pic.
,
I'm not sure that using two different batteries is the best idea, they will charge / discharge at different rates. I can't remember the exact issues but you might want to look into it. Maybe you already researched it.
Anyway seems cool.
,
I'm not sure that using two different batteries is the best idea, they will charge / discharge at different rates. I can't remember the exact issues but you might want to look into it. Maybe you already researched it.
Anyway seems cool.
Correct, the two different batteries have different charge/discharge rates which taxes the alternator unduly over time, though not immediately. The isolator mitigates this to some degree so I don't suspect he will wear the alt out *that* quickly.
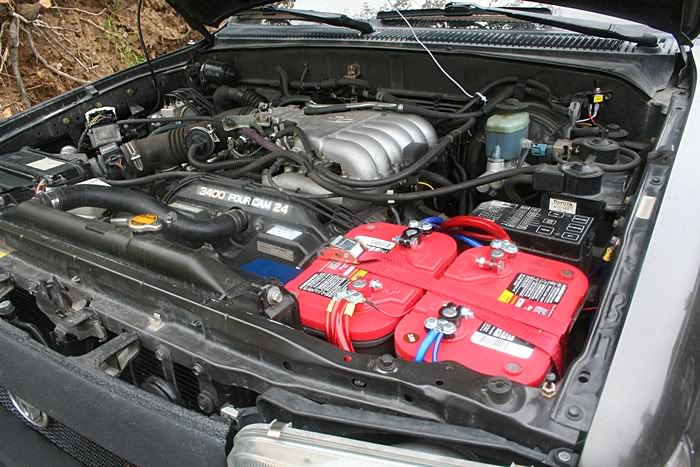
The ideal set up is j-money's with matching batteries.
Good job on the install j-money!
12-13-2009, 08:27 PM
#10
Registered User

Join Date: Jan 2008
Posts: 54
Likes: 0
Received 0 Likes
on
0 Posts
I bet this setup works great if your alternator takes a dump in the middle of nowhere and you have to get home. Just switch the power wires and drive home, and hope the 2nd battery doesnt die.
12-14-2009, 08:30 PM
#12
Registered User
what amp do you think your alt should push to be able to safely handle 2 batteries , lets say with hella 500s, accesories, 2000w sounds? my 3.0 alt couldnt do it anymore RIP
12-15-2009, 05:47 AM
#13
I have been contemplating this very set up as I was looking at installing more outlets, adding subs and having other electrical accessories. Trying to keep things simple and allowing for minor modification of existing configurations. I will have to follow this thread, nicely done.
I can see the optima is a bit narrower, so two of these types of batteries may help to save some space? Very interested to see how you did the new battery holder and reconfiguration of the overflow tank location. Did you weld the new battery holder as well as the new hanger for the overflow? Just picked up a small electrical welder at an auction as never having used one this might be an interesting way to learn. Well done
I can see the optima is a bit narrower, so two of these types of batteries may help to save some space? Very interested to see how you did the new battery holder and reconfiguration of the overflow tank location. Did you weld the new battery holder as well as the new hanger for the overflow? Just picked up a small electrical welder at an auction as never having used one this might be an interesting way to learn. Well done
12-15-2009, 03:36 PM
#14
Registered User
Join Date: Feb 2009
Location: colorado
Posts: 120
Likes: 0
Received 0 Likes
on
0 Posts
nice man looks familiar im using the same isolator you are i believe. but i had to move my overflow bottle to the other side to make room tho. how did you attach yours?
Last edited by 98.T4R; 12-15-2009 at 03:43 PM.
12-15-2009, 05:40 PM
#15
Registered User
Thread Starter
Join Date: Jan 2009
Posts: 166
Likes: 0
Received 0 Likes
on
0 Posts
Well i need to post pictures of my new box i made, i will do that in the morning when its light out. I will try to explain what i did in words.
I made a frame that fits the two batteries out of 1 1/4 inch angle iron. then i welded expanded metal to the bottom. I also made a support leg from the bottom of the battery box and it bolts to the fender for extra support.
As far as the overflow tank, i just welded a sheet metal spade to the side of the new battery box. This spade fits into the slot on the back of the overflow tanks snugly. i also made another piece that supports the bottom of the overflow tank, it has the rubber bushing from the original location and the plastic pin on the bottom goes right in to it.
I know its confusing to explain without pics. but they will come.
And the Optima battery was chosen because of its small size. i believe that it is for a honda civic. It is a D51 size.
And last but not least, this should all be fine on my alternator because i have not added any electrical devices, just an extra battery. I was running lights, and subs + amp on my old setup fine. My winch will be installed soon, that is why i added the extra battery
P.S. I like your setup 98.T4R especially the nylon strap to hold it down. i did the same thing and it is simple and cheap.
Thanks all for the complements
12-15-2009, 06:23 PM
#16
Registered User
Join Date: Feb 2009
Location: colorado
Posts: 120
Likes: 0
Received 0 Likes
on
0 Posts
very cool, that sounds really similar to mine as far as the tray and bolting to the fender. i did away with the strap lol it was weakish. i know have a overly strong bracket for them.
12-17-2009, 05:44 AM
#17
Be sure to post to this thread when you post up the full install and fabrication. I would really like to do this install. I would really like to see the fabrication of the brackets as well as where/how you mounted them to the fender. Really a picture kinda guy, helps me to understand the installation process. I can figure out things once I understand your thought process. I am wanting to learn how to weld and this would be a great first project.
It seems if you went with two of the same size optima as you used (D51)would give you a wee bit more space. Both installs are very nicely done. May have to figure out another location for the isolator as I have an auxillary fuse panel installed at the location you chose for the isolator. Was looking at where I could mount the second battery but can't really relocate much under my hood. I think the side by side narrower Optima may be the ticket. Well done
It seems if you went with two of the same size optima as you used (D51)would give you a wee bit more space. Both installs are very nicely done. May have to figure out another location for the isolator as I have an auxillary fuse panel installed at the location you chose for the isolator. Was looking at where I could mount the second battery but can't really relocate much under my hood. I think the side by side narrower Optima may be the ticket. Well done
12-17-2009, 07:29 AM
#18
Registered User

Join Date: Jan 2006
Location: Cape Cod
Posts: 459
Likes: 0
Received 0 Likes
on
0 Posts
i am not tryin to be mean. great install and nice lil writeup, but u cant actually trust that dinky little strap. do u offroad? i am guessing the batterys weigh over 50 pounds 2gether. 1 good bump and you're gona have a bit of a mess.
Last edited by akaphilly; 12-17-2009 at 07:54 AM.
12-17-2009, 02:12 PM
#19
Registered User
Not to change the subject completely--but what about installing a larger deep cycle battery and then using a little 1000w $!00 genertator for just--in-case problems?
Austin Taco brought this idea up and it made me go--yeah--yeah thats a good idea versus two batteries.
Currelty I run the deep cycle Platinum Diehard with a new battery plate and modded battery hold down....
Austin Taco brought this idea up and it made me go--yeah--yeah thats a good idea versus two batteries.
Currelty I run the deep cycle Platinum Diehard with a new battery plate and modded battery hold down....
12-17-2009, 04:08 PM
#20
Registered User
Join Date: Feb 2009
Location: colorado
Posts: 120
Likes: 0
Received 0 Likes
on
0 Posts