Dutchbelly's 1988 4runner Build-up
 06-15-2011, 02:54 PM
#181
Registered User
Thread Starter
Join Date: Apr 2011
Location: Southern Ontario
Posts: 428
Likes: 0
Received 0 Likes
on
0 Posts
I've got a buddy who's going to come over tomorrow to help. if that doesn't work i'm going to find a way to cut them off without wreaking the hubs. and you don't strike me as a defeatist at all chef.
 06-15-2011, 04:19 PM
#183
Registered User

Dutch:
From the picture of your tank and pick-up it looks like you've got a 65 litre (17 gal) tank.
23206-35160 should be the part # for a new OEM pick-up assembly. Toyota calls it a "Bracket". Check with you local dealer and see what the price is.
I live close to the US border and I buy all of my OEM parts from Champion Toyota in Houston Texas. I ship them to Maine, go pick them up, bring them into N.B and pay the HST. No middleman, no brokerage fees and a big saving!
By the way the price of that part at Champion is $115.08 U.S.
06-15-2011, 05:16 PM
#184
Registered User
Thread Starter
Join Date: Apr 2011
Location: Southern Ontario
Posts: 428
Likes: 0
Received 0 Likes
on
0 Posts
Thanks hadmatt. I'll look into it. The prices I saw floating around for the bracket were around 150 bucks. Not a big deal if that's all I needed, but it looks like I need a new pump sending unit, and preferrably a new tank too, because the inside is caked with rust. My father in law has a cousin that runs a junkyard nearby, and he's got him calling all the other yards he knows to see if he can source me out a whole unit. If that's not an option I'll have to buy new parts.
So here are a few pics of the carnage:
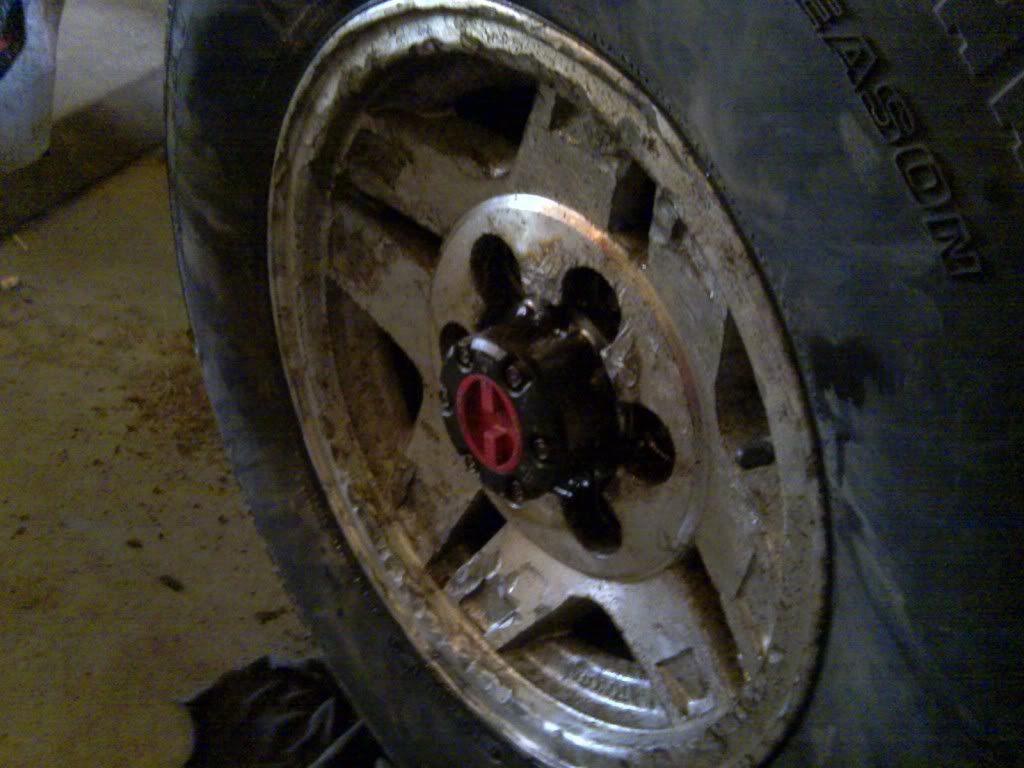
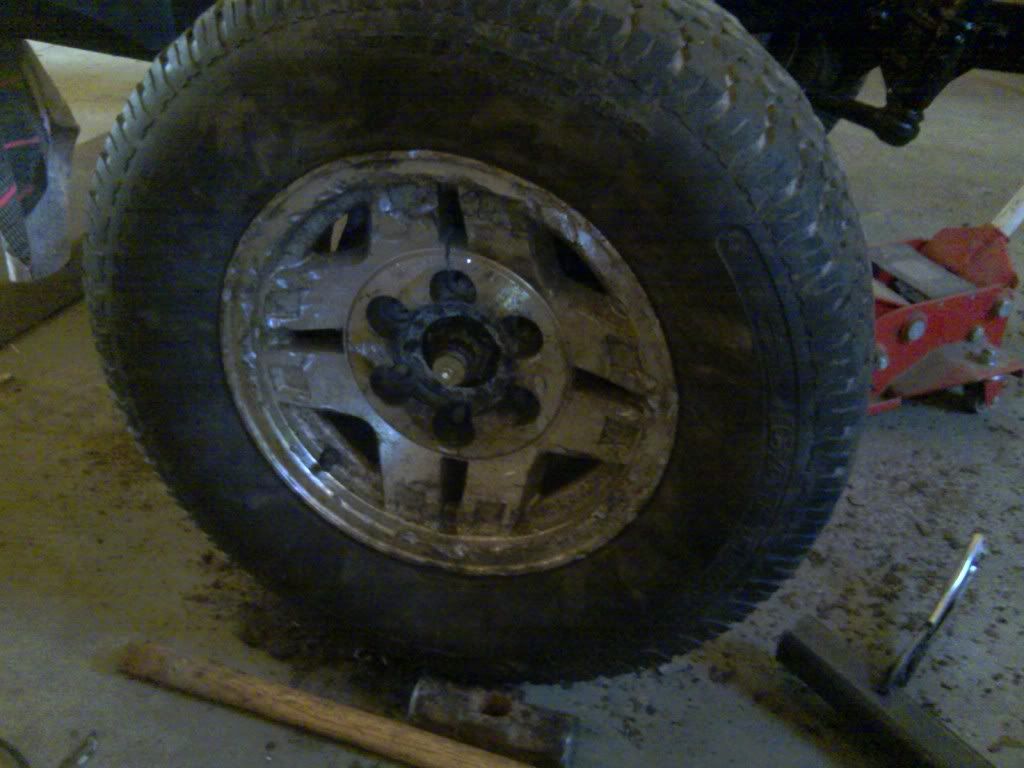
This is after about 3 hrs of working on just one of the two front rims. You can see from the dents I wasn't going easy on it. I ended up taking the freewheel hub assembly off and taking the torch right to the steel hub and then letting it cool. I was getting desperate. I beat on it for a while again, and then the sledge head came off the handle. I broke the sledge before I broke the darn rim free. I was about to give up for the night but than I noticed something while I was sitting on my rear and saying horrible words to the offending rim.
The lugs weren't centred on the holes anymore, which meant I had shifted the rim ever so slightly. It wasn't much, but it was more than I'd accomplished up until this point. I went and found another sledge and slowly turned the wheel while slamming the bottom of the rim as I went. It seemed to move ever so slightly but wouldn't break free. I then soaked it in penetrating fluid, hoping that it would work it's way in now that I had the rim budging slightly. It worked.
Hopefully tomorrow I can do the same with rim #2. Hopefully...
So here are a few pics of the carnage:
This is after about 3 hrs of working on just one of the two front rims. You can see from the dents I wasn't going easy on it. I ended up taking the freewheel hub assembly off and taking the torch right to the steel hub and then letting it cool. I was getting desperate. I beat on it for a while again, and then the sledge head came off the handle. I broke the sledge before I broke the darn rim free. I was about to give up for the night but than I noticed something while I was sitting on my rear and saying horrible words to the offending rim.
The lugs weren't centred on the holes anymore, which meant I had shifted the rim ever so slightly. It wasn't much, but it was more than I'd accomplished up until this point. I went and found another sledge and slowly turned the wheel while slamming the bottom of the rim as I went. It seemed to move ever so slightly but wouldn't break free. I then soaked it in penetrating fluid, hoping that it would work it's way in now that I had the rim budging slightly. It worked.
Hopefully tomorrow I can do the same with rim #2. Hopefully...
06-15-2011, 07:32 PM
#189
Lol it's just a personal preference thing. You've got to paint your truck the colour that makes you happy. I've got no issues with other people driving around in yellow trucks, but pretty low on my list of colour preferences when it comes to my own vehicle. It didn't stop my wife from painting our downstairs bathroom yellow, though. She says it's supposed to make it cheery in there. I've never thought of a bathroom as a cheery place, so the only logic I could think of to paint the walls in there yellow was it would be less noticeable if you had a history of bad aim. If you know what I mean...
06-16-2011, 04:40 AM
#190
Super Moderator
Staff
iTrader: (1)
Join Date: Aug 2008
Location: Anderson Missouri
Posts: 11,788
Likes: 0
Received 21 Likes
on
19 Posts
That was some work out. Never seen anything like it. Just imagine if you would of had a flat on the road somewhere, thinking no big deal, get the spare out. Good thing you found out now. Great job.
06-16-2011, 07:21 AM
#191
Registered User
Thread Starter
Join Date: Apr 2011
Location: Southern Ontario
Posts: 428
Likes: 0
Received 0 Likes
on
0 Posts
Funny you should mention having a flat terry. my daily driver doesn't even have a spare tire. the carrier was taken off by the po. The only reason it hasn't been a huge problem is the tires i have on it have such strong side walls I can limp it to the tire place with almost no pressure without riding on the rim. first time I had a flat the tire pressure didn't even register on the gauge and i thought for sure I'd be replacing the tire after i drove it to the shop that way. that was 3 years ago and i believe that tire is still on the truck after a cheap patch job. needless to say i'll be looking into buying the same tires for this truck. they're worth the expensive price tag.
06-16-2011, 04:21 PM
#192
Registered User
Sending unit for an SR5 with a low fuel light is about 95 US, I just put one of those in too. The first pick up assembly that I put in my new tank 7 years ago came out of a car, possibly a corola or camry. I had to tweak it a little but it worked great till the pipes rusted off of it last fall. As far as pumps, most anything will fit. When I built my truck I did a 5m-ge conversion and I installed the 5M pump on to my pickup assembly with no problems, but you have to use the rubber isolator that fits the pump. I suspect that any 4 cylinder pump will work. If you are in a bind, I've got the 5M pump here and the original 22re pump that came with my 86 (I'd have to test it to see if it works) and my junked 89 4Runner at my brothers still has the pump in it.
06-16-2011, 07:26 PM
#194
Registered User
Thread Starter
Join Date: Apr 2011
Location: Southern Ontario
Posts: 428
Likes: 0
Received 0 Likes
on
0 Posts
Sending unit for an SR5 with a low fuel light is about 95 US, I just put one of those in too. The first pick up assembly that I put in my new tank 7 years ago came out of a car, possibly a corola or camry. I had to tweak it a little but it worked great till the pipes rusted off of it last fall. As far as pumps, most anything will fit. When I built my truck I did a 5m-ge conversion and I installed the 5M pump on to my pickup assembly with no problems, but you have to use the rubber isolator that fits the pump. I suspect that any 4 cylinder pump will work. If you are in a bind, I've got the 5M pump here and the original 22re pump that came with my 86 (I'd have to test it to see if it works) and my junked 89 4Runner at my brothers still has the pump in it.
06-16-2011, 08:12 PM
#195
Registered User
Thread Starter
Join Date: Apr 2011
Location: Southern Ontario
Posts: 428
Likes: 0
Received 0 Likes
on
0 Posts
So I planned on spending all night working on the second rim, mostly because the first front rim took over 3hrs to free up. I didn't end up having the same amount of time because the Father in law needed help with gutting and skinning a pair of pork a local farmer needed to let go. One had a broken leg, one had a bad hip, and you can't legally butcher and sell "unhealthy" animals even if it doesn't effect the meat quality. You can however have them butchered for private/personal use without an inspection so it was 45mins of work and the time it takes to have a few "sociables" for a good share of the pork, so my loss of time was worth it's weight in meat.
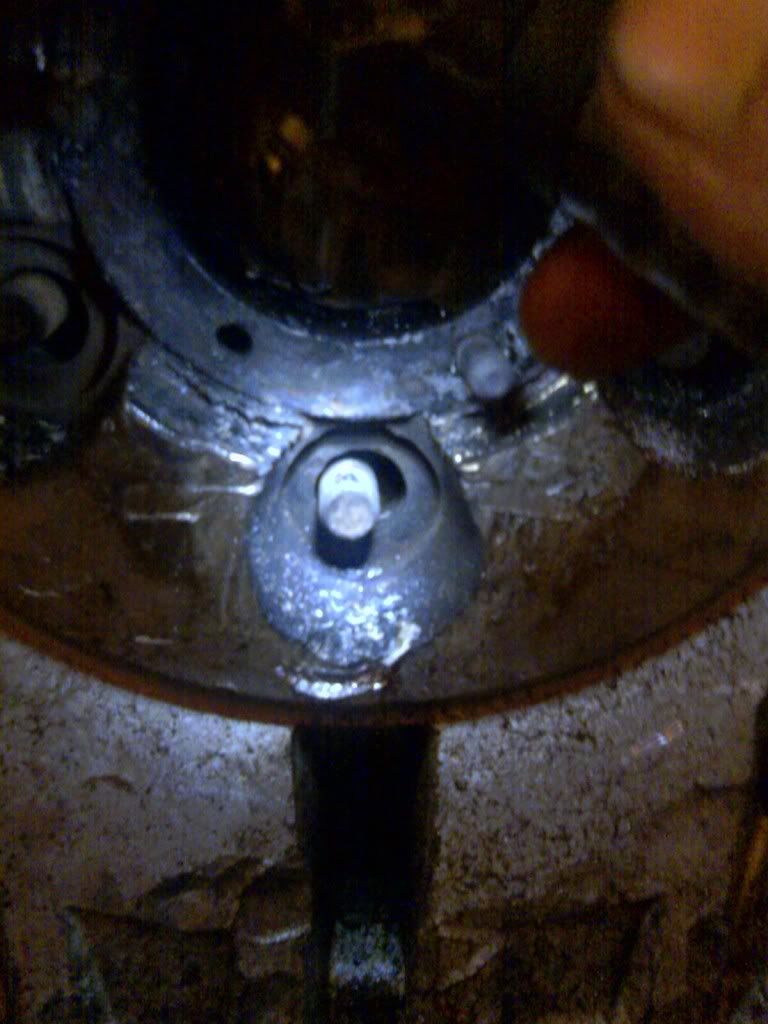
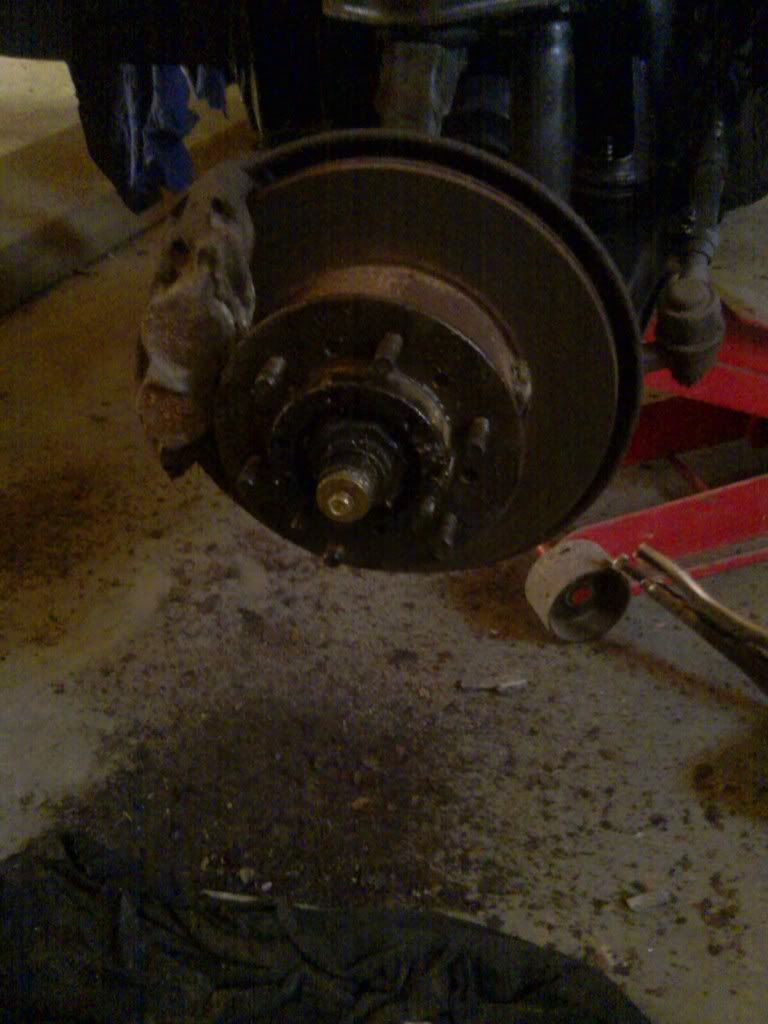
Oh, and I got the 2nd rim off. The 2nd rim took less than an hour, which means the first 2 weeks of work on the first rim were a waste of time. If you ever find yourself with a seized 4runner aluminium rim on the front of your truck, take the manual locking hub off at the expense of a gasket and a bunch of grease, heat the steel hub red hot (aim your heat between the hub and the rim while turning slowly- you want the least amount of heat in the bearings as possible), hit it a couple times around the rubber (I beat the crap out of the rim itself because I had replacement rims) to free up the aluminium rim from the hub, go for a beer while the hub cools and shrinks, have another beer because by now you need it, when you're calmed down - spin the wheel gradually while hitting the bottom of the wheel with a sledge (the bottom or top, if you trust your ball joints to take the force. If you hit the sides you'll never know for sure if the rim's free or if you're just turning the wheel), throw penetrating fluid around the hub when you see slight movement and repeat the process until the fluid works its way through enough for you to pull the wheel off. There's a chance you can do this without wrecking the rim, but I'm not sure that was a possibility in my case. If you're trying to save the rim, pump the tire to the max pressure you think it can possibly take and hit the rubber instead of the rim. You can put wood against the rim and hit the rim with a wood buffer, but you'll go through a lot of wood from it splintering. Once again: the first rim took me almost 4hrs to get off the last night I worked on it, and this is what I did at the end. The second rim took me under an hour because this is what I did at the beginning. I'll need to clean out the bearings, repack them, put in a new gasket for the freewheel hub (or whatever its' called) and put it all back together, so make sure you can't remove them without this process before you resort to it. I'll try to see if I can put together some pics for the process, I didnt' have much time after dealing with the pork so I just went at it without recording what I did. Cheers!
Oh, and I got the 2nd rim off. The 2nd rim took less than an hour, which means the first 2 weeks of work on the first rim were a waste of time. If you ever find yourself with a seized 4runner aluminium rim on the front of your truck, take the manual locking hub off at the expense of a gasket and a bunch of grease, heat the steel hub red hot (aim your heat between the hub and the rim while turning slowly- you want the least amount of heat in the bearings as possible), hit it a couple times around the rubber (I beat the crap out of the rim itself because I had replacement rims) to free up the aluminium rim from the hub, go for a beer while the hub cools and shrinks, have another beer because by now you need it, when you're calmed down - spin the wheel gradually while hitting the bottom of the wheel with a sledge (the bottom or top, if you trust your ball joints to take the force. If you hit the sides you'll never know for sure if the rim's free or if you're just turning the wheel), throw penetrating fluid around the hub when you see slight movement and repeat the process until the fluid works its way through enough for you to pull the wheel off. There's a chance you can do this without wrecking the rim, but I'm not sure that was a possibility in my case. If you're trying to save the rim, pump the tire to the max pressure you think it can possibly take and hit the rubber instead of the rim. You can put wood against the rim and hit the rim with a wood buffer, but you'll go through a lot of wood from it splintering. Once again: the first rim took me almost 4hrs to get off the last night I worked on it, and this is what I did at the end. The second rim took me under an hour because this is what I did at the beginning. I'll need to clean out the bearings, repack them, put in a new gasket for the freewheel hub (or whatever its' called) and put it all back together, so make sure you can't remove them without this process before you resort to it. I'll try to see if I can put together some pics for the process, I didnt' have much time after dealing with the pork so I just went at it without recording what I did. Cheers!
06-16-2011, 08:15 PM
#196
Registered User
Thread Starter
Join Date: Apr 2011
Location: Southern Ontario
Posts: 428
Likes: 0
Received 0 Likes
on
0 Posts
lol I hear you. My pics might not be good, but I have the rims to prove it. I'll have to take a few good pics of the first rim in good light and you'll understand how much work it was.
06-17-2011, 05:24 AM
#198
Registered User
On the brake issue, if you want to get tid of the proportioning valve at the rear of the vehicle and only have to run one line back to your rear brakes, I have a solution for you...at least this is what I did and my brakes have not given me a minutes problem in 7years.
Any vehicle that has disk brakes in the front and drum brakes in the rear has some type of proportioning valve to limit the amount of brake fluid and the pressure to the rear brakes so that your front disks still do the majority of the braking and the rear drums don't lock up.
When I built my truck a used an 88 Cressida as a donor for my 5m-ge engine. I had the complete car. The cressida had factory front and rear disk brakes, but they were of course smaller than my truck, but the cressida had a factory proportioning valve mounted below the master cylinder. I took the 15/16 bore master cylinder and proportioning valve and mounted it in my truck. The master cylinder bolted to my truck booster and I used the factory cressida brake lines that connected the proportioning valve to the master cylinder, fab'd a bracket for the proportioning valve and mounted it to the drivers inner fender. On the passengers side I swapped the fittings mounted to the frame with to "L" fittings (I think these were Cresida as well, or one might have been the trucks front fitting and the other was a cressida fitting, I'm trying to remember back 7 years and most of the time I don't remember yesterday!). I made 2 new pipes from the master across the firewall to the "L" fittings one line went to the passengers front caliper, the other went to the rear flex hose above the rearend. Nice and neat, no more rear valve and the very best of brakes. I installed a rear transfer case brake 7 years ago and I'll be doing a complete rebuild on my pick-up later this summer, with toyota rear disks. I'm going to keep this setup and see how the cressida proportioning valve works with front and rear disks on my truck. I think it will be great, after all that is the system that it was designed for.
Oh and the rebuild...I bought an 87 cab from a fellow Yotatech brother here in N.B. It came off of a 1 ton that some trade or technical school owned in Quebec. It sat inside for 20 years! The cab is immaculate, little bit of surface rust in a couple of places. My truck has always been SAS since I built it, but The 5M is being replaced with a 1UZ-FE and an R151F tranny, with a 23 spline transfer case.
Right now my son is building a 84 Suzuki SJ410. He put a Samurai frame under it, 85 toyota axles front and rear, my 89 4 runner 5 speed and transfer case with a 1.9 IDI Vw turbo diesel. Right now he has 529 gears with a Detroit locker for the front and he is going to put a spool in the rear. If the gearing is to much he'll drop back to 456 or 430's. It should be quite a rig, he's trying to get it ready for a run in September. I'm just finishing up a Kia Sportage to use as a DD while I rebuild my Pick-up. Once I start my build I be putting it on here. I'm enjoying your built keep it up.
Last edited by Hadmatt54; 06-17-2011 at 05:26 AM.
06-17-2011, 11:51 AM
#199
Super Moderator
Staff
iTrader: (1)
Join Date: Aug 2008
Location: Anderson Missouri
Posts: 11,788
Likes: 0
Received 21 Likes
on
19 Posts
Your rims have been something else. Glad to hear you got it. My guage has the light but have never seen it lit. I think I seen on Yotarobs build that the fuel level sensor in the tank is supposed to have an extra wire (3 I think) where as models without that option only have 2wires.
Im not 100% sure about this, but I did see in my owners manual about the light. I have yet to find a yota of this generation that had one that worked.
You move quick and are patient, that rim was a test of patience.lol
Im not 100% sure about this, but I did see in my owners manual about the light. I have yet to find a yota of this generation that had one that worked.
You move quick and are patient, that rim was a test of patience.lol


