TheBrownNote's 1985 Pickup Build-Up Thread
 08-14-2009, 06:17 PM
#1
Registered User
Thread Starter
Join Date: Jan 2009
Posts: 27
Likes: 0
Received 0 Likes
on
0 Posts
Hey there yotatech,
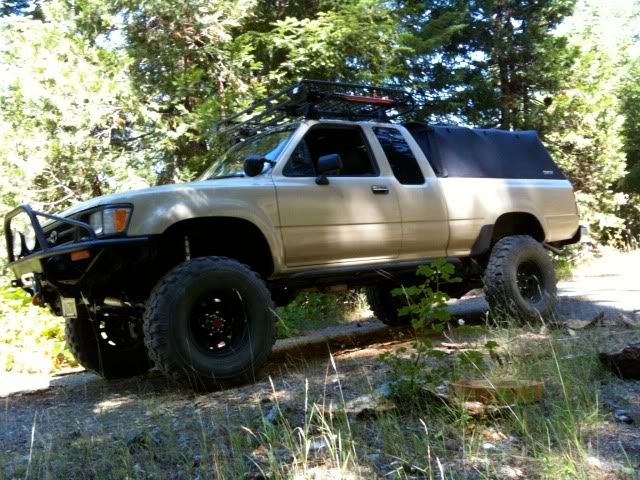
I've decided to modify my 1985 SR5 Pickup. I bought the truck in the summer of 2007 with ~172,xxx miles. I may be the 4th or 5th owner; we're not so sure about it. I know the car was originally from Florida, so it's traveled far in the past 20+ years to end up here in Eugene, Oregon.
At around 179,xxx I discovered a cracked block AND blown head gasket. The motor was replaced with a new (rebuilt used) engine from Asian Import Automotive. Since then the rig has done good save for a faulty AFM and funky auto hubs.
I decided to start building the truck about 6 months ago, and was waiting for warmer summer months to begin the build. I'm not building any specific sort of rig, so my apologies to everybody expecting some crazy rock-crawling beast or a big fat mudder (who muds these things anyways? hehe just kiddin'). My intentions are to build an all around bomber truck; a survival rig of sorts, able to take me where I want to go and not get stuck in the process.
Last month, I had the factory automatic locking hubs replaced with a set of Warn premium manual locking hubs; they are bomber. My intentions were to perform this modification on my own, however I do not own a 54 mm, thin-walled, 6 sided deep socket (spindle nut necessary to replace the hubs), so I took it to Archer Brother's 4x4 for the install (sorry Sky, I didn't know you existed at the time!). So without further ado, here is a future modification list as well as some photos of the rig for your viewing pleasure. Stay tuned for the next few months, as this build will take quite a while. I'll be looking for some serious in the near future, so keep reading! Thanks,
Sam
Future Modifications:


 What a beaut!
 Semi-legal!!!
 Solid welds!
Thanks again y'all, and stay tuned!!!
I've decided to modify my 1985 SR5 Pickup. I bought the truck in the summer of 2007 with ~172,xxx miles. I may be the 4th or 5th owner; we're not so sure about it. I know the car was originally from Florida, so it's traveled far in the past 20+ years to end up here in Eugene, Oregon.
At around 179,xxx I discovered a cracked block AND blown head gasket. The motor was replaced with a new (rebuilt used) engine from Asian Import Automotive. Since then the rig has done good save for a faulty AFM and funky auto hubs.
I decided to start building the truck about 6 months ago, and was waiting for warmer summer months to begin the build. I'm not building any specific sort of rig, so my apologies to everybody expecting some crazy rock-crawling beast or a big fat mudder (who muds these things anyways? hehe just kiddin'). My intentions are to build an all around bomber truck; a survival rig of sorts, able to take me where I want to go and not get stuck in the process.
Last month, I had the factory automatic locking hubs replaced with a set of Warn premium manual locking hubs; they are bomber. My intentions were to perform this modification on my own, however I do not own a 54 mm, thin-walled, 6 sided deep socket (spindle nut necessary to replace the hubs), so I took it to Archer Brother's 4x4 for the install (sorry Sky, I didn't know you existed at the time!). So without further ado, here is a future modification list as well as some photos of the rig for your viewing pleasure. Stay tuned for the next few months, as this build will take quite a while. I'll be looking for some serious
in the near future, so keep reading! Thanks,Sam
Future Modifications:
- Full OME lift (w/ drop draglink and extended steel-braided brake lines)
- LC Engineering Street header (purchased and arrived already!
 )
) - Custom 2.25" exhaust, no cat, mild muffler
- Intake/Battery location swap
- 32 x 11.50 BFG All-Terrains
- Detroit Locker
- 4:56 gears if necessary to compliment the above parts
- Surface rust removal/ respray of some body panels
- New OEM parts where necessary (eg. new wiper arms)
- Rhino lining the bed
- Storage compartment for the bed
- Custom bumpers front and rear (who wants to help me??)

- Winch of some sort
What a beaut! Semi-legal!!! Solid welds!Thanks again y'all, and stay tuned!!!
Last edited by TheBrownNote; 08-14-2009 at 06:38 PM.
 08-14-2009, 06:41 PM
#3
Registered User
Thread Starter
Join Date: Jan 2009
Posts: 27
Likes: 0
Received 0 Likes
on
0 Posts
08-14-2009, 06:44 PM
#4
Registered User
Join Date: May 2007
Location: Dinuba Ca.
Posts: 151
Likes: 0
Received 0 Likes
on
0 Posts
that is a nice truck man it will be a great rig to build but along with those bfgs you will need atleast 3 inches of lift and if your gunna go 3 you might as well go 4 so you can go with cross over steering as well and if you go 32x11.50 s you might as well go 33x12.50s and 4.88s I am runing 32s rite now with 4.88s and wish I had 33s but with 32s the 4.56s will be ok not sure I'm sure others will chime in on that. Any ways nice truck and good luck with that rig it is a good one and capable of any thing.
08-14-2009, 06:49 PM
#5
Registered User
Thread Starter
Join Date: Jan 2009
Posts: 27
Likes: 0
Received 0 Likes
on
0 Posts
that is a nice truck man it will be a great rig to build but along with those bfgs you will need atleast 3 inches of lift and if your gunna go 3 you might as well go 4 so you can go with cross over steering as well and if you go 32x11.50 s you might as well go 33x12.50s and 4.88s I am runing 32s rite now with 4.88s and wish I had 33s but with 32s the 4.56s will be ok not sure I'm sure others will chime in on that. Any ways nice truck and good luck with that rig it is a good one and capable of any thing.
 08-14-2009, 07:07 PM
#6
Registered User

Join Date: Jul 2009
Location: Ut
Posts: 26
Likes: 0
Received 0 Likes
on
0 Posts
that is a nice truck man it will be a great rig to build but along with those bfgs you will need atleast 3 inches of lift and if your gunna go 3 you might as well go 4 so you can go with cross over steering as well and if you go 32x11.50 s you might as well go 33x12.50s and 4.88s I am runing 32s rite now with 4.88s and wish I had 33s but with 32s the 4.56s will be ok not sure I'm sure others will chime in on that. Any ways nice truck and good luck with that rig it is a good one and capable of any thing.
Perfect reasoning!!!!

Trending Topics
08-18-2009, 08:08 PM
#8
Registered User
Thread Starter
Join Date: Jan 2009
Posts: 27
Likes: 0
Received 0 Likes
on
0 Posts
Update 1: LCE Header installed!!!
This afternoon a friend and I installed my LCE header. I wish I could have documented the process, however the camera ran out of batteries after the first picture, and the charger is at the ladies house. Here's how the process went:
Step 1: Unhook battery cables~~
Step 2: I cut the exhaust off with a hacksaw right before the muffler. This was the only way I was able to take off the exhaust. Sawing metal is very entertaining when your cutting at awkward angles .
.
Step 3: After the latter half of the exhaust was removed, I unbolted the rest from the header and shimmied it off the hangers and out from under the rig.
Step 4: I unbolted the manifold, which was nerve racking. I didn't want to snap the studs or something horrible like that, so I put some WD40 on the bolts and let it soak in for a little while. Upon unbolting everything, I noticed that half the studs stayed in, while the other half came out completely.
Step 5: I cleaned the ports with some degreaser before putting the gasket on and bolting the header on. The header fit very easily, I just had to bend the lower heat shield out of the way and it slid right in. After bolting what I thought was everything down, I fired it up and realized that I spaced putting on the block-off plates. Oops. No worries. Bolted them on and fired it up...no leaks!!
Step 6: I attached the connector pipe to the header, and to my surprise, the pipe ran right up to the preview hanger. I used a coat hanger and a bit of the original hanger metal to secure it and take some stress off of the block.
Step 7: Last but not least, I had to cut, splice, and extent the O2 sensor, whose bung was now on the connector pipe. Easy stuff, although it was my first time soldering anything. I stripped the wire about 1.75 inches, made a slight bend, and twisted them together before soldering them up and putting on the electrical tape. I hooked everything back up, fired it up, and ....it's nice and loud .
.
Next up is a custom 2.25 exhaust made by a fellow here in Eugene. I'm stoked. I'll update with pictures once the camera is all charged.
Thanks,
Sam
Step 1: Unhook battery cables~~
Step 2: I cut the exhaust off with a hacksaw right before the muffler. This was the only way I was able to take off the exhaust. Sawing metal is very entertaining when your cutting at awkward angles
. Step 3: After the latter half of the exhaust was removed, I unbolted the rest from the header and shimmied it off the hangers and out from under the rig.
Step 4: I unbolted the manifold, which was nerve racking. I didn't want to snap the studs or something horrible like that, so I put some WD40 on the bolts and let it soak in for a little while. Upon unbolting everything, I noticed that half the studs stayed in, while the other half came out completely.
Step 5: I cleaned the ports with some degreaser before putting the gasket on and bolting the header on. The header fit very easily, I just had to bend the lower heat shield out of the way and it slid right in. After bolting what I thought was everything down, I fired it up and realized that I spaced putting on the block-off plates.
Oops. No worries. Bolted them on and fired it up...no leaks!!Step 6: I attached the connector pipe to the header, and to my surprise, the pipe ran right up to the preview hanger. I used a coat hanger and a bit of the original hanger metal to secure it and take some stress off of the block.
Step 7: Last but not least, I had to cut, splice, and extent the O2 sensor, whose bung was now on the connector pipe. Easy stuff, although it was my first time soldering anything. I stripped the wire about 1.75 inches, made a slight bend, and twisted them together before soldering them up and putting on the electrical tape. I hooked everything back up, fired it up, and ....it's nice and loud
.Next up is a custom 2.25 exhaust made by a fellow here in Eugene. I'm stoked. I'll update with pictures once the camera is all charged.
Thanks,
Sam
08-22-2009, 03:35 PM
#9
Registered User
Thread Starter
Join Date: Jan 2009
Posts: 27
Likes: 0
Received 0 Likes
on
0 Posts
Here are some pictures of the header I installed as well as the new custom exhaust:


Next up, I'll be doing some paint work to the truck. I've just received some paint in the mail, factory code 033 (toyota white), some primer, grease remover, and some sand paper. I'll be covering up all the little rust spots as well as repainting all of the trim. Stay tuned!
Sam
Next up, I'll be doing some paint work to the truck. I've just received some paint in the mail, factory code 033 (toyota white), some primer, grease remover, and some sand paper. I'll be covering up all the little rust spots as well as repainting all of the trim. Stay tuned!
Sam
09-01-2009, 09:47 PM
#11
Registered User
Last edited by toyospearo; 09-01-2009 at 09:49 PM.
09-03-2009, 07:54 AM
#13
Registered User
Thread Starter
Join Date: Jan 2009
Posts: 27
Likes: 0
Received 0 Likes
on
0 Posts
My paint and supplies were purchased from http://www.automotivetouchup.com/
09-03-2009, 08:11 AM
#14
Registered User
I got mine through a local auto paint store. I took the info in (code, name, etc.) and they mixed it up. The paint I used was a BASF paint from their Limco division. one thing I can tell you is if you use Limco or any specific name brand make sure to use the EXACT same name brand. If you mix the makers the paint does not match.
hope that helps.
hope that helps.
09-03-2009, 09:39 AM
#15
Registered User
Thread Starter
Join Date: Jan 2009
Posts: 27
Likes: 0
Received 0 Likes
on
0 Posts
Hey folks,
I'm interested in swapping the location of my battery and air filter, and was wondering if anybody here had tips pertaining to this modification? Specifically, how to move the AFM wires to the other side of the bay without splicing? Thanks!
Sam
I'm interested in swapping the location of my battery and air filter, and was wondering if anybody here had tips pertaining to this modification? Specifically, how to move the AFM wires to the other side of the bay without splicing? Thanks!
Sam
10-27-2009, 11:35 AM
#16
Registered User
Thread Starter
Join Date: Jan 2009
Posts: 27
Likes: 0
Received 0 Likes
on
0 Posts
Hey folks,
I'm looking for some advice on new tires. I'm thinking about purchasing some new BFG AT tires, and am wondering about which size is going to work best for my specific application.
The truck will be run mainly in the wet and snow, and my 30x9.50s are coming to an end.
I'm thinking about running 32X11.50s on some old rock crawler wheels (15x something....unknown offset). I've heard I can stuff these under without a rubbing problem depending on the size and offset of the wheel. What do you all think? Should I think about trying to find some 4.56 thirds? I've just added a full exhaust from the header back, so I've got some more power. I don't have money for the lift (full OME is going to run be around $1300), so trying to squeeze 33x10.50s is out of the picture, and I'm the kinda person who buys once and buys right i.e. no body lift for me.
I need opinions! Advice! Pictures! Anything!@!$!@#
10-28-2009, 11:04 AM
#17
Registered User
Join Date: Dec 2008
Location: Winston Salem
Posts: 329
Likes: 0
Received 0 Likes
on
0 Posts
not sure about stock ride height from that year but 33x10.5s will fit under a stock 4runner, shouldnt they fit your truck too?
1300 for a lift? what about new springs in the back then rears up front?
1300 for a lift? what about new springs in the back then rears up front?
10-29-2009, 11:24 AM
#19
Registered User
Join Date: Mar 2007
Location: Phoenix, Arizona
Posts: 680
Likes: 0
Received 0 Likes
on
0 Posts
fwiw here is a pic of my abused worn out ifs front end sagging. with 33x10.5x15.
i did have to pound in the pinch weld to stop the rubbage.
aired down offroad i didnt rub, would most likely at full lock and compressed up at street psi tho.
32x11.5 is a good choice to tho, little smaller, and more width for more traction
i did have to pound in the pinch weld to stop the rubbage.
aired down offroad i didnt rub, would most likely at full lock and compressed up at street psi tho.
32x11.5 is a good choice to tho, little smaller, and more width for more traction


