navyRedneck's 1985 Pickup Build-Up Thread
 03-24-2007, 06:11 PM
#61
Contributing Member
Thread Starter
Join Date: May 2006
Location: South Carolina
Posts: 377
Likes: 0
Received 0 Likes
on
0 Posts
Took it offroad for the first time today
Engine is still running really rich. Actually kinda worrying me as I read somewhere today that an overrich condition can wash the cylinder walls of oil and damage your engine... I hate reading about something that I've been doing and finding out that I could be damaging my engine. (oh, and that's in addition to clogging my brand new cat with the over-rich fuel mixture)
The AARP looks to be in good shape (no gas in the vacuum line). The float looks empty and I couldn't see gas trickling in the butterfly valve while the truck was running. The truck also diesels when I kill the ignition. I'm thinking of trying to rebuild the carb and if that fails, then order a rebuilt one from http://www.recarbco.com. I called today and the guy there said it would cost me 230 or so (I forget actual number). I really don't want to drop that much money into the carb but I really need the truck running.
I tried the 4wd (once offroad) for the first time and it worked well. I can get it in 4low but it jumps out after I shift to 2nd gear. I think one of the PO messed up the throw length when he installed the 3" lift.
Did I mention earlier that the suspension is completely shot? I can't imagine a 2 horse wagon being any worse. I almost got motion sickness from it. Even small bumps offroad led to 3 or 4 up and downs while the shocks dampened out. Although the radio was off I could almost hear "Oregon Trail" music playing... I think the 4runner has really spoiled me. It's bigger with nice coil springs in the rear and the IFS helps smoothen out bumps in the front. Toyota wasn't as far off shifting to IFS as I sometimes think. Definitely need to get a new suspension and then compare it. I know the sfa contributes to some of it but I bet better shocks and springs will fix a lot of it.
Yesterday I decided to try and break the bolts free on the front and rear diff. I got the front fill bolt free and checked the oil level. No oil visible on my finger. I kind of expected that so I went ahead and drained and refilled it then instead of waiting. I think the knuckles are leaking which reminds me once again that I need to rebuild the front axle soon. Rear diff oil was in pretty good shape but I replaced it as well. No significant amount of metal shavings in either axle so that was nice to find.
 03-25-2007, 02:03 PM
#62
Registered User
Join Date: Oct 2006
Location: Greeley Colorado
Posts: 746
Likes: 0
Received 0 Likes
on
0 Posts
dang man for a guy with no mechanical expertise your doing a hella of a job, you could try a weber carb if you legally can if so its a weber 32/34 much less complicated
03-25-2007, 03:29 PM
#63
Contributing Member
Thread Starter
Join Date: May 2006
Location: South Carolina
Posts: 377
Likes: 0
Received 0 Likes
on
0 Posts
Thanks, Just Learning. I spend a lot of time fixing my mistakes, though. For example, I figured out why I stripped out that exhaust manifold stud. I put anti-seize on it and didn't know to back off of the torque when torqueing it down. So I tried to take it to the factory spec of 33 ft-lbs with anti-seize on it and stripped it out at 25. I should have backed the 33 down about 40% or so which would have meant a max spec of 20 ft-lbs...
I don't know much about carbs but there's a good bit of discussion here on which carb is best and it seems that the Aisin stock carbs are the most reliable. That's why I'm currently only considering a stock carb. Someone please correct me if I'm wrong, though. I did send a PM to kyle_22r as he seems to be one of the guys that knows the most about carbs on this forum.
My current idea is this. I know a guy with a broken down 87 2wd yota pickup 22r in a junkyard in back of his shop. I'm not sure what's wrong with it but I'm gonna ask him to sell me the carb and some other parts off of it. From the toyota EPC that I have it looks like the 87 and 85 carbs are identical. I'm gonna guess this is because they were already using EFI by 85 and didn't waste any more money on developing the carb further. That means I can take his 87 carb and attempt a rebuild using a rebuild kit ($30 or so) and then test it out on my pickup. If I mess it up badly, then I go back to my original running-rich carb so I can drive the truck to a shop. Oh, and it looks like I will need to buy a vacuum hand-pump to do some of the testing.
Here's the EPC schematics comparing the 87 to the 85:
85 carb http://i147.photobucket.com/albums/r...203/85carb.jpg
87 carb http://i147.photobucket.com/albums/r...203/87carb.jpg
85 carb blownup http://i147.photobucket.com/albums/r...arbblownup.jpg
87 carb blownup http://i147.photobucket.com/albums/r...arbblownup.jpg
03-26-2007, 05:31 PM
#64
Contributing Member
Thread Starter
Join Date: May 2006
Location: South Carolina
Posts: 377
Likes: 0
Received 0 Likes
on
0 Posts
Got the junkyard carb
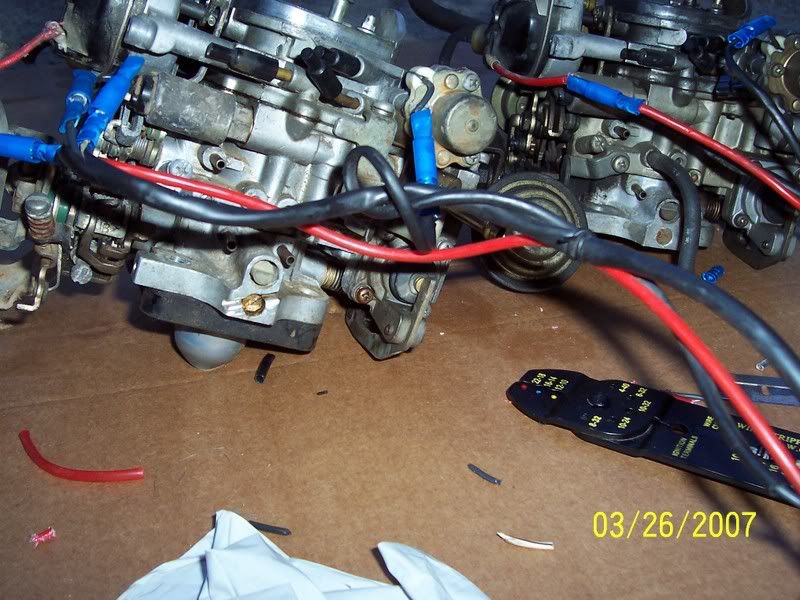
Got the carb but they are not exactly the same... The 87 carb has a different plug so I'm splicing the old plug into the new carb using disconnects in case I need to go back.
The 85 carb (rebuilt by a shop) is also missing the idle-up diaphragm (per the FSM) and someone also drilled out the idle mixture adjusting screw... The 85 carb also has some federal emission garbage on it.
85 on the left and 87 on the right
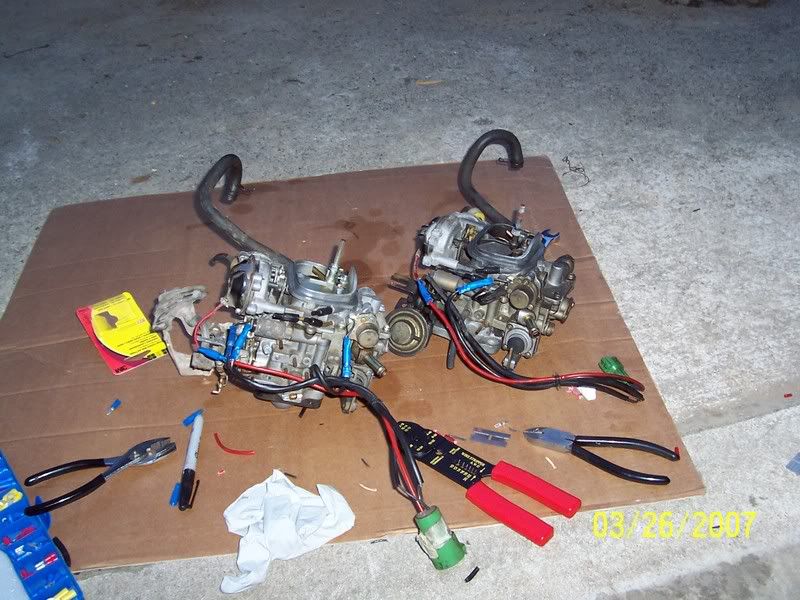
forgot to photoshop it first but you can easily see the drilled out plug which is different from the 87 carb on the right:
Oh, and I was completely out to lunch yesterday when I was looking at the 85 carb on the truck:
float sightglass has gas in it with the level at the very top
passenger side butterfly valve has gas trickling down it which is causing my too-rich condition
AAP does have gas in the vacuum hose. Not a lot but too much per the searches I've done here
Tomorrow I hope to get the 87 carb installed and see if it runs... Maybe I should get the fire extinguisher from the house first. Reminds me of the time I was soldering some pipes under the bathroom sink and caught some tape on fire. It didn't help that the wood the cabinet was made out of was already smoldering. Anyway, my wife has already seen it all...
The 85 carb (rebuilt by a shop) is also missing the idle-up diaphragm (per the FSM) and someone also drilled out the idle mixture adjusting screw... The 85 carb also has some federal emission garbage on it.
85 on the left and 87 on the right
forgot to photoshop it first but you can easily see the drilled out plug which is different from the 87 carb on the right:
Oh, and I was completely out to lunch yesterday when I was looking at the 85 carb on the truck:
float sightglass has gas in it with the level at the very top
passenger side butterfly valve has gas trickling down it which is causing my too-rich condition
AAP does have gas in the vacuum hose. Not a lot but too much per the searches I've done here
Tomorrow I hope to get the 87 carb installed and see if it runs... Maybe I should get the fire extinguisher from the house first. Reminds me of the time I was soldering some pipes under the bathroom sink and caught some tape on fire. It didn't help that the wood the cabinet was made out of was already smoldering. Anyway, my wife has already seen it all...
03-28-2007, 04:32 PM
#65
Contributing Member
Thread Starter
Join Date: May 2006
Location: South Carolina
Posts: 377
Likes: 0
Received 0 Likes
on
0 Posts
Good news!
I finished moving the wires and then I went on a hunt for the gasket to connect the carb to the intake manifold. Neither Autozone nor Advanced Auto Parts or Parks had the gasket. Of course, Parks, the last one, was able to tell me that Fel-pro only sells that gasket in the rebuild kit for $30. So I reused the old gasket.
Anyway, everything connected back up except for the dashpot system (also called the idle-up diaphragm per the diagram in the FSM). That was not on the carb I pulled from the truck but it's supposed to be per the FSM which says all Manual Transmission trucks should have it. Anyway, I left it on the carb but I didn't have the air filter and hose to connect to it. I guess I'll have to revisit my friend's junkyard to take that off the truck as well. For now it looked like it wouldn't prevent the truck from running per the FSM so I left it as is.
I tried to crank the truck, checking the sightglass every so often. It finally filled up to the middle and still wouldn't crank so I shot some carb start into the intake. Then the truck fired up. I still noticed lots of gas pouring from the passenger side butterfly valve but that eventually stopped as I continued hooking up vacuum lines. The truck sounds much better now although I still think I need a carb adjustment badly. I'll probably take it to my mechanic friend and see what he thinks. So the truck is running again!
My parts came in from rockstomper (new winch line, shackes for my bumper build, and treesaver). Warn also sent me some papers for my 22 year old winch. They included some troubleshooting stuff to make sure the winch is working good. I'm looking forward to mounting the winch and making sure its working good. That'll be after I get a weld repair on the bullguard and pick up some new grade 8 bolts.
I also picked up a 12" long receiver blank from Northern Tools (awesome store!!) for $20. Between that and the shackle mounts from Rockstomper I'm now ready to order some steel. My welding buddy said he gets a discount on steel via his company so maybe that will help out, too. I'm still unsure how much bracing to do in the back to make sure the receiver is strong enough.
Back to this thread to get that question answered:
https://www.yotatech.com/forums/f88/simple-cheap-heavy-duty-bumper-idea-110331/
04-01-2007, 04:07 PM
#67
Contributing Member
Thread Starter
Join Date: May 2006
Location: South Carolina
Posts: 377
Likes: 0
Received 0 Likes
on
0 Posts
My brain is still out to lunch
I'm still all messed up here. Here's what I know (or think I know) now:
I'm NOT supposed to have the idle-up diaphragm dash pot system. It does say "manual transmission only" in the 85 FSM but it's under the EFI section and I have a carb... So I need to take that off and go back to the original carb design that I pulled off.
I also decided to trace all the vacuum lines using the FSM diagram. Guess what I found? Yep, two problems:
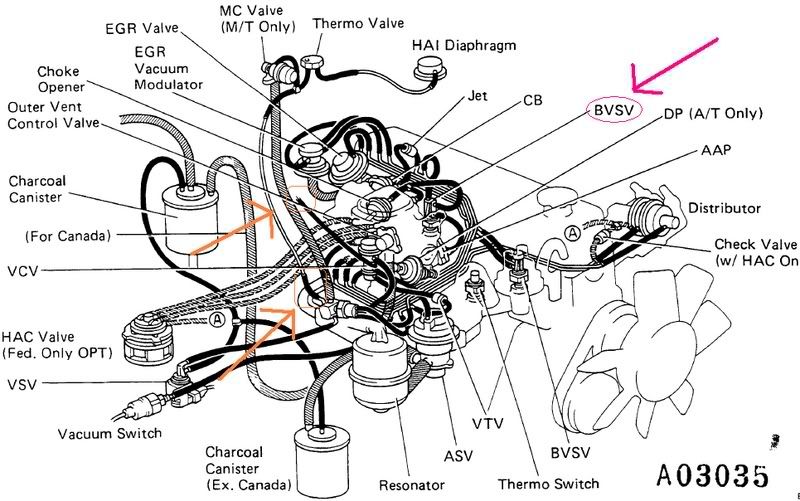
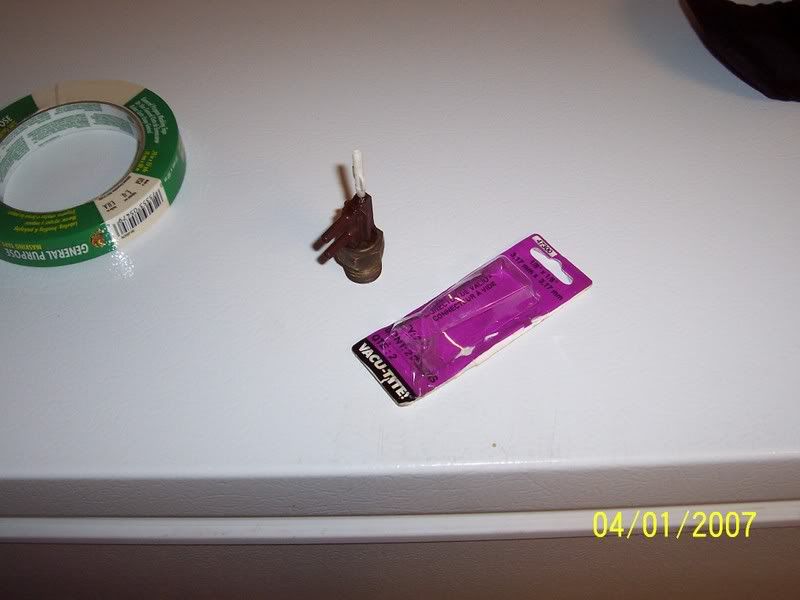
1. Shown by the pink line on the diagram. BVSV reed valve top plug is broken off and plugged and so is the vacuum line that was supposed to be on it. I did take it off and boil it to make sure the reed valve opened like it's supposed to. I then rigged it to make it work (similar to the VSV valve on my 4runner). Same fix that I got off of this forum somewhere else. I used a plastic T-fitting that I sanded down to plug into the port and the made it permanent using super-glue. The fitting is 1/8" by 1/8". It works great on the rubber hose but needs sanding to plug into the reed valve. If you don't expoxy it it will come off later. I learned that from the 4runner when it quit at a redlight on me...
2. Vacuum hoses were incorrectly plugged in. Shown by the orange lines. They were swapped. Fixed those in 10 seconds.
I'm NOT supposed to have the idle-up diaphragm dash pot system. It does say "manual transmission only" in the 85 FSM but it's under the EFI section and I have a carb... So I need to take that off and go back to the original carb design that I pulled off.
I also decided to trace all the vacuum lines using the FSM diagram. Guess what I found? Yep, two problems:
1. Shown by the pink line on the diagram. BVSV reed valve top plug is broken off and plugged and so is the vacuum line that was supposed to be on it. I did take it off and boil it to make sure the reed valve opened like it's supposed to. I then rigged it to make it work (similar to the VSV valve on my 4runner). Same fix that I got off of this forum somewhere else. I used a plastic T-fitting that I sanded down to plug into the port and the made it permanent using super-glue. The fitting is 1/8" by 1/8". It works great on the rubber hose but needs sanding to plug into the reed valve. If you don't expoxy it it will come off later. I learned that from the 4runner when it quit at a redlight on me...
2. Vacuum hoses were incorrectly plugged in. Shown by the orange lines. They were swapped. Fixed those in 10 seconds.
04-05-2007, 02:03 PM
#69
Registered User
The diagram above is of a non-cali model 22R carb
FYI
there were a lot of different model carbs made for the 22R but two basic models, a cali and a non-cali ... its emission stuff.
MY 87 4x4 has the non-cali and our 84 2wd has the cali..
if you need some help gettn' running I've helped some others on here with their carbs. I've rebuilt the cali model and had mine apart and back together as well.
04-05-2007, 02:12 PM
#70
Registered User
went back and read a few more of your posts
running rich? I had same issue and rebuilding the carb fixed it. Theirs a thing called a power piston and power valve in our carbs, powervalve is @ the bottom of the gas bowl and the piston is at the top. They can get gunked up.
rebuild kits come with a new power valve but you can just clean the piston
If the float sticks it can cause gas to poor in and a flood the carb.
I'd get that $30 kit and tear the carb apart, get some carb cleaner few cans an egg carton (Great for keeping track of the parts) and clean it out. Replace the fuel filter while you're at it.
04-19-2007, 06:35 PM
#71
Contributing Member
Thread Starter
Join Date: May 2006
Location: South Carolina
Posts: 377
Likes: 0
Received 0 Likes
on
0 Posts
Drew303, thanks for the offer of help. Currently the truck is still at my friend's garage. I told him to take his time so I can slow the bleeding wallet problem the truck is causing me. He's trying to get the AC to hold a vacuum and charge in freon. He also said he would take a look at the carb and give me a direction to go. In the meantime I'm counting pennies to see how to pay for a new suspension.
I've decided to go with ARB OME because this will be a hunting vehicle, not rock climbing, and I wanted a bolt-on suspension because it's a daily driver and I wanted to minimize both the resulting lift and fabrication required.
Here's what I know I need so far (per Buddy and Nils at ARB):
CS008FA front springs, left and right. These are soft springs.
CS009R rear springs, left and right. These are medium springs.
N84 soft valve nitro shocks for the front
N85 firm valve nitro shocks for the rear
This is based on running a bullbar and winch in front and a camper shell (eventually) and hunting supplies and a steel rear bumper with both DD and offroad driving. This is good for up to 110 lbs in the front and anything between 0 and GVM in the rear. Buddy also told me that if the rear is still too firm that I could take out a leaf.
My biggest problem until now has been shipping since the only warehouse that I could order these from has been on the West Coast ($150 shipping bill). I talked to Buddy King at ARB today and he said that they are ready to buy and build a warehouse on the East Coast but it would be 6 months until ready to start shipping parts from it. It would be nice to wait until then to save a few dollars but I'm looking at restarting hog trapping by the beginning of next month. The 4runner can't go down the trails that I need to get down so the truck needs to get finished. (I'm tired of carrying 5 gallon buckets of corn and diesel for over 200 yards and it's even worse if you actually get to kill something that far in)
I think I have one place that charges flat-rate to all 48 states and one that offers free shipping. Between those 2 I think I can save $100 or so. Here are the two sites I'm looking at:
http://www.truckaddons.com (free shipping over $200)
http://www.torasport.com (flat rate to 48 states)
I'm also ordering cheap poly bushings, trailgear greaseable bolts, and an anti-inversion kit from ARB (Nils from tech told me that I needed that for the rear). I hope to reuse my shackles. He also said to check the spring perches as many get beat up and can actually cause the leaf springs to bend around the axle. He said the cheapest fix was to grind down the edges and weld on 3/16" steel plate for new perches.
Not sure about ordering the steering stabilizer yet. When I order all this will probably depend on the the repair bill to get the AC system working (fingers crossed that it will even work since I'm using some junkyard parts and who knows how long ago the compressor has actually worked). He's confident he can covert it over to R-134A since I bought a new accumulator.
All thoughts, suggestions, or criticisms are appreciated.
05-19-2007, 03:34 PM
#72
Contributing Member
Thread Starter
Join Date: May 2006
Location: South Carolina
Posts: 377
Likes: 0
Received 0 Likes
on
0 Posts
I ordered a reman'd carb from National Carburetors for $200. It's running but still not as smoothly as I'd like. My evaluation on them is still out as I still need to get the carb adjusted a little finer.
I also finally installed a rear view mirror although now my dome light doesn't work. I worked on it for 30 minutes as the electrical part is really, really simple. For the life of me I can't figure it out. I tried sanding the contacts to get better electrical contact and I tried shorting past some of the stuff. I guess I need an electrical troubleshooter to get that fixed.
AC is still messed up as both the accumulator I ordered and the junkyard hose don't match up to my AC system. Probably gonna get a custom hose built and get autozone to swap out the accumulator for a generic one with the right fittings.
I also have a friend selling me a camper shell. It looks a little rough but it will do the job (which is locking up my guns and hunting gear when I'm in the woods). For $25 I'm not too concerned how it looks.
Next problem facing me is one that I need some help on. I'm hoping that 4crawler will respond as I think his fix here will take care of it:
http://www.4crawler.com/4x4/ForSale/...wShifter.shtml
The problem is that every time I shift into 4 low and shift to 2nd gear the tranny gear shifter knocks the transfer case shifter out of 4 low. Pretty frustrating since I need 4 low to run those 33" tires that I'm putting on soon. (4.88 gears to come later as cash is available).
My problem is that someone redneck-rigged it before me and I'm not sure that the 4crawler fix may only work for the un-rigged setup.
Here are the pictures showing my problem:
http://i147.photobucket.com/albums/r...204/1st4hi.jpg
1st 2 hi with no problems going all the way to 5th and reverse
http://i147.photobucket.com/albums/r...204/2nd4hi.jpg
2nd 2 hi
http://i147.photobucket.com/albums/r...204/rev4hi.jpg
reverse 2 hi See where someone already did a redneck job cutting the sheet metal after the 3" body lift? This tells me that something is already messed up.
Now shift into 4 low
http://i147.photobucket.com/albums/r...04/1st4low.jpg
1st gear in 4 low

2nd gear in 4 low. It is okay here but when the boots are installed this is where the tranny shifter forces the transfer shifter out of 4 low.
http://i147.photobucket.com/albums/r...%204/boots.jpg
picture of my boots in case they are the problem. Dunno if this is factory standard or not.
I also finally installed a rear view mirror although now my dome light doesn't work. I worked on it for 30 minutes as the electrical part is really, really simple. For the life of me I can't figure it out. I tried sanding the contacts to get better electrical contact and I tried shorting past some of the stuff. I guess I need an electrical troubleshooter to get that fixed.
AC is still messed up as both the accumulator I ordered and the junkyard hose don't match up to my AC system. Probably gonna get a custom hose built and get autozone to swap out the accumulator for a generic one with the right fittings.
I also have a friend selling me a camper shell. It looks a little rough but it will do the job (which is locking up my guns and hunting gear when I'm in the woods). For $25 I'm not too concerned how it looks.
Next problem facing me is one that I need some help on. I'm hoping that 4crawler will respond as I think his fix here will take care of it:
http://www.4crawler.com/4x4/ForSale/...wShifter.shtml
The problem is that every time I shift into 4 low and shift to 2nd gear the tranny gear shifter knocks the transfer case shifter out of 4 low. Pretty frustrating since I need 4 low to run those 33" tires that I'm putting on soon. (4.88 gears to come later as cash is available).
My problem is that someone redneck-rigged it before me and I'm not sure that the 4crawler fix may only work for the un-rigged setup.
Here are the pictures showing my problem:
http://i147.photobucket.com/albums/r...204/1st4hi.jpg
1st 2 hi with no problems going all the way to 5th and reverse
http://i147.photobucket.com/albums/r...204/2nd4hi.jpg
2nd 2 hi
http://i147.photobucket.com/albums/r...204/rev4hi.jpg
reverse 2 hi See where someone already did a redneck job cutting the sheet metal after the 3" body lift? This tells me that something is already messed up.
Now shift into 4 low
http://i147.photobucket.com/albums/r...04/1st4low.jpg
1st gear in 4 low
2nd gear in 4 low. It is okay here but when the boots are installed this is where the tranny shifter forces the transfer shifter out of 4 low.
http://i147.photobucket.com/albums/r...%204/boots.jpg
picture of my boots in case they are the problem. Dunno if this is factory standard or not.
05-20-2007, 10:47 AM
#74
Try flipping one or both shifter bases 180 degrees on the tranny or t-case and see if that works any better. Bend the shifter(s) so they don't hit. Or put on a short throw kit on one or both. Will make it so they don't move as far back and forth and are less likely to make contact.
Last edited by 4Crawler; 05-20-2007 at 05:58 PM.
05-20-2007, 02:22 PM
#75
Registered User

Join Date: Apr 2006
Posts: 745
Likes: 0
Received 0 Likes
on
0 Posts

Congrats on doing such a good job, was a good read!
05-20-2007, 03:13 PM
#76
Registered User
Join Date: Oct 2006
Location: washington
Posts: 175
Likes: 0
Received 0 Likes
on
0 Posts
my friend jus changed that on his truck, i guess the 4 wheel drive shifter can come off and you can put it on backwards so that it sits way farther towards the passenger side. not sure on the exact details but im sure u can figure it out. looks great btw! keep up the good work.
05-20-2007, 05:44 PM
#77
Contributing Member
Thread Starter
Join Date: May 2006
Location: South Carolina
Posts: 377
Likes: 0
Received 0 Likes
on
0 Posts
Thanks for all the comments. I will try reversing the transfer case shifter and if that doesn't work I'll probably order the kit from 4crawler as soon as I have some cash available. My 4runner currently needs at least 1 bearing replaced and that may end up costing me some cash. I'm hoping it's a wheel bearing but it could be the pinion bearing as well... I realize there are some tests to figure out which one but the sound really seems to move around depending on how I'm driving. I even lifted up the rear axle with a jack.
Next priority is probably gonna be AC and OME shocks. I'd really like to just replace the shocks and see if that helps the ride any before I spend the $400 plus to get new springs. I'll call ARB soon to see what their opinion is on running new shocks with the stock springs for a while before buying springs. As long as their shocks won't limit the stock spring travel then I think they would be okay. I'm not looking for the perfect ride, just something to stop the bone-jarring ride I have right now.
Tomorrow I'm hoping to sand down the rust spots in the bed and coat them good. Tuesday might be the day I bolt down the camper shell and I want it to stay put. My friend told me that he had one come off while driving. Something about the clamps loosening up... My plan is to put a gasket in between the bed and shell using some rubber grip material I found in Wal-Mart and then bolt it using stainless steel bolts. Does anyone think the grip material (it has holes all in it) will store water that might cause rust? Also means I have to reinstall the tailgate and do whatever I can there to slow the rust that is eating up the bottom of the tailgate.
05-21-2007, 09:12 AM
#78
Registered User
Join Date: Aug 2005
Location: Springs, Colorado
Posts: 1,671
Likes: 0
Received 0 Likes
on
0 Posts
I would just use rust primer on the lip of the bed and topper, then get an intertube or some sort of rubber strip and just put it in between the two. Bolts work great, ive used clamps and 4 studs that the topper slid onto.
06-19-2007, 05:04 PM
#79
Contributing Member
Thread Starter
Join Date: May 2006
Location: South Carolina
Posts: 377
Likes: 0
Received 0 Likes
on
0 Posts
Pickup is running!!!
I've been daily driving it for a few days now. Did the 500 mile oil change a little early (400) just to be a little safe. I also did a 70 mile oil change. Will get the valve alignment done soon.
Also changed my manual tranny oil. Also been working on the bed, both the top and underside. I cut off some junk: spare tire metal pieces and a muffler shield that I don't need due to the 3" body lift. Then I did a lot of sanding, priming, and painting. Hope to get the camper shell on soon. Will try to post up some pictures soon.
Next stop is shocks and an alignment that should center the steering wheel. I thought of doing it myself (center the steering wheel that's off by 180 degrees) but I'd feel a lot safer for my alignment mechanic to tell me that my steering and suspension system is safe. I'm already taking it to 70 on the interstate going to and from work everyday and I think $75 for an alignment is worth it if he can check it over and tell me what he thinks might be in bad shape.
Oh, I stripped off one of the screws holding the metal linkage that prevents the tailgate from dropping down too far. Costs $38 from the dealership as it's all one piece, linkage and screw. Time to call my junkyard connection, govt.mule.
Also still having problems finding an accumulator for my AC system. One I got from autozone had the wrong fittings on it and they can't help me find the one I need. Also have the wrong hoze which means I need to get one made. Looks like my ac system was pieced together from somewhere...
06-22-2007, 05:47 PM
#80
Contributing Member
Thread Starter
Join Date: May 2006
Location: South Carolina
Posts: 377
Likes: 0
Received 0 Likes
on
0 Posts
Finally got the truck on a lift and....
Front disc brake pads are new so that makes v6 calipers seem a waste of money for a while.
Rear drum brake pads are just about completely gone so I will be ordering toyota brand pretty soon.
Rear left wheel has a broken stud which means I'll try to replace that when I replace the pads.
Tonight I installed the tailgate in order to fit the camper shell tomorrow. The guy I'm getting the camper shell from also mentioned that I have a lot of loose wires hanging around that could start a fire. I've noticed them but I was planning on using a few to put 2 lights on the bullbar. I don't want a fire, though, so I got rid of as many as possible from the engine compartment. Here is what I pulled from the engine bay alone (does not include the ones I cut during my engine replacement):
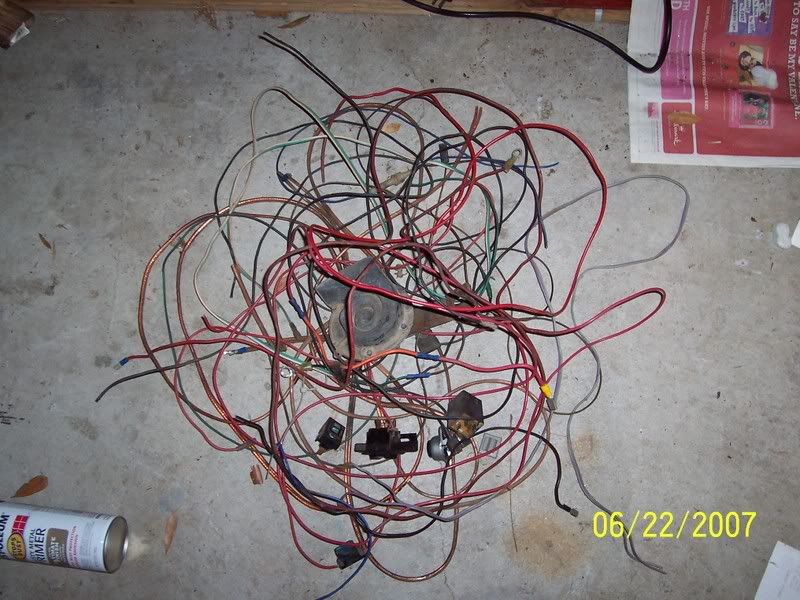
There are more in the cab. I really thought they were all dead but as I was pulling one some sparks flew... Makes me appreciate the fire extinguisher I got for the truck the other day.
Put my order into trdparts4u for my 4 ARB old man emu shocks. They beat the truckaddonparts price. I'm actually going against one of the recommendations of ARB. They suggested firm rear and soft front but after talking to some other people I went firm for all 4 shocks. I've even emailed this guy:
http://home.att.net/~benmlee/lift/EMU.htm
He still loves the OME setup. Here's what I'm getting:
n93 shocks, qty 2
n85 shocks, qty 2
I found so much conflicting info on the web but the ARB spec sheet that I found listed both as firm valve with the front (N93) being designed for a heavier load which will acount for the bullbar and winch going on soon. If anyone wants a copy of the sheet pm me. I couldn't find a way to it from the arb homepage but I can find it using a search.
Rear drum brake pads are just about completely gone so I will be ordering toyota brand pretty soon.
Rear left wheel has a broken stud which means I'll try to replace that when I replace the pads.
Tonight I installed the tailgate in order to fit the camper shell tomorrow. The guy I'm getting the camper shell from also mentioned that I have a lot of loose wires hanging around that could start a fire. I've noticed them but I was planning on using a few to put 2 lights on the bullbar. I don't want a fire, though, so I got rid of as many as possible from the engine compartment. Here is what I pulled from the engine bay alone (does not include the ones I cut during my engine replacement):
There are more in the cab. I really thought they were all dead but as I was pulling one some sparks flew...
Makes me appreciate the fire extinguisher I got for the truck the other day.Put my order into trdparts4u for my 4 ARB old man emu shocks. They beat the truckaddonparts price. I'm actually going against one of the recommendations of ARB. They suggested firm rear and soft front but after talking to some other people I went firm for all 4 shocks. I've even emailed this guy:
http://home.att.net/~benmlee/lift/EMU.htm
He still loves the OME setup. Here's what I'm getting:
n93 shocks, qty 2
n85 shocks, qty 2
I found so much conflicting info on the web but the ARB spec sheet that I found listed both as firm valve with the front (N93) being designed for a heavier load which will acount for the bullbar and winch going on soon. If anyone wants a copy of the sheet pm me. I couldn't find a way to it from the arb homepage but I can find it using a search.


