fustercluck's 1985 4Runner Build-Up Thread
 04-29-2007, 08:15 PM
#21
Registered User
Thread Starter
Join Date: Sep 2004
Location: right here.
Posts: 7,263
Likes: 0
Received 0 Likes
on
0 Posts
Thanks for y'alls' patience. I have been consumed with obligations lately....
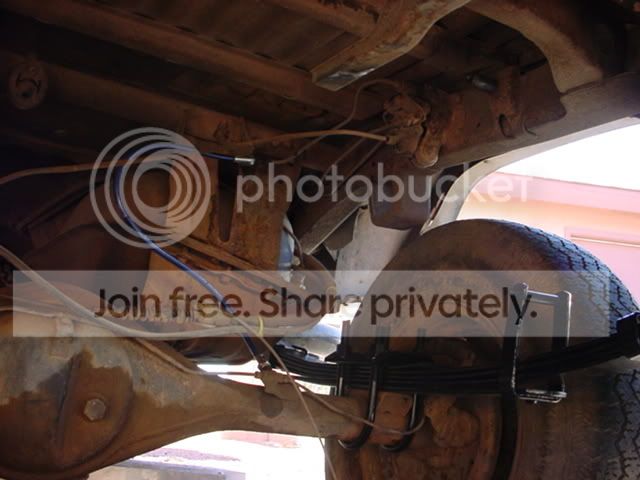
Below we have a pic of my nearly complete front axle assembly. Note the sporty red caliper and hand trigged and drilled /vented rotors . The brake upgrade consists of v6 calipers with fj 40 rotors powered by an fj80 master cylinder and hybrid wiring harness. Behind the MC is a dual diaphragm v6 brake booster. The whole system is linked by plastic encased extended and braided SS lines....makes me quiver a little to describe it
For now, I'm using some Rancho 5000 shocks with Rancho 3" lift springs. I chose to use this lift because it was the path of least resistance given my soon to be nomadic state. Looking closely, one can see a pair of quick disco sway bar end links with Energy Suspension bushings. These units are made by Roger Brown of 4crawler off road. They are stainless steel and very well crafted. I chose to mount a sway bar because the formidable Mrs. Fuster has seized this rig for her use and I wanted the on road handling to be predictable and firm.
As I have progressed through this build, I have been replacing the old fasteners with stainless steel and/or heat treated zinc plated nuts/bolts

Below we have a pic of my nearly complete front axle assembly. Note the sporty red caliper and hand trigged and drilled /vented rotors
. The brake upgrade consists of v6 calipers with fj 40 rotors powered by an fj80 master cylinder and hybrid wiring harness. Behind the MC is a dual diaphragm v6 brake booster. The whole system is linked by plastic encased extended and braided SS lines....makes me quiver a little to describe it For now, I'm using some Rancho 5000 shocks with Rancho 3" lift springs. I chose to use this lift because it was the path of least resistance given my soon to be nomadic state. Looking closely, one can see a pair of quick disco sway bar end links with Energy Suspension bushings. These units are made by Roger Brown of 4crawler off road. They are stainless steel and very well crafted. I chose to mount a sway bar because the formidable Mrs. Fuster has seized this rig for her use and I wanted the on road handling to be predictable and firm.
As I have progressed through this build, I have been replacing the old fasteners with stainless steel and/or heat treated zinc plated nuts/bolts
 04-29-2007, 08:17 PM
#22
Registered User
Thread Starter
Join Date: Sep 2004
Location: right here.
Posts: 7,263
Likes: 0
Received 0 Likes
on
0 Posts
This is the passenger side leaf pack. I snapped this pic to illustrate the steel braided extended brake line. The tires in this, and the previous pic, are spares. While I was building the rear suspension, I loaned my keeper tires/rims to a buddy so he could tow his new project fj40 from Gila Bend, AZ. to Mesa, AZ. I helped him with it last weekend which is why there was no update on Sunday as promised  I have some pics of his rig elsewhere that I'll post up later.
I have some pics of his rig elsewhere that I'll post up later.
04-29-2007, 08:20 PM
#23
Registered User
Join Date: Jan 2007
Location: Phoenix, AZ
Posts: 442
Likes: 0
Received 0 Likes
on
0 Posts
Very nice Fuster! We shall get together before you become mobile and move out of AZ. We can sit back for a beer and talk about kids and trucks!
PM Me sometime to meet up!
John
PM Me sometime to meet up!
John
04-29-2007, 08:23 PM
#24
Registered User
Thread Starter
Join Date: Sep 2004
Location: right here.
Posts: 7,263
Likes: 0
Received 0 Likes
on
0 Posts

 04-29-2007, 08:29 PM
#25
Registered User
Thread Starter
Join Date: Sep 2004
Location: right here.
Posts: 7,263
Likes: 0
Received 0 Likes
on
0 Posts
 05-06-2007, 06:39 AM
#26
Registered User
Thread Starter
Join Date: Sep 2004
Location: right here.
Posts: 7,263
Likes: 0
Received 0 Likes
on
0 Posts
The pic below does not do justice to the work involved to achieve this feat. This is the finished product of much grunting and noodling. The process for final fitment was so intense that I could not document it while in the act. The shots I have taken are after the fact.
As we placed the bed near it's mounting position, I could see that the fuel tank would again be an obstruction. Regardless of the colossal contortions and pains I took to avoid removing the tank for the other facets of this build, I had no choice but to surrender to reality...I could not place the bed in it's 'cradle' while the tank was in place. Since I absent mindedly filled my tank before parking it to do this project, the weight/unwieldiness of the full vessel required that I empty it before removal. Ugh....siphoning gasoline orally
below is an image of the removed tank. The plastic tubing was the siphoning device. Circled is a bottle of Listerine. Can anyone guess why that was necessary?

After the tank was emptied, and the extreme unpleasantness of sucking on gasoline fumes was finished, I dropped the protective shield from under the tank. Circled in red is what I found.....D'oh!!!!!!!!
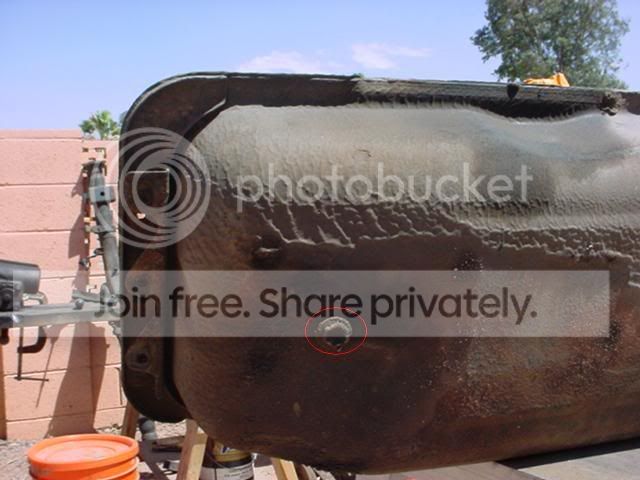
I guess the time for discovery is before the act....
As we placed the bed near it's mounting position, I could see that the fuel tank would again be an obstruction. Regardless of the colossal contortions and pains I took to avoid removing the tank for the other facets of this build, I had no choice but to surrender to reality...I could not place the bed in it's 'cradle' while the tank was in place. Since I absent mindedly filled my tank before parking it to do this project, the weight/unwieldiness of the full vessel required that I empty it before removal. Ugh....siphoning gasoline orally
below is an image of the removed tank. The plastic tubing was the siphoning device. Circled is a bottle of Listerine. Can anyone guess why that was necessary?
After the tank was emptied, and the extreme unpleasantness of sucking on gasoline fumes was finished, I dropped the protective shield from under the tank. Circled in red is what I found.....D'oh!!!!!!!!
I guess the time for discovery is before the act....
05-06-2007, 06:40 AM
#27
Registered User
Thread Starter
Join Date: Sep 2004
Location: right here.
Posts: 7,263
Likes: 0
Received 0 Likes
on
0 Posts
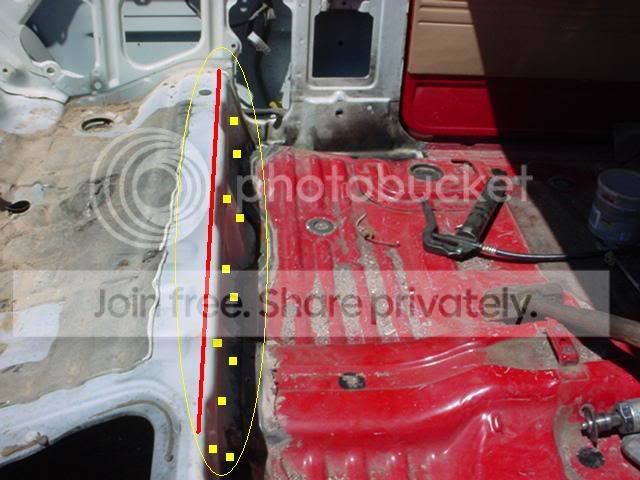
The above conditions are why we were able to remove the bed without dropping the fuel tank and why we couldn't install with it in place. Circled in yellow is the bench where the rear passenger sit. The fuel tank sits directly under the right side and above the plane of the floor pan. With the cab pillars in place and cut 1/4 inch long, we could not lift the bed over the tank while sliding it under the pillars.....let alone aligning it at the critical junction located at the door jamb/cab pillar/floor pan/rocker panel. We either had to cut the cab pillars out an weld them back after fitment, or we had to remove the tank. Since cutting the pillars is as rookie as welding the bed straight across the floor pan, out came the gas tank.
The red line indicates where we cut the old bed for removal. The yellow dotted portion is what we trimmed later and is why we could remove the old bed while the tank was in place. That same portion on the donor bed was why we had to remove the tank.
05-06-2007, 06:45 AM
#28
Registered User
Thread Starter
Join Date: Sep 2004
Location: right here.
Posts: 7,263
Likes: 0
Received 0 Likes
on
0 Posts
 05-06-2007, 08:16 AM
#30
Registered User
Thread Starter
Join Date: Sep 2004
Location: right here.
Posts: 7,263
Likes: 0
Received 0 Likes
on
0 Posts

 05-12-2007, 11:12 PM
#31
Registered User
Thread Starter
Join Date: Sep 2004
Location: right here.
Posts: 7,263
Likes: 0
Received 0 Likes
on
0 Posts
Well I didn't get very far on the runner today. I needed to finesse some body panel unions, but it was 102 degrees today and by the time I got outside to work, it was a scorcher. I mostly did some fine tuning of components I had installed, but wasn't satisfied with the fit and finish.
My neighbor with the FJ40 was having trouble getting the starter and the ignition replaced and began to get frustrated. I ambled over to see if I could offer a hand. We worked on it for a while and by process of elimination, concluded that the starter AND the ignition switch he bought were both independently defective. Their combined failure symptoms were misleading enough to cause him to suspect his own wiring.....turns out he did it right and the parts were the culprits. He bought me a soda for the moral support
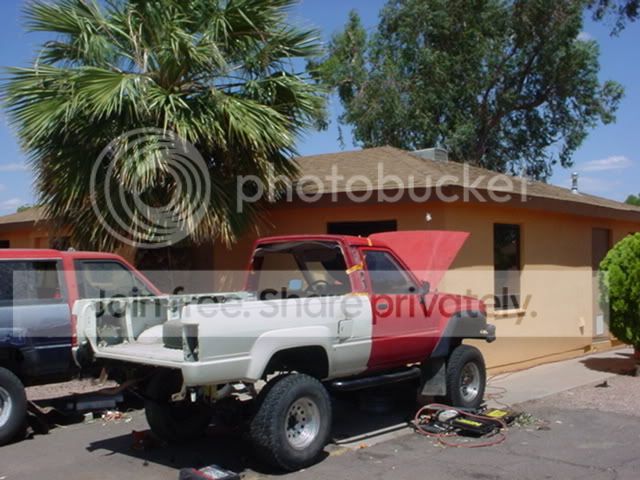
Back to my runner...I put my topper on to help with the alignment. I think I'll trim and weld Monday morning. Here's a pic with the 84 truck parked elsewhere so I could get a good shot of my runner.
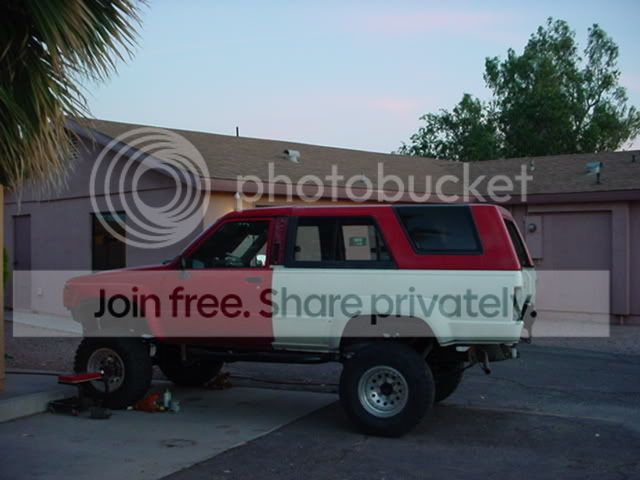
This pic is disappointing. It was getting too dark for a good shot, so I'll need to re-take this exposure tomorrow when the sun is behind me. Here's the crummy one for now...

All I have left is to finish the rear brake rebuild and bleed the system, bolt the front drive shaft on, fill the front diff, Finish welding the IFS steering box mounts, and complete about 23 man hours of body and paint. I may get this girl done before I move!
My neighbor with the FJ40 was having trouble getting the starter and the ignition replaced and began to get frustrated. I ambled over to see if I could offer a hand. We worked on it for a while and by process of elimination, concluded that the starter AND the ignition switch he bought were both independently defective. Their combined failure symptoms were misleading enough to cause him to suspect his own wiring.....turns out he did it right and the parts were the culprits. He bought me a soda for the moral support
Back to my runner...I put my topper on to help with the alignment. I think I'll trim and weld Monday morning. Here's a pic with the 84 truck parked elsewhere so I could get a good shot of my runner.
This pic is disappointing. It was getting too dark for a good shot, so I'll need to re-take this exposure tomorrow when the sun is behind me. Here's the crummy one for now...
All I have left is to finish the rear brake rebuild and bleed the system, bolt the front drive shaft on, fill the front diff, Finish welding the IFS steering box mounts, and complete about 23 man hours of body and paint. I may get this girl done before I move!
05-13-2007, 10:11 AM
#32
Registered User
Join Date: May 2007
Posts: 38
Likes: 0
Received 0 Likes
on
0 Posts
Man you are invincible! I have commandeered my parents garage and haven't even got that extensive on what I thought was a mild restoration. and you don't even have a garage! Or 70 degree weather. Keep up your most excellent work man. wow.
05-13-2007, 03:40 PM
#33
Registered User
Thread Starter
Join Date: Sep 2004
Location: right here.
Posts: 7,263
Likes: 0
Received 0 Likes
on
0 Posts
It's interesting you mention 'restoration'. I wrestle with the competition between restoration mode and repair mode. Whenever I do anything like this, regardless of how firmly I resolve to 'only repair', it becomes a restoration and the intensity and scope of work is correspondingly protracted.
This project yearns for a full restoration, but the ultimate purpose of the repair is incongruent with the care and time required to put things restoratively right. Why spend 10 man hours disassembling, cleaning, coating, rebuilding with upgraded parts and reassembling the front axle, only to run it through the mud and over rocks on the trail? It's as if two antipodal forces tug at my senses continually during this effort.
I have done full frame-off rotisserie restorations on a few vehicles before. Once you do that and reach the final satisfaction of competition class completion, anything less seems.....well....like a waist of time and talent.
Anyway, I temper my propensity toward full blown project mode with time and space limitations. This thing has to be done in thirty days within the space provided. Those parameters confine any 'can of worms' tangents that temp my soul.
Interestingly, Ryan, my FJ40 friend and neighbor, has restored classic and muscle cars professionally and for competition since he was in his teens. While 'back fencing it' yesterday, we both chuckled at how we similarly wrestle with restoration mode on our projects. Doubtless his FJ project will make the full evolution to 'resto'. I'm certain he, as I, can't contain his passions so easily....
Edit: Parenthetically, I'd like to thank my friend Brian, the Wabbit at WABFAB, for his patient council during this period and for offering for sale quality parts and service. Hey Wab, check is in the mail right?
Last edited by fustercluck; 05-13-2007 at 03:47 PM.
05-18-2007, 04:18 PM
#34
Registered User
Join Date: May 2007
Posts: 38
Likes: 0
Received 0 Likes
on
0 Posts
warning: lack of eloquence
I do restoration work here in Idaho and I know what your talking about as far as the can of worms goes. I also have that nasty habit of cleaning,coating or replacing every little part and piece that i come across. And it is hard to justify cleaning up all this stuff only to run it in the mud. well Either way your going to have one solid rig on your hands. Its actually very inspiring! And I guarantee were going far and beyond the "Jones'". Who cares about the Jones' anyway. Chase the dream not the competition!
06-03-2007, 10:54 PM
#36
Registered User
Thread Starter
Join Date: Sep 2004
Location: right here.
Posts: 7,263
Likes: 0
Received 0 Likes
on
0 Posts
I'm sorry I missed this post for so long. I've been overwhelmed with this project and my other obligations vs. my deadline. I haven't been able to update as often as I wish I could.
The bed sides are supported by the factory skeleton. It is actually a factory bed that I cut from a totaled runner down here in AZ. It spent it's entire life in the desert, so no rust....
I was lazy and posted some links to another forum where my build-up is chronicled more comprehensively so I would have to do more than embed links. I've done the same on other sites, but for some reason the links won't work here at YT. It is a mystery to me. So if anyone wants to read the more detailed build-up thread, email me or PM me and I'll shoot you a link. I have tons more pics and commentary ready to post on that thread in the next few days.
I just tried to fix the links by copy and pasting them directly from my browser's address bar to YT link prompt window. It will not recognize that site. I am baffled....
07-25-2007, 07:29 AM
#38
Registered User
Join Date: Oct 2006
Location: Midlothian, VA
Posts: 685
Likes: 0
Received 0 Likes
on
0 Posts
You might want to check this thread.. Fuster's been updating it along the way much more regularly than this one:
http://www.ultimateyota.com/index.ph...26&topic=777.0
http://www.ultimateyota.com/index.ph...26&topic=777.0


