1984 4runner - build up

 01-22-2013, 09:17 AM
#22
Registered User
Thread Starter
Join Date: Jun 2012
Location: seattle
Posts: 48
Likes: 0
Received 0 Likes
on
0 Posts
I am worried my external roll cage is going to make this project (when I get around to it) a pain.
01-22-2013, 10:50 AM
#24
Registered User
Thread Starter
Join Date: Jun 2012
Location: seattle
Posts: 48
Likes: 0
Received 0 Likes
on
0 Posts
Though I have really gotten turbo upgrade fever which is a pretty big project, so I may have been better starting with a big motor =).
01-22-2013, 01:13 PM
#25
Registered User
ya that's kinda what maed me go with an n/a engine in the end. turbo engines are too easy to throw mods on and get lots of extra power, at the sacrifice of reliability and longevity.
Last edited by liveoffroad; 01-22-2013 at 01:15 PM.
01-23-2013, 07:28 AM
#26
Registered User
Thread Starter
Join Date: Jun 2012
Location: seattle
Posts: 48
Likes: 0
Received 0 Likes
on
0 Posts
There are other issues if you don't tune the engine right but that is universal to all engines =).
If you (or anyone) is interested in upgrading a 22rte turbo I highly recommend this site! It has a ton of great info.
http://www.well.com/~mosk/welcome.htm
02-20-2013, 02:07 PM
#27
Registered User
Thread Starter
Join Date: Jun 2012
Location: seattle
Posts: 48
Likes: 0
Received 0 Likes
on
0 Posts
As I was putting back together my front axle I couldn't quite remember the order of all the components in the Warn hub. So I took apart the other one and noticed immediately that there were more parts than in the other one. After a quick bit of research it turns out that it is missing its inner hub gears (thank you PO you piece of crap!!). After a bit of research it became apparent the stock Aisin hubs are much better than the warn's and you can upgrade the Aisins to chromoly gears. The problem with these hubs is they are stupid expensive! but I guess you gotta pay to play, just ordered the set.
02-22-2013, 12:12 PM
#29
Registered User
Thread Starter
Join Date: Jun 2012
Location: seattle
Posts: 48
Likes: 0
Received 0 Likes
on
0 Posts
02-26-2013, 09:06 AM
#30
Registered User
As I was putting back together my front axle I couldn't quite remember the order of all the components in the Warn hub. So I took apart the other one and noticed immediately that there were more parts than in the other one. After a quick bit of research it turns out that it is missing its inner hub gears (thank you PO you piece of crap!!). After a bit of research it became apparent the stock Aisin hubs are much better than the warn's and you can upgrade the Aisins to chromoly gears. The problem with these hubs is they are stupid expensive! but I guess you gotta pay to play, just ordered the set.
02-26-2013, 09:35 AM
#31
Registered User
Thread Starter
Join Date: Jun 2012
Location: seattle
Posts: 48
Likes: 0
Received 0 Likes
on
0 Posts
haha, you gotta love sloppy PO's. when i bought mine, there were 2 different gear ratio's in the axles....[/quote]
The PO of mine was truly a worthless piece of crap! I had never really worked on cars when I bought it so I was very under educated which has cost me. This is my list of things I had to fix just purely because of bad workmanship.
1) the cross member is mounted in such a way that the bottom two bolts on the transmission wiggle loose causing space between the transmission and engine, this ruined the clutch. fixed this by mounting nuts to the other side of the bolts
2) butchered the EFI conversion which game me never ending electrical issues, pissed me off so much I did the turbo engine swap. These electrical issues burnt out my starter and alternator as well!
3) hub wasn't put together properly which I am pretty sure is why my birfield went as well.
at a point where I wish I would have built it all myself but I suppose at least ive learned a lot
03-07-2013, 03:14 PM
#32
Registered User
Thread Starter
Join Date: Jun 2012
Location: seattle
Posts: 48
Likes: 0
Received 0 Likes
on
0 Posts
So got my new hubs, they are a little stiff but now where near the point where I would have to use a lighter or something to turn them.
05-02-2013, 11:35 AM
#34
Registered User
Thread Starter
Join Date: Jun 2012
Location: seattle
Posts: 48
Likes: 0
Received 0 Likes
on
0 Posts
I am still rebuilding my front axle =(, As I was replacing the hubs I noticed the PO had drilled out the hub assembly to put in bigger unknown studs (don't ask me why). These studs would not work with my stock AISIN hubs that I bought. So I had to buy new hub assemblies from trail gear. Since I was this far into I figured I might as well upgrade to FJ40 rotors and Toyota V6 calipers and Master cylinder. Super frustrating process as the further I got into the axle the more I realized was wrong. I really don't have problems spending money on upgrades or things I break (that's what I signed up for when getting into wheeling) but the majority of the cost of this project turned out to be just fixing stuff the PO messed up. I will never buy a used vehicle that has been built EVER again.
Enough of my whining =). Here are pics of the nice new shiny parts.
All new (rotor, hub assembly, hub), its so shiny! lol
[IMG]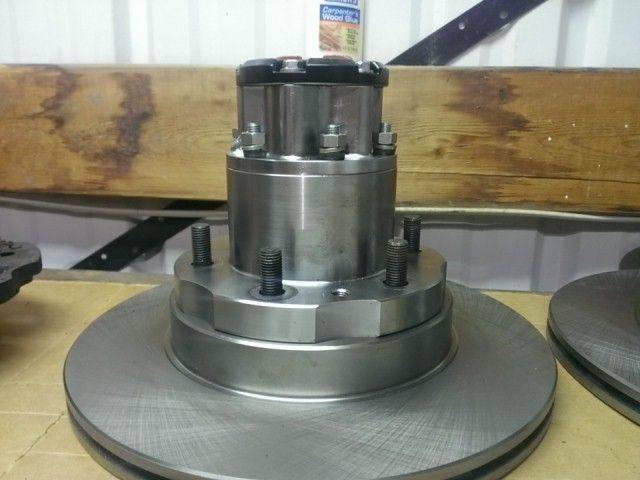 [/IMG]
Here it is installed with the new caliper (one thing is that the calipers I got looked identical and would only install on the passenger side, passenger and driver side calipers are different right?)
[IMG]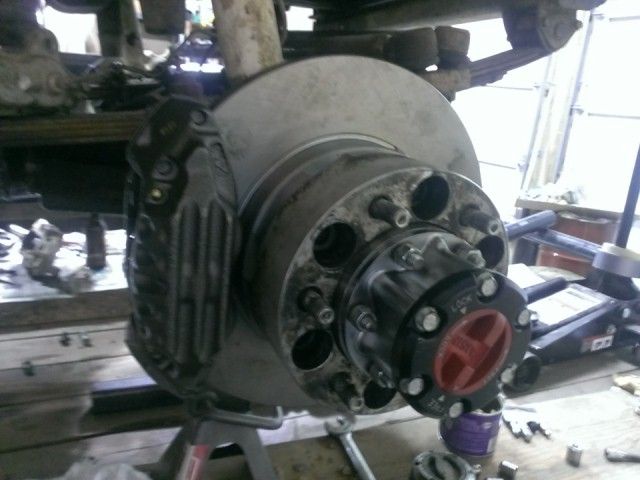 [/IMG]
So close to getting it back into wheeling condition =)
Enough of my whining =). Here are pics of the nice new shiny parts.
All new (rotor, hub assembly, hub), its so shiny! lol
[IMG]
 [/IMG]
Here it is installed with the new caliper (one thing is that the calipers I got looked identical and would only install on the passenger side, passenger and driver side calipers are different right?)
[IMG]
 [/IMG]
So close to getting it back into wheeling condition =)
Last edited by 1984RunnerCrawler; 05-02-2013 at 11:39 AM.
05-02-2013, 07:36 PM
#35
Registered User
Thread Starter
Join Date: Jun 2012
Location: seattle
Posts: 48
Likes: 0
Received 0 Likes
on
0 Posts
So after getting back to my shop I saw that the two calipers were different (the difference between this is where the brake line attaches).
The problem is on the drivers side the knuckle and rotor are not aligned properly (not parallel). I don't really know what could be wrong at this point, so the next time I can make it out to my shop I am going to rip the entire drivers side out and replace it to see if I messed anything up while installing it. The rotor is solid and doesn't budge when I try to wiggle it so not really sure what could be going on.
Anyone have any info about this?
Just a reminder I am a newbie when it comes to working cars (my first axle rebuild) so any little detail/experience will help =).
04-04-2014, 12:40 PM
#36
Registered User
Thread Starter
Join Date: Jun 2012
Location: seattle
Posts: 48
Likes: 0
Received 0 Likes
on
0 Posts
I blew up my front axel yet again and twisted my rear driveline in half on a trip up compressor in north idaho. So its time for longfields.
Longfields and hub gears for 599$ from my local trail gear dealer is a pretty sweet deal!
Longfields and hub gears for 599$ from my local trail gear dealer is a pretty sweet deal!
07-29-2014, 10:31 PM
#37
Registered User
Thread Starter
Join Date: Jun 2012
Location: seattle
Posts: 48
Likes: 0
Received 0 Likes
on
0 Posts
FYI, turns out my steering stops were dented in which was causing the internals of my birf's to blow up (refer to previous picture). From what ive read when birf's fail under normal conditions the outside cracks.
Got my long fields installed, really nice product.
After I installed the long fields i went out on a few trips and ended up blowing up my clutch so I dropped my tranny and ordered the heavy duty marlin crawler clutch. While my tranny is down im going to install twin sticks and 4.7's in my rear case. I gotta say I am pretty excited about the 4.7's! =)
One of my lockers has never been reliable so I pulled it out and it turned out to be a lunch box. And from the research i did you should not have Lunch boxes in the rear. So while ive got everything torn down it is getting a full spool.
There is a rock crawling competition in north idaho on august 22 so the goal is to have everything back together by then.
07-30-2014, 12:35 AM
#38
Super Moderator
Staff
iTrader: (1)
Join Date: Aug 2008
Location: Anderson Missouri
Posts: 11,788
Likes: 0
Received 21 Likes
on
19 Posts
Even buying a stock truck, you will be surprised at what POs do to them. They butcher them up as well. Anytime I get a new truck, I just expect to go thru it and correct their poor work.


