
ZUK & BJ spacer 1988 toyota pickup
 11-14-2012, 03:49 PM
#41
Registered User
If you want to drive it on the road at all, I think you'd want to stay away from a spool. That's not a locker, it's a hard fastener between the two wheels.
Marlin Crawler offers pre-built third members with lockers. Auto-lockers like the Spartan will let your differential open up while turning on the road, but lock up otherwise.
http://www.marlincrawler.com/differential/complete
Marlin Crawler offers pre-built third members with lockers. Auto-lockers like the Spartan will let your differential open up while turning on the road, but lock up otherwise.
http://www.marlincrawler.com/differential/complete
 11-19-2012, 04:24 PM
#42
Registered User
Thread Starter

Join Date: Jun 2012
Posts: 39
Likes: 0
Received 0 Likes
on
0 Posts
Thanks for the heads up!! I went ahead and ordered a factory 4.88 rear third member for $300 shipped. The front was $150 shipped and its ADD. I will just mod it to stay locked so i can sell my 4.10 thirds.
11-20-2012, 06:14 AM
#43
Registered User
That's a great deal. Do you mind sharing where from? Or was it just an individual?
For the ADD Tube... you can use your existing tube on it, it will fit. You just need to order an oil seal to put where the ADD stub axle is. I ordered TIMKEN part# 710419 from Rockauto.com. Then your axle tube bolts right up.
It seems like most people that buy diffs don't need the axle tube since they'll be swapping in to a truck that already has one, so I don't think you need to worry about keeping the ADD tube with the V6 diff and non-ADD tube with your 4.10 diff. But that's just a guess/opinion on my part.
I just went through all this myself: https://www.yotatech.com/forums/f116...l#post51985953
But you can see I had no clue what was going on at the time.
11-29-2012, 11:02 AM
#45
Registered User
Thread Starter
Join Date: Jun 2012
Posts: 39
Likes: 0
Received 0 Likes
on
0 Posts
The rear third came in along with the diff drop kit. I checked the ratio on the rear and it is 4.88:1. Just ordered that seal.
I wont be able to install them until after next week, hopefully I can finish it in one weekend.
I wont be able to install them until after next week, hopefully I can finish it in one weekend.
Last edited by jrrtt09; 11-29-2012 at 11:13 AM.
11-29-2012, 11:16 AM
#46
Registered User
Join Date: Jan 2012
Posts: 194
Likes: 0
Received 0 Likes
on
0 Posts
Looks good. Been thinking about doing the coil springs on top of my leafs in the rear as well.
Did you lift the truck to to fully extend suspension to see how tall of spring you would need so in case you max out your suspension the spring wont fall off?
Did you lift the truck to to fully extend suspension to see how tall of spring you would need so in case you max out your suspension the spring wont fall off?
12-09-2012, 03:26 PM
#48
Registered User
Thread Starter
Join Date: Jun 2012
Posts: 39
Likes: 0
Received 0 Likes
on
0 Posts
I replaced the differentials today, didn't take many pics because I was trying to finish it in one day. I finished the rear in about 3 hours, and I almost finished the front.
I'm trying to figure out what to do with the two blocks that came with the differential drop kit. The two rear spacers are in with the two bolts holding the differential in, but I didn't have time to install the cross member. I'm not sure what to do with the two blocks and those 4 tiny bolts that came with the kit.
I'm trying to figure out what to do with the two blocks that came with the differential drop kit. The two rear spacers are in with the two bolts holding the differential in, but I didn't have time to install the cross member. I'm not sure what to do with the two blocks and those 4 tiny bolts that came with the kit.
12-09-2012, 04:03 PM
#49
I replaced the differentials today, didn't take many pics because I was trying to finish it in one day. I finished the rear in about 3 hours, and I almost finished the front.
I'm trying to figure out what to do with the two blocks that came with the differential drop kit. The two rear spacers are in with the two bolts holding the differential in, but I didn't have time to install the cross member. I'm not sure what to do with the two blocks and those 4 tiny bolts that came with the kit.
I'm trying to figure out what to do with the two blocks that came with the differential drop kit. The two rear spacers are in with the two bolts holding the differential in, but I didn't have time to install the cross member. I'm not sure what to do with the two blocks and those 4 tiny bolts that came with the kit.
 12-11-2012, 03:56 PM
#50
Registered User
Thread Starter
Join Date: Jun 2012
Posts: 39
Likes: 0
Received 0 Likes
on
0 Posts
Thanks Chef!!
I connected the cross member and tightened the differential. All I have left to do is connect the U-joint, tighten the CV joints, put oil in the third members, and bleed the brakes. It might take a couple of days because I only have about 45 minutes of daylight when I get home from work in the afternoon.
I connected the cross member and tightened the differential. All I have left to do is connect the U-joint, tighten the CV joints, put oil in the third members, and bleed the brakes. It might take a couple of days because I only have about 45 minutes of daylight when I get home from work in the afternoon.
Last edited by jrrtt09; 12-11-2012 at 04:27 PM.
12-19-2012, 08:31 AM
#51
Registered User
Thread Starter
Join Date: Jun 2012
Posts: 39
Likes: 0
Received 0 Likes
on
0 Posts
I got it all back together and it drives fine. I had a little fun with it on the levee and it pulls the tires fine in the thick stuff. No pictures, but i'll take the time to make a short write up of all the tricks that worked for me.
1st step - Clean grease off of U-joint bolts front and rear. Then spray penetrating oil on U-Joint bolts, rear differential bolts, front differential mounting bolts, differential fill caps and drain plugs, front cross member bolts, CV shaft bolts, brake bleeder bolts, and 4 bolts holding brake assembly onto axle tube. This should be done a week or so in advance, although I did it the day of.
2nd step - Drain oil from rear differential. Remove 4 bolts connecting U joint to rear carrier(I put the truck in gear to keep axle from rotating). Remove tires and put jack stands under axle. Remove 4 bolts on each side of axle tube connecting tube to brake assembly. Disconnect E-brake cord and brake lines on each side. Carefully pull the brake assembly with axle shafts out of tubes and place them on a clean surface. Remove the bolts connecting carrier to housing but leave the top bolt in loosely. Use a floor jack to put pressure on the carrier to break the seal of the carrier to housing. Use the floor jack to support the carrier as you remove it from the bolts and lower it. I used Toyota red sealant to seal up the new carrier and used the floor jack to put the carrier back into place.
3rd step. I followed this write up http://www.gearinstalls.com/ifs.htm
The only things to add are to:
- Remove the 4 bolts connecting the U-joint to the carrier FIRST. Again I locked my hubs and put it in 4Lo to keep the axle from turning.
- When removing the CV shaft bolts, I kept it in gear and used a breaker bar with an impact socket, I grabbed the breaker bar with one hand and grabbed any part of the truck I could find with the other hand and pulled. They all broke pretty easy using this method.
- Removing the carrier was easy, I used a jack to lift it up and the passenger side CV shaft came out easy and I used 2 small screwdrivers to compress the drivers side CV joint to get it out. No grinding or beating required.
- I did not press the bolts out. When putting the carrier back in there, I put the bolts in the drivers side CV shaft and put the nuts on as soon as the carrier was lifted enough to reach the CV shaft that was hanging. I then used the jack to lift the carrier into place and connected the other CV shaft using 2 small screwdrivers to compress the CV joint.
It is important to remove the passengers side CV axle first and to install the drivers side CV axle first. I did not need to cut the wheel or remove and ball joints, although this might have made it easier. Hope this helps.
 12-20-2012, 05:24 AM
#54
Registered User
Thread Starter
Join Date: Jun 2012
Posts: 39
Likes: 0
Received 0 Likes
on
0 Posts
I used black magic 13x5" 125lb coil springs. I got them shipped for $75. It works great if i have weight in the bed, but it limits flex a little and can be a little bouncy when driving fast down dirt roads.
10-14-2013, 10:10 AM
#55
Registered User
Thread Starter
Join Date: Jun 2012
Posts: 39
Likes: 0
Received 0 Likes
on
0 Posts
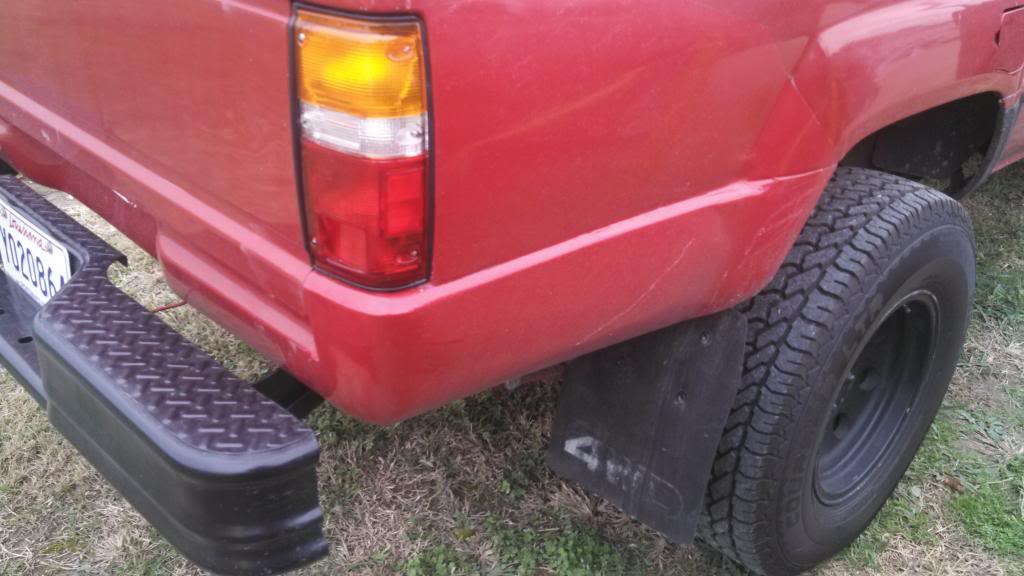
Well, I got in a fender bender and decided to do a little more work to the 88. I was hit behind the passenger rear wheel, and the shackle was bent slightly, so I decided to get some 7" shackles to replace the Zuk mod. This put me a little taller in the rear than with the zuk mod, so I also cranked the T-bars a little to get the front a half inch lower than the rear. I also found out that I didn't grind enough metal off near the ball joints, and that was limiting my up-travel on my passenger side.
I also replaced the 33x13.50 LTBs with 265/75 Mastercraft Courser LTRs (load range E). I don't go off-road enough to justify a M/T tire.
The ride quality has drastically increased, even with the load range E tires. It feels softer than my dads 1987 Xtra cab 4x4 truck, which is stock with 30x9.50 kumho A/T tires. But without the sway bar on mine, it wanders a little more. I could never get over 70 mph with the swampers, but with these I can easily get to 85 mph (on the speed-o at least). I like the gearing with 4.88 and 32" tires, it has balls in 4th and 5th gear.
I'll post pics later.
12-11-2013, 11:16 AM
#57
Registered User
Thread Starter
Join Date: Jun 2012
Posts: 39
Likes: 0
Received 0 Likes
on
0 Posts
12-11-2013, 11:33 AM
#58
Registered User
Thread Starter
Join Date: Jun 2012
Posts: 39
Likes: 0
Received 0 Likes
on
0 Posts
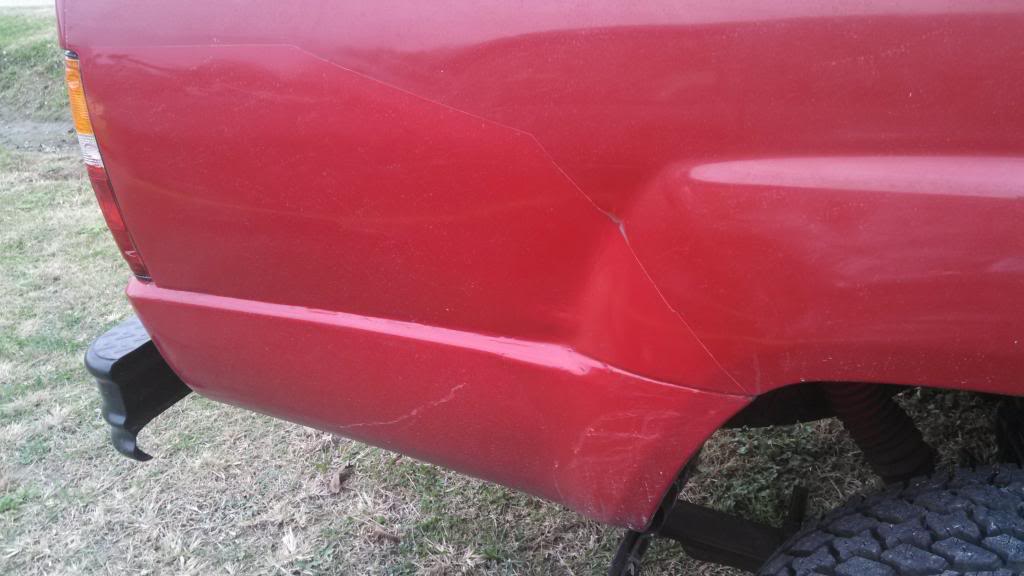
Here's the pictures of the damage from the wreck and the Bondo work that my dad did. He'll be repairing dents on his 87 Xtra cab, so he decided to use my truck as his guinea pig. He did a pretty good job for his first time using bondo.
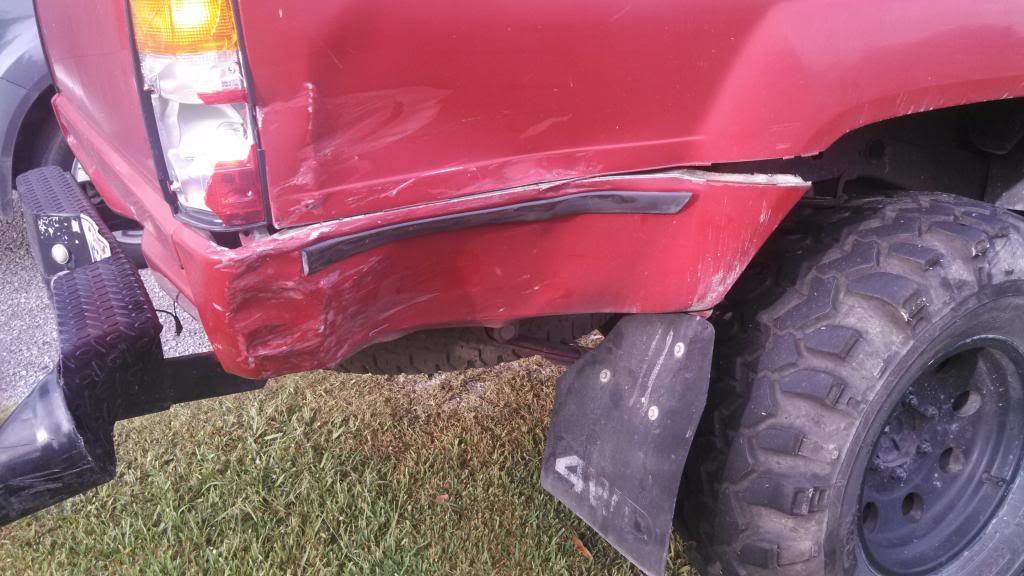
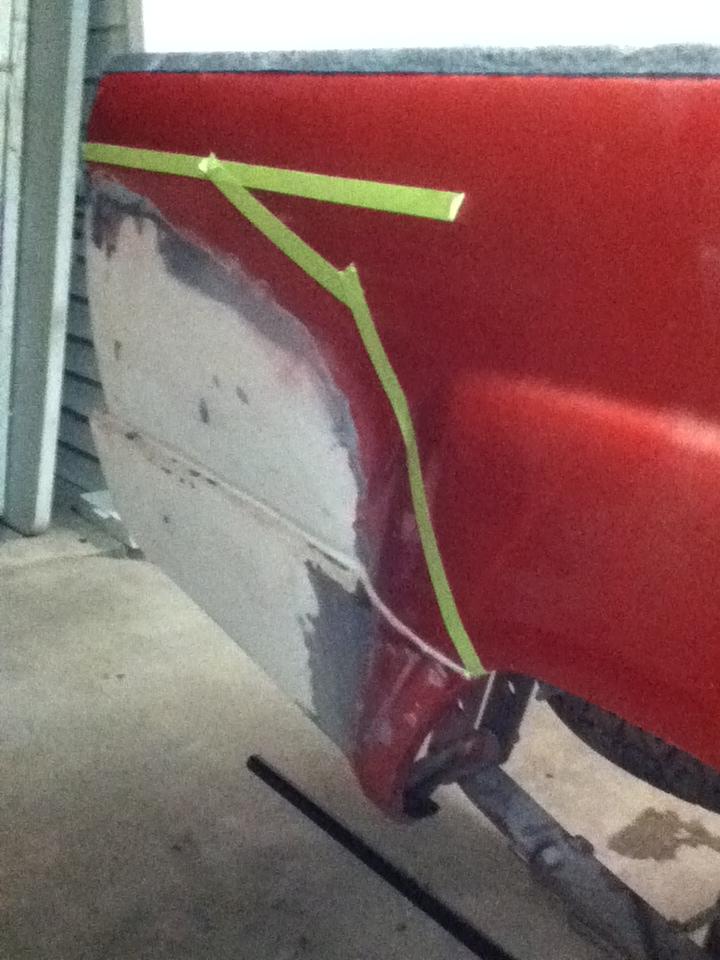


Last edited by jrrtt09; 12-12-2013 at 05:11 AM.
12-11-2013, 11:48 AM
#59
Registered User
Thread Starter
Join Date: Jun 2012
Posts: 39
Likes: 0
Received 0 Likes
on
0 Posts
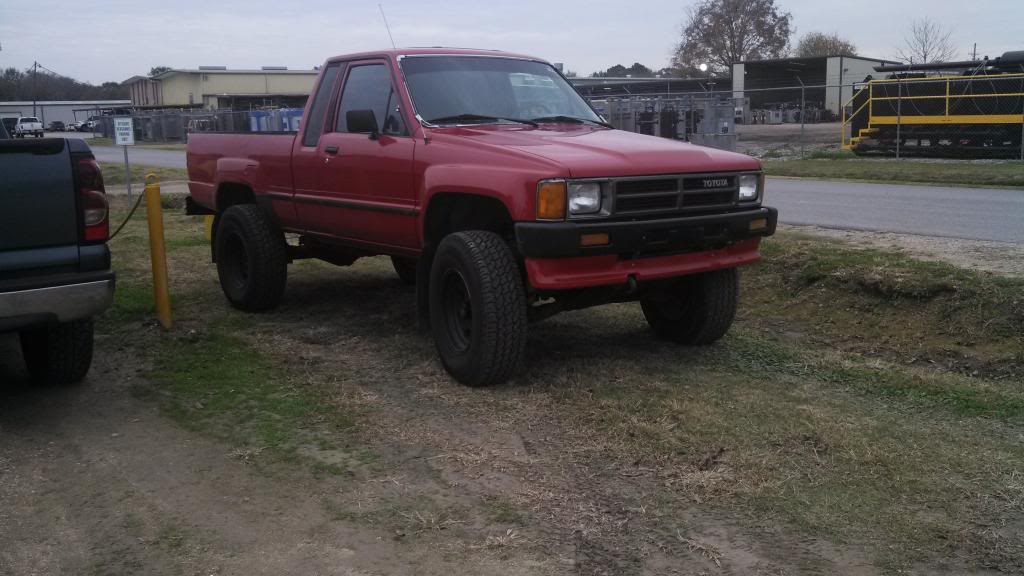
Here's how it sits with the new tires and 7" shackles, I cranked the T bars to match the height of the rear.
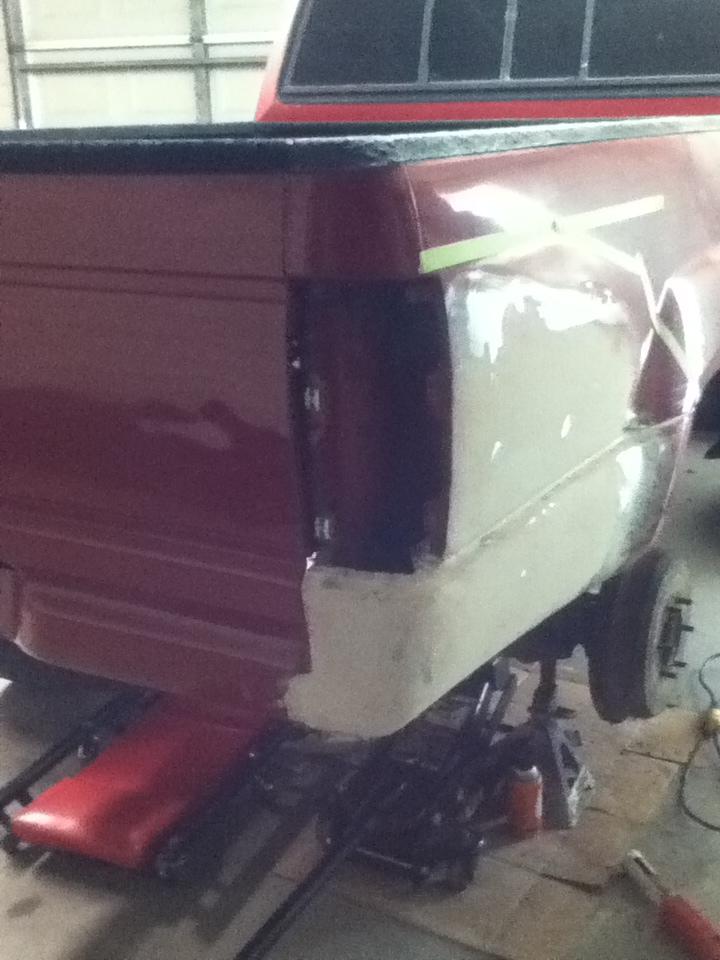
Here's how the repaired area looks with a little bit of rattle can.

Here's how the repaired area looks with a little bit of rattle can.


Thread
Thread Starter
Forum
Replies
Last Post
Dustin Egle
86-95 Trucks & 4Runners
2
02-26-2016 03:48 PM
lilgription
86-95 Trucks & 4Runners
14
08-06-2013 01:58 PM


