
Cold Air/Supra AFM Mount (dial-up beware)
 08-21-2010, 06:23 PM
#1
Cold Air/Supra AFM Mount (dial-up beware)
so when i went to install my ebay finds, i found that the included hardware didn't support the bulk of the supra afm too well, so today i decided to make my own. it's probably strong enough to make into a tow point. enough blabbering, and now for something completely different:
PICTURES (why you clicked to begin with)
http://www.flickr.com/photos/ianrab/4914307965/http://www.flickr.com/photos/ianrab/4914304803/http://www.flickr.com/photos/ianrab/4914305237/
^before
http://www.flickr.com/photos/ianrab/4914908922/http://www.flickr.com/photos/ianrab/4914305409/^a must. i can't count the number of times these have saved my vision
http://www.flickr.com/photos/ianrab/4914306399/^first piece
http://www.flickr.com/photos/ianrab/4914909520/^a hack saw worked sooooo much better than the dremel
http://www.flickr.com/photos/ianrab/4914909722/^first hole drilled. the wrong way. the bolts bump into each other
http://www.flickr.com/photos/ianrab/4914910126/^the right way to drill adjacent mounting holes. no bumping
http://www.flickr.com/photos/ianrab/4914909922/http://www.flickr.com/photos/ianrab/4914306787/http://www.flickr.com/photos/ianrab/4914306589/http://www.flickr.com/photos/ianrab/4914910944/http://www.flickr.com/photos/ianrab/4914911380/http://www.flickr.com/photos/ianrab/4914307223/http://www.flickr.com/photos/ianrab/4914912280/http://www.flickr.com/photos/ianrab/4914307771/^check for clearance. probably should have done that to begin with. oh well
http://www.flickr.com/photos/ianrab/4914308147/^after
just goes to show what someone without a welder and grinder can do
Last edited by irab88; 08-22-2010 at 01:01 PM.


Trending Topics
08-21-2010, 07:12 PM
#9
Registered User
I have a/c, and I made it work. 
 08-21-2010, 07:22 PM
#13
Registered User
Logan's is hiding behind yours, But I see mine in the background, too. Almost a three-fer!
I was even able to build a partition to keep the majority of the underhood heat away from the intake.
I was even able to build a partition to keep the majority of the underhood heat away from the intake.
Last edited by kiyobrown; 08-21-2010 at 07:24 PM.
08-21-2010, 07:26 PM
#14
Contributing Member
iTrader: (3)
I recommend the Kiyobrown intake seperation swaperooo mod, ftw 
I'd search for a link...but Im WAAAAAAAAAAAAAAAY too lazy...
I'd search for a link...but Im WAAAAAAAAAAAAAAAY too lazy...
Last edited by BigBluePile; 08-21-2010 at 07:27 PM. Reason: not posting link...:roll:
08-21-2010, 07:59 PM
#16
Registered User
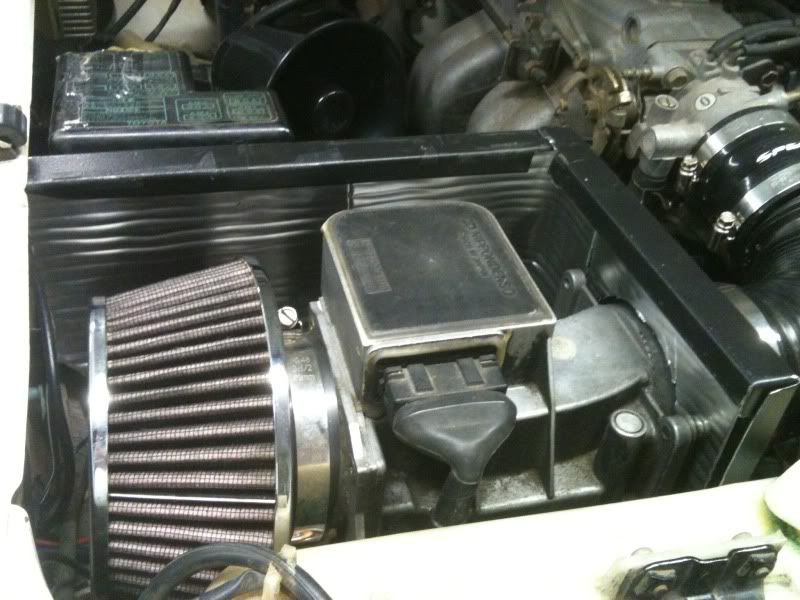
Well, here were my choices on where to put the partition. Only reason I threw it in was so you can see the setup a little better.......
And here is the finished product. Some old metal shelves, tin snips, rivets, and peel and seal (poor man's dynamat)
I tried looking for a link, I must have posted it in the bumper thread, or the friend bank thread, or the snow run thread. Who knows, but I never made a separate thread.
Either way, I still haven't sealed the top of the box against the hood. But it still gets air thats only 5 degrees warmer then ambient air. I'll take it.
Last edited by kiyobrown; 08-21-2010 at 08:00 PM.
08-22-2010, 12:11 PM
#17
Nice setups. Like the mount.
Kiyo, where'd you get that filter. I have a taller one that's size would prevent this set up.
BBP/Kiyo: when you move the MAF to the battery location is there any special methods for elongating sensor connector? Yes I've been here long enough to search but am lazy. Thanks.
If I ever get time again to wrench. My dang truck isn't even trail ready now. With no idea when I'll ever get the time reduce my "todo list."
08-22-2010, 01:11 PM
#18
Registered User
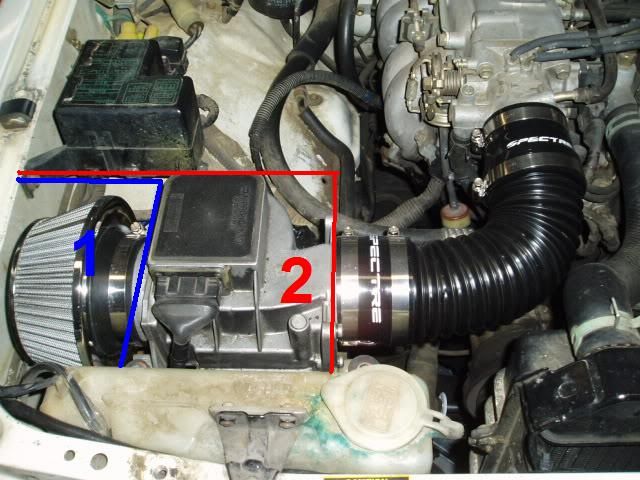
Scott, it's an autozone "spectre"'special. They had a couple sizes. This one allowed for more of a sweeping 90. Although eventually I would like to get something non corrugated. But I am pretty sure my 196k mile motor wouldn't notice the difference.
My special method was cut and splice, and try not to screw up the wires.
My special method was cut and splice, and try not to screw up the wires.
08-22-2010, 01:18 PM
#19
Contributing Member
iTrader: (3)
Hey Mudd!!!!!!! 
whatdya mean your rig ain't ready to wheel?!
fer sure man, mine as well is the Spectre special, but is a much larger version of Kiyo's. I got some good high quality weather proof splices and cut one at a time. Next time I'll cut the wires at different lengths so not to have one giant LUMP of splices. Also, you'll have to extend a main power wire too.
Last edited by BigBluePile; 08-22-2010 at 04:09 PM. Reason: Had to wave
08-22-2010, 03:41 PM
#20
BBP: I burned up the Hayden controller for my fan, the automatic part. Think that dang flexalite is jinxed. Got a taurus fan to put in. Need to order the controller components I want. And of course the time to install. Want to pull the rear dif and swap in the ARB weld on some axle armor and shock mounts while I got the axle broken down. Got a ton of cosmetic stuff to do.


