
Aussie Locker install question
 Jun 27, 2008 | 09:44 AM
#1
Thread Starter
Registered User
Joined: Oct 2007
Posts: 5,377
Likes: 5
Aussie Locker install question
I've bought new 4.56 thirds, so I have to re-install my locker. Last time I had a devil of a time getting the adjuster (spanner?) nuts to go back on. This is the circular adjuster's which allow you to adjust the backlash.
Do you install the adjuster nuts first, then the bearing caps? Or do you bolt the bearing cap on, then thread in the adjuster nuts?
Also, when you're disassembling the diff, do you mark the position of the adjuster nuts, then back them out, counting the number of rotations, or what?
Here's a pic form Zuk's page.
Much appreciated,
Matt
Jun 27, 2008 | 10:15 AM
#2
Registered User
Joined: May 2007
Posts: 541
Likes: 0
From: Tabernacle, NJ
with the bearing caps removed you should be able to slide them into the threads in pretty much the same place they came out of. Then put the caps back on. Then give them about a turn until it starts to tighten up (as per the instructions that came with my lock-rights). Btw if you're doing this on a 2 pinion and had to remove your ring gear, stick the ring gear in the oven at 225 until you're ready to put it back on. It will drop right on with no help from a hammer. But yes you should mark the adjuster nuts so you knew the position they came out in. Then put them back in the same.
http://www.4x4wire.com/toyota/tech/lockright_locker/
http://www.4x4wire.com/toyota/tech/lockright_locker/
Last edited by Beaniam; Jun 27, 2008 at 10:18 AM.
Jun 27, 2008 | 10:33 AM
#3
Contributing Member
Joined: Apr 2004
Posts: 5,464
Likes: 6
From: Arvada, Colorado
Well, I actually disagree with that, but I'm not sure it matters too much.
I put the caps on, line up the threads, and then tighten them down slightly. Then thread the nuts and make sure they are threading properly. I then set the backlash using a dial indicator, because I don't trust that everything will settle down perfectly as it was before. We're talking thousandths of an inch, and just a few off can mean premature gear wear, or damage.
Anyway, just my .02
Jun 28, 2008 | 10:32 AM
#7
Registered User
Joined: Mar 2008
Posts: 4,371
Likes: 6
From: Texas
Either I'm confused or putting an Aussie in is a lot more complicated that I thought it was. Since I'll be doing this exact same swap in a week or so maybe ya'll can answer something for me.
Why do you have to reset the backlash if all you're doing is pulling the carrier, installing the AL and reinstalling the carrier? You're not replacing gears, nothing to do with the ring and pinion is changing right? So can't you just mark everything and put it back the way it came out? This will be my first Toyota rear end so if my questions are stupid you can let me know.
Why do you have to reset the backlash if all you're doing is pulling the carrier, installing the AL and reinstalling the carrier? You're not replacing gears, nothing to do with the ring and pinion is changing right? So can't you just mark everything and put it back the way it came out? This will be my first Toyota rear end so if my questions are stupid you can let me know.
Trending Topics
Jun 28, 2008 | 11:44 AM
#8
Registered User
Joined: Mar 2008
Posts: 4,371
Likes: 6
From: Texas
http://gearinstalls.com/aussielocker.htm
Another Zuk. This is the one I'm going to print out and use.
Another Zuk. This is the one I'm going to print out and use.
Jun 28, 2008 | 03:02 PM
#9
Registered User
Joined: Jan 2008
Posts: 278
Likes: 0
From: Birmingham, AL
To properly turn the adjuster you need a face spanner wrench. A lot of people just use a punch and hammer, but a diff is one of those things where it pays to have the proper tool.
Adjustable face spanner
To pull the carrier you have to take off the bearing adjusters, which control how close the ring gear is to the pinion - If you can trust yourself to put it back EXACTLY how it came out, then it's not that complicated. I'm honest when I say I don't trust that my install isn't slightly off and that it won't damage my expensive gears. It's worth spending $15 on a dial indicator to set the backlash. It's easy to paint a pattern and adjust.
Adjustable face spanner
Either I'm confused or putting an Aussie in is a lot more complicated that I thought it was. Since I'll be doing this exact same swap in a week or so maybe ya'll can answer something for me.
Why do you have to reset the backlash if all you're doing is pulling the carrier, installing the AL and reinstalling the carrier? You're not replacing gears, nothing to do with the ring and pinion is changing right? So can't you just mark everything and put it back the way it came out? This will be my first Toyota rear end so if my questions are stupid you can let me know.
Why do you have to reset the backlash if all you're doing is pulling the carrier, installing the AL and reinstalling the carrier? You're not replacing gears, nothing to do with the ring and pinion is changing right? So can't you just mark everything and put it back the way it came out? This will be my first Toyota rear end so if my questions are stupid you can let me know.
Last edited by Crawdad; Jun 28, 2008 at 03:07 PM.
Jun 30, 2008 | 05:04 PM
#11
Thread Starter
Registered User
Joined: Oct 2007
Posts: 5,377
Likes: 5
Can someone comfirm this:
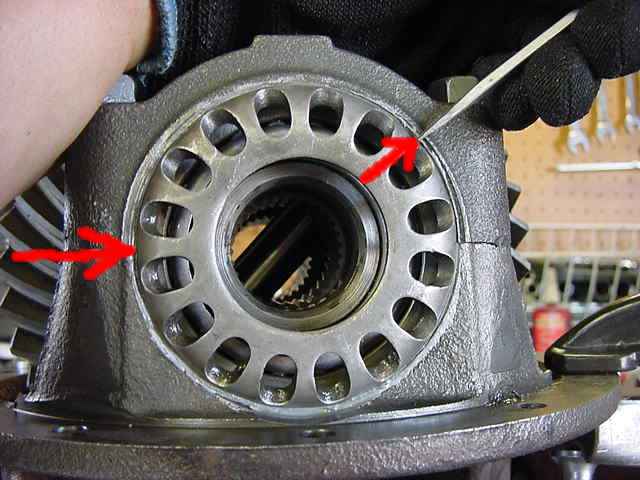
14. With the carrier in place, you will push it as far as it will go towards the side opposite the ring gear (making sure the bearing races are fully on their bearings). This acts to force the ring gear against the pinion, eliminating any backlash. Try it, when done properly you should feel no play between the ring gear and pinion, instead of the amount of backlash you felt before you disassembled the gears.
15. Find the adjuster ring for the ring gear side, and orient it with its mark in its final position (probably straight up). Place the adjuster ring against the bearing race and slide it down into the threads. There should be no space between the adjuster and the bearing race.
The adjuster ring (arrow) in place, flush against the bearing race behind it
16. Now get the carrier bearing cap for the ring gear side and orient it properly. It should slide down on the adjuster ring. Use the two bolts to line it up so everything goes together smoothly. Snug up the bolts.
The other adjuster in place, marks oriented straight up as they were when we disassembled the diff
17. The other adjuster ring is ready to be installed now. Orient it with its mark in the final position. Start it out flush with the bearing race, and slide it down into the threads. As you do this the meshing of the threads will force the adjuster ring outwards away from bearing race. Get the other carrier bearing cap, orient it properly so its punch marks match the marks you put on the housing, and use the bolts to help position it over the bearing race and adjuster. Slide the cap down, and it should mesh nicely. Snug the cap bolts.
Using a brass punch to drive the ring gear adjuster around one full turn
18. Now you will set the bearing preload and backlash. The adjuster ring on the side opposite the ring gear is sitting out away from the bearing race just a bit. You will use a punch to rotate the adjuster ring clockwise, threading it in towards the bearing race. The first half of the turn should go easily, until the adjuster ring starts to contact the bearing race. The last half will require some force to turn the ring, as you are creating the preload and moving the ring gear away from the pinion gear to create the backlash. The adjuster ring should end up with the mark in the same position as when you marked it and took it apart.
Jul 1, 2008 | 07:14 AM
#12


I've bought new 4.56 thirds, so I have to re-install my locker. Last time I had a devil of a time getting the adjuster (spanner?) nuts to go back on. This is the circular adjuster's which allow you to adjust the backlash.
Do you install the adjuster nuts first, then the bearing caps? Or do you bolt the bearing cap on, then thread in the adjuster nuts?
Also, when you're disassembling the diff, do you mark the position of the adjuster nuts, then back them out, counting the number of rotations, or what?
Here's a pic form Zuk's page.
Much appreciated,
Matt
Do you install the adjuster nuts first, then the bearing caps? Or do you bolt the bearing cap on, then thread in the adjuster nuts?
Also, when you're disassembling the diff, do you mark the position of the adjuster nuts, then back them out, counting the number of rotations, or what?
Here's a pic form Zuk's page.
Much appreciated,
Matt
I mark the position of the wheels before dis-assembly. Then during assembly, turn the wheel on the RING SIDE(the side with the ring bolts heads) in all the way until the ring touches the pinion and BL is 0. At this point, you have likely went about 1/2 turn past your inscribed mark so back it off until it lines up. With one adjuster set the other is a no brainer.
Now, at this point, I also add more CBPL to prevent the ring from deflecting under heavy torque loads. This basically adds strength to the gear set and prevents the outside edges of the ring teeth from "falling off". The basic procedure to add some CBPL is straight forward.....turn each wheel 1 notch tighter using the inscribed marks as a reference. Then WACK both bearing caps with a hammer numerous times WHILE the pinion is rotated back and forth. This has the effect of equalizing the bearing tensions and preventing false backlash measurements. Do that for a couple of notches and your done. Oh ya....don't forget to use lotsa anti-seize.
I think a cheap dial indicator perhaps from Harbor freight is a wise investment...take a BL reading before tearing the case out and make sure its about the same after this Aussie install. Take more than 1 or 3 or even 5 measurements....take a BL measurement from every other tooth around the ring. That's about 20 numbers and write them down. That's the best method to document BL accurately.

ZUK
Last edited by ZUK; Jul 1, 2008 at 07:25 AM.
Jul 2, 2008 | 09:08 PM
#14
Thread Starter
Registered User
Joined: Oct 2007
Posts: 5,377
Likes: 5
Alright, I measured the backlash on every second tooth on my 4.56 third, it averaged out at 0.011". The FSM says the backlash should be 0.005-0.007". There is virtually no carrier bearing pre-load (CBPL). The gears look fine, no chips or noticeable scarring.
When I put this diff back together, I suppose I set the backlash, then crank both the wheels a couple notches each? Assuming there is no pre-load, how many notches should they each go? I made a wheel adjuster tool that looks just like the one in the picture below. 1/4" x 1.5" bolts are cheap and fit nicely into the adjuster wheels.
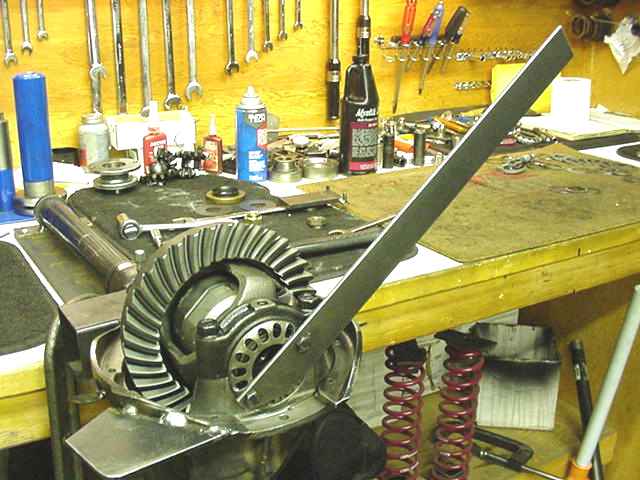
When I put this diff back together, I suppose I set the backlash, then crank both the wheels a couple notches each? Assuming there is no pre-load, how many notches should they each go? I made a wheel adjuster tool that looks just like the one in the picture below. 1/4" x 1.5" bolts are cheap and fit nicely into the adjuster wheels.
Last edited by Matt16; Jul 2, 2008 at 09:11 PM.
Jul 2, 2008 | 09:31 PM
#15
Registered User
Joined: May 2007
Posts: 775
Likes: 0
From: Shoreline, Wa
Alright, I measured the backlash on every second tooth on my 4.56 third, it averaged out at 0.011". The FSM says the backlash should be 0.005-0.007". There is virtually no carrier bearing pre-load (CBPL). The gears look fine, no chips or noticeable scarring.
When I put this diff back together, I suppose I set the backlash, then crank both the wheels a couple notches each? Assuming there is no pre-load, how many notches should they each go? I made a wheel adjuster tool that looks just like the one in the picture below. 1/4" x 1.5" bolts are cheap and fit nicely into the adjuster wheels.
When I put this diff back together, I suppose I set the backlash, then crank both the wheels a couple notches each? Assuming there is no pre-load, how many notches should they each go? I made a wheel adjuster tool that looks just like the one in the picture below. 1/4" x 1.5" bolts are cheap and fit nicely into the adjuster wheels.
what are all of those plates you got welded on there for? did you do that for the the proportioning valve mount?
Jul 3, 2008 | 09:44 AM
#18
That plate welded to the left side of my fixture is just a convenient place to secure the dial indicator magnetic base to.
You might get up to 6 notches on each side, Matt.....3 or 4 is probably good though. Yes, I set the wheels back to where the inscribed marks were and usually that gets you to the same BL as before.....Once BL is verified then I move things one notch at a time. ZUK
You might get up to 6 notches on each side, Matt.....3 or 4 is probably good though. Yes, I set the wheels back to where the inscribed marks were and usually that gets you to the same BL as before.....Once BL is verified then I move things one notch at a time. ZUK
Jul 3, 2008 | 10:41 AM
#19
Thread Starter
Registered User
Joined: Oct 2007
Posts: 5,377
Likes: 5
Can I tighten the backlash on used gears? I presume that gears have meshed with 0.011 backlash, so if I set the backlash at 0.006, the gears will have to re-mesh with the new backlash. Am I correct? Do I have to break in the gears again for the new BL?
I am planning on using 80W140 dino oil for few hundred miles, then switching to a synthetic of the same weight.
I am planning on using 80W140 dino oil for few hundred miles, then switching to a synthetic of the same weight.
Jul 3, 2008 | 03:16 PM
#20
If you go to 006 then the gears might whistle some.....I don't think it will develop much heat so no break-in required.
I think you should stay close to the 011....maybe tighten it up to 009 or 010 and call it good. It won't whistle with a slight decrease in the backlash it has been burned in with.
I think you should stay close to the 011....maybe tighten it up to 009 or 010 and call it good. It won't whistle with a slight decrease in the backlash it has been burned in with.


