
3vze Top End rebuild...W/pics...slowly
 02-17-2005, 08:51 AM
#41
Registered User
Thread Starter
Join Date: Jan 2005
Location: Moreno Valley, Ca
Posts: 571
Likes: 0
Received 0 Likes
on
0 Posts
Good for a laugh....
Ok real quick, I'm making progress on the removal. The crossover pipe bolts are all off but 1 and I cant seem to break loose the camshaft bolt or the crankshaft bolts. I feel good about today however. After working late into last night this morning I decided to call the dealership and find out how much they would sell the SST's for........
09213-58011 $259.00
09330-00021 $58.60
09213-31021 $139.44
09278-54012 $533.01
Total...............$990.05
Holy crap, what a rip off. Back to my garage and some blood, sweat, and tears to get this teardown done today. Thought I'd share those stealership prices.
-=-Morphine=-
09213-58011 $259.00
09330-00021 $58.60
09213-31021 $139.44
09278-54012 $533.01
Total...............$990.05
Holy crap, what a rip off. Back to my garage and some blood, sweat, and tears to get this teardown done today. Thought I'd share those stealership prices.
-=-Morphine=-
 02-17-2005, 03:49 PM
#43
Registered User
Thread Starter
Join Date: Jan 2005
Location: Moreno Valley, Ca
Posts: 571
Likes: 0
Received 0 Likes
on
0 Posts
New Oversided Valves just arrived
Quick note...My Engnbldr.com oversized valves just arrived. WooHoo I'm so Happy. Now back to the garage.
If people want I'll post some pics laters
-=Morphine=-
If people want I'll post some pics laters
-=Morphine=-
02-17-2005, 03:58 PM
#44
Registered User
PICS PICS PICS!!
here the dealership would NOT sell me the SSTs at all!! They gave me a phone number to call that was their supplier. If you want ill track that number down again and give em a call to find out prices...
here the dealership would NOT sell me the SSTs at all!! They gave me a phone number to call that was their supplier. If you want ill track that number down again and give em a call to find out prices...
02-21-2005, 08:41 PM
#46
Contributing Member
Join Date: Apr 2004
Location: Parker, CO
Posts: 942
Likes: 0
Received 0 Likes
on
0 Posts
To get the bolt broke free on the cams and crank use the timing belt and wrap it around the gears and use a vice grip to hold it in place so it won't turn and the crank on it with a breaker bar.
Question for you though, if your compression is down in your cylenders doesn't that mean you need to replace the piston rings? and if you rebuild your heads and not your pistons then won't you just blow out your piston rings sooner?? That is something that i would check into or somebody on hear can answer for us.
Good posting by the way.
02-21-2005, 08:46 PM
#47
Registered User
Thread Starter
Join Date: Jan 2005
Location: Moreno Valley, Ca
Posts: 571
Likes: 0
Received 0 Likes
on
0 Posts
The HEADS are off
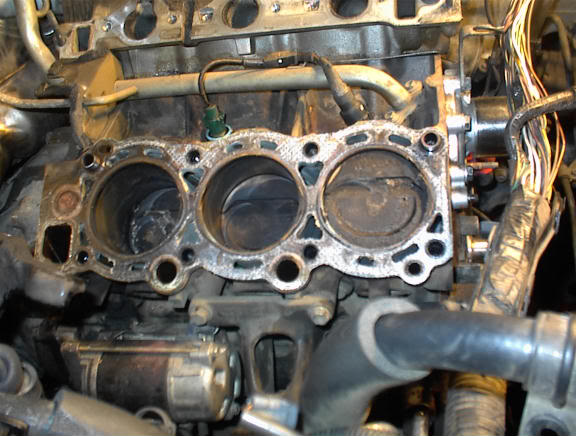
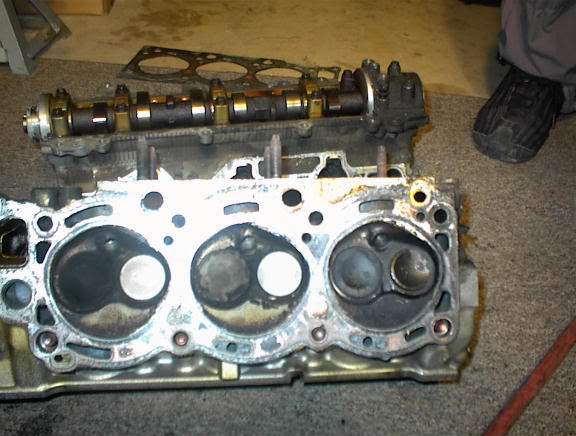
OK the heads are off...My garage is a mess....I broken down and actually bought some off my OWN tools so I wont need to borrow from friends later. The heads are off!!! The block is DIRTY and the valves are, for better words, "NASTY"
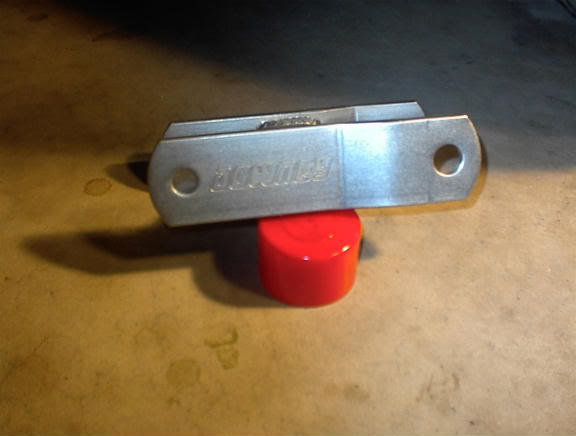
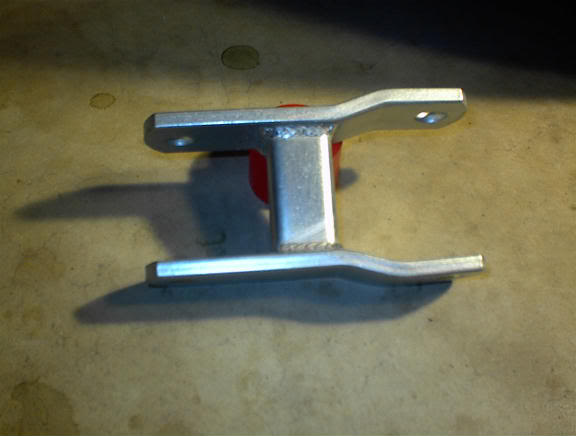
Here's the SST I used to break loose the camshaft pulleys.....My buddy Gary stopped by and was a huge help!
My friggin' crossover pipe...What a damn pain in the A$$. Patience and time and some contortionist stretching and she came loose. I didn't remove the crossover until the heads were off.
Below the passanger side heads:

Heads with valves:

Below the drivers side head:

Drivers side head:
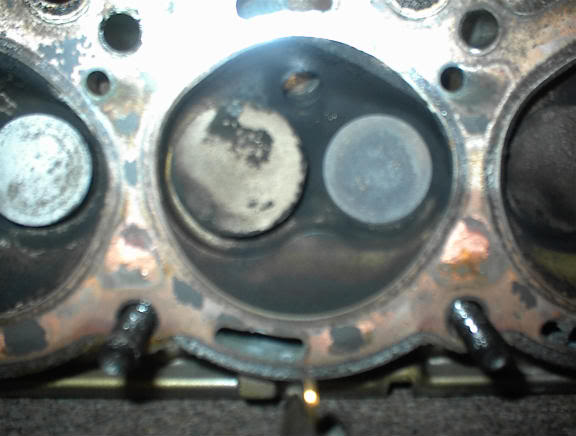
#6 valve and then the block at Cylinder #2 up close...Cylinder #6 is were my problem are.
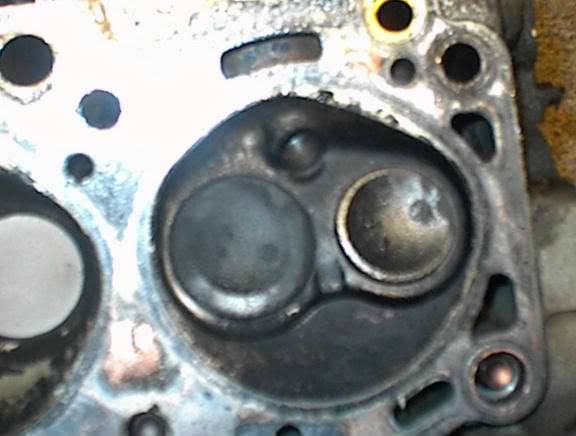
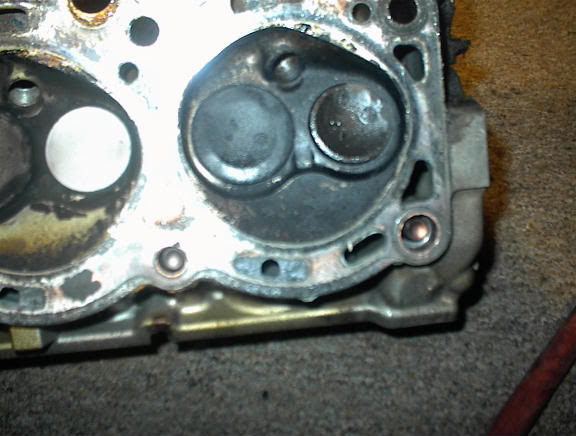
Please comment on the shape and apperance of the block and valves. I'd like to get down to the machine shop tomorrow and have the head work done:
Surface work, pressure plated, slight over bore to accomodate the new oversize valves, valve shimmed(adjusted) and other stuff I'm not familiar with.
-=Morphine=-
Here's the SST I used to break loose the camshaft pulleys.....My buddy Gary stopped by and was a huge help!
My friggin' crossover pipe...What a damn pain in the A$$. Patience and time and some contortionist stretching and she came loose. I didn't remove the crossover until the heads were off.
Below the passanger side heads:
Heads with valves:
Below the drivers side head:
Drivers side head:
#6 valve and then the block at Cylinder #2 up close...Cylinder #6 is were my problem are.
Please comment on the shape and apperance of the block and valves. I'd like to get down to the machine shop tomorrow and have the head work done:
Surface work, pressure plated, slight over bore to accomodate the new oversize valves, valve shimmed(adjusted) and other stuff I'm not familiar with.
-=Morphine=-
02-21-2005, 08:53 PM
#48
Registered User
Thread Starter
Join Date: Jan 2005
Location: Moreno Valley, Ca
Posts: 571
Likes: 0
Received 0 Likes
on
0 Posts
Additional tools used
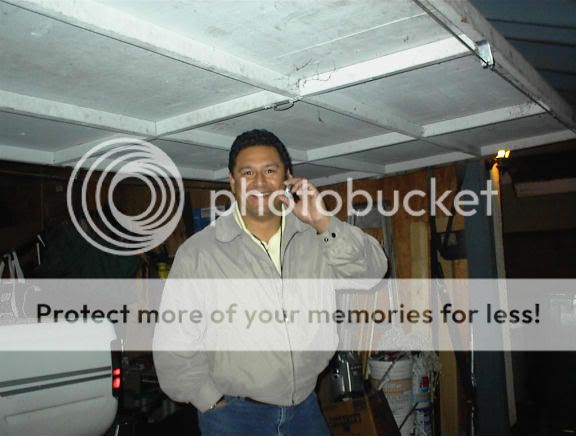
I ended up using a chain wrench (at least I believe that's what is called) to hold the camshaft pulleys in place, then a breaker bar and socket, then lots of force and my own SST Gary as seen above.
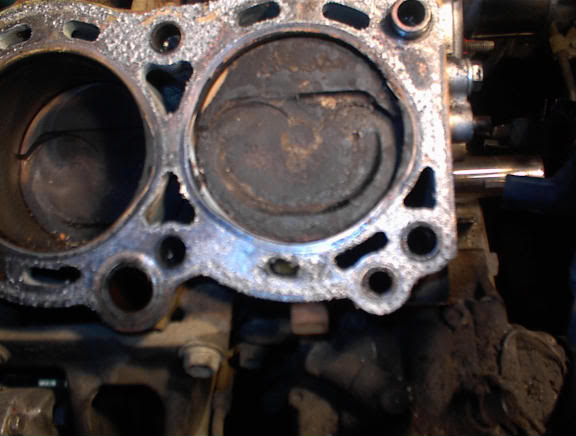
Red 85: good point. When I did the compression test I redid it again with teh same results. Next I squirted a little oil in the spark plug hole and retested...no change in the results letting us know that the seals are decent. I don't think that would point to my pistons but I defenitely could be wrong...I AM NOT A MECHANIC.
***please someone address this issue if you could***
After looking at the above images it may as well be my pistons.
Thanks for all the support my fellow YOTATECHers.
the journeys is only 45% done now...stay tuned for the other 55%
-=Morphine=-
**edit** just checked my email and Rich at Cruizinperformance is shipping back my fuel injectors Tomorrow. Man that is good timing.**
Last edited by Morphine; 02-21-2005 at 08:55 PM. Reason: Additional information
02-22-2005, 12:56 AM
#49
Registered User
Join Date: Apr 2004
Location: NV
Posts: 2,583
Likes: 0
Received 0 Likes
on
0 Posts
I just got mine back together tonight and everything seems to be working fine. I'm sure the tops of your pistons could use a good cleaning. I actually used my dremel on mine and it worked nicely. There was a ton of build up on my pistons where the valves seat on them. I also had to replace all of my valve cover bolts, the originals were breaking left and right (before getting to 5ft/lbs). I had some problems with 3 of my intake manifold bolts not tightening. I had to go buy longer bolts that would reach better threads. So, heads up on that stuff.
I was relieved to find out that the OEM headgaskets have been redesigned since 1995. My gaskets looked exactly like yours and in my pic below you can see what the new ones look like. I've been at it for 12 hrs today, so I'll try to remember some more tips tomorrow when this headache is gone.

I was relieved to find out that the OEM headgaskets have been redesigned since 1995. My gaskets looked exactly like yours and in my pic below you can see what the new ones look like. I've been at it for 12 hrs today, so I'll try to remember some more tips tomorrow when this headache is gone.
02-22-2005, 08:16 PM
#51
Registered User
Join Date: Apr 2004
Location: NV
Posts: 2,583
Likes: 0
Received 0 Likes
on
0 Posts
Originally Posted by Bumpin' Yota
CL - how did you clean the head and piston surfaces so nicely?
02-22-2005, 08:20 PM
#52
Registered User

Join Date: Feb 2005
Location: Atsugi Japan
Posts: 344
Likes: 0
Received 0 Likes
on
0 Posts
Morph,
I do not think that there is a means of checking for a ring problem when the HG is shot. You should have seen nice number for the odd side that did not have the bad hg, all bets are off for the side with the bad HG. I have yet to have to replace rings on a HG that was caught early. I think that your was caught in time and not run after so you should be okay with the rings you have. IF you use the dremel tool to clean all that up which you can, be careful not to take up too much of the metal as that is a mating surface and it has to be reused. When I do mine I use a fine grade oil based honing stone (normally used for knife sharping) a very light machine oil or a half weight eng oil. Use of a 6 inch stone in an eight pattern almost makes it impossible to create a low spot however the stone will do nothing for the piston tops for those I use a soft scrub pad (the wife hates it when I take from the kitchen) and the same light weight oil. Not as shinny as the one pictured here but it works well.
I do not think that there is a means of checking for a ring problem when the HG is shot. You should have seen nice number for the odd side that did not have the bad hg, all bets are off for the side with the bad HG. I have yet to have to replace rings on a HG that was caught early. I think that your was caught in time and not run after so you should be okay with the rings you have. IF you use the dremel tool to clean all that up which you can, be careful not to take up too much of the metal as that is a mating surface and it has to be reused. When I do mine I use a fine grade oil based honing stone (normally used for knife sharping) a very light machine oil or a half weight eng oil. Use of a 6 inch stone in an eight pattern almost makes it impossible to create a low spot however the stone will do nothing for the piston tops for those I use a soft scrub pad (the wife hates it when I take from the kitchen) and the same light weight oil. Not as shinny as the one pictured here but it works well.
02-22-2005, 08:39 PM
#53
Registered User
Thread Starter
Join Date: Jan 2005
Location: Moreno Valley, Ca
Posts: 571
Likes: 0
Received 0 Likes
on
0 Posts
Pics of the cleaning tools??
Thanks ChickenLover and Dragon564 for the input on cleaning up my mess. I'll apologize now as I haven't slept in 41hours (don't ask - work and home) but could you possibly list part numbers, brand names and or pics of these items? My mind is fuzzy, currently slurry my vision and blurry my speech. Off to bed and thanks again ya'll.
Big thanks to Bumpin' Yota there for asking the question and for helping me along the way.
-=Morphine=-
Big thanks to Bumpin' Yota there for asking the question and for helping me along the way.
-=Morphine=-
02-23-2005, 07:07 PM
#54
Registered User
Thread Starter
Join Date: Jan 2005
Location: Moreno Valley, Ca
Posts: 571
Likes: 0
Received 0 Likes
on
0 Posts
Updates
OK, heads are at the machine shop and should be ready Friday. Bruce at partsdinosaur is awesome. I'd highly recommend him and his company for gaskets and various items. I ordered the full gasket kit and being the noob I am, when I dropped the heads off I forgot about the vale seats. So I go back to his site and order them. Within 10minutes I have an email from Bruce informing me that they are included in the Full gasket set I purchased the day before. Now Bruce knows I'd like to get these as soon as possible and when he found out that I was in SoCal, same as his distributor he made arrangements for them to ship the products directly to me instead of his store shipping them from out of state. Awesome service and support.
Next I found my Downey headers localy (within 45 miles) and at one hell of a price. Downey Ceramic headers, new in the box with all mounting supplies and the Smog sticker for $155 cheaper than Downey directly.
Now with the money saved, I picked up some Downey HD shackles.
And finally some pics.
Headers
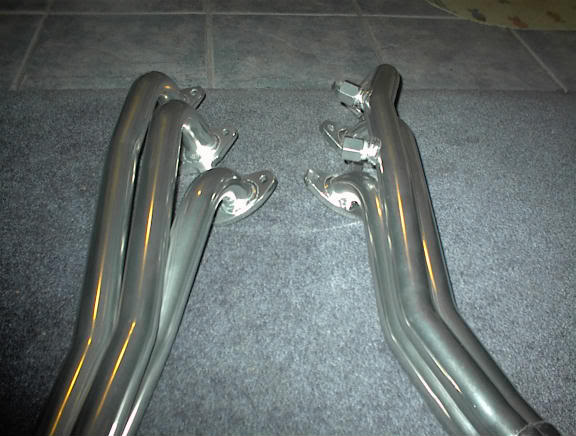
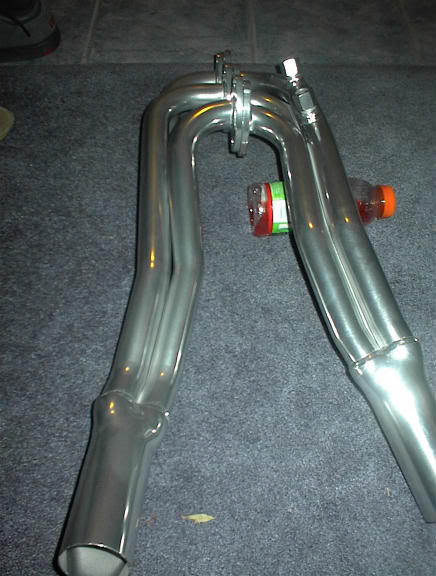
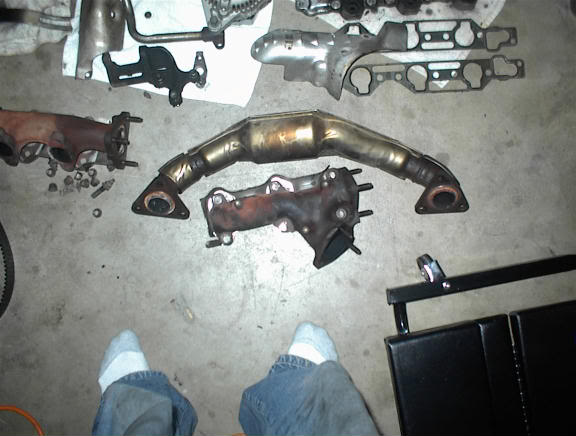
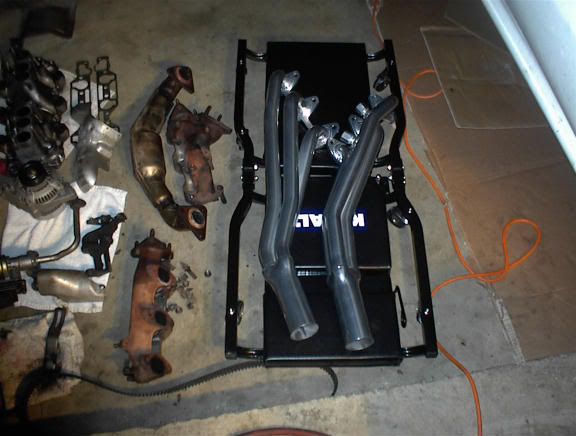
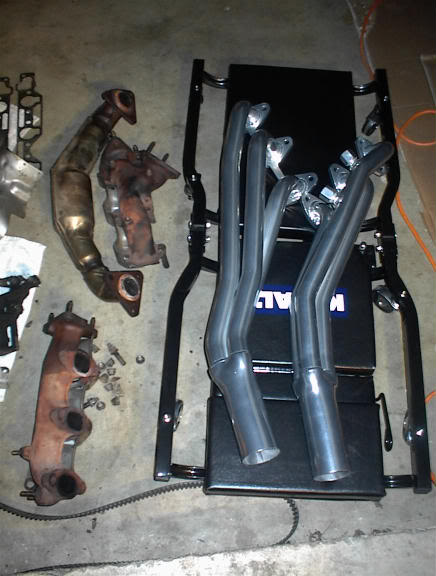
Old exhaust manifolds and crossover next to the headers:
New shackles and a comparison to the stock setup:

Next I found my Downey headers localy (within 45 miles) and at one hell of a price. Downey Ceramic headers, new in the box with all mounting supplies and the Smog sticker for $155 cheaper than Downey directly.
Now with the money saved, I picked up some Downey HD shackles.
And finally some pics.
Headers
Old exhaust manifolds and crossover next to the headers:
New shackles and a comparison to the stock setup:
02-23-2005, 10:39 PM
#56
Registered User
Join Date: Feb 2005
Location: Atsugi Japan
Posts: 344
Likes: 0
Received 0 Likes
on
0 Posts
Morph,
I see those headers...hey just for you buudy...dont put those things on your truck. your truck is way to good for such a thing, Come on they are not even shinny enough to comb your hair in.......just send them over to me in Japan, and then you can get something that your truck is worthy of.....hey may be after you ship those downeys over here to Japan I will have my stockers chrome plated and I send to you......think about you would be the only guy on your block with chromed stock 3VZ-e headers....you can't go wrong with a deal like that.......
okay maybe it not such a good deal for you....what can I say...NICE, VERY NICE
02-23-2005, 11:24 PM
#58
Registered User
Thread Starter
Join Date: Jan 2005
Location: Moreno Valley, Ca
Posts: 571
Likes: 0
Received 0 Likes
on
0 Posts
Alright Kris first, rough estimate on parts and what not....
Machine work (including valve adjustment, and over bore for the new OS valves) =278
OS Valves = 65
Partsdinosaur.com = 394.00 (includes full gasket set, head bolts, all timing belt needs, h2o & oil pump)
Knock Sensor and wire = 200
Total = 1050 roughly
Doesn't include goodies like Downey Ceramic headers = 345
Downey HD Shackles = 50
Skyjacker Shocks(4 corners) and steering stabilizer = 180
Misc fluids and filters = unknown (haven't purchased them yet)
The EXPERIENCE and RESPECT for any "Good" mechanic = PRICELESS!!!
Dragon564 - Sorry I discussed it with my lady and she said no. I spend to much time looking in the mirror already and shiny stock unit wont work. Sorry man I tried for you.
CL - thanks for the heads up. I'll look into that.
By the time this project is done I will have spent more than I planned in $$$ and Time. Man you guys weren't kidding about "welcome to yotatech, my wallet will hate me from now on." At least my lady is having a blast and CAN'T wait to get out on the trails. For all new comers and the mechanically challenged...This thread just goes to show what you can do if patient, you have a great support system (Yotatech.com), and can get over your fears of "working on an engine". My previous experience with car repair was changing burnt out bulbs and oil changes.
Thanks yotatech
-=Morphine=-
02-24-2005, 02:00 AM
#59
Registered User
Join Date: Feb 2005
Location: lake in the hills
Posts: 43
Likes: 0
Received 0 Likes
on
0 Posts
Great job
 Nice work morphine. You will love the headers, I have had mine for 6 years and love em..
 I will be contacting partsdinosaur today and getting the same kit.
Not to hijack but I did a comp check and had all but one read at 160. and piston one is at 140. I have 164000 miles and had the head gasket done at 60000. Am i jumping the gun wanting to do the upper rebuild? Seems to run great but am in the process of overhauling almost every thing else. O well thanks again morphine for the great info...Jay...
 02-24-2005, 08:34 AM
#60
Registered User
Thread Starter
Join Date: Jan 2005
Location: Moreno Valley, Ca
Posts: 571
Likes: 0
Received 0 Likes
on
0 Posts
Jaymo, I'm not a mechanic but what I have read is that the compression test should read between 172 to 141 minimum. It sounds like you are rightwithin specs, even though close to those specs. Did you by chance re-do the compression test with a little oil shot down into the spark plug hole? If so did the results change? if not could you do it? If the results change it will let us know that its the piston seals and not neccessarily the valves or head gasket.
Someone else can please chime in if I'm incorrect on this but I do believe that is how it read. For comparisson here were my compression test results again (no change with the oil)
Cylinder 1 = 135
Cylinder 2 = 133
Cylinder 3 = 134
Cylinder 4 = 131
Cylinder 5 = 130
Cylinder 6 = 30-35
I think you might be fine on the top end unless there are other problems we don't know about. Just remember that I am not a mechanic.
-=Morphine=-


