
xBEEFx's 1988 4Runner Build-Up Thread
 Apr 15, 2012 | 10:16 PM
#1
Thread Starter
Registered User
Joined: Aug 2009
Posts: 10
Likes: 2
xBEEFx's 1988 4Runner Build-Up Thread
After a long time lurking on this site, I figured it's about time to contribute.
Purchased my 88 4Runner SR5 V6 auto in 8/09 for $1950 with about 272k, already had rebuilt top end, new water pump, new cat (thanks tweakers), a leaky rear main seal (that never happens), dying CV boots, clear coat flaking, a hammer to help the dying starter, needed new tires, A/C not working, stalled at lights (low coolant), drivers seat was in horrible shape (as they all are), and the radio wiring was an electrical fire waiting to happen.
Only picture I could find of how it looked when I got it -

I'm not new to Toyotas. My first vehicle which was always owned by the family was a 1986 Toyota Pickup extra cab. Had a rebuilt 22R, rebuilt transfer case, and rebuilt trans (that all went within 2 weeks of each other). Gigantic mistake letting it get totalled after getting rear ended twice within a separate 2 weeks with only 191k. I DON'T LIKE TO TALK ABOUT IT -.- haha
By January I had replaced the starter with a fresh Toyota one, alternator, and rear drive shaft (decided to donkey d!(k on the freeway at 70mph and tore the bolt holes off)
About 6 months later I picked up the tires and wheels (2@70% 2@30% tread) that are on it currently off of craigslist, as well as a smittybuilt rear bumper I have yet to put on, and also decided I wanted to get rid of all the peeling clearcoat and paint the truck with duplicolor spray on bedliner. Pulled the roof rack off and discovered just how many brass/rubber gromets were holding it and 2 70lb kayaks on (4 out of 12). Also threw on some harbor freight spotlights (after this picture was taken), also pulled the lower spoiler since the plastic trim was falling off, and it was bent and twisted beyond repair.
After 2 coats of paint/duplicolor spray on bedliner -


New tires and painted wheels -

Naturally the day after I painted it, I was rear ended at slow speeds, flaked the bedliner at the very bottom of the tailgate and pushed the bumper in maybe half an inch, the lady who rear ended me had a brand new hyundai suv, and needed a new front bumper, and license plate afterwards
All of this was in preparation for a trip to AZ to visit my grandfather....I made the mistake of taking my DR650 as a precaution of breaking down - (don't do this unless you have a ZUK mod, which I didn't have, or good suspension, which I also didn't have)

About 6 months ago, I pulled the shifter solenoids, and clean out the trans pan after reading some posts on here, decided to clean them out with brake cleaner and an air compressor (don't do that). Made it worse. Since then I have been going from 1>3>4, 2nd graces me with its presence every once and a while just to tease me, but once I come to a stop, usually back to limp home in 3rd mode.
If you're still here, you obviously want to see more pictures, they will be coming along as I continue to do the build up.
Within the next week I expect to replace the shifter solenoids thanks to an awesome deal on ebay for $135 shipped - http://www.ebay.com/itm/230357832802...9#ht_744wt_877
As well as the steering stabilizer that decided to snap off a couple weeks ago, the ZUK mod with some TJ front coils off a 02 j**p, and rebuilding the weathered interior walls in the back passenger, and tailgate area.
Within the next few months-
Herculiner interior floor
possibly recarpeting using indoor/outdoor carpet
adding subs/speakers/cargo lights to the soon to be rebuilt passenger/tailgate area
rear main seal....lets not get ahead of ourselves
replacing front axles
de-rusting and repainting entire truck
and whatever else I can't think of right now
photo as of today 4/15/12

Purchased my 88 4Runner SR5 V6 auto in 8/09 for $1950 with about 272k, already had rebuilt top end, new water pump, new cat (thanks tweakers), a leaky rear main seal (that never happens), dying CV boots, clear coat flaking, a hammer to help the dying starter, needed new tires, A/C not working, stalled at lights (low coolant), drivers seat was in horrible shape (as they all are), and the radio wiring was an electrical fire waiting to happen.
Only picture I could find of how it looked when I got it -
I'm not new to Toyotas. My first vehicle which was always owned by the family was a 1986 Toyota Pickup extra cab. Had a rebuilt 22R, rebuilt transfer case, and rebuilt trans (that all went within 2 weeks of each other). Gigantic mistake letting it get totalled after getting rear ended twice within a separate 2 weeks with only 191k. I DON'T LIKE TO TALK ABOUT IT -.- haha
By January I had replaced the starter with a fresh Toyota one, alternator, and rear drive shaft (decided to donkey d!(k on the freeway at 70mph and tore the bolt holes off)
About 6 months later I picked up the tires and wheels (2@70% 2@30% tread) that are on it currently off of craigslist, as well as a smittybuilt rear bumper I have yet to put on, and also decided I wanted to get rid of all the peeling clearcoat and paint the truck with duplicolor spray on bedliner. Pulled the roof rack off and discovered just how many brass/rubber gromets were holding it and 2 70lb kayaks on (4 out of 12). Also threw on some harbor freight spotlights (after this picture was taken), also pulled the lower spoiler since the plastic trim was falling off, and it was bent and twisted beyond repair.
After 2 coats of paint/duplicolor spray on bedliner -
New tires and painted wheels -
Naturally the day after I painted it, I was rear ended at slow speeds, flaked the bedliner at the very bottom of the tailgate and pushed the bumper in maybe half an inch, the lady who rear ended me had a brand new hyundai suv, and needed a new front bumper, and license plate afterwards
All of this was in preparation for a trip to AZ to visit my grandfather....I made the mistake of taking my DR650 as a precaution of breaking down - (don't do this unless you have a ZUK mod, which I didn't have, or good suspension, which I also didn't have)
About 6 months ago, I pulled the shifter solenoids, and clean out the trans pan after reading some posts on here, decided to clean them out with brake cleaner and an air compressor (don't do that). Made it worse. Since then I have been going from 1>3>4, 2nd graces me with its presence every once and a while just to tease me, but once I come to a stop, usually back to limp home in 3rd mode.
If you're still here, you obviously want to see more pictures, they will be coming along as I continue to do the build up.
Within the next week I expect to replace the shifter solenoids thanks to an awesome deal on ebay for $135 shipped - http://www.ebay.com/itm/230357832802...9#ht_744wt_877
As well as the steering stabilizer that decided to snap off a couple weeks ago, the ZUK mod with some TJ front coils off a 02 j**p, and rebuilding the weathered interior walls in the back passenger, and tailgate area.
Within the next few months-
Herculiner interior floor
possibly recarpeting using indoor/outdoor carpet
adding subs/speakers/cargo lights to the soon to be rebuilt passenger/tailgate area
rear main seal....lets not get ahead of ourselves
replacing front axles
de-rusting and repainting entire truck
and whatever else I can't think of right now
photo as of today 4/15/12
Apr 15, 2012 | 10:28 PM
#2
Thread Starter
Registered User
Joined: Aug 2009
Posts: 10
Likes: 2
Oh yeah, fixed my horn a couple days ago, it went from working every once and a while, to whenever I turn the wheel, to being always on. Sanded the ring a bit to get it back to looking new, and added a fix I've seen done on the forums, using a .22 caliber brass casing.

I know what your thinking, I definitely didn't use my 10/22 to give myself an empty casing in the garage. I really pulled the casing from the actual bullet, and safely disposed of the black powder inside, and did not de-prime it using the 10/22 seen behind.
.22 casing on the contact in the middle of the picture

Turns out that was only half the problem. My road rage punching the steering wheel had put the contacts of the actual horn button in constant contact. Straightened with precision with a screwdriver and brute force.

Going to have to pull the horn button again for some reworking, have to press the horn too hard through the pad to make it work
I know what your thinking, I definitely didn't use my 10/22 to give myself an empty casing in the garage. I really pulled the casing from the actual bullet, and safely disposed of the black powder inside, and did not de-prime it using the 10/22 seen behind.
.22 casing on the contact in the middle of the picture
Turns out that was only half the problem. My road rage punching the steering wheel had put the contacts of the actual horn button in constant contact. Straightened with precision with a screwdriver and brute force.
Going to have to pull the horn button again for some reworking, have to press the horn too hard through the pad to make it work
Apr 17, 2012 | 02:21 AM
#3
Thread Starter
Registered User
Joined: Aug 2009
Posts: 10
Likes: 2
Shifter solenoid replacement
Replaced the shifter solenoids and lock up solenoid today, figured since I had all 3, I may as well do all of them. Tired of pulling the transmission pan.
Remove front swaybar (mine was already off)
Drain the transmission fluid, make sure you have a big enough pan, and keep it handy because theres still about another 1-2 quarts in it between the filter and the pan after it stops flowing. ASK ME HOW I KNOW.

If you own a Toyota, and don't own a set of swivel sockets, you're missing out.

Remove all the pan bolts except 2 at the front side of the pan (opposite drain hole), get that drain pan underneath the drain hole again, loosen the last 2 bolts about half way, and pull the rear of the pan (drain hole side) down GENTLY until the rest of the fluid drains out.

Once its empty, put the drain screw back in, and remove the last 2 bolts. Be sure to have a hand on the trans pan when you take the last bolt out. pull the filler/dipstick line down, it should seperate about where its bolted down.
Last time I did this, I cleaned all the magnets, and the entire pan with brake cleaner and some rags. Cleaning the magnets are the hardest part.

From the front of the truck to the rear for the A340H transmission, it's the lock-up solenoid (GREEN) , #1 shifter solenoid (WHITE), and #2 shifter solenoid (BLUE). Be careful when disconnecting them at the harness, the lock in clips are pretty frail, if they do break off, it's no big deal, they stay in place once plugged in.
Directly underneath, top of photo is drivers side of the trans -

From the drivers side -
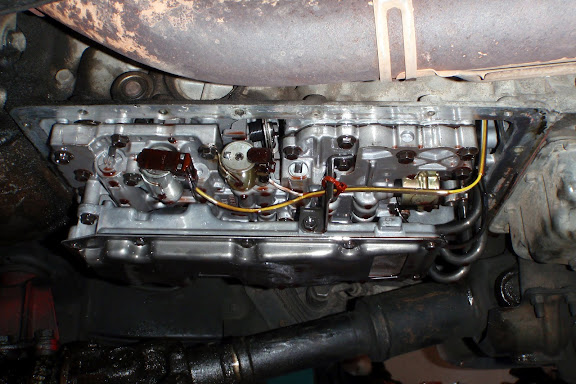
With these solenoids, they fit perfect. Only issue I had was the lock up solenoid where the electrical plug in is, when you are trying to mount it, it may rub against the case of the transmission, but it does fit perfectly. I also put a bit of ATF on each of the solenoid gaskets where they fit into the respective holes.

Wild guess that the 2 with the black nipple are the shifter solenoids, and the silver nipple is the lock up -

I didn't need to replace the filter, since I had replaced it 6 months ago - FYI ALOT OF FLUID IS STILL IN THE FILTER, ASK ME HOW I KNOW. Make sure you have that pan handy. And from what I've read, don't use any gasket sealer on the filter.
Now comes the hard part. Once you apply the gasket/sealer to the pan, and clean up the trans side where it seats, if you're looking up from underneath the truck, get the passenger side of the pan up and over the trans first, if you're doing this by yourself, holding the pan, trying to not touch the gasket with seal to anything, and trying to line up the filler pipe with the part thats still attached to the vehicle, fear not, you can unbolt the filler pipe later and re-align it, just worry about getting the pan lined up for now. Once everything looks good, hand thread one of the 19 trans bolts, preferably in any hole you can see through the gasket and just get it in enough so you can get more comfortable, and do the same thing on the opposite side so you can let go of the pan, continue the same step until you get all 19 in, and tighten them down evenly on each side to seat the pan.

If you're a normal person like myself and couldn't get the trans filler line to line up with the rest of it, there are 2 bolts holding the top portion of it on (the top one is the same size nut that the 19 trans pan bolts were) the lower is a 12mm if I remember correctly (horrible memory). It's easiest to go under the vehicle again to line up and seat the filler line to the trans line, once thats seated all the way down, put the bolt back in while your down there, don't tighten it all the way down until you put the top bolt in.
Also, make sure any transmission fluid laying around the garage isnt waste transmission oil you had laying around from the last time you did this. Luckily I only poured a small funnel full in, and as you've noticed, the trans holds alot of fluid. Depending if you replaced the filter also. I ended up putting around 5 quarts in. Don't forget to let it breathe while filling, ASK ME HOW I KNOW.
Remove front swaybar (mine was already off)
Drain the transmission fluid, make sure you have a big enough pan, and keep it handy because theres still about another 1-2 quarts in it between the filter and the pan after it stops flowing. ASK ME HOW I KNOW.
If you own a Toyota, and don't own a set of swivel sockets, you're missing out.
Remove all the pan bolts except 2 at the front side of the pan (opposite drain hole), get that drain pan underneath the drain hole again, loosen the last 2 bolts about half way, and pull the rear of the pan (drain hole side) down GENTLY until the rest of the fluid drains out.
Once its empty, put the drain screw back in, and remove the last 2 bolts. Be sure to have a hand on the trans pan when you take the last bolt out. pull the filler/dipstick line down, it should seperate about where its bolted down.
Last time I did this, I cleaned all the magnets, and the entire pan with brake cleaner and some rags. Cleaning the magnets are the hardest part.
From the front of the truck to the rear for the A340H transmission, it's the lock-up solenoid (GREEN) , #1 shifter solenoid (WHITE), and #2 shifter solenoid (BLUE). Be careful when disconnecting them at the harness, the lock in clips are pretty frail, if they do break off, it's no big deal, they stay in place once plugged in.
Directly underneath, top of photo is drivers side of the trans -
From the drivers side -
With these solenoids, they fit perfect. Only issue I had was the lock up solenoid where the electrical plug in is, when you are trying to mount it, it may rub against the case of the transmission, but it does fit perfectly. I also put a bit of ATF on each of the solenoid gaskets where they fit into the respective holes.
Wild guess that the 2 with the black nipple are the shifter solenoids, and the silver nipple is the lock up -
I didn't need to replace the filter, since I had replaced it 6 months ago - FYI ALOT OF FLUID IS STILL IN THE FILTER, ASK ME HOW I KNOW. Make sure you have that pan handy. And from what I've read, don't use any gasket sealer on the filter.
Now comes the hard part. Once you apply the gasket/sealer to the pan, and clean up the trans side where it seats, if you're looking up from underneath the truck, get the passenger side of the pan up and over the trans first, if you're doing this by yourself, holding the pan, trying to not touch the gasket with seal to anything, and trying to line up the filler pipe with the part thats still attached to the vehicle, fear not, you can unbolt the filler pipe later and re-align it, just worry about getting the pan lined up for now. Once everything looks good, hand thread one of the 19 trans bolts, preferably in any hole you can see through the gasket and just get it in enough so you can get more comfortable, and do the same thing on the opposite side so you can let go of the pan, continue the same step until you get all 19 in, and tighten them down evenly on each side to seat the pan.
If you're a normal person like myself and couldn't get the trans filler line to line up with the rest of it, there are 2 bolts holding the top portion of it on (the top one is the same size nut that the 19 trans pan bolts were) the lower is a 12mm if I remember correctly (horrible memory). It's easiest to go under the vehicle again to line up and seat the filler line to the trans line, once thats seated all the way down, put the bolt back in while your down there, don't tighten it all the way down until you put the top bolt in.
Also, make sure any transmission fluid laying around the garage isnt waste transmission oil you had laying around from the last time you did this. Luckily I only poured a small funnel full in, and as you've noticed, the trans holds alot of fluid. Depending if you replaced the filter also. I ended up putting around 5 quarts in. Don't forget to let it breathe while filling, ASK ME HOW I KNOW.
Oct 29, 2012 | 10:27 PM
#4
Registered User
Joined: Jul 2012
Posts: 1
Likes: 0
From: El Paso TX
I really appreciate the walkthrough on the shifter solenoid replacement. I have to do that on my 88 X-tra Cab pickup. Looking forward to your slow build. I too have an 88' 3.0 V6 SR5 4x4 with the auto tranny. Same original color you had before painting it. I'll probably be posting up my slow build soon.

Thread
Thread Starter
Forum
Replies
Last Post
RedRunner_87
95.5-2004 Tacomas & 96-2002 4Runners (Build-Up Section)
84
Jun 1, 2021 01:51 PM


