
reasonable shop cost for pinion seal replacment??
 Aug 31, 2008 | 01:44 PM
#1
Thread Starter
Registered User

Joined: May 2008
Posts: 3,277
Likes: 23
From: way way nor cal
reasonable shop cost for pinion seal replacment??
being I dont have the proper alignment tools to replace this PITA I might need to take it to a shop and have the pinion seal replaced. I have gear oil all over my gas tank and muffler. I have done many repairs big and small to this truck and I am wondering if it is something I can do without more of my hair falling out in frustration. If not, what would a shop charge to do this?? If anyone knows what a "reasonable" charge for this would be please let me know. There just happens to be an honest mechanic/shop here in town. So if all else fails I can take it in.
thanks
Oh, what size are the drain and fill nuts on the differential??

thanks
Oh, what size are the drain and fill nuts on the differential??
Last edited by toyospearo; Aug 31, 2008 at 01:53 PM.
Aug 31, 2008 | 02:27 PM
#3
Registered User
Joined: Apr 2006
Posts: 1,458
Likes: 4
From: Downeast, ME
I wanna say off the top of my head the drain and fill are...22mm?
Do a search. I remember a thread on here a while ago (a year?) about what exactly is involved in replacing it. If I remember right its a lot easier than you'd think.
Do a search. I remember a thread on here a while ago (a year?) about what exactly is involved in replacing it. If I remember right its a lot easier than you'd think.
Aug 31, 2008 | 02:41 PM
#4
Registered User
Joined: Jun 2006
Posts: 2,243
Likes: 5
From: Calgary, AB
To do one takes about 45 minutes, give or take. Place a scribe mark on the drive shaft and flange to make sure you put it back on in the same spot.
You need a 14 mm wrench for your 4 bolts that hold the driveshaft to the companion flange. I prefer to use the gear end wrenches like these http://www.canadiantire.ca/browse/pr...08474396672989
Drain the rear diff using a 23 mm socket. It goes quicker, obviously, if you remove the drain and the fill plugs at the same time.
Using a 30 mm socket, remove the nut that holds the companion flange to the rear pinion, counting the number of turns it took to remove it. Mine took 9 1/2 turns. This way you can bolt it up to the proper tightness when you're done.
Using a screwdriver or puller, pull the old pinion seal out. Careful you don't damage the pinion shaft. Grease the inside of the rubber seal and slide it over the pinion shaft. The hard part comes here...driving it in square. I didn't with my first one and ruined it taking it out to put in a second one. Use something big enough that you can drive it in straight.
Retighten the nut, making sure to tighten back the same number of counts. Use a chisel and stake the nut to the shaft. Rebolt the driveshaft to the flange.
It's not hard, you don't need specialty tools.
http://www.4crawler.com/4x4/CheapTri...eal/index.html
Aug 31, 2008 | 03:55 PM
#6

Registered User
Joined: Jul 2008
Posts: 266
Likes: 1
The hardest part is getting the drive shaft off. I think I needed two or three wrenches and some grunt the first time. I may have put new washers on them, I forget but it wouldn't be a bad idea. If I recall correctly, the only specialty tool that is going to get you to spec is an inch pound torque wrench to set the resistance(preload) when you tighten the main nut on the pinion. I just went by feel and it seems to be holding up, like the others here seemed to have done. I'd say $150 or so in a bargain shop, but that is just a guess. They'd probably be going "by feel" also, imo.
Trending Topics
Aug 31, 2008 | 05:05 PM
#8
Thread Starter
Registered User
Joined: May 2008
Posts: 3,277
Likes: 23
From: way way nor cal
could you be more specific about this part with staking the nut to the shaft. I have never done it.
thanks.
D
Aug 31, 2008 | 05:27 PM
#9
Registered User
Joined: Jul 2007
Posts: 738
Likes: 2
From: Vancouver, BC
24mm is the size.
Be sure you can remove the fill plug before the drain plug, otherwise you can't even drive the thing to a shop if you drain the oil and cannot refill it.
Proper method is to remove the 3rd member (carrier assembly), remove the pinion and change the seal and use a new spacer, while setting pinion bearing preload.
Doing it using any shortcut methods can allow over-preloading (or worse yet, under-preloading) of the pinion bearings, which not only lead to shorter pinion bearing life, but can affect pinion depth, which then leads to improper mesh of the gears, etc etc.
If the gearset already has a solid pinion spacer installed, you can definately shortcut it, in which case it will take less than an hour to flip in a seal and refill the diff.
Last edited by 86tuning; Aug 31, 2008 at 05:49 PM.
Aug 31, 2008 | 05:39 PM
#10


being I dont have the proper alignment tools to replace this PITA I might need to take it to a shop and have the pinion seal replaced. I have gear oil all over my gas tank and muffler. I have done many repairs big and small to this truck and I am wondering if it is something I can do without more of my hair falling out in frustration................................
per your pm to me, there is a reasonable way to do this job in less than 1 hour with just a little common sense and an electric impact wrench. I hope you have access to this impact and a 30mm socket(1 3/16" will work also). With an electric impact there is no need to 'secure' the pinion flange with a specially made bar with 2 bolts drilled thru it. The impact will whizz it off with little effort. Do not remove the dent in the nut. The impact will whizz it off fast, dent or no dent(97% of the time). Air impacts are more "harsh" and I don't use them for that reason....and the noise of the air compressor
 Notice in the pic below that the big socket is plugged DIRECTLY into the impact gun. If adapters or extensions are used then the effectiveness of the impact goes way down.
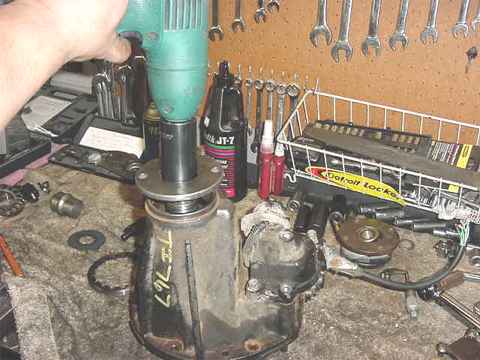
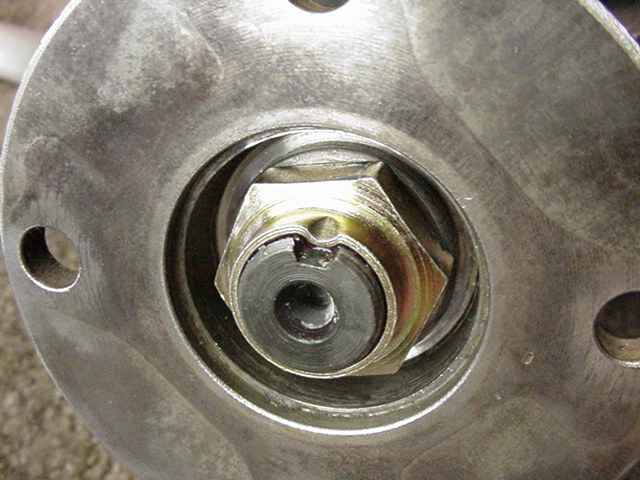
You're going to re-use the crush sleeve...re-use the pinion nut also. Therefore, it's real easy get the nut back on to the exact spot it was before because there is a dent in the nut that lines up with the groove in the pinion shaft...easy. see sample pic below.
remove the lower end of the driveshaft....don't let the lower piece of the DS fall off as it is PHASED with the upper half. Mis-aligning the splines on the DS could result in an unbalanced condition and a vibration. Tie(or bungie cord) the entire DS up and out of the way.
Next step....This can be important....wiggle the flange back and forth about 1/8"....this is the tiny amount of free play you have to work with to get a feel for the "pre-load" of the pinion bearings. That free-play is normal and is absolutely necessary for proper operation. Memorize that feel.
Your seal is leaking....and it could be because the pinion bearings have worn so much that there is now "slop" in the flange and the seal can't seal with a wobbly flange. If that's the case, then memorizing that feel is no longer important because to get rid of that flange slop will involve tightening the big nut past the ding mark....past the point it is now set from the factory.
Now use the impact to whiz off the big nut...then slide the flange off. It may require minor tapping to get it off.....then remove the seal using your favorite method(I use a medium slot screwdriver and a hammer).
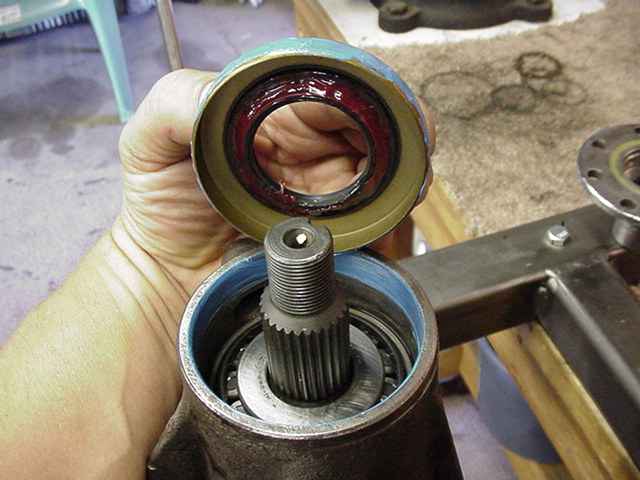
Prep new seal with RTV on the outside and thick grease on the inside as shown below. The rtv will make it easier to tap the seal in place with a steel hammer. A hammer is not the ideal method but often it is the only method available for most backyard mechanics. The grease on the inside will prevent the tiny spring from popping off during the hammer hits.
With the seal tapped flush or slightly recessed into the tunnel (.040" per the FSM) now you can install the flange followed by the washer and the ORIGINAL NUT. The Original nut has the dimple in it and allows us to spin it to the exact place as before. You might want to use red loctite to help lock it in place to supplement the re-staking of the nut. But don't stake it until you read the next paragraph.
Now if you have the dent in the nut aligned with the pinion groove....and the flange has the same good feel when you rock it back and forth then it's ok to stake it at this point.....BUT if the flange is wobbly or has that up/down left/right slop I was talking about earlier then you now must tighten the nut in about 10~20 degree increments until all the slop is gone. At this point the feel of the pre-load will be about the same. Now if you continue to tighten it more then you will feel the flange "tighten up" and it won't turn as easy. Back off a little(to be avoided) and stake it (edited note: crushing a crush sleeve a little more is not a problem....it's the backing off of the nut a little from over-tightening the PPL that should be avoided.) I can't explain exactly how snug the flange should feel....I know how it should feel and you have to use your judgment. Used bearings specifically take less preload than new bearings. 4~6 inch/lb for used bearings.
Stake the nut in the new spot and you're home free.
Most leaky seals can be effectively fixed this way with good long term results.
ZUK
Last edited by ZUK; Nov 13, 2008 at 04:47 PM.
Aug 31, 2008 | 05:53 PM
#11
Thread Starter
Registered User
Joined: May 2008
Posts: 3,277
Likes: 23
From: way way nor cal
ZUK, you are the man. Due to your patience and clear instructions I understand the procedure.
To thank you I brought you something from the sea.
thank you thank you
To thank you I brought you something from the sea.
thank you thank you
Last edited by toyospearo; Nov 7, 2008 at 08:04 PM.


 Sep 1, 2008 | 08:28 AM
#16
Registered User
Joined: Sep 2005
Posts: 8,656
Likes: 16
From: NW Ark on wooded ten acres...Ozarks at large!
 Sep 1, 2008 | 10:27 AM
#17
Registered User
Joined: Mar 2008
Posts: 12,723
Likes: 6
From: Temecula Valley, CA
Sep 1, 2008 | 01:02 PM
#18
Registered User
Joined: Jun 2006
Posts: 2,243
Likes: 5
From: Calgary, AB
Sep 1, 2008 | 10:36 PM
#19

Registered User
Joined: Oct 2007
Posts: 297
Likes: 0
From: near Redding California
Nov 7, 2008 | 07:11 PM
#20
Registered User
Joined: Jul 2006
Posts: 241
Likes: 0
From: Minneapolis MN
Pinion seal replacement tips! (Bolt and seal)
This is a great thread, i hope that anyone with questions will find this thread and not start a new one! 
I have some further advice that is not touched upon by the experts who have posted to this thread:
I did my pinion seal this past Wednesday and it took me close to 5 hours. That is 4 hours two long, 2 of which were spent trying to un-stake the nut and the the other trying to pound my seal in. For both i offer advice since neither is touched upon and is referred to as a just do it. Yet for the first timer these are the major stopping points.
1st: To un-stake the nut, use a screw driver or cold chisel that is the correct width. Mine was staked so far that it was flush with the pinion shaft, i needed to wedge a sharp edge between before i impacted the nut off. You have to hit it much harder than you would think but keep at it an you will sperate the two. I ground down a cheap flat head screw driver to be adquate but i'm sure you can find something off the shelf to do the trick.
2nd: Getting the seal in can be very tricky, no matter what method you use it will go in uneven at first. When it is in uneven (not fully but about twice as far in on one side versus the other) use a piece of a 2x4 or 2x6 of soft wood. I used pine, put the end of the wood on the side that is sticking out and pound it in with a hammer. The wood will supply and even distributed load to the side and will sink the side without popping out the other. This method worked for me on the second try. Give it shoot it is much easier than using the old rubber mallet trick.
Good luck i hope this helps someone.


