
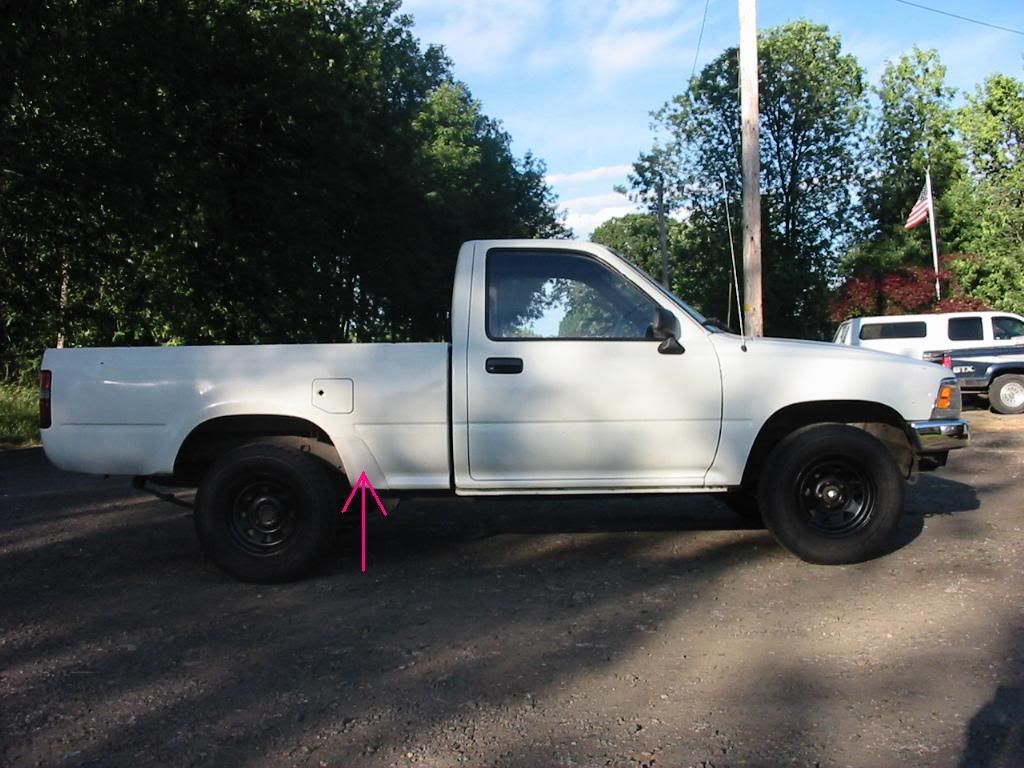
Painting the rubbery piece in front of rear fenders
 Jun 21, 2008 | 07:02 PM
#1
Thread Starter
Registered User
Joined: Feb 2008
Posts: 2,805
Likes: 1
From: Salem, OR
Painting the rubbery piece in front of rear fenders
Anybody ever paint these? I want to paint mine black...any suggestions?
(I put this in 86-95 Trucks & 4Runners because thats what it is...mods feel free to move it where ever!)
(I put this in 86-95 Trucks & 4Runners because thats what it is...mods feel free to move it where ever!)
 Jun 21, 2008 | 07:10 PM
#5
Registered User
Joined: Oct 2006
Posts: 935
Likes: 4
From: Branford, CT.
I've only seen them in black also.
Pickup some of this paint: http://www.krylon.com/products/fusion_for_plastic/
Pickup some of this paint: http://www.krylon.com/products/fusion_for_plastic/
Jun 21, 2008 | 07:19 PM
#6
Thread Starter
Registered User
Joined: Feb 2008
Posts: 2,805
Likes: 1
From: Salem, OR
I've only seen them in black also.
Pickup some of this paint: http://www.krylon.com/products/fusion_for_plastic/
Pickup some of this paint: http://www.krylon.com/products/fusion_for_plastic/
 Jun 21, 2008 | 07:20 PM
#7
Thread Starter
Registered User
Joined: Feb 2008
Posts: 2,805
Likes: 1
From: Salem, OR
Trending Topics
Jun 21, 2008 | 07:42 PM
#8
Registered User
Joined: Mar 2008
Posts: 12,723
Likes: 6
From: Temecula Valley, CA
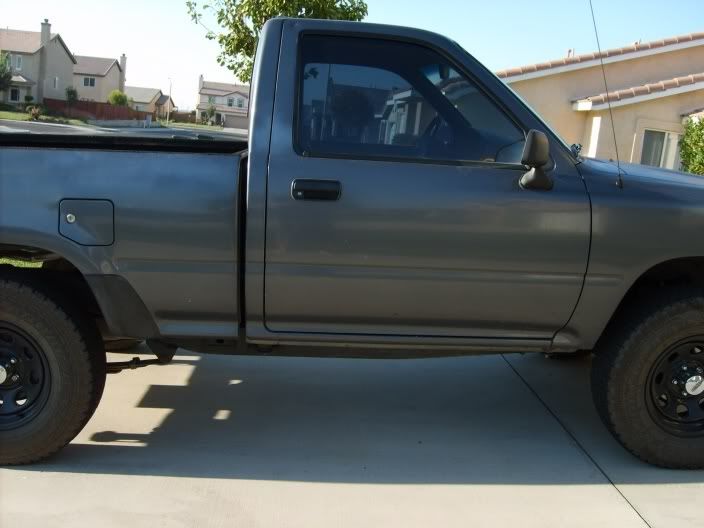
If you have to do them black, at least find a way to blend it into the truck... like carry the black forward along the line made by the door jamb...
before:

...

sorry, I'm not a photoshop xpert...
before:
...
sorry, I'm not a photoshop xpert...
Last edited by abecedarian; Jun 21, 2008 at 08:08 PM.
Jun 21, 2008 | 08:52 PM
#9
Thread Starter
Registered User
Joined: Feb 2008
Posts: 2,805
Likes: 1
From: Salem, OR

Unless I can get the same paint but for different materials...I am not a big fan of painting my body though...as I can't see myself NOT messing up

BTW...hows the new sig


 Jun 22, 2008 | 07:28 AM
#13
Contributing Member
Joined: Feb 2008
Posts: 12,248
Likes: 33
From: Lake City, Fl
Mine were white when I got my truck...

I sanded, put on 2 coats of primer, sanded some more, put on 2 coats of black, sanded one more time, then put on 2 coats of clear, and finally buffed them up with some rubbing compound, and they look better than a stock set of back ones IMO...

This was all done with a rattle can too; took all of maybe $15.
If you do decide to paint them, just remember that surface prep is the key to a good flawless pain job.

I sanded, put on 2 coats of primer, sanded some more, put on 2 coats of black, sanded one more time, then put on 2 coats of clear, and finally buffed them up with some rubbing compound, and they look better than a stock set of back ones IMO...
This was all done with a rattle can too; took all of maybe $15.
If you do decide to paint them, just remember that surface prep is the key to a good flawless pain job.
 Jun 22, 2008 | 09:06 PM
#16
Thread Starter
Registered User
Joined: Feb 2008
Posts: 2,805
Likes: 1
From: Salem, OR
Mine were white when I got my truck...
I sanded, put on 2 coats of primer, sanded some more, put on 2 coats of black, sanded one more time, then put on 2 coats of clear, and finally buffed them up with some rubbing compound, and they look better than a stock set of back ones IMO...
This was all done with a rattle can too; took all of maybe $15.
If you do decide to paint them, just remember that surface prep is the key to a good flawless pain job.
Thanks!
Jun 23, 2008 | 03:23 PM
#17
Registered User
Joined: Mar 2008
Posts: 315
Likes: 1
From: Waterloo, Ia
All that needs to be done is scuffed up a little bit after washing and drying them well, then wipe off with a paper towel and spray that Fusion Black paint you buy at the parts store. First a light coat then two heavy after it gets tacky. (Also has directions on the can as well) I used this on a dirt bick of mine and it holds up to ALOT of abuse.  rocks, sand, mud, power washer, you name it, it sticks and stays for me.
rocks, sand, mud, power washer, you name it, it sticks and stays for me.
Jun 23, 2008 | 07:24 PM
#18
Contributing Member
Joined: Feb 2008
Posts: 12,248
Likes: 33
From: Lake City, Fl
Step 1: Wash them off very well
Step 2: Rough them up a bit with some sand paper; I used 80 grit for the rough-up
Step 3: Apply primer; I used 2 light coats and was sure to cover every inch
Step 4: Lighty sand with a higher grit; 120-300 grit would work fine; this isn't really so the paint will stick better, but more to level out the dried primer for a smooth surface to paint the color one
Step 5: Apply 2 or 3 coats of the color paint of your choise, allowing plenty of time to dry between coats.
Step 6: Using fine grit sand paper (I used 1000 grit), lighty go over the colored surface; this gives the surface a nice level prfile for the next step.
Step 7: Apply 2 or 3 coats of clear coat. The clear coat will give it a stronger, more daurable finish, and also give it a bit of a shine.
In the end, rub in some rubbing or buffing compound to give it even more of a shine.
ALSO, Be sure to run some tach-cloth over the piece after sanding every time to get all the dust off.
For the black paint, I used a paint designed to go on plastic bumpers; I chose it because it's a little flexable after drying, that way if something were to lean or bump against it, it won't just crack and flake off.
If all goes well, you end up with a very nice fished product that looks pretty much factory, if not better.
Now of coarse you don't have to go through all those steps. You can always just wash it, spray on a few coats of the black paint, and call it a day. Just make sure you use a paint that will stick well to plastic without a primer. The steps I mentioned above however give a very nice, and pretty much permanent result that should last the life of the rest of the paint job on the truck.
Jun 23, 2008 | 07:33 PM
#19
Thread Starter
Registered User
Joined: Feb 2008
Posts: 2,805
Likes: 1
From: Salem, OR
Step 1: Wash them off very well
Step 2: Rough them up a bit with some sand paper; I used 80 grit for the rough-up
Step 3: Apply primer; I used 2 light coats and was sure to cover every inch
Step 4: Lighty sand with a higher grit; 120-300 grit would work fine; this isn't really so the paint will stick better, but more to level out the dried primer for a smooth surface to paint the color one
Step 5: Apply 2 or 3 coats of the color paint of your choise, allowing plenty of time to dry between coats.
Step 6: Using fine grit sand paper (I used 1000 grit), lighty go over the colored surface; this gives the surface a nice level prfile for the next step.
Step 7: Apply 2 or 3 coats of clear coat. The clear coat will give it a stronger, more daurable finish, and also give it a bit of a shine.
In the end, rub in some rubbing or buffing compound to give it even more of a shine.
ALSO, Be sure to run some tach-cloth over the piece after sanding every time to get all the dust off.
For the black paint, I used a paint designed to go on plastic bumpers; I chose it because it's a little flexable after drying, that way if something were to lean or bump against it, it won't just crack and flake off.
If all goes well, you end up with a very nice fished product that looks pretty much factory, if not better.
Now of coarse you don't have to go through all those steps. You can always just wash it, spray on a few coats of the black paint, and call it a day. Just make sure you use a paint that will stick well to plastic without a primer. The steps I mentioned above however give a very nice, and pretty much permanent result that should last the life of the rest of the paint job on the truck.
I'll definitely have to give this a try
 Jun 23, 2008 | 07:42 PM
#20
Registered User
Joined: Feb 2007
Posts: 2,203
Likes: 0
From: Sierra Nevada's or the Deserts of Las Vegas
Mine were black and I repainted them black cause they were faded I just cleaned them with mineral spirits and sanded them lightly then painted with regular spray paint.
On a second note, anyone know what the heck they are for anyways??
On a second note, anyone know what the heck they are for anyways??


