
New Shock Crossmember for the 1983
 May 25, 2008 | 06:38 AM
#1

Thread Starter
Registered User
Joined: Mar 2007
Posts: 112
Likes: 0
From: Potsdam, New York
New Shock Crossmember for the 1983
Well as someone pointed out in the thread where I posted pics of some playing around that I did, my shocks were not really doing anything. This was mostly due to the fact that the stock crossmember was rotten and broken 
Thursday my mom and stepdad left for the long weekend, and asked me to stop by and feed their cats. I took this more as a "our garage will be empty for 5 days" so I pulled the 83 in and decided to get down to business
First thing first, I had to get the bed off. I took the wheels off and then took out the bolts with a 1/2" air impact wrench and an angle grinder for one of the more screwed nuts.

Then came time to lift the bed off.
Unfortunately I was by myself, and really had to stop and have a beer to figure this one out, as I had limited tools available.

Creative use of the rafters, a tow strap, some chain, and a come-along got the bed dangling from the ceiling of the garage.
One thing I didn't think of though, was that the truck was still on jackstands and I couldn't raise the bed high enough with the topper on it.
SO... I put the wheels back on, dropped the truck down, choked up the chain and tow strap, and stood on the tire to crank the come-along.

The tie-down points on the side of the bed worked great for lifting

After bringing the bed up a bit I was able to roll the truck forward and out from underneath the hanging death trap

Once the bed was off I got to work taking out the fuel tank, and unhooking stuff from the frame
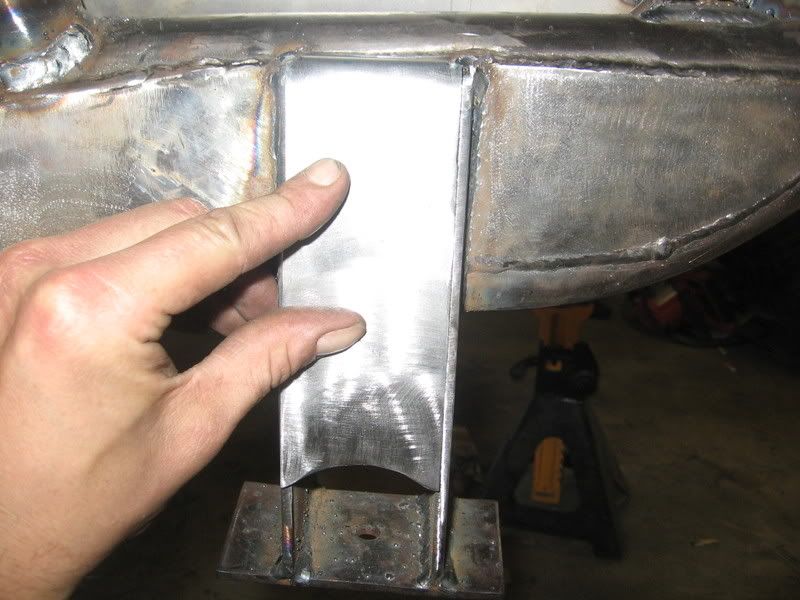
Of course I was working by myself and really moving along, so I forgot to get pics of the old crossmember. Here are some pics of the new one


After getting the crossmember welded in, I tacked on the shock mounts and tested them out. These shocks are dead but at least there is a spot to mount them now
Once I was sure they were where I wanted them, I burned them in then tacked in the rear gas tank mount, then test fitted the gas tank and burned that mount in as well.
My welds are getting better the more I practice but overhead stuff still really sucks. I wish I would have welded the shock mounts on before putting the crossmember in, or welded them on top rather than on bottom so I could actually do my best at welding them, but they feel solid enough. Anything is better than rusty torn metal for now, I suppose.
Once everything was welded in I got to work cleaning up the frame (except the spare tire xmember, that will get axed at a later date, so I didn't mess with it) so that I could paint it. First goes some primer:


Then three coats of krylon semi-flat rattle can, and she was ready to go back together, hopefully with a prolonged lifespan for the rear half of the frame

apologies for the lack of detailed step-by-step pics, but I was busy
Anyways, just thought I'd share the fun.
Total time works out to about 20 hours between thursday, friday, and saturday night but of course this is factoring in things like having to go to town for more wire for the welder, having the welder liner mess up, getting food, etc
Last night I drove it out of the garage and shut it off. When I came back around midnight to drive it home, I started it up and let it idle, but then it started sputtering like it was running out of gas, and died.
I pulled the lines from the tank and everything was bone dry. I think stuff must've gotten dislodged inside the tank and clogged everything up while I was moving it around? I'm going to try changing the fuel filter today when I get done with work.
Next on the list (I already fixed my pinion seal, tc ) is to make a new rear bumper and some sliders
Thursday my mom and stepdad left for the long weekend, and asked me to stop by and feed their cats. I took this more as a "our garage will be empty for 5 days" so I pulled the 83 in and decided to get down to business
First thing first, I had to get the bed off. I took the wheels off and then took out the bolts with a 1/2" air impact wrench and an angle grinder for one of the more screwed nuts.
Then came time to lift the bed off.
Unfortunately I was by myself, and really had to stop and have a beer to figure this one out, as I had limited tools available.
Creative use of the rafters, a tow strap, some chain, and a come-along got the bed dangling from the ceiling of the garage.
One thing I didn't think of though, was that the truck was still on jackstands and I couldn't raise the bed high enough with the topper on it.
SO... I put the wheels back on, dropped the truck down, choked up the chain and tow strap, and stood on the tire to crank the come-along.
The tie-down points on the side of the bed worked great for lifting
After bringing the bed up a bit I was able to roll the truck forward and out from underneath the hanging death trap
Once the bed was off I got to work taking out the fuel tank, and unhooking stuff from the frame
Of course I was working by myself and really moving along, so I forgot to get pics of the old crossmember. Here are some pics of the new one
After getting the crossmember welded in, I tacked on the shock mounts and tested them out. These shocks are dead but at least there is a spot to mount them now
Once I was sure they were where I wanted them, I burned them in then tacked in the rear gas tank mount, then test fitted the gas tank and burned that mount in as well.
My welds are getting better the more I practice but overhead stuff still really sucks. I wish I would have welded the shock mounts on before putting the crossmember in, or welded them on top rather than on bottom so I could actually do my best at welding them, but they feel solid enough. Anything is better than rusty torn metal for now, I suppose.
Once everything was welded in I got to work cleaning up the frame (except the spare tire xmember, that will get axed at a later date, so I didn't mess with it) so that I could paint it. First goes some primer:
Then three coats of krylon semi-flat rattle can, and she was ready to go back together, hopefully with a prolonged lifespan for the rear half of the frame
apologies for the lack of detailed step-by-step pics, but I was busy
Anyways, just thought I'd share the fun.
Total time works out to about 20 hours between thursday, friday, and saturday night
but of course this is factoring in things like having to go to town for more wire for the welder, having the welder liner mess up, getting food, etcLast night I drove it out of the garage and shut it off. When I came back around midnight to drive it home, I started it up and let it idle, but then it started sputtering like it was running out of gas, and died.
I pulled the lines from the tank and everything was bone dry. I think stuff must've gotten dislodged inside the tank and clogged everything up while I was moving it around? I'm going to try changing the fuel filter today when I get done with work.
Next on the list (I already fixed my pinion seal, tc
) is to make a new rear bumper and some sliders
May 25, 2008 | 06:53 AM
#3
Thread Starter
Registered User
Joined: Mar 2007
Posts: 112
Likes: 0
From: Potsdam, New York
Everything was wire-wheeled to bare metal to at least 1/2" around where I was going to be welding...
Maybe I didn't clean it well enough? the braided wire wheel wasn't doing anything else, the metal looked bare, and I didn't want to hit it with the grinder?
Can you circle the part you are talking about in the pic? I'm always looking for pointers
Maybe I didn't clean it well enough? the braided wire wheel wasn't doing anything else, the metal looked bare, and I didn't want to hit it with the grinder?
Can you circle the part you are talking about in the pic? I'm always looking for pointers
Last edited by operose; May 25, 2008 at 06:54 AM.
May 25, 2008 | 07:03 AM
#4
Registered User
Joined: May 2006
Posts: 2,377
Likes: 2
From: St. Loser, Misery
Everything was wire-wheeled to bare metal to at least 1/2" around where I was going to be welding...
Maybe I didn't clean it well enough? the braided wire wheel wasn't doing anything else, the metal looked bare, and I didn't want to hit it with the grinder?
Can you circle the part you are talking about in the pic? I'm always looking for pointers
Maybe I didn't clean it well enough? the braided wire wheel wasn't doing anything else, the metal looked bare, and I didn't want to hit it with the grinder?
Can you circle the part you are talking about in the pic? I'm always looking for pointers
Its better to remove a small amount of material (which is negligible if you are just removing the surface rust) than have a contaminated weld. Your welds dont look that bad from what I can see in the pic.
May 25, 2008 | 07:06 AM
#5
Thread Starter
Registered User
Joined: Mar 2007
Posts: 112
Likes: 0
From: Potsdam, New York
I usually use a flapper disc to clean it up. If there is that much surface rust on the metal a wire wheel wont do much. The metal should look like this before welding...nice and shiny.
Its better to remove a small amount of material (which is negligible if you are just removing the surface rust) than have a contaminated weld. Your welds dont look that bad from what I can see in the pic.
Its better to remove a small amount of material (which is negligible if you are just removing the surface rust) than have a contaminated weld. Your welds dont look that bad from what I can see in the pic.
 there was still some pitting
Thanks man! the more I learn now the better I can do next time.
I still plan on pulling the box off and removing the spare tire crossmember next month some time. When I do that I'll clean the whole thing up with a flap disk, cut the shock mounts off, and re-do them as I really am not that happy with them.
I'd like this truck to last as long as possible so doing this right is my biggest priority. Unfortunately I don't know everything so it might take me a couple of tries first
Last edited by operose; May 25, 2008 at 07:10 AM. Reason: I'm dumb

Thread
Thread Starter
Forum
Replies
Last Post
kawazx636
The Classifieds GraveYard
34
Oct 6, 2021 03:03 PM


