Pics from 3rd gen 4runner rear bumper build

 09-19-2005, 05:42 PM
#22
Contributing Member
Thread Starter
Join Date: Feb 2003
Location: CT
Posts: 613
Likes: 0
Received 0 Likes
on
0 Posts
Originally Posted by dragr1
Looks good. Kinda like mine. 
Now I have to fix the exhaust hole.
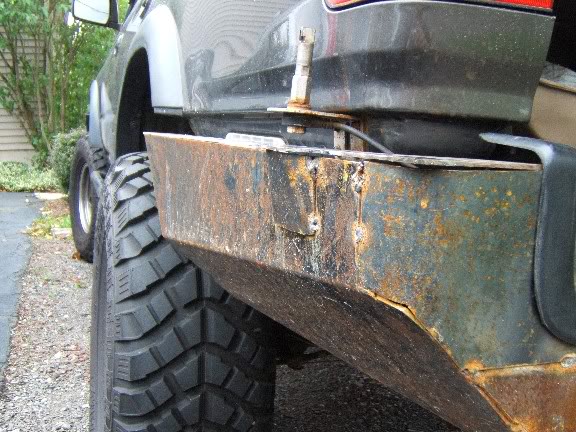
dragr1, is your exhaust routed through your bumper?
09-19-2005, 06:04 PM
#23
Originally Posted by TStango
Thanks. I just fixed the way the side pieces were angle up too close to the body. I cut some of the tack welds, made a relief cut on the bottom edge where they attached to the 2x4 and was able to bend them into the correct position.
Now I have to fix the exhaust hole.
dragr1, is your exhaust routed through your bumper?
Now I have to fix the exhaust hole.
dragr1, is your exhaust routed through your bumper?
No. I was just commenting b/c that is the basic design that Tom (Trailcarnage) and I came up with about 2 years ago. BruceTs improved the frame mounts over our design and angled the sides different from mine. My exhaust still hangs in the factory location. I really like that bumper though, it's an improved version of my bumper.
 09-20-2005, 10:41 AM
#25
Contributing Member

Join Date: Nov 2003
Posts: 2,315
Likes: 0
Received 0 Likes
on
0 Posts
Originally Posted by dragr1
No. I was just commenting b/c that is the basic design that Tom (Trailcarnage) and I came up with about 2 years ago. BruceTs improved the frame mounts over our design and angled the sides different from mine. My exhaust still hangs in the factory location. I really like that bumper though, it's an improved version of my bumper.
And I would have bought one if he ever went through with production......
I was in the middle of designing mine when Tom posted drawings of his and liked his frame mounts.
As for the exhaust, note the location of the hole in mine, it's closer to the rear wheel, away from the body mount. With a 1 1/2" body lift, I was able to route the pipe over the frame rail. A similar result could be achieved by making a oval section flat enough.
09-20-2005, 11:16 AM
#26
Contributing Member
Thread Starter
Join Date: Feb 2003
Location: CT
Posts: 613
Likes: 0
Received 0 Likes
on
0 Posts
Originally Posted by BruceTS
As for the exhaust, note the location of the hole in mine, it's closer to the rear wheel, away from the body mount. With a 1 1/2" body lift, I was able to route the pipe over the frame rail. A similar result could be achieved by making a oval section flat enough.
I was wondering if you needed to notch the seam on the body for extra clearance but it sounds like you didn't have any issues. I think I can fix mine.
09-22-2005, 06:20 AM
#27
Contributing Member
Join Date: Jun 2004
Location: Richmond, Va
Posts: 4,218
Likes: 0
Received 0 Likes
on
0 Posts
I have a 1" BL and the exhaust routed OVER the frame--no problem.
Another thing to consider is the distance the bumper protrudes from the truck. This is where a larger tire comes into play. I think Steve S has around 5"-5 1/4" to allow a 305 fully inflated. I only have arounnd 2 3/4" so that limits the max. inflated spare tire
Another thing to consider is the distance the bumper protrudes from the truck. This is where a larger tire comes into play. I think Steve S has around 5"-5 1/4" to allow a 305 fully inflated. I only have arounnd 2 3/4" so that limits the max. inflated spare tire
09-22-2005, 08:32 AM
#28
Contributing Member
Thread Starter
Join Date: Feb 2003
Location: CT
Posts: 613
Likes: 0
Received 0 Likes
on
0 Posts
Originally Posted by FilthyRich
I have a 1" BL and the exhaust routed OVER the frame--no problem.
Another thing to consider is the distance the bumper protrudes from the truck. This is where a larger tire comes into play. I think Steve S has around 5"-5 1/4" to allow a 305 fully inflated. I only have arounnd 2 3/4" so that limits the max. inflated spare tire
Another thing to consider is the distance the bumper protrudes from the truck. This is where a larger tire comes into play. I think Steve S has around 5"-5 1/4" to allow a 305 fully inflated. I only have arounnd 2 3/4" so that limits the max. inflated spare tire
Right now I'm comfortable with a 285/75 tire underneath which has the same circumference as the 305/70's that are mounted on the truck. I won't be able to get anything bigger than that under there and I don't think I'll ever need to...hopefully

Last edited by TStango; 09-22-2005 at 08:34 AM.


 10-13-2005, 09:59 AM
#31
Contributing Member
Thread Starter
Join Date: Feb 2003
Location: CT
Posts: 613
Likes: 0
Received 0 Likes
on
0 Posts
I'll get some pictures up soon - by Sat at the latest.
The pace will pick up now that I'm done with my home improvement projects and I have a Paragon trip planned for the 29th of this month. So I really want to get this done in time to test it out.
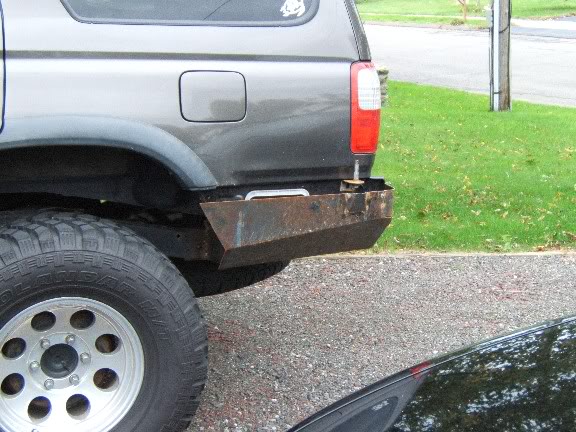
I did some work on the rounded corners yesterday and tacked them into place. They were a real bitch. Well one side was. At my buddy's shop I was able to heat up the passenger side and beat it around a pipe without too much trouble. Yesterday I did some work at home and had to make do with what I had. We are talking an olympic curl bar, two bench vices and a hammer. It took a while but I finally got it right. I also made the piece for the firestick mount and tacked that on. All that is left is to tack the tops of the side pieces on, which are already cut out of sheet metal, and then make pieces to cap off each side end directly behind the tire (where a mud flap would normally go). This will hopefully restore my gas mileage. :pat:
I'll get those pictures for ya!
-Tim
The pace will pick up now that I'm done with my home improvement projects and I have a Paragon trip planned for the 29th of this month. So I really want to get this done in time to test it out.
I did some work on the rounded corners yesterday and tacked them into place. They were a real bitch. Well one side was. At my buddy's shop I was able to heat up the passenger side and beat it around a pipe without too much trouble. Yesterday I did some work at home and had to make do with what I had. We are talking an olympic curl bar, two bench vices and a hammer. It took a while but I finally got it right. I also made the piece for the firestick mount and tacked that on. All that is left is to tack the tops of the side pieces on, which are already cut out of sheet metal, and then make pieces to cap off each side end directly behind the tire (where a mud flap would normally go). This will hopefully restore my gas mileage. :pat:
I'll get those pictures for ya!
-Tim
10-13-2005, 10:18 AM
#33
Contributing Member
Thread Starter
Join Date: Feb 2003
Location: CT
Posts: 613
Likes: 0
Received 0 Likes
on
0 Posts
Originally Posted by bamachem
gas mileage?

10-16-2005, 11:52 AM
#35
Contributing Member
Thread Starter
Join Date: Feb 2003
Location: CT
Posts: 613
Likes: 0
Received 0 Likes
on
0 Posts
Originally Posted by BruceTS
Weird that your mileage dropped? I can't see how it would cause that much drag.
BTW I was looking for the CD that has the photo's of my build-up, but couldn't locate it.....
BTW I was looking for the CD that has the photo's of my build-up, but couldn't locate it.....

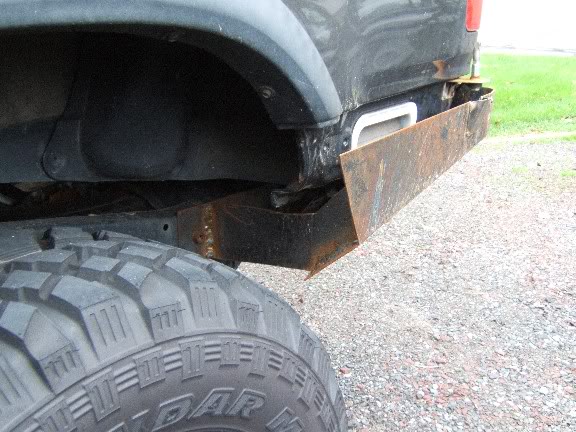
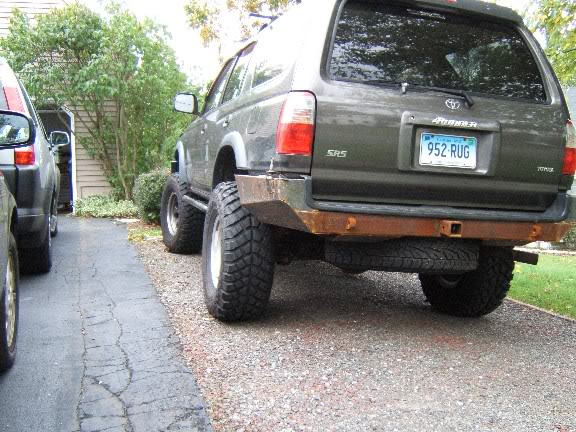
Here are some pictures of where I am right now. The side pieces are supported by a 3/16" thick bracket which is welded to the frame bracket -this thing feels really sturdy. The rounded corners are tacked on.
Now the next step is the top plates for the sides which are ready to be tacked on. Then I will cut some 1/8" plate to cap off the leading edge of the sides just behind the tires and tack those on also. I also need to grab a piece of angle iron to support and secure the plastic sill piece and attach that.
After those remaining things are completed, I should be able to take the whole bumper off and finish weld the entire thing. There will be lots of grinding and blending after that because these welds will not be pretty.
The one thing I'm not too pleased with is the gap between the side pieces and the body. It's around 1 1/4" which is a little too much. Something must have gotten lost in translation when going from cardboard to sheet metal. Bruce, I'm going to need to cover it with some weatherstripping for sure.
Last edited by TStango; 10-16-2005 at 01:29 PM.
10-16-2005, 12:04 PM
#36
Contributing Member
Join Date: Nov 2003
Posts: 2,315
Likes: 0
Received 0 Likes
on
0 Posts
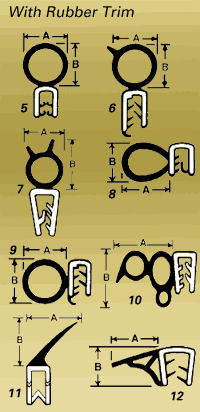
The 1 1/4" gap is no problem, the weather stripping will hide it just fine. Remember you need a minimum of 1" gap, even at that the body can still flex upwards of 2" from the frame, but the weather stripping will dampen the impact.
10-16-2005, 01:43 PM
#37
Contributing Member
Thread Starter
Join Date: Feb 2003
Location: CT
Posts: 613
Likes: 0
Received 0 Likes
on
0 Posts
Originally Posted by BruceTS
The 1 1/4" gap is no problem, the weather stripping will hide it just fine. Remember you need a minimum of 1" gap, even at that the body can still flex upwards of 2" from the frame, but the weather stripping will dampen the impact.
Vinyl

Rubber
-Thanks
Last edited by TStango; 10-16-2005 at 01:45 PM.
10-20-2005, 05:14 AM
#39
Contributing Member
Thread Starter
Join Date: Feb 2003
Location: CT
Posts: 613
Likes: 0
Received 0 Likes
on
0 Posts
Originally Posted by BruceTS

Type 10 Sponge Rubber Bulb with Solid Rubber Trim, Lip Bulb A-9/16", B-13/
Roll part # ZX812914B $39.99
Thanks Bruce. Just ordered it.
-Tim
11-02-2005, 12:01 PM
#40
Contributing Member
Thread Starter
Join Date: Feb 2003
Location: CT
Posts: 613
Likes: 0
Received 0 Likes
on
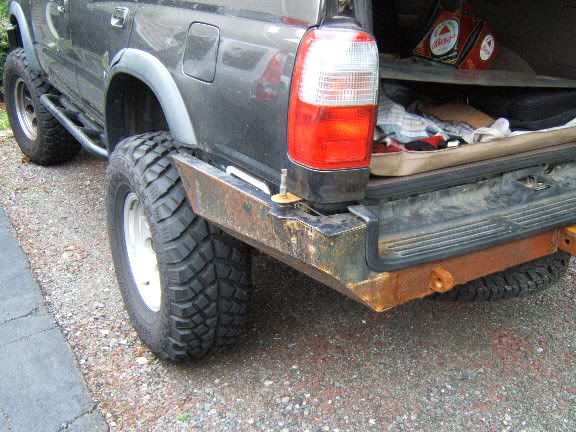
0 Posts
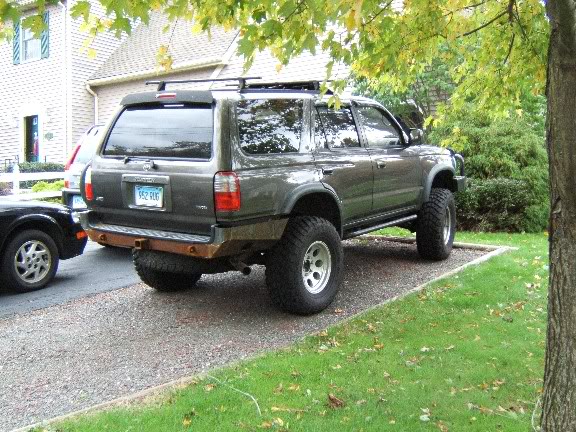
Had to put in some long hours and finish the bumper in time for a trip to Paragon this past weekend. Here are some quick pictures. The bumper made light contact with a few rocks. All that added clearance almost makes it a challenge to bottom it out.


