sushi20j's 1989 4Runner SR5 Build-Up Thread

 10-01-2010, 05:33 PM
#22
Registered User
Thread Starter
Join Date: Nov 2009
Location: Huntsville, AL
Posts: 45
Likes: 0
Received 0 Likes
on
0 Posts
Thanks! Yours is coming along pretty nice too. Those whips are sick!
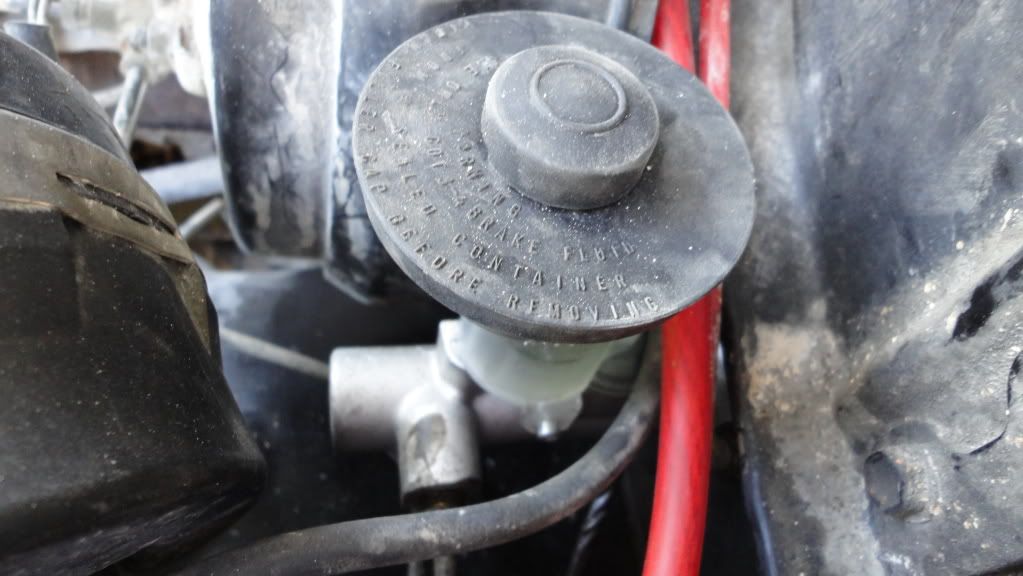
Picker her up from the shop today! No more oil leaks and this new clutch is killer! The guys at the shop also informed me that my clutch master cylinder is leaking. So I went ahead and picked up a new master and slave cylinder from the part store today. I'll get them installed tomorrow.
Goodies from Trail-Gear this afternoon:
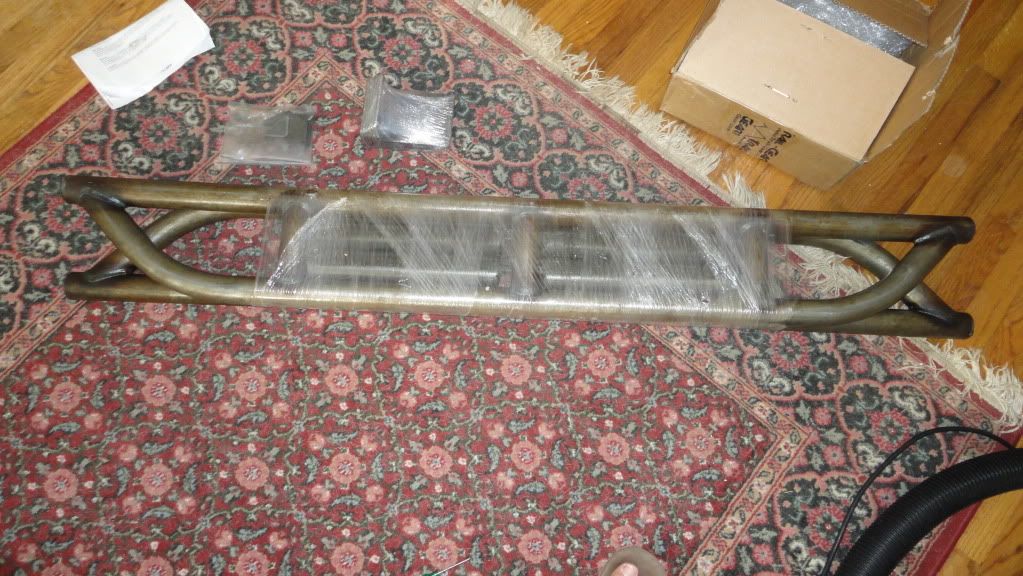
I'll be waiting to weld these up until I get my body lift from Roger Brown.
Picker her up from the shop today! No more oil leaks and this new clutch is killer! The guys at the shop also informed me that my clutch master cylinder is leaking. So I went ahead and picked up a new master and slave cylinder from the part store today. I'll get them installed tomorrow.
Goodies from Trail-Gear this afternoon:
I'll be waiting to weld these up until I get my body lift from Roger Brown.
10-03-2010, 02:44 PM
#23
Registered User
Thread Starter
Join Date: Nov 2009
Location: Huntsville, AL
Posts: 45
Likes: 0
Received 0 Likes
on
0 Posts
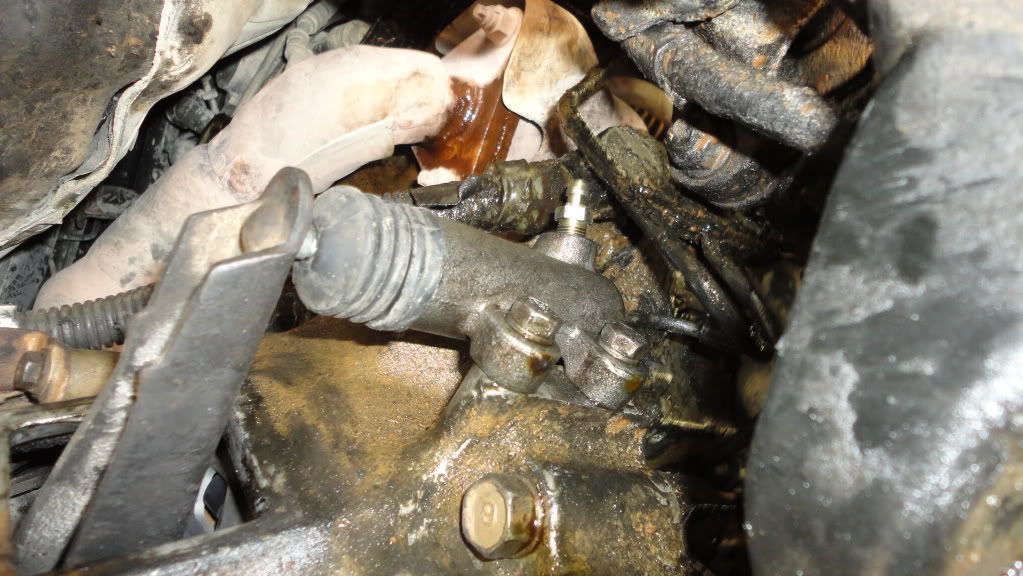
Got the new Clutch Master and Slave Cylinder put in today. She drives even better now! I still have a pretty nice oil leak though...  ...looks like it may be the valve cover gaskets.
...looks like it may be the valve cover gaskets.
10-07-2010, 09:40 AM
#24
Registered User
Thread Starter
Join Date: Nov 2009
Location: Huntsville, AL
Posts: 45
Likes: 0
Received 0 Likes
on
0 Posts
Here are some shots of the new Clutch Master and Slave Cylinders.
Went over to the lake this past weekend with the wife and dogs. Almost got stranded when we left. The main power line off the battery to the fuse box and almost completely corroded through. I guess bouncing through the woods to the lake didn't help it. Ended up getting my wife to turn the key while I very carefully jiggled the wire till it made a good enough connection to start. Yesterday I went to the local car audio shop and bought 2 new battery terminals and 25 feet of 4 gauge wire. I went ahead and replaced the 2 ground straps coming off the battery (one to the fender and one to the block) , the alternator wire and the main power wire.
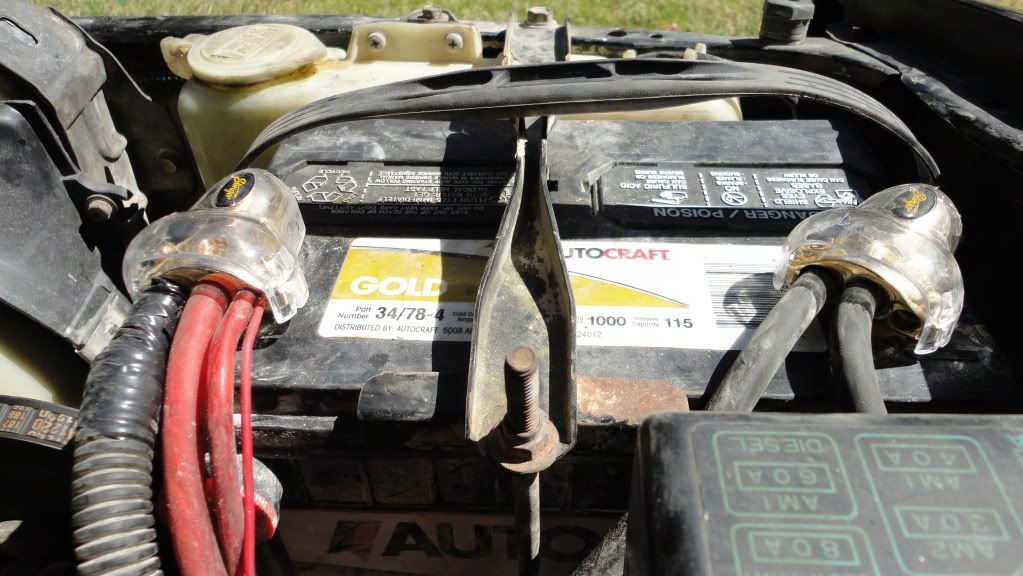
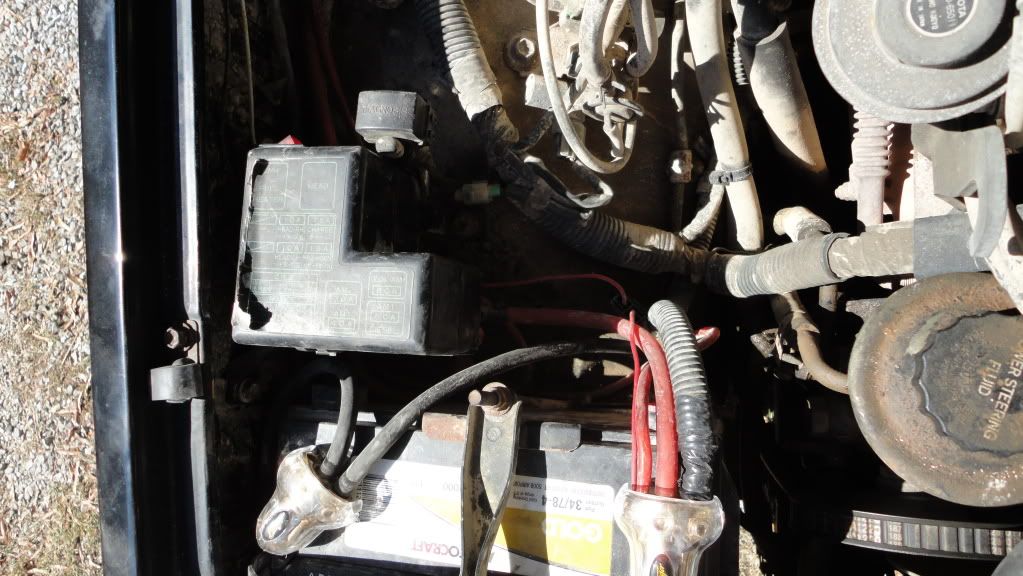
I really like these new battery terminals! Gold plated, two 4 gauge hookups and an 8 gauge hookup. Every thing is held together allen key set screws.
I also got my body lift kit in from Roger Brown! I got the 2" Ultimate Lift Block Kit wit radiator and bumper brackets. I also got some shift lever extensions and the Poly body mount bushings.

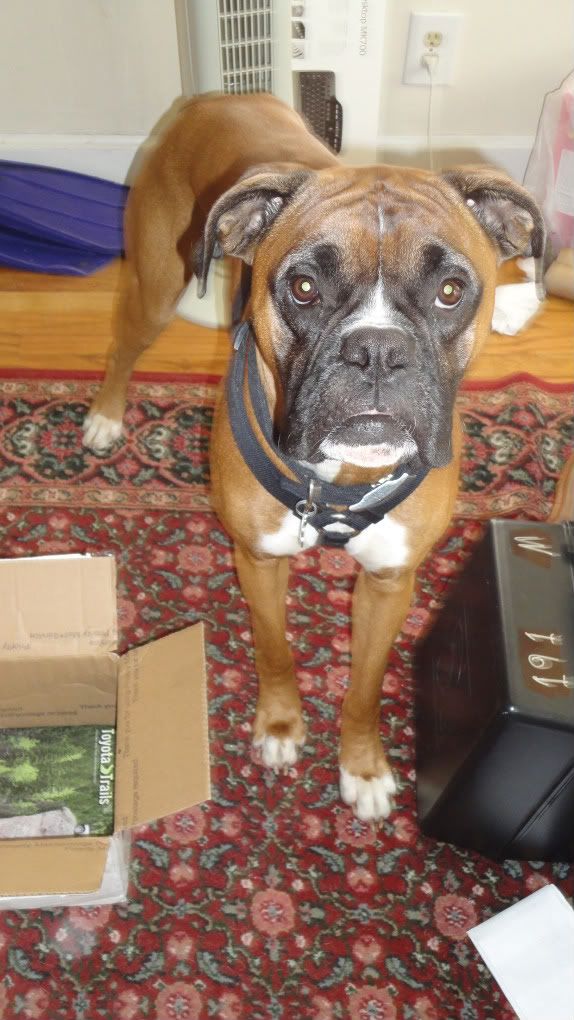
And here is my dog giving me the "are those new chew toys?" look.
I went and got a few cans of PB Blaster and started soaking all the bolts. I'll soak em every day for the next week or so while I try to convince my wife to order a Hi-Lift Jack.
Went over to the lake this past weekend with the wife and dogs. Almost got stranded when we left. The main power line off the battery to the fuse box and almost completely corroded through. I guess bouncing through the woods to the lake didn't help it. Ended up getting my wife to turn the key while I very carefully jiggled the wire till it made a good enough connection to start. Yesterday I went to the local car audio shop and bought 2 new battery terminals and 25 feet of 4 gauge wire. I went ahead and replaced the 2 ground straps coming off the battery (one to the fender and one to the block) , the alternator wire and the main power wire.
I really like these new battery terminals! Gold plated, two 4 gauge hookups and an 8 gauge hookup. Every thing is held together allen key set screws.
I also got my body lift kit in from Roger Brown! I got the 2" Ultimate Lift Block Kit wit radiator and bumper brackets. I also got some shift lever extensions and the Poly body mount bushings.
And here is my dog giving me the "are those new chew toys?" look.
I went and got a few cans of PB Blaster and started soaking all the bolts. I'll soak em every day for the next week or so while I try to convince my wife to order a Hi-Lift Jack.
10-10-2010, 02:30 PM
#25
Registered User
Thread Starter
Join Date: Nov 2009
Location: Huntsville, AL
Posts: 45
Likes: 0
Received 0 Likes
on
0 Posts
Got started on the valve cover gaskets this afternoon. I finished one side, but ran outta time to get the other side finished today. I never really gave much thought to all of those vacuum lines till I started pulling them all off.... there must be 30+ connections on this thing.  Hopefully all the pictures I took will make sense when I try to put it all back together tomorrow. Pics to come.
Hopefully all the pictures I took will make sense when I try to put it all back together tomorrow. Pics to come.
10-10-2010, 04:37 PM
#27
Registered User
Join Date: Aug 2009
Location: Home is Mathis, Texas, for now
Posts: 87
Likes: 0
Received 1 Like
on
1 Post
Yes, definitly looking great. I cant wait to get seriously started on mine next spring. Its kinda motivational to see another black 4runner going thru the same mods I have wanted to do for the last 2 or 3 years.
10-11-2010, 04:48 PM
#28
Registered User
Thread Starter
Join Date: Nov 2009
Location: Huntsville, AL
Posts: 45
Likes: 0
Received 0 Likes
on
0 Posts
Finished up the valve covers today!
 Even with all the pictures I took I still managed to mess up four of the vacuum lines.
  It was the two lines coming off the power steering pump and the two lines off the a/c actuator that tripped me up. I was getting ready to start a desperation
  me post and then I found a link to a FSM in somebody's sig while I searching for clues. I stared at this picture (the one at the bottom of the page 5) for about 3 seconds and it all made sense.... and I felt a bit silly for not realizing it sooner. I'll post some pics later tonight. Now its time to cook some dinner.
10-12-2010, 11:27 AM
me post and then I found a link to a FSM in somebody's sig while I searching for clues. I stared at this picture (the one at the bottom of the page 5) for about 3 seconds and it all made sense.... and I felt a bit silly for not realizing it sooner. I'll post some pics later tonight. Now its time to cook some dinner.
10-12-2010, 11:27 AM
#29
Registered User
iTrader: (2)
Join Date: Dec 2009
Location: Pleasanton, CA - SF Bay Area
Posts: 2,159
Likes: 0
Received 7 Likes
on
5 Posts
I was wondering, on the 22RE....there are 2 vacuum lines that go frm the intake mani to the power steering pump....does it matter which attaches to which? I feel like i've switched them in the past with no change in my steering capability (which seems fine to me)..... Also noticed that one of them going into the mani was all clogged at the bung where it enters the mani (I've since cleaned it but with no change in perf).
10-12-2010, 02:06 PM
#30
Registered User
Thread Starter
Join Date: Nov 2009
Location: Huntsville, AL
Posts: 45
Likes: 0
Received 0 Likes
on
0 Posts
I was wondering, on the 22RE....there are 2 vacuum lines that go frm the intake mani to the power steering pump....does it matter which attaches to which? I feel like i've switched them in the past with no change in my steering capability (which seems fine to me)..... Also noticed that one of them going into the mani was all clogged at the bung where it enters the mani (I've since cleaned it but with no change in perf).
A few pics before I put her all the way back together:

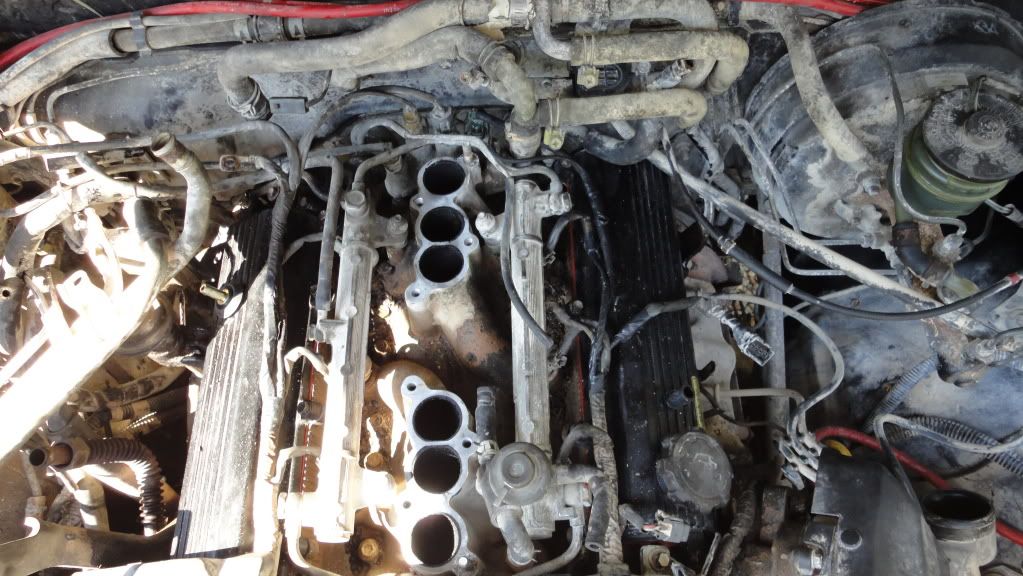
After a thorough cleaning and a few beads of Permatex the valve cover gaskets are no longer leaking! I took plenty more pictures, I just didn't want to bore you guys with 20 shots of vacuum hoses.
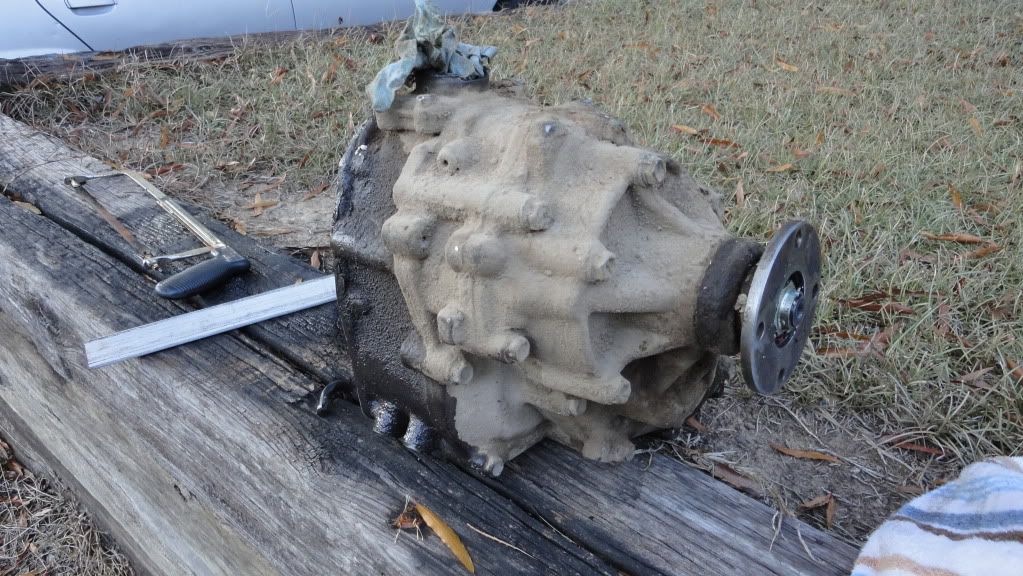
Now that I have eliminated the highest source of oil its time to keep moving down the block. This brings me to the timing cover. After talking to a few friends that own a local auto shop, we came to the conclusion that its most likely the cam seals. Well this brings me to my next question... Do I get the parts from the LPS or Toyota. The parts from the LPS are about $225 whereas Toyota wants about $470. These prices include: Water Pump, Timing Belt, Camshaft Seals, Timing Belt Component Kit (Tensioners, Springs) and Crank Seal. I know lots of people like to argue that you should only use Genuine OEM Toyota parts. Anyone had any early failure of these specific LPS parts? Input please and thank you.
10-13-2010, 02:49 PM
#31
Registered User
Thread Starter
Join Date: Nov 2009
Location: Huntsville, AL
Posts: 45
Likes: 0
Received 0 Likes
on
0 Posts
A few sneak peak pics of what's happening after the New Year! 
Thanks 4x4YOTA!
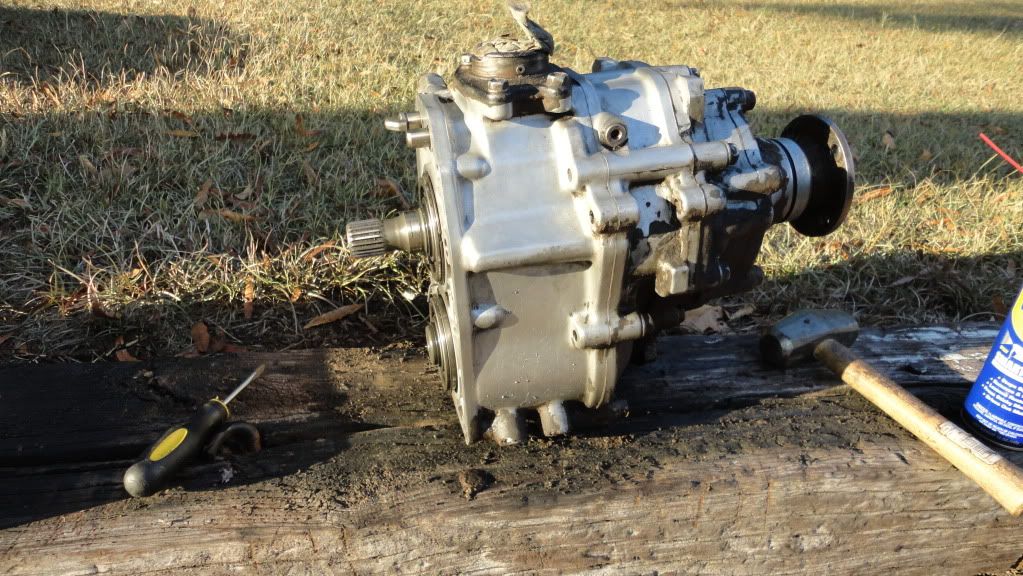
Starting to clean her up... the funk was caked on her over a 1/4" thick in some spots.
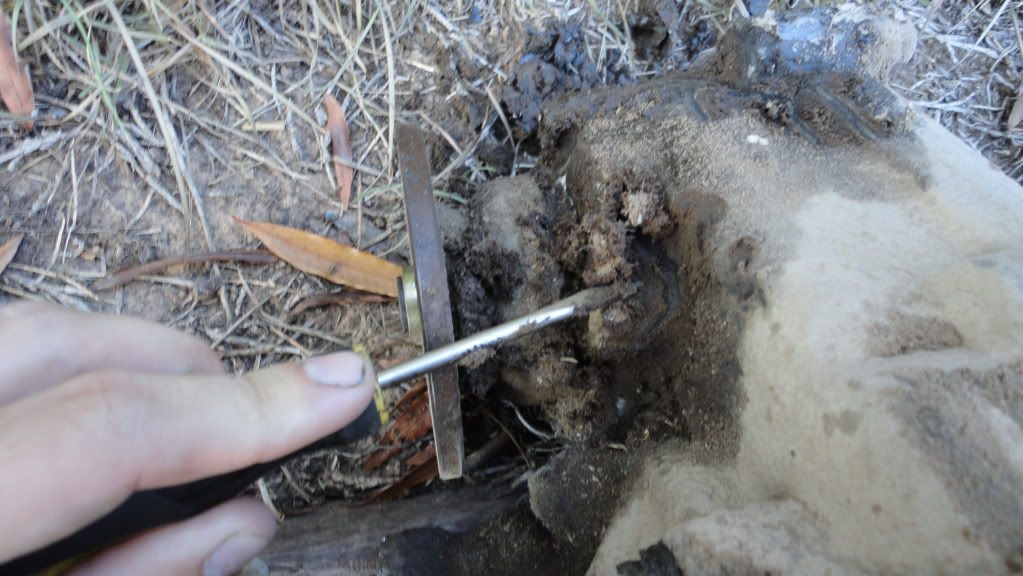
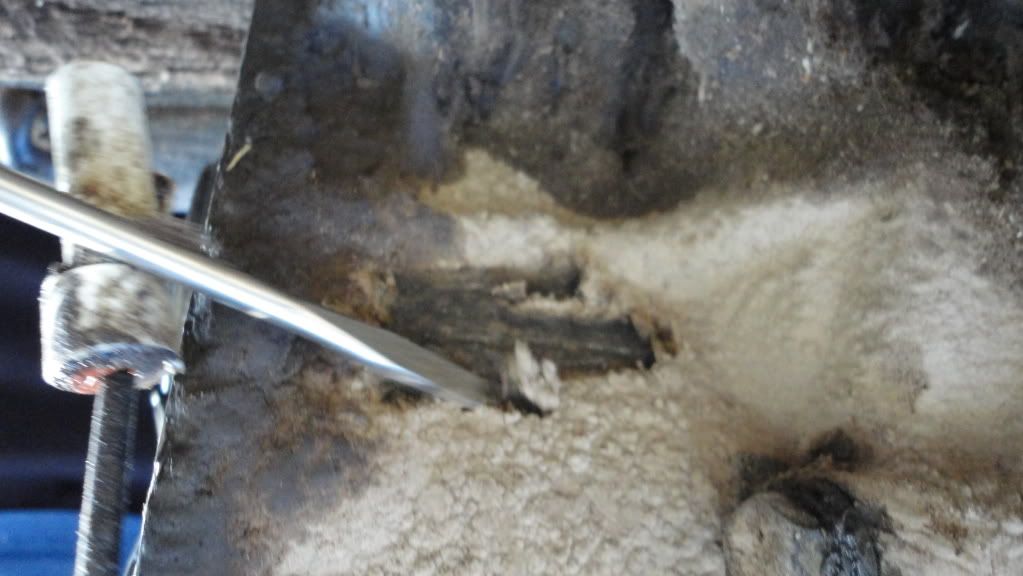
I ran out of paper towels and cleaner, but she looks a lot better now. I'll finishing the cleaning in a day or so.

Thanks 4x4YOTA!
Starting to clean her up... the funk was caked on her over a 1/4" thick in some spots.
I ran out of paper towels and cleaner, but she looks a lot better now. I'll finishing the cleaning in a day or so.
01-19-2011, 11:34 AM
#33
Registered User
Thread Starter
Join Date: Nov 2009
Location: Huntsville, AL
Posts: 45
Likes: 0
Received 0 Likes
on
0 Posts
02-22-2011, 09:32 PM
#35
Registered User
Thread Starter
Join Date: Nov 2009
Location: Huntsville, AL
Posts: 45
Likes: 0
Received 0 Likes
on
0 Posts
Tailer Update!
Its been a while, so let me get you guys up to speed.
My father unexpectedly passed away a few months ago, so I have been helping my step mom and little brother get relocated from NY back to the south. That in turn meant the cash I (my wife) had set aside for the paint job had to go somewhere else... so I got this! It has made getting them moved a whole lot easier.
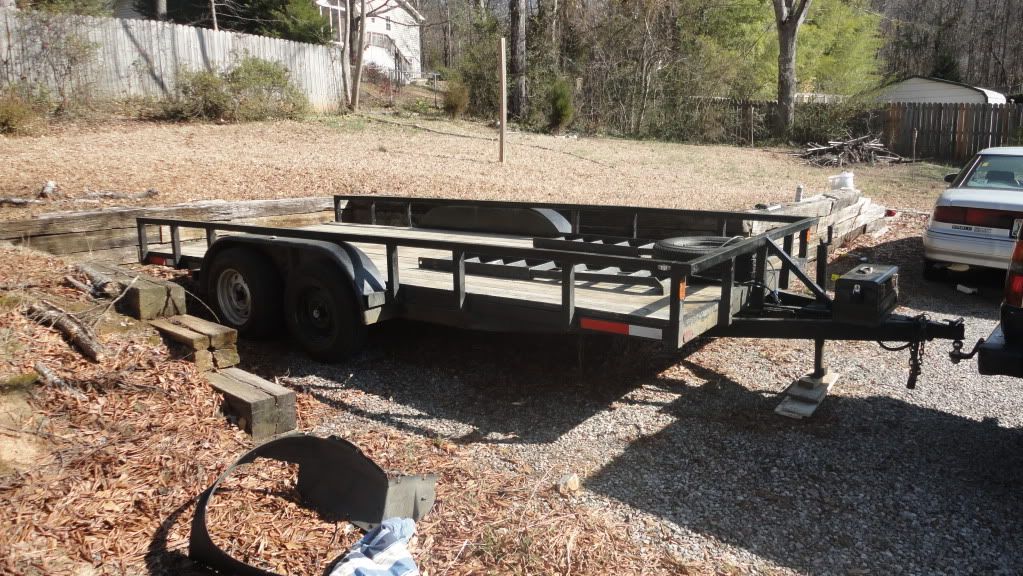
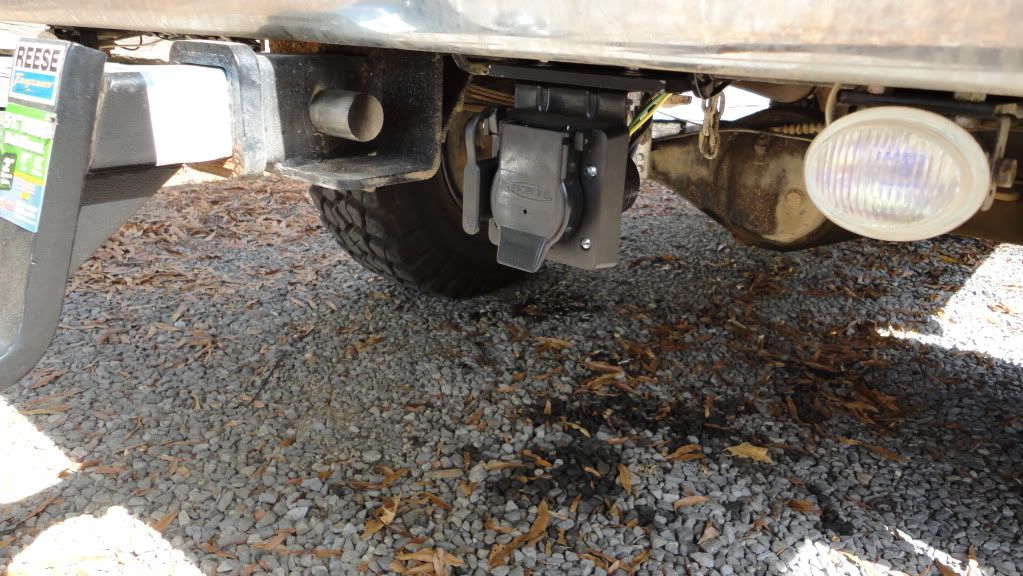
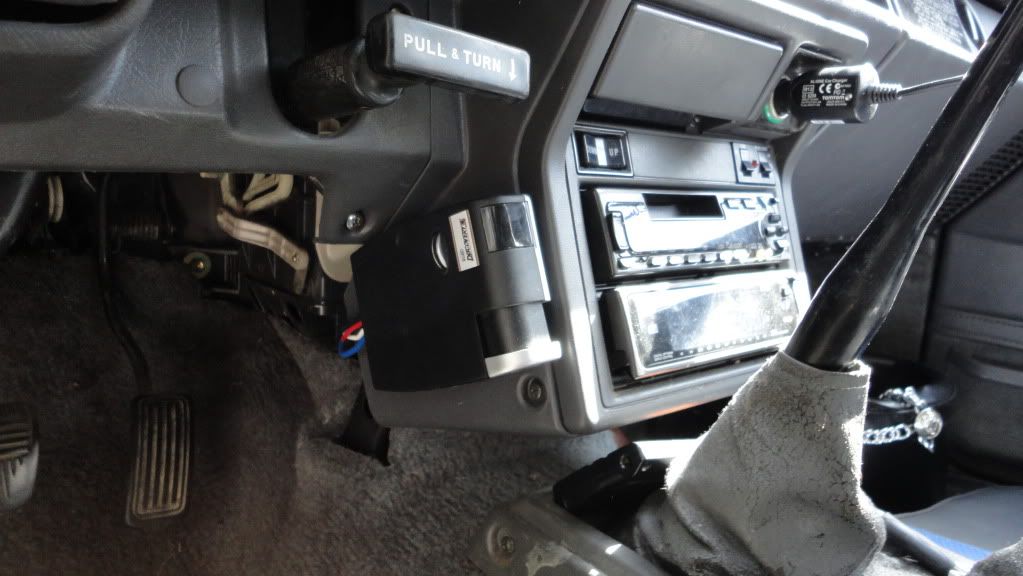
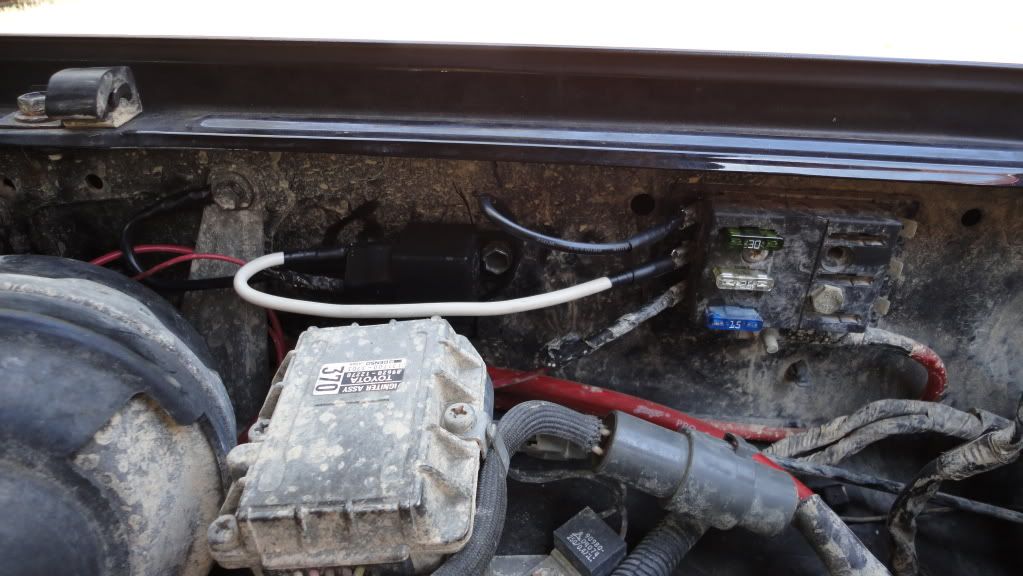
This bad boy is a 7x16ft tandem axle with electric brakes! And I may as well have stole it! Found her on Craigslist and the guy I bought it from didn't realize what he had. He thought it was a 6x16ft tandem axle without brakes! When I went to pick it up, I rushed him along for the bill of sale as fast as I could once I realized what the trailer really was, hooked up and booked it outta there. I got the trailer for $800. Before I bought the trailer I picked up a Curt Manufacturing 51120 Brake Controller, wiring harness, and a Hopkins 4/7 pin receptacle for the 4Runner. I got all of this installed the night before I went to pick up the trailer (since I wasn't sure what I was going to run into.) I had some left over steel from my Zuk Coils, so I cut a piece, drilled two holes, and welded it up for the receptacle. I chose to mount the brake controller to the left of my CD player. I chose this spot for a few reasons: easy to reach, not in the way, and it was the only place that looked good IMO. I didn't use the mounting bracket that the controller came with either... it made the controller stick out too far, it seemed to obtrusive to me. So I got some velcro and super glue and shes not going anywhere. I also added a nice relay to the system for the reverse lights on the trailer. I plan to get some more fog lights, like I mounted under the hood, for the back of the trailer to make backing up a bit easier at night. Since the fogs I want are rated at 55 watts each I didn't want to overload the factory reverse wiring. Overall not a bad install, took me about 4 hours to get everything done right between the controller, relays, and receptacle.
Shot of the 4/7 pin receptacle:
Shot of the brake controller:
Shot of the relay:
A few more trailer shots:


I forgot to take pics of when I got the trailer but you can see some of the fancy extras I put on it. First thing I did was re-wire it from tongue to tail with brand new LEDs, wire, and circuit box. Almost looks like a X-mas tree going down the interstate. I got everything I needed from http://www.etrailer.com/ Good prices, nice how to videos, and great service. Second thing I did was throw on a new set of rubber. The tires that were on there had almost dry rotted all the way through. I did a lot of research on trailer tires and determined that the Maaxis 8008 ST Radials were the way to go. Third, I picked up some steel and welded up a box to hold my toolbox on the front of the trailer. I keep several different tie downs, a few tools, and different size ballmounts in there. Last thing I did was pressure wash the deck, once the weather warms up a bit I will reseal it.
Overall I got a great deal on this trailer and couldn't be happier with its performance.
Trailer: $800
Tires: $450 (Including the Spare)
Lights/Wire from eTrailer: $250
Brake Controller/Receptacle: $70
Misc: $30
Total: $1600
My father unexpectedly passed away a few months ago, so I have been helping my step mom and little brother get relocated from NY back to the south. That in turn meant the cash I (my wife
) had set aside for the paint job had to go somewhere else... so I got this! It has made getting them moved a whole lot easier.This bad boy is a 7x16ft tandem axle with electric brakes! And I may as well have stole it! Found her on Craigslist and the guy I bought it from didn't realize what he had. He thought it was a 6x16ft tandem axle without brakes! When I went to pick it up, I rushed him along for the bill of sale as fast as I could once I realized what the trailer really was, hooked up and booked it outta there. I got the trailer for $800.
Before I bought the trailer I picked up a Curt Manufacturing 51120 Brake Controller, wiring harness, and a Hopkins 4/7 pin receptacle for the 4Runner. I got all of this installed the night before I went to pick up the trailer (since I wasn't sure what I was going to run into.) I had some left over steel from my Zuk Coils, so I cut a piece, drilled two holes, and welded it up for the receptacle. I chose to mount the brake controller to the left of my CD player. I chose this spot for a few reasons: easy to reach, not in the way, and it was the only place that looked good IMO. I didn't use the mounting bracket that the controller came with either... it made the controller stick out too far, it seemed to obtrusive to me. So I got some velcro and super glue and shes not going anywhere. I also added a nice relay to the system for the reverse lights on the trailer. I plan to get some more fog lights, like I mounted under the hood, for the back of the trailer to make backing up a bit easier at night. Since the fogs I want are rated at 55 watts each I didn't want to overload the factory reverse wiring. Overall not a bad install, took me about 4 hours to get everything done right between the controller, relays, and receptacle.Shot of the 4/7 pin receptacle:
Shot of the brake controller:
Shot of the relay:
A few more trailer shots:
I forgot to take pics of when I got the trailer but you can see some of the fancy extras I put on it. First thing I did was re-wire it from tongue to tail with brand new LEDs, wire, and circuit box. Almost looks like a X-mas tree going down the interstate. I got everything I needed from http://www.etrailer.com/ Good prices, nice how to videos, and great service. Second thing I did was throw on a new set of rubber. The tires that were on there had almost dry rotted all the way through. I did a lot of research on trailer tires and determined that the Maaxis 8008 ST Radials were the way to go. Third, I picked up some steel and welded up a box to hold my toolbox on the front of the trailer. I keep several different tie downs, a few tools, and different size ballmounts in there. Last thing I did was pressure wash the deck, once the weather warms up a bit I will reseal it.
Overall I got a great deal on this trailer and couldn't be happier with its performance.
Trailer: $800
Tires: $450 (Including the Spare)
Lights/Wire from eTrailer: $250
Brake Controller/Receptacle: $70
Misc: $30
Total: $1600
02-22-2011, 09:52 PM
#36
Registered User
Thread Starter
Join Date: Nov 2009
Location: Huntsville, AL
Posts: 45
Likes: 0
Received 0 Likes
on
0 Posts
Now that I've filled you in on the trailer, time to fill you in on the 4Runner. During one of my several treks to NY my water pump decided that being original wasn't fun anymore and that it was time to go on a permanent vacation. The timing could not have been better The night before I was gunna head back to AL with a trailer load I ended up having to replace the water pump. On the bright side at least it happened before the 1100 mile trip back. I figured this would be a great time to replace the timing components while I was in there, unfortunately not a single part store in the area could touch the timing components for two days. That didn't line up with my departure that was scheduled for 14 hours later. I went ahead and tackled the pump for the time being. Fairly straight forward till I opened the water pump box, only to find that they had sent me one with a bypass tube. The LPS had already closed by this time which meant my 7am departure was going to pushed back to 10am. The part store was not going to be able to touch to correct pump for two days. So I got a piece of hose and a plug and sealed her off. Once I got her plugged, filled and burped the rest of the trip went great. I did notice that the timing tensioner and idler pulleys were shot. The dummy fan bracket/pulley was shot too. About a month ago, with the help of my local shop buddies, we replaced the timing belt, tensioner, and idler pulleys, and the dummy fan bracket/pulley. While we had everything apart, we took another shot at solving my oil leak. We replaced the cam seals and the crank seal. After a few hundred miles I am glad to report that I no longer have an oil leak! I now instead have a radiator leak  So the following week I threw in a new radiator and all is well!
The night before I was gunna head back to AL with a trailer load I ended up having to replace the water pump. On the bright side at least it happened before the 1100 mile trip back. I figured this would be a great time to replace the timing components while I was in there, unfortunately not a single part store in the area could touch the timing components for two days. That didn't line up with my departure that was scheduled for 14 hours later. I went ahead and tackled the pump for the time being. Fairly straight forward till I opened the water pump box, only to find that they had sent me one with a bypass tube. The LPS had already closed by this time which meant my 7am departure was going to pushed back to 10am. The part store was not going to be able to touch to correct pump for two days. So I got a piece of hose and a plug and sealed her off. Once I got her plugged, filled and burped the rest of the trip went great. I did notice that the timing tensioner and idler pulleys were shot. The dummy fan bracket/pulley was shot too. About a month ago, with the help of my local shop buddies, we replaced the timing belt, tensioner, and idler pulleys, and the dummy fan bracket/pulley. While we had everything apart, we took another shot at solving my oil leak. We replaced the cam seals and the crank seal. After a few hundred miles I am glad to report that I no longer have an oil leak! I now instead have a radiator leak So the following week I threw in a new radiator and all is well!
02-22-2011, 10:05 PM
#37
Registered User
Thread Starter
Join Date: Nov 2009
Location: Huntsville, AL
Posts: 45
Likes: 0
Received 0 Likes
on
0 Posts
And now for some fun I had last week!
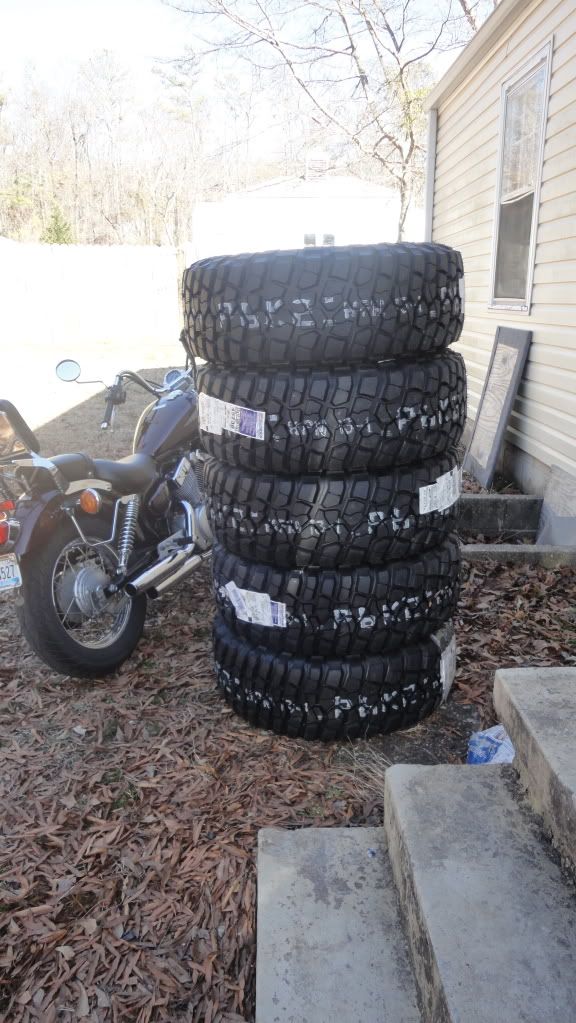
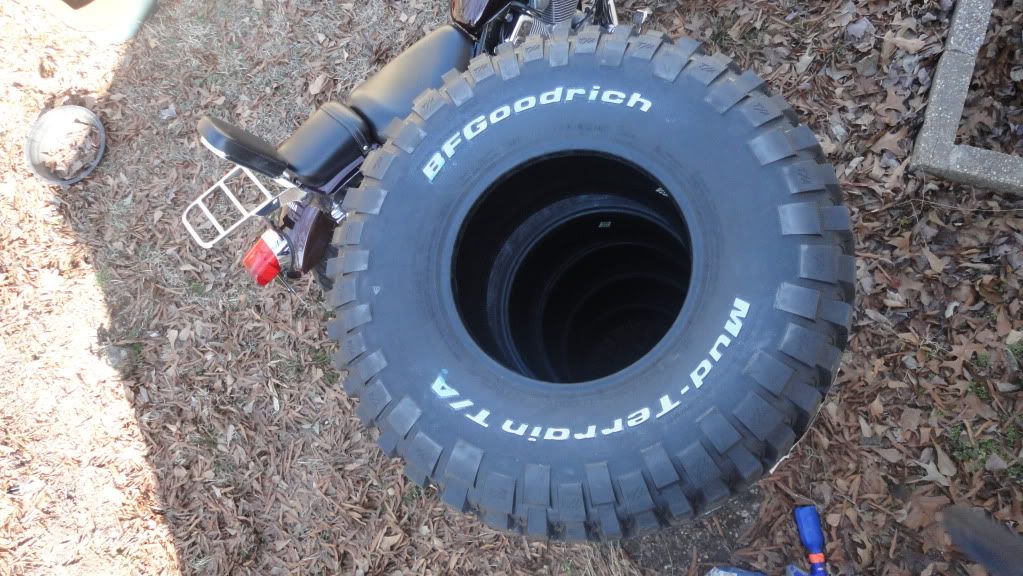
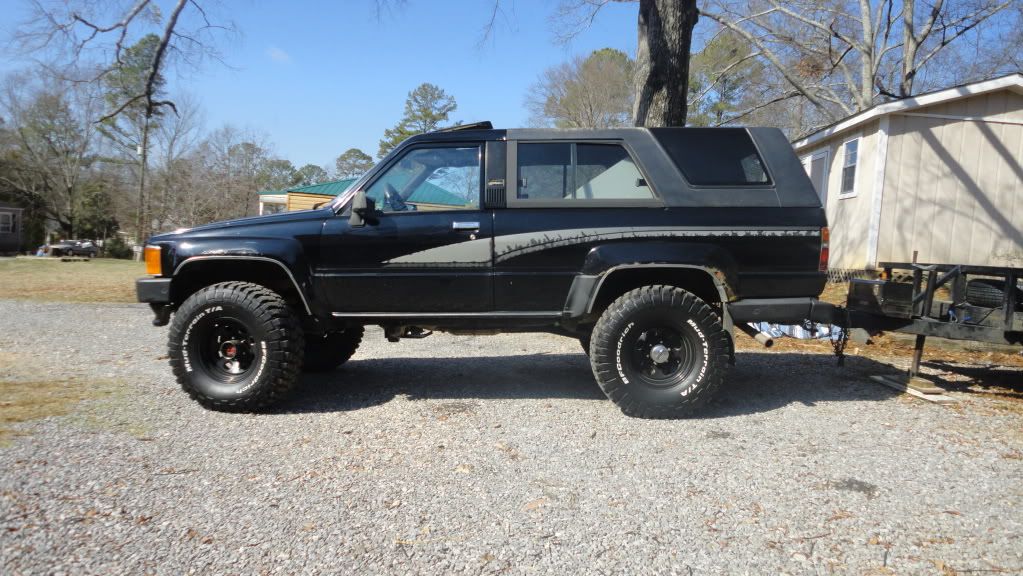

Got me some BFGoodrich KM2 33x12.50R15s! A friend offered me a great price on my 32s and I couldn't resist the upgrade! Its a tight fit but they are in there with only a 1.5" suspension lift, and they only rub at full lock when turning. They are just barely hitting the pinch weld in the back and just barely hitting the bumper valence in the front. So to remedy this slight issue my 2" body lift is finally going on this weekend along with my sliders!
My how plans start to change... I originally only wanted 31s.. now I've got 33s. My paint job might get put off for a while too, I currently have a lead on a 3.4 I should know more within the next week or so.
Got me some BFGoodrich KM2 33x12.50R15s! A friend offered me a great price on my 32s and I couldn't resist the upgrade! Its a tight fit but they are in there with only a 1.5" suspension lift, and they only rub at full lock when turning. They are just barely hitting the pinch weld in the back and just barely hitting the bumper valence in the front. So to remedy this slight issue my 2" body lift is finally going on this weekend along with my sliders!
My how plans start to change... I originally only wanted 31s.. now I've got 33s. My paint job might get put off for a while too, I currently have a lead on a 3.4
I should know more within the next week or so.
Last edited by sushi20j; 02-23-2011 at 05:04 AM.
02-23-2011, 02:33 PM
#38
Registered User
Join Date: Jul 2010
Location: Auburn, Alabama
Posts: 135
Likes: 0
Received 0 Likes
on
0 Posts
sweet home alabama! i havent seen too many other people on here from AL, but how are the rancho shocks now that youve had them for a while? i was looking into getting some
02-23-2011, 08:24 PM
#40
Registered User
Thread Starter
Join Date: Nov 2009
Location: Huntsville, AL
Posts: 45
Likes: 0
Received 0 Likes
on
0 Posts
 The Ranchos are great, especially if you've got any kind of suspension lift. Everything is nice and smooth. Let me know if ya ever wanna check it all out in person.
...speaking of Ranchos, I replaced my steering stabilizer a few weeks back. I went with a Rancho there as well. Just some FYI about that. I went through 3 different Rancho stabilizers from the LPS. Turns out the stabilizer is listed wrong in their system. Had to get my friends at the shop to help me figure that mess out. The 4th go round we finally had it right... had to order a stabilizer for a early 90s Land Cruiser, to get the proper fit on my 4Runner.
Thanks!
I got two good coats of bed liner on my sliders today. They will be getting two more coats tomorrow. Then Friday night, its on with the body lift and a bit of welding.


