sushi20j's 1989 4Runner SR5 Build-Up Thread
 11-19-2009, 01:21 PM
#1
Registered User
Thread Starter
Join Date: Nov 2009
Location: Huntsville, AL
Posts: 45
Likes: 0
Received 0 Likes
on
0 Posts
sushi20j's 1989 4Runner SR5 Build-Up Thread
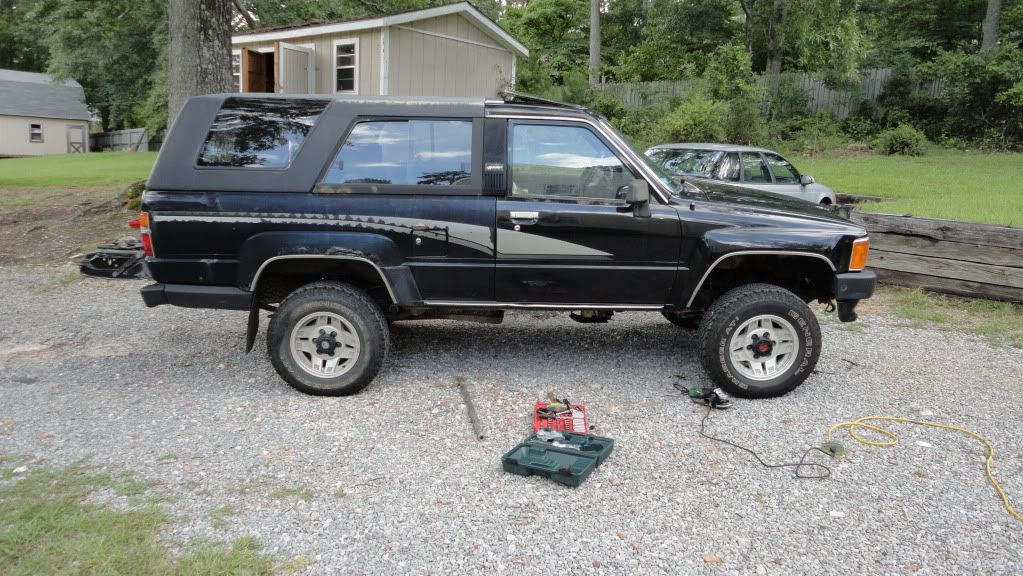
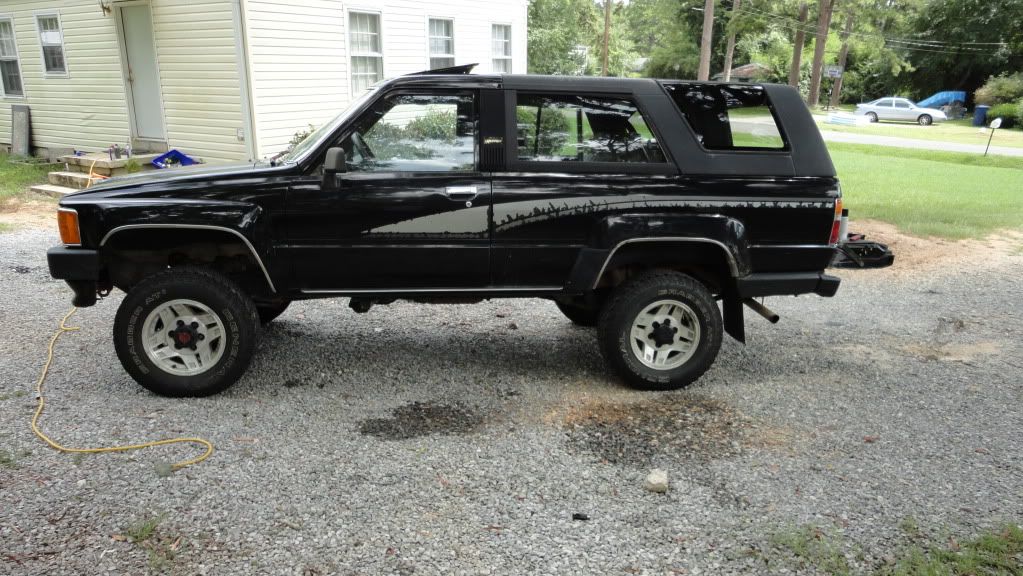
To start this is my first post on yotatech! I have been on the site for the past few weeks now since my fiance and I just purchased our first 4Runner. There is a wealth of information here and I have learned a lot already. Any who enough babbling.
The Rig:
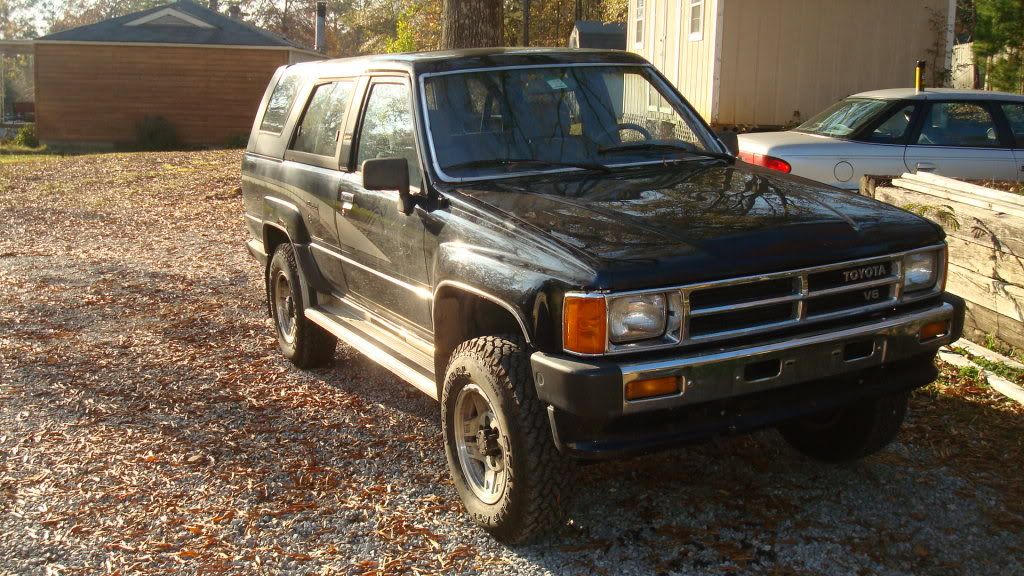
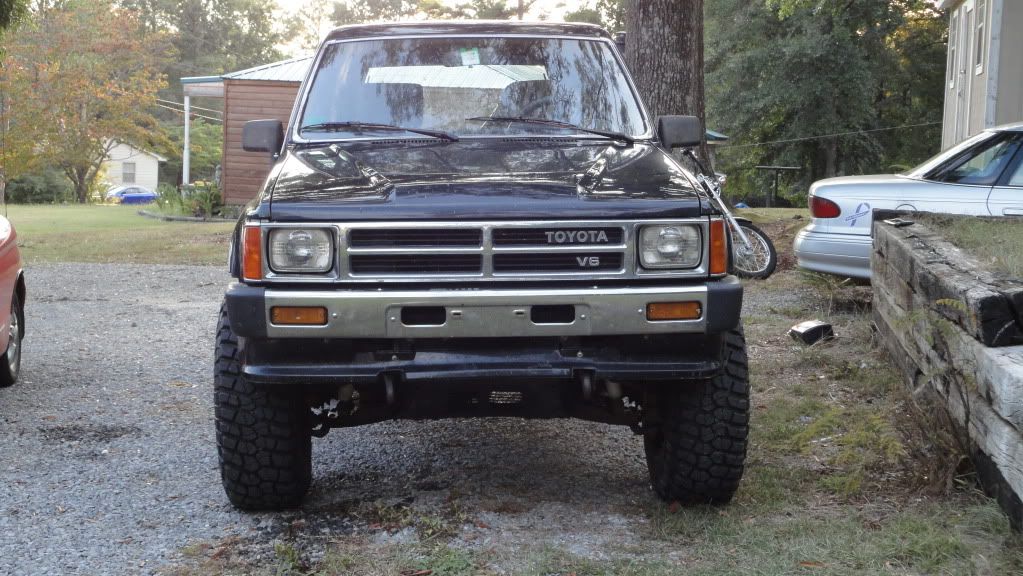
1989 4Runner SR5
4x4
3.0l-V6
R150F 5-Speed
4.10-Gears
215k miles
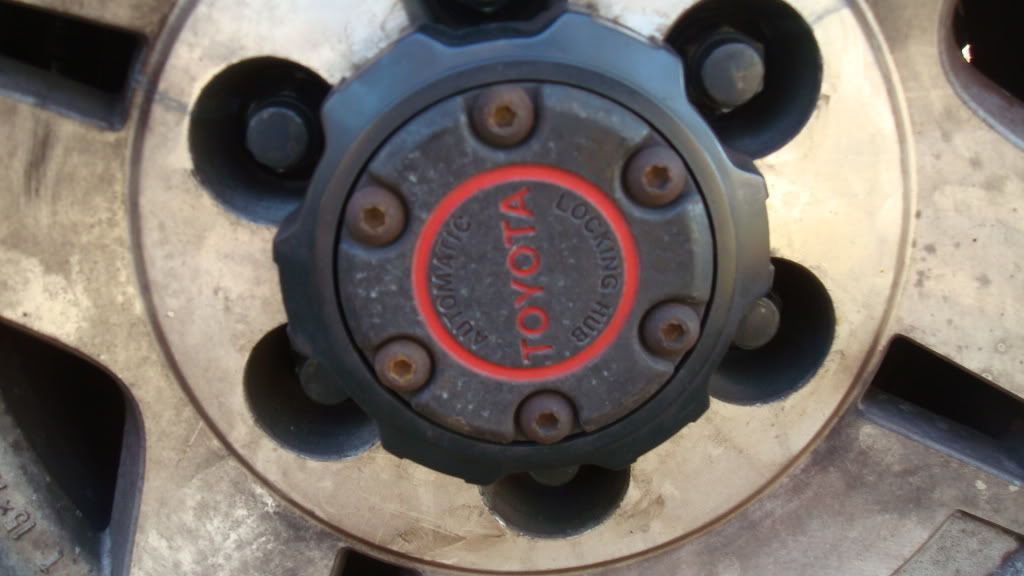
Auto-Hubs (Boo!)
I got this from one of my professors at school. The Runner has been kept in pretty decent shape and has had most of the regular maintenance taken care of: Clutch, Timing Belt, Alt, A/C, Battery, Shocks, Brakes, Exhaust, and the list goes on and on. Drives great and gets about 18 mpg city and 21 hwy.
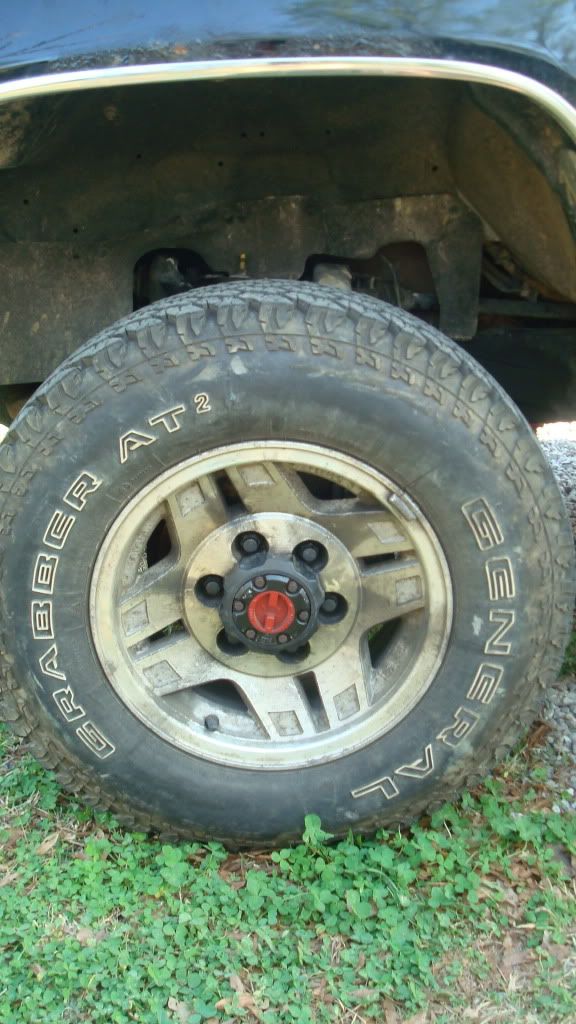
Only Big thing we had to do when we got it was to put on some new tires. We decided to go with some General Grabber AT2s in 225/75R15 for now. They look good, had some pretty good reviews, and most importantly fit our budget. So far they have proven to be a great tire.
Future Plans:
Zuk Coil Mod
Aisin Manual Locking Hubs
New Paint Job
CB or Ham Radio
Winch
31's
4.30 or 4.556 - Gears
Lockers or LSD (Still haven't decided which way I want to go here. This Runner will mainly be our DD and will see some mild-medium trail use.)
The Pics:
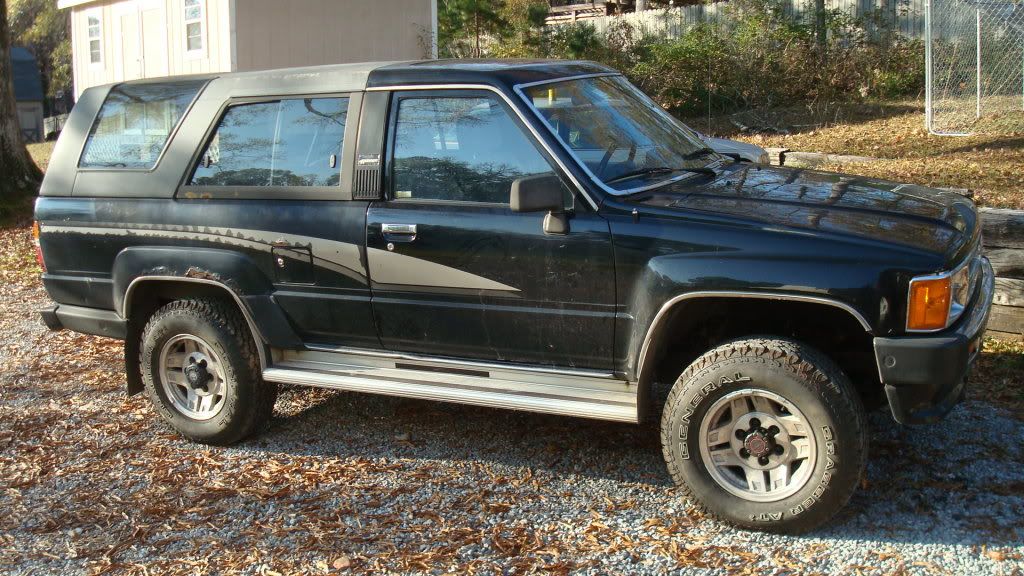
Exterior Shot

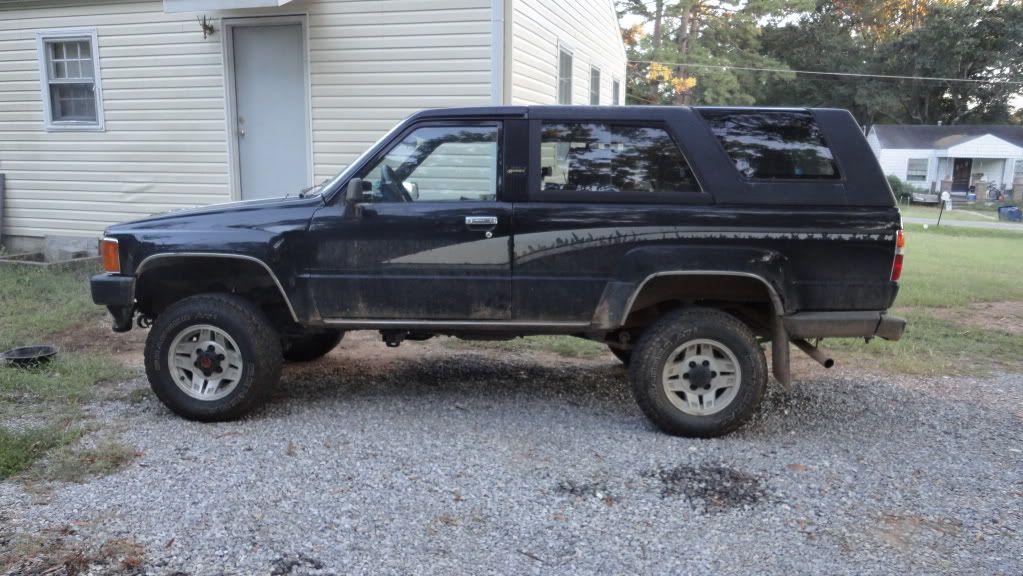
Another Exterior Shot
Wheel Shot

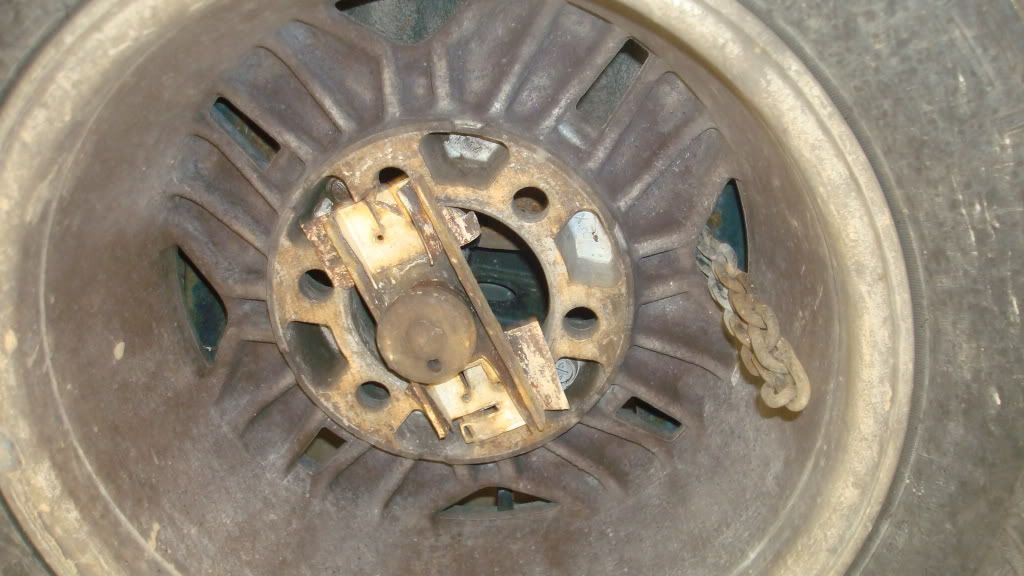
Pesky Auto-Hub
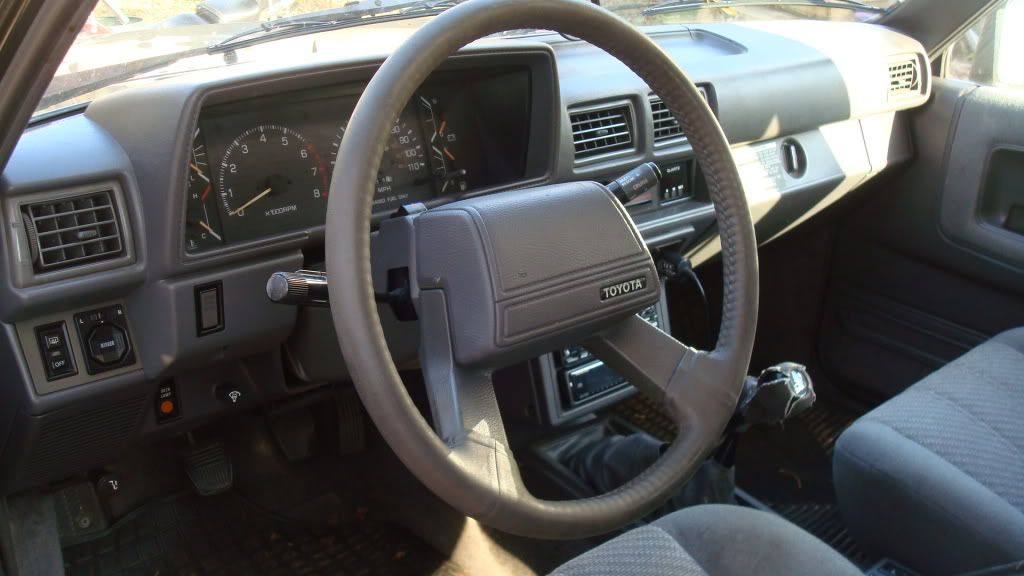
Interior Shot
Engine Bay Shot

I will post pics of the future mods as I get em' done. Being a college student nearing graduation and getting married this summer will slow things down a bit for this Runner.
Over Thanksgiving I will be doing the Zuk Coil Mod and converting to Aisin Manual Locking Hubs. The Paint Job will have to wait till May or June. Anything else will happen when it happens.
The Rig:
1989 4Runner SR5
4x4
3.0l-V6
R150F 5-Speed
4.10-Gears
215k miles
Auto-Hubs (Boo!)
I got this from one of my professors at school. The Runner has been kept in pretty decent shape and has had most of the regular maintenance taken care of: Clutch, Timing Belt, Alt, A/C, Battery, Shocks, Brakes, Exhaust, and the list goes on and on. Drives great and gets about 18 mpg city and 21 hwy.
Only Big thing we had to do when we got it was to put on some new tires. We decided to go with some General Grabber AT2s in 225/75R15 for now. They look good, had some pretty good reviews, and most importantly fit our budget. So far they have proven to be a great tire.
Future Plans:
Zuk Coil Mod
Aisin Manual Locking Hubs
New Paint Job
CB or Ham Radio
Winch
31's
4.30 or 4.556 - Gears
Lockers or LSD (Still haven't decided which way I want to go here. This Runner will mainly be our DD and will see some mild-medium trail use.)
The Pics:
Exterior Shot
Another Exterior Shot
Wheel Shot
Pesky Auto-Hub
Interior Shot
Engine Bay Shot
I will post pics of the future mods as I get em' done. Being a college student nearing graduation and getting married this summer will slow things down a bit for this Runner.
Over Thanksgiving I will be doing the Zuk Coil Mod and converting to Aisin Manual Locking Hubs. The Paint Job will have to wait till May or June. Anything else will happen when it happens.
 11-20-2009, 05:42 AM
#3
Registered User
Thread Starter
Join Date: Nov 2009
Location: Huntsville, AL
Posts: 45
Likes: 0
Received 0 Likes
on
0 Posts
04-05-2010, 03:49 PM
#4
Registered User
Thread Starter
Join Date: Nov 2009
Location: Huntsville, AL
Posts: 45
Likes: 0
Received 0 Likes
on
0 Posts
Time for an UPDATE!  Got a lot of stuff done to the 4Runner over the past few months, just haven't had time to update my post. I apologize for the lack of 'during' pics. I could never seem to find my camera while I was actually doing a project. So these are all after the project shots from this afternoon. I won't go into great detail on most of these Mods either, there are plenty of write-ups on yotatech already. I have become good friends with the search feature.
First Project: Manual Locking Hubs + ZUK Coil Mod - Thanksgiving
Picked up these Hubs from a local salvage yard for $50 each.
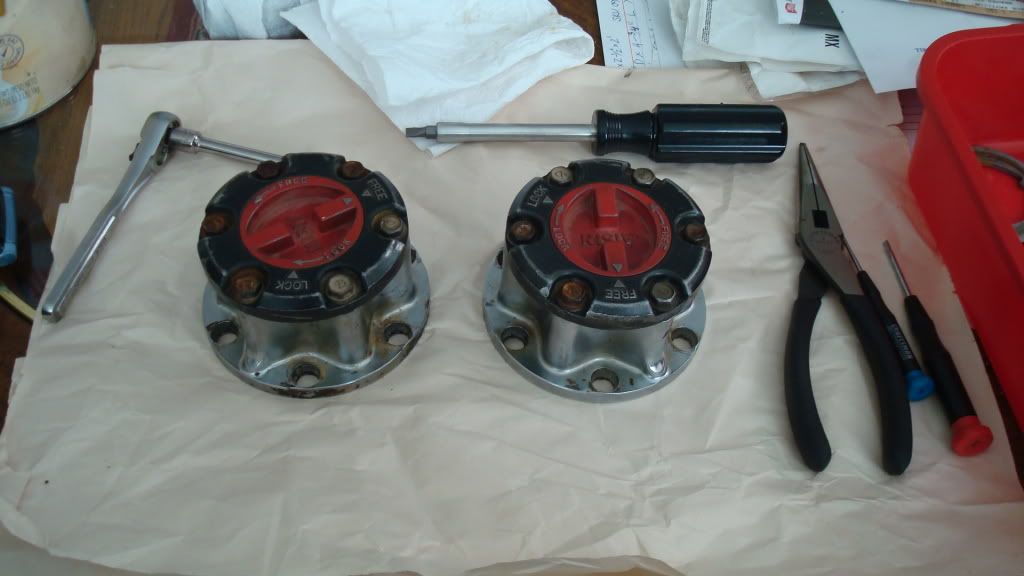
Took em' apart and soaked all the parts in Purple Power Degreaser for 24 hours. Then reassembled and greased em' up.
Shot with the rebuilt Hubs in.
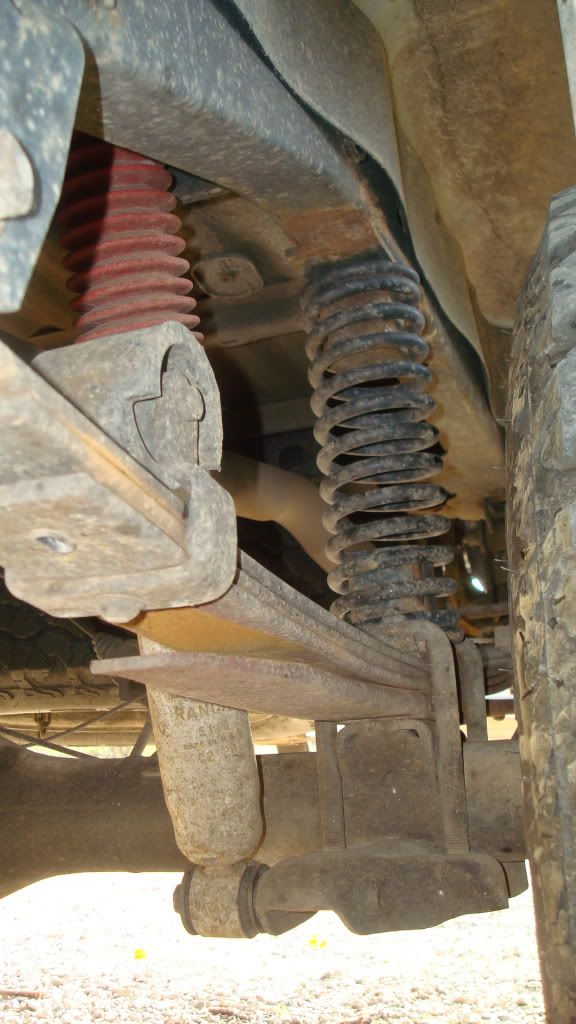
Thanks go out ZUK + www.gearinstalls.com for all the info, photos, and write-ups. The ZUK coils were a fun family project. My Mom works at Fastenal so a was able to get all the steel for the brackets nice and cheap. My Step-Dad was able to fab the brackets up in his shop. Then we installed them. I got the coil springs off ebay as per ZUK's recomendation. http://cgi.ebay.com/ebaymotors/NEW-R...mZ290014125492 I went with the 14" 125 lb coils I split the difference between ZUK's recomendations. http://www.gearinstalls.com/coilinfo.htm
There were two mistakes that I made when drawling up the plans for these coils:
1: I completely missed the hole that is required in the bottom plate on the bracket for the leaf pack bolt. Luckily my Step-Dad was able to fix that with his drill press.
2: 2" square tubing is not 2" at the diagonal, which inturn means the coil spring won't fit. It was a simple oversight on my part and luckily again my Step-Dad was able to fix it with an angle grinder. He just ground down each corner of the square tubing till the coils fit. If I had to do it again I would have just got 2" circle tubing instead.
Manual hub cost:
Hubs - $100
New gaskets and O-Rings from the dealer - $20
Now that the weather has warmed up I am going to clean up those rust spots and repaint em'
ZUK coil cost:
Coils - $75
Steel - $35
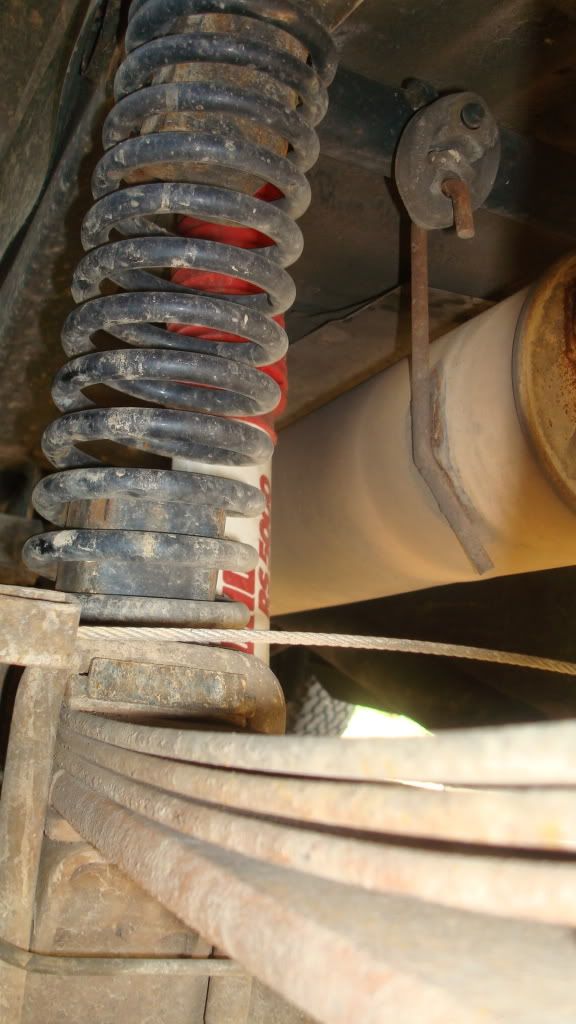
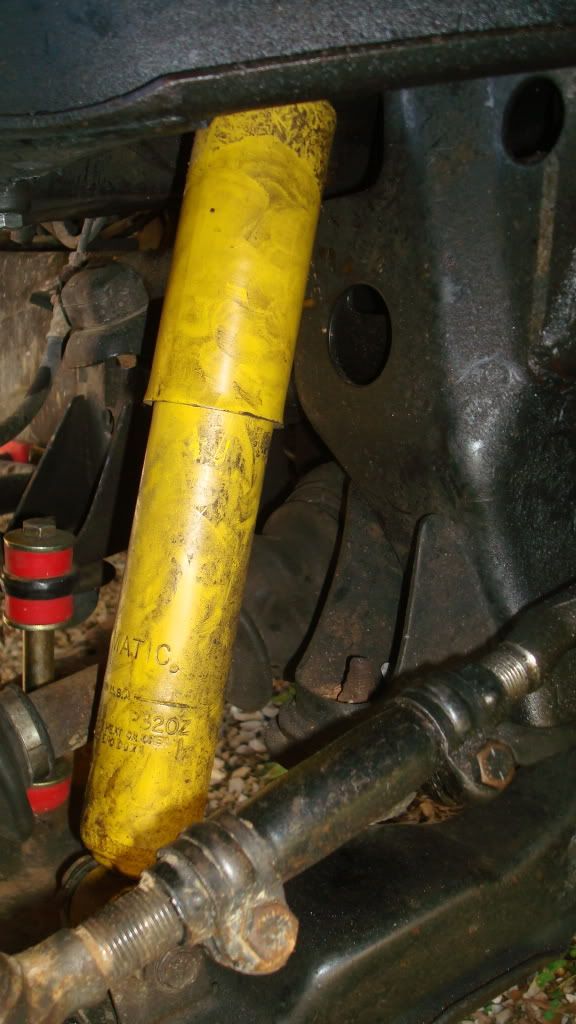
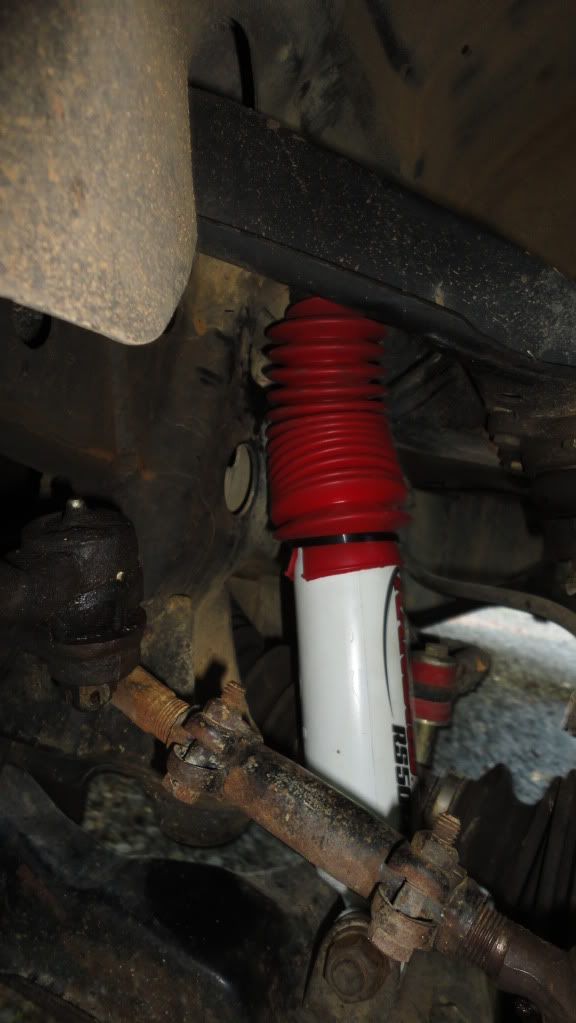
Over Christmas my Dad got me the Rancho Shocks that you see in the pics. The RS5144. The Runner rode a lot better after that, especially since the stock shocks were pretty close to being fully extended. He also got me a K&N air filter.
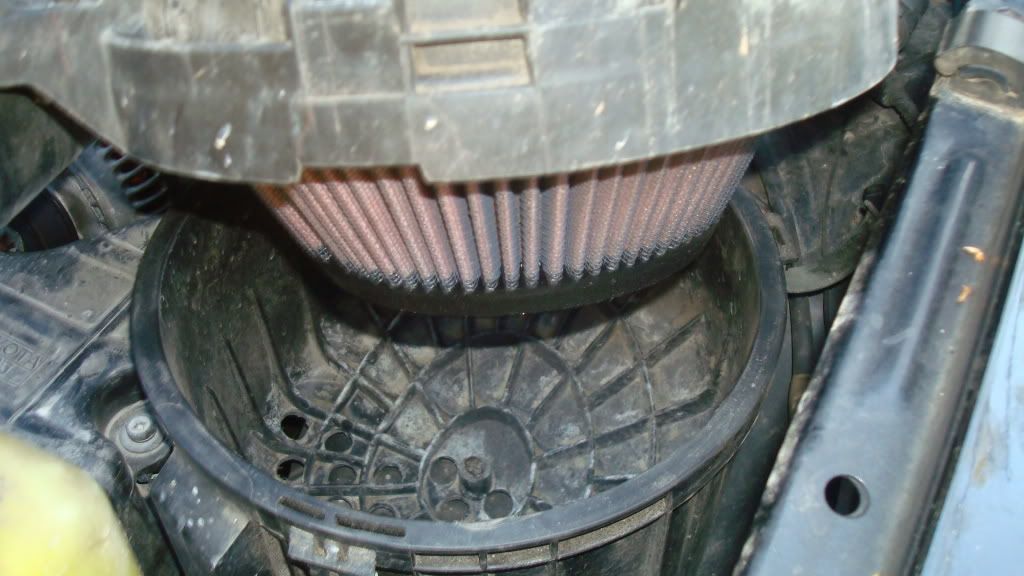
As you can see I also drilled out half of the air box to help improve air flow. While I was at my Dad's house for Christmas we also replaced the spark plugs and wires. We also drained and refilled the front and rear differentials, transfer case, and the tranny. More on the transfer case in the next post, it was a PITA!
Got a lot of stuff done to the 4Runner over the past few months, just haven't had time to update my post. I apologize for the lack of 'during' pics. I could never seem to find my camera while I was actually doing a project. So these are all after the project shots from this afternoon. I won't go into great detail on most of these Mods either, there are plenty of write-ups on yotatech already. I have become good friends with the search feature.First Project: Manual Locking Hubs + ZUK Coil Mod - Thanksgiving
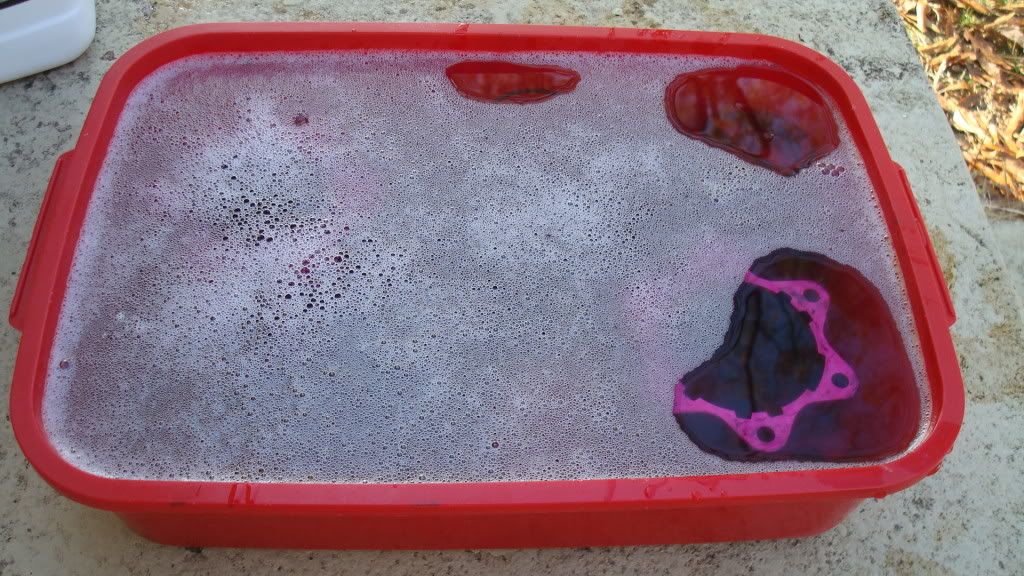
Picked up these Hubs from a local salvage yard for $50 each.
Took em' apart and soaked all the parts in Purple Power Degreaser for 24 hours. Then reassembled and greased em' up.
Shot with the rebuilt Hubs in.
Thanks go out ZUK + www.gearinstalls.com for all the info, photos, and write-ups. The ZUK coils were a fun family project. My Mom works at Fastenal so a was able to get all the steel for the brackets nice and cheap. My Step-Dad was able to fab the brackets up in his shop. Then we installed them. I got the coil springs off ebay as per ZUK's recomendation. http://cgi.ebay.com/ebaymotors/NEW-R...mZ290014125492 I went with the 14" 125 lb coils I split the difference between ZUK's recomendations. http://www.gearinstalls.com/coilinfo.htm
There were two mistakes that I made when drawling up the plans for these coils:
1: I completely missed the hole that is required in the bottom plate on the bracket for the leaf pack bolt. Luckily my Step-Dad was able to fix that with his drill press.
2: 2" square tubing is not 2" at the diagonal, which inturn means the coil spring won't fit. It was a simple oversight on my part and luckily again my Step-Dad was able to fix it with an angle grinder. He just ground down each corner of the square tubing till the coils fit. If I had to do it again I would have just got 2" circle tubing instead.
Manual hub cost:
Hubs - $100
New gaskets and O-Rings from the dealer - $20
Now that the weather has warmed up I am going to clean up those rust spots and repaint em'
ZUK coil cost:
Coils - $75
Steel - $35
Over Christmas my Dad got me the Rancho Shocks that you see in the pics. The RS5144. The Runner rode a lot better after that, especially since the stock shocks were pretty close to being fully extended. He also got me a K&N air filter.
As you can see I also drilled out half of the air box to help improve air flow. While I was at my Dad's house for Christmas we also replaced the spark plugs and wires. We also drained and refilled the front and rear differentials, transfer case, and the tranny. More on the transfer case in the next post, it was a PITA!
04-05-2010, 03:54 PM
#5
Looking good .. good call on replacing the hubs , it'll save you some fuel economy for sure ..
when it come down to fixing the rust ... check us out .. http://www.toyotafiberglass.com
.
when it come down to fixing the rust ... check us out .. http://www.toyotafiberglass.com
.
04-08-2010, 07:11 AM
#6
Registered User
Thread Starter
Join Date: Nov 2009
Location: Huntsville, AL
Posts: 45
Likes: 0
Received 0 Likes
on
0 Posts
Thanks. Replacing the Hubs was my first priority after the new tires. Not so much for fuel economy since they were Auto-Hubs and the axles were not spinning unless the Runner was in 4WD, but because the drivers side was shot and the 4WD would not engage. That was no good in and of itself, I also did not like the idea of throwing it in reverse and dropping back into 2WD till the axle rotated back around.
I will definitely keep you guys in mind for the body work. Just depends on what we find when we strip the Runner down for paint.
I will definitely keep you guys in mind for the body work. Just depends on what we find when we strip the Runner down for paint.
04-08-2010, 08:03 AM
#7
Registered User
Thread Starter
Join Date: Nov 2009
Location: Huntsville, AL
Posts: 45
Likes: 0
Received 0 Likes
on
0 Posts
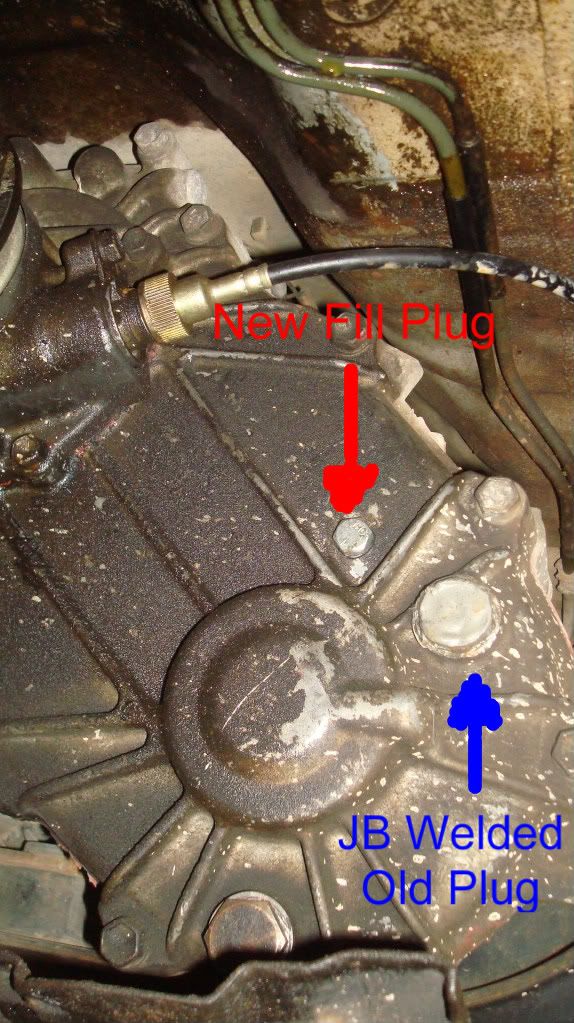
Now the fun my Dad and I had with the transfer case.  As I mentioned in my earlier post we drained and refilled the front and rear differentials, transfer case, and the tranny. Out of the four the tranny was by far the easiest. If I had to guess somebody must have changed the tranny fluid before. I don't think that the front and rear differential and the transfer case had ever been done before. The drain and fill plugs were a PITA to get out. Even with a 1/2" drive with a 2 foot pipe on the end we couldn't get those plugs to break free. After trying for about 2 hours with plenty of PB Blaster we weren't getting anywhere. After a short lunch break, my Dad got out his impact wrench and after about 2 minutes a plug they finally broke free. We did the front and rear diffs first then we went on to the transfer case. Now I am sure that just about anyone who has attempted these jobs has wondered why the nice folks at Toyota only made the head of the drain and fill plug bolts about 3/16" thick. Anywho, the drain plug came out nice and easy. The fill plug however did not cooperate at all. Rounded it off and started the real fun. We tried just about everything to get that fill plug out.
We tried:
1. Beating some 'English' on it.
2. A pipe wrench.... but that 3/16" was not enough to grab on to.
3. Easy-Out.... sounds EASY enough right? Not so much. Drilled out the bolt as insructed. Inserted the Easy-Out. Started to try to remove the the bolt and SNAP, the Easy-Out sheared off in the fill plug. We took out as much of the Easy-Out as we could and then with a Dremel flatened the Easy-Out till it was level with the head of the bolt.
At this point we now had two problems: 1. How to refill the transfer case. 2. How to seal up the fill plug to prevent leaks.
We decide to JB Weld the the bolt to keep it from leaking. After applying the JB to the bolt head we let it dry for a day and a half just to be sure.
For the new fill plug we drilled and tapped a new hole (5/16") about an inch or so above the old fill plug. For the new plug we ground down a stainless steel bolt to size and used an o-ring to ensure a good seal.
So far everything has held up and no leaks after about 4k miles. ::Knock on Wood::
As I mentioned in my earlier post we drained and refilled the front and rear differentials, transfer case, and the tranny. Out of the four the tranny was by far the easiest. If I had to guess somebody must have changed the tranny fluid before. I don't think that the front and rear differential and the transfer case had ever been done before. The drain and fill plugs were a PITA to get out. Even with a 1/2" drive with a 2 foot pipe on the end we couldn't get those plugs to break free. After trying for about 2 hours with plenty of PB Blaster we weren't getting anywhere. After a short lunch break, my Dad got out his impact wrench and after about 2 minutes a plug they finally broke free. We did the front and rear diffs first then we went on to the transfer case. Now I am sure that just about anyone who has attempted these jobs has wondered why the nice folks at Toyota only made the head of the drain and fill plug bolts about 3/16" thick. Anywho, the drain plug came out nice and easy. The fill plug however did not cooperate at all. Rounded it off and started the real fun. We tried just about everything to get that fill plug out. We tried:
1. Beating some 'English' on it.
2. A pipe wrench.... but that 3/16" was not enough to grab on to.
3. Easy-Out.... sounds EASY enough right? Not so much. Drilled out the bolt as insructed. Inserted the Easy-Out. Started to try to remove the the bolt and SNAP, the Easy-Out sheared off in the fill plug.
We took out as much of the Easy-Out as we could and then with a Dremel flatened the Easy-Out till it was level with the head of the bolt. At this point we now had two problems: 1. How to refill the transfer case. 2. How to seal up the fill plug to prevent leaks.
We decide to JB Weld the the bolt to keep it from leaking. After applying the JB to the bolt head we let it dry for a day and a half just to be sure.
For the new fill plug we drilled and tapped a new hole (5/16") about an inch or so above the old fill plug. For the new plug we ground down a stainless steel bolt to size and used an o-ring to ensure a good seal.
So far everything has held up and no leaks after about 4k miles. ::Knock on Wood::
Trending Topics
04-09-2010, 10:49 AM
#8
Registered User
Thread Starter
Join Date: Nov 2009
Location: Huntsville, AL
Posts: 45
Likes: 0
Received 0 Likes
on
0 Posts
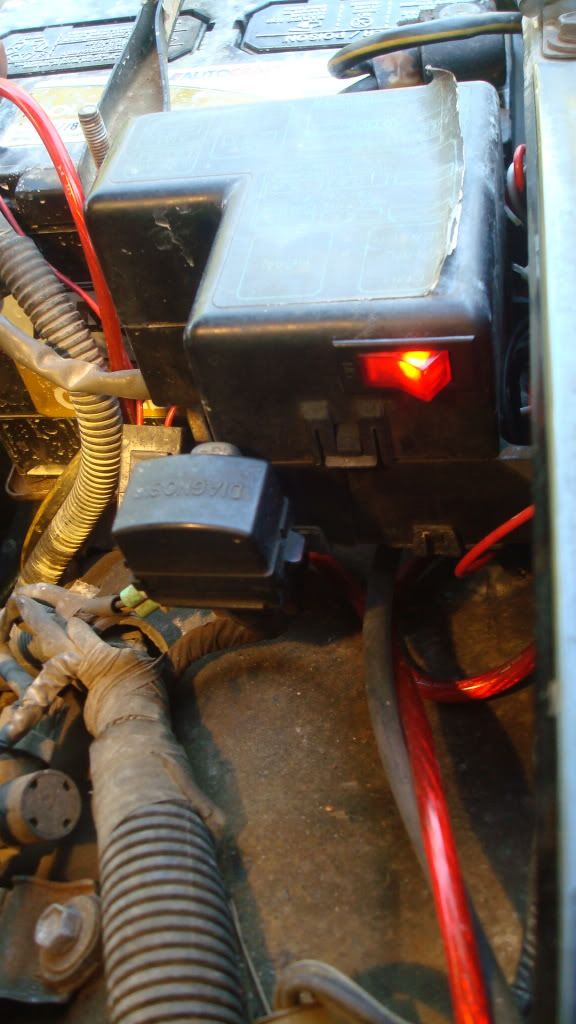
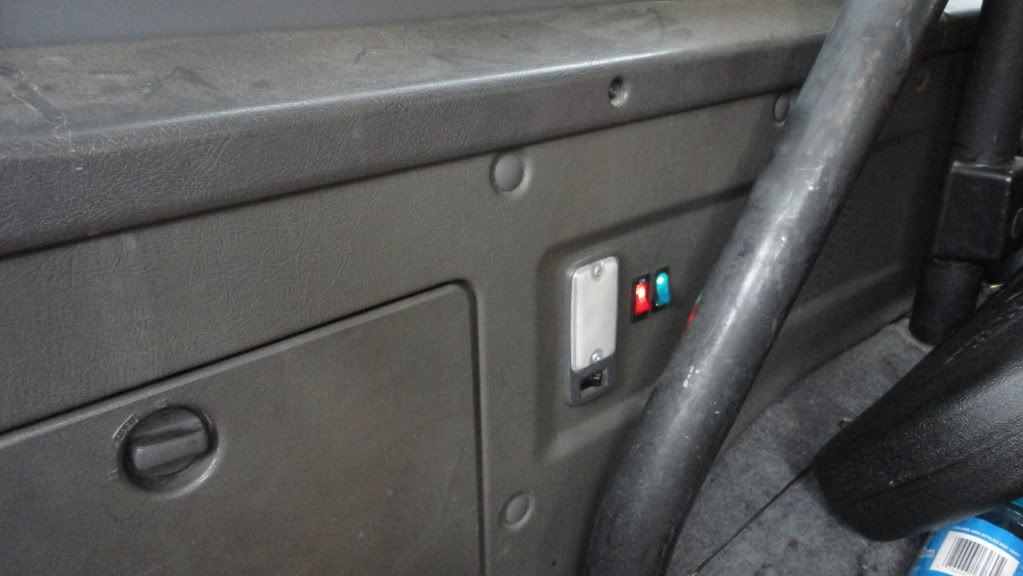
I this pic you can see the new ignition coil I put in and the location of the Auxiliary Fuse box I added.
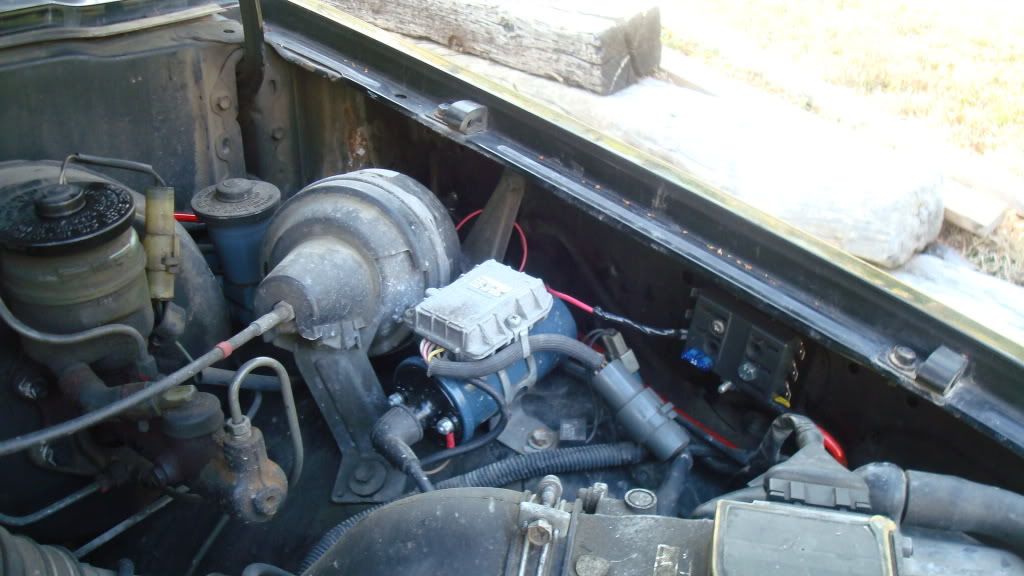
I also added a set of lights under the hood. I decided to add these in case of an 'emergency' break down. Its a lot easier to work under the hood at night with two hands as opposed to one, since one hand is usually holding a flashlight. I was also glad that I put these in because two weeks after I got em' hooked up my power steering belt went out one night on the interstate. I zip-tied the wiring to the hood and added a set of quick disconnects in the wiring next to the wiper hose disconnect, in case I need to remove the hood.
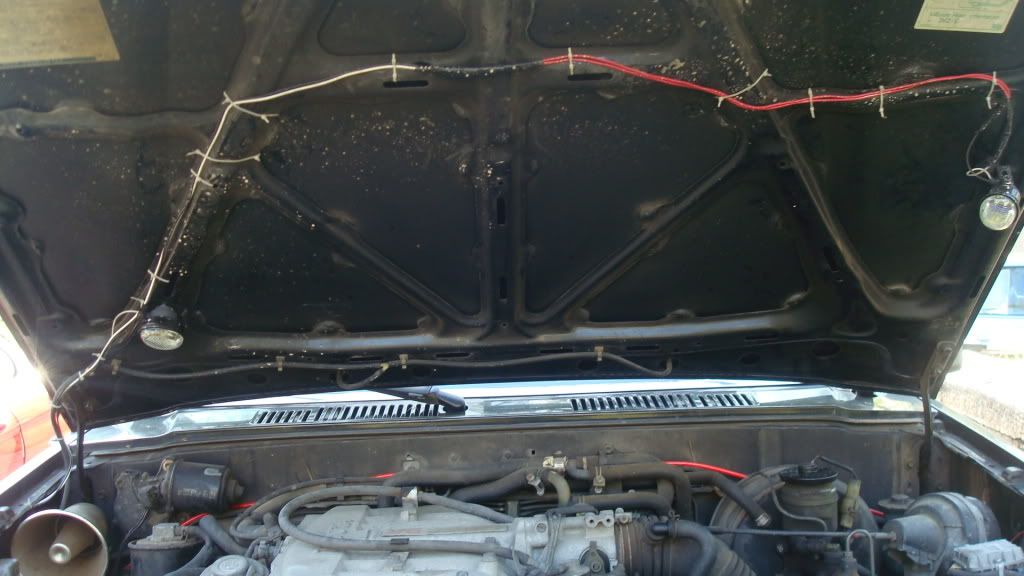
I mounted the switch under the hood in the fuse box cover. I used a Dremel to cut out the hole for the switch in the cover.
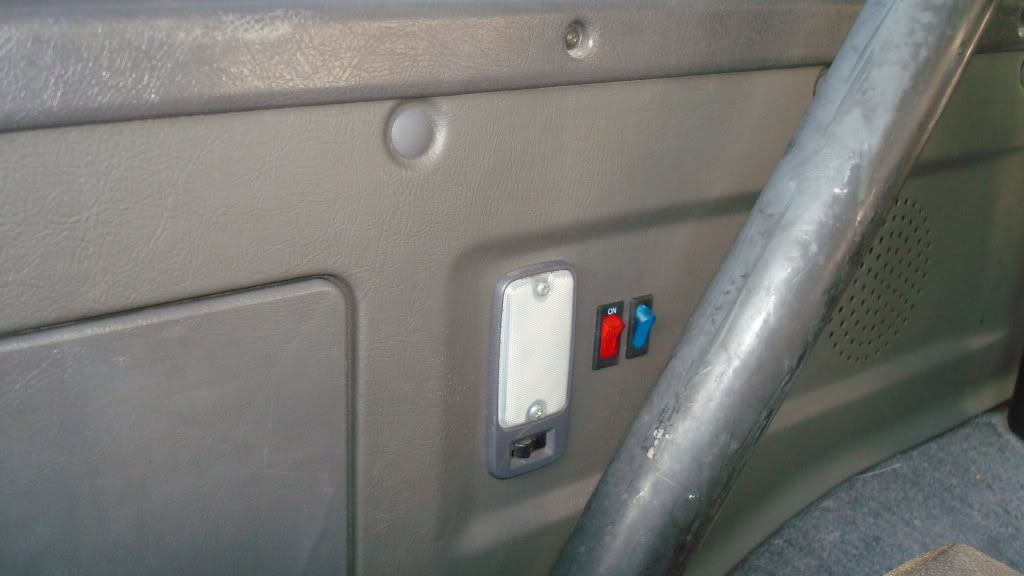
I also mounted two light switches in the rear. One will be for a cargo light which will be mounted next to the wiper motor. The other switch will be for a set of exterior lights mounted below the bumper.
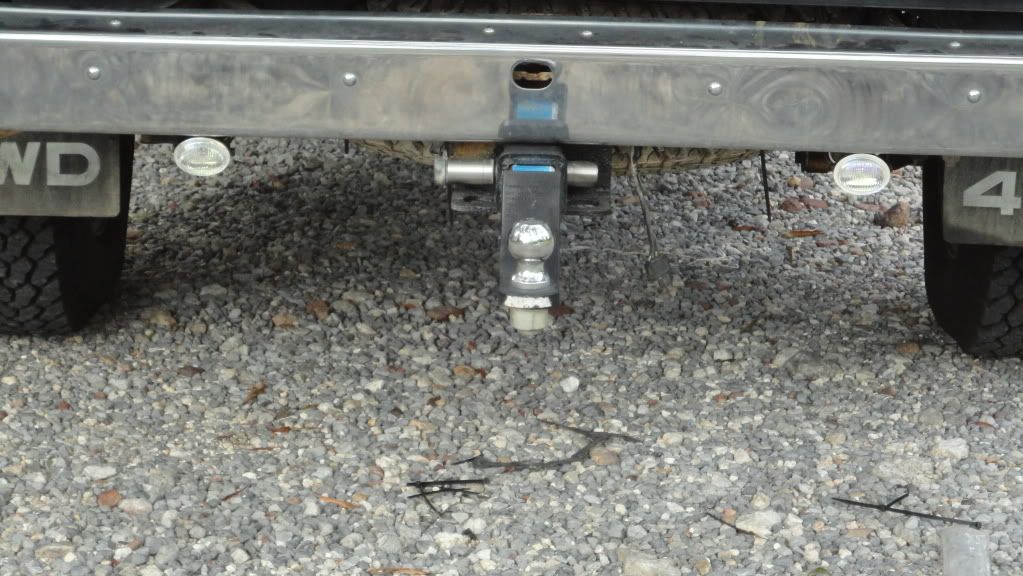
A few weeks ago i went to the salvage yard and picked up a few things. I got another tow hook, aluminum rim for the spare, rear seat headrests, and an alternator. All for $80. Can anybody recommend a good company that can rebuild the alt to a high amp that won't charge me an arm and a leg? I found a place locally but they want $280 to rebuild it for that price I could just as easily do the GM swap twice.
I also added a set of lights under the hood. I decided to add these in case of an 'emergency' break down. Its a lot easier to work under the hood at night with two hands as opposed to one, since one hand is usually holding a flashlight. I was also glad that I put these in because two weeks after I got em' hooked up my power steering belt went out one night on the interstate. I zip-tied the wiring to the hood and added a set of quick disconnects in the wiring next to the wiper hose disconnect, in case I need to remove the hood.
I mounted the switch under the hood in the fuse box cover. I used a Dremel to cut out the hole for the switch in the cover.
I also mounted two light switches in the rear. One will be for a cargo light which will be mounted next to the wiper motor. The other switch will be for a set of exterior lights mounted below the bumper.
A few weeks ago i went to the salvage yard and picked up a few things. I got another tow hook, aluminum rim for the spare, rear seat headrests, and an alternator. All for $80. Can anybody recommend a good company that can rebuild the alt to a high amp that won't charge me an arm and a leg? I found a place locally but they want $280 to rebuild it for that price I could just as easily do the GM swap twice.
04-11-2010, 08:31 AM
#9
Registered User
Thread Starter
Join Date: Nov 2009
Location: Huntsville, AL
Posts: 45
Likes: 0
Received 0 Likes
on
0 Posts
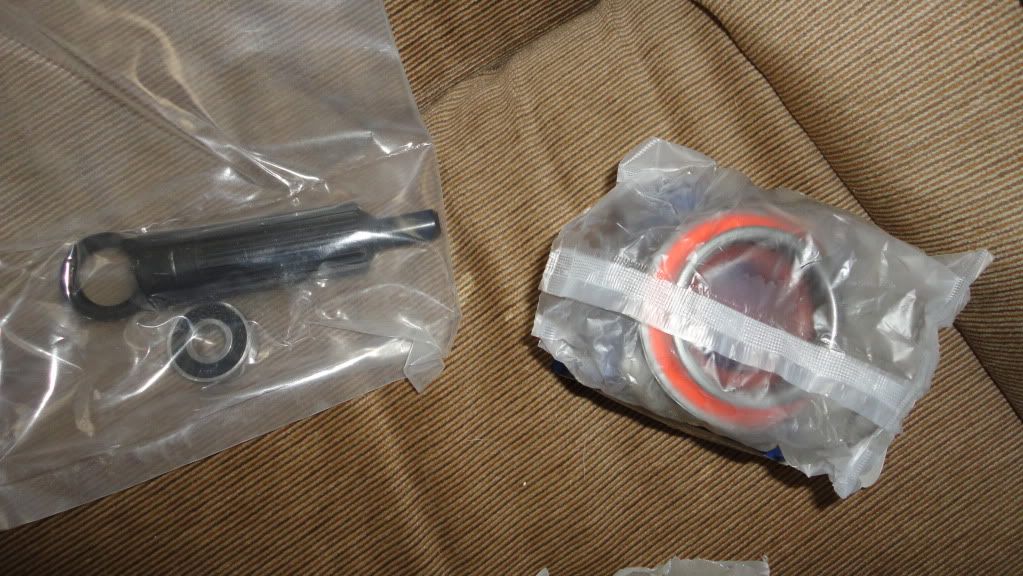
A few weekends ago a replaced the front brake calipers, pads, rotors, inner and out wheel bearings, inner and outer wheel races and the oil seals. That was a job too! Well the races were a job, a press woulda made that a whole lot easier.
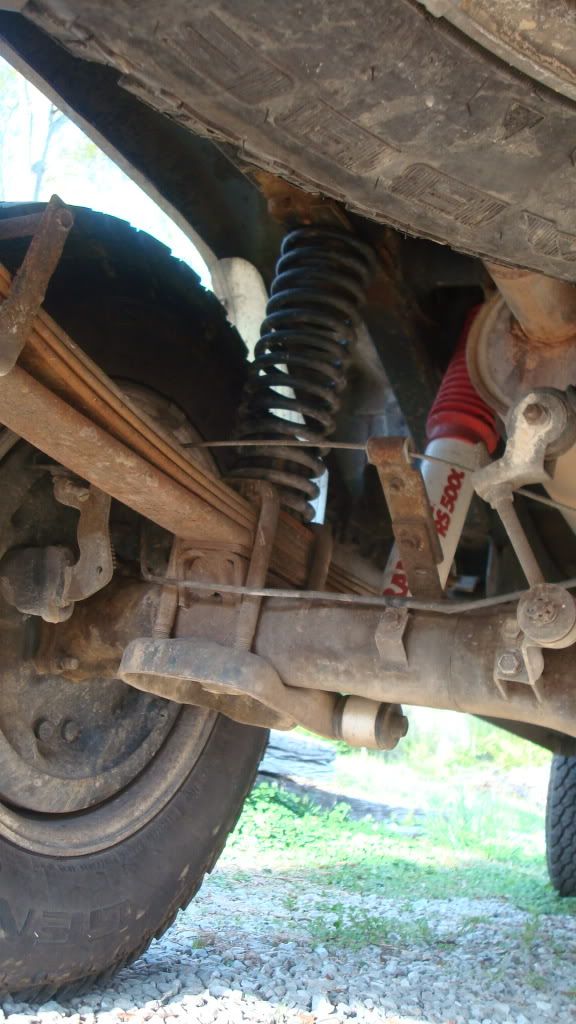
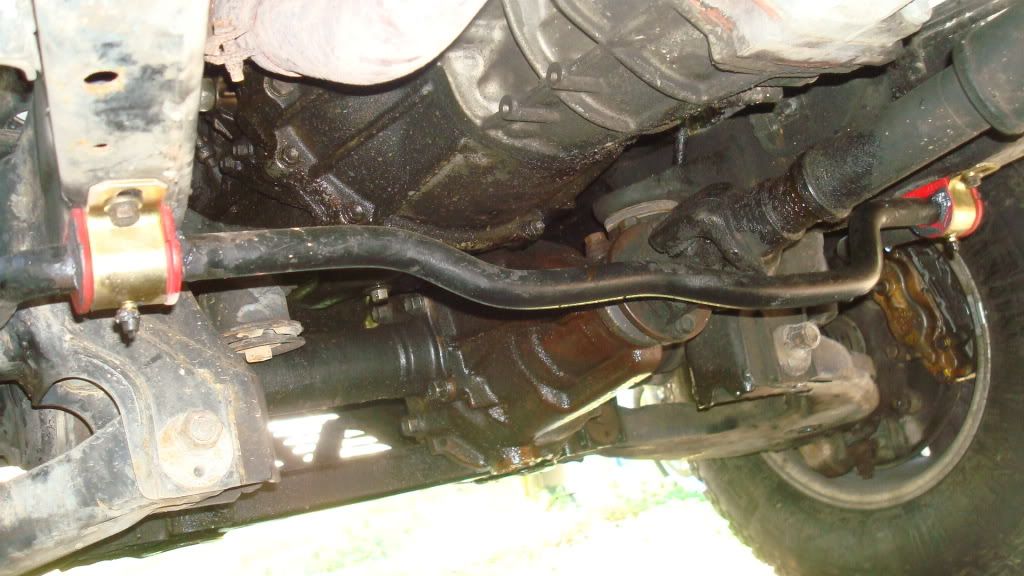
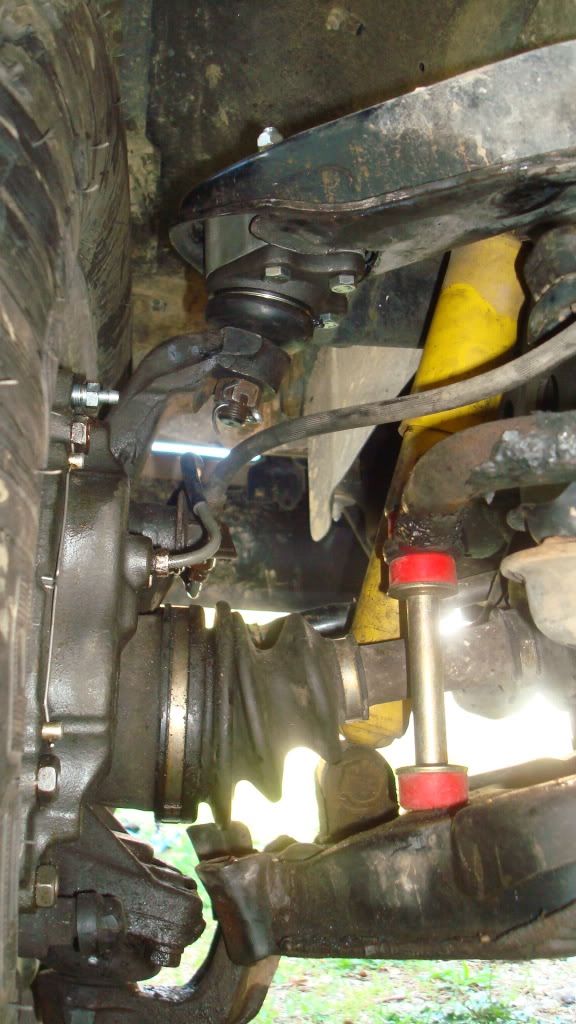
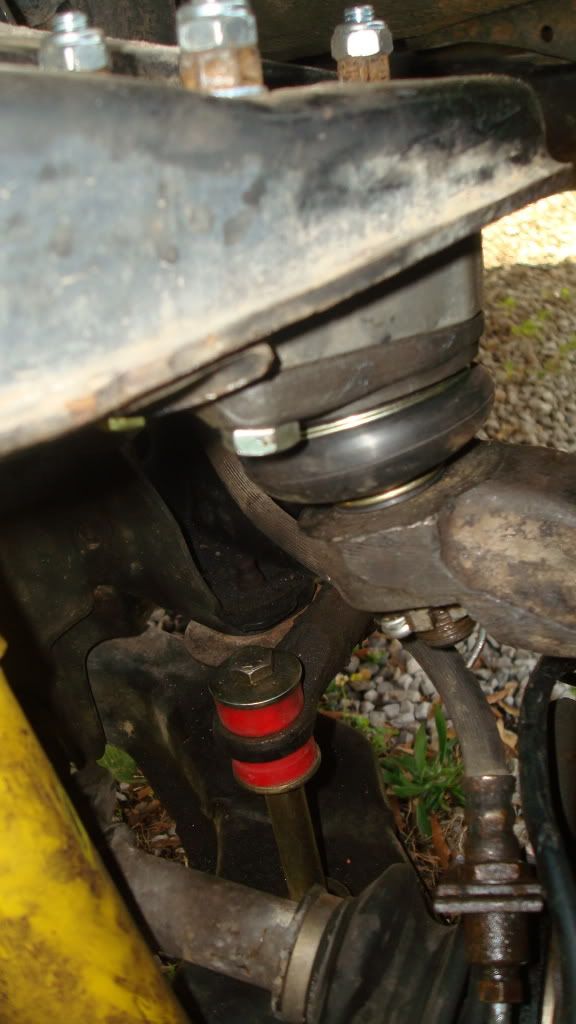
A few pics of the new Sway Bar and Link Kit bushings and my 1.5" Ball Joint Spacers! My Dad is an engineer so he drew up the ball joint plans for me and I had a local shop make em' for me for $75 each. Picked up the new hardware from Fastenal for $4. I also replaced the Upper Ball Joints while I had everything out.
Only thing I need now is an extended length brake line kit and a bracket to relocate the LSPV a bit higher.
I could also use some new shocks up front. As you can tell these guys are almost fully extended.
09-13-2010, 04:26 PM
#11
Registered User
Thread Starter
Join Date: Nov 2009
Location: Huntsville, AL
Posts: 45
Likes: 0
Received 0 Likes
on
0 Posts
With the coils I got just over 3" of lift. Based off some measurements I got from the shop after I put in the ball joint spacers I'd say that I netted about an 1.5" over stock.
Before:
After:
 09-13-2010, 04:36 PM
#12
Registered User
Thread Starter
Join Date: Nov 2009
Location: Huntsville, AL
Posts: 45
Likes: 0
Received 0 Likes
on
0 Posts
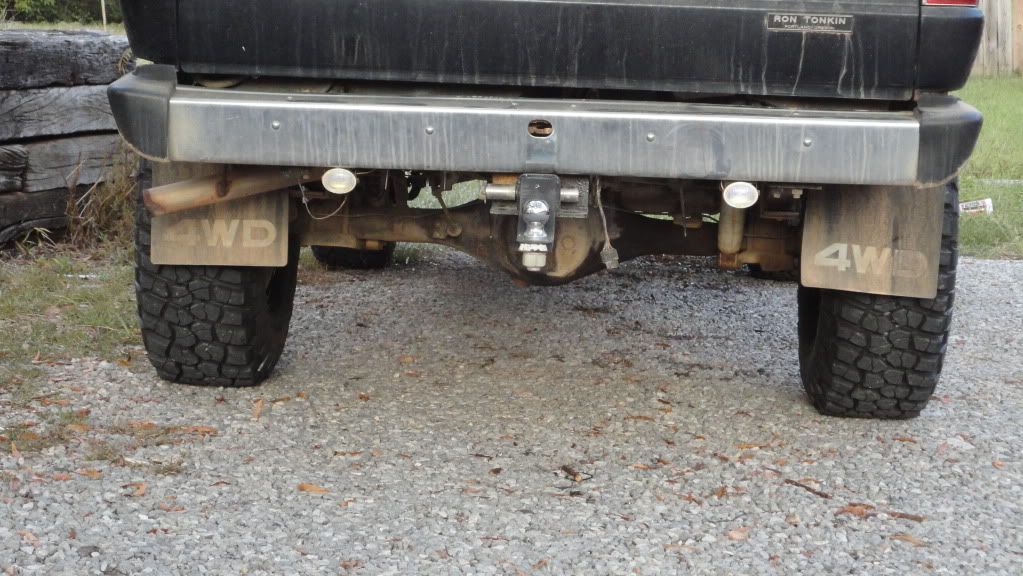
I finally got my cargo light and my rear lights mounted and wired up.
The switches:
New Cargo Light:

Rear Lights:
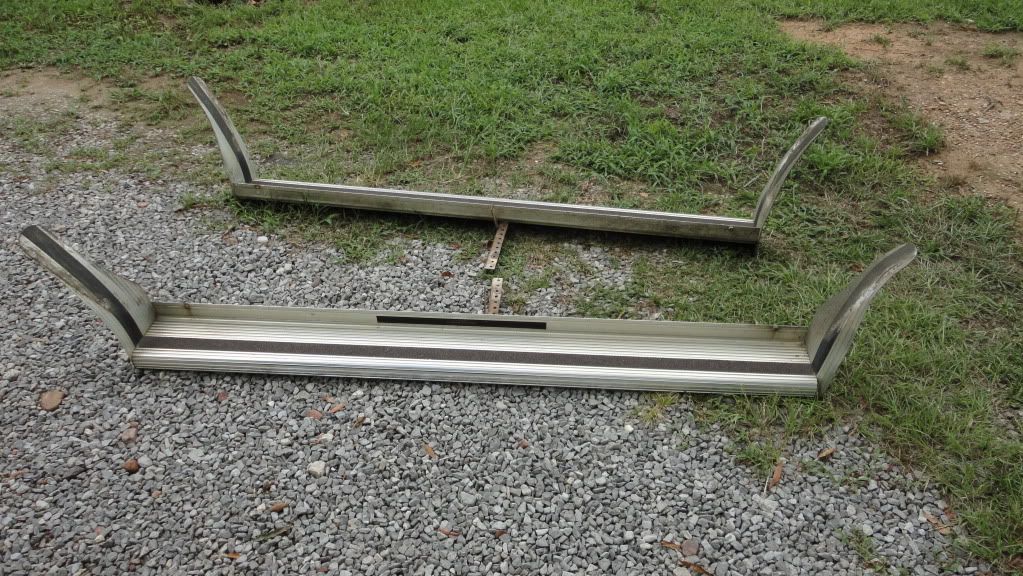
I also took my running boards off. It wasn't to difficult..... I had to grind half the bolts off and the other half sheared off in the frame.
The switches:
New Cargo Light:
Rear Lights:
I also took my running boards off. It wasn't to difficult..... I had to grind half the bolts off and the other half sheared off in the frame.
09-13-2010, 05:17 PM
#13
Registered User
Thread Starter
Join Date: Nov 2009
Location: Huntsville, AL
Posts: 45
Likes: 0
Received 0 Likes
on
0 Posts
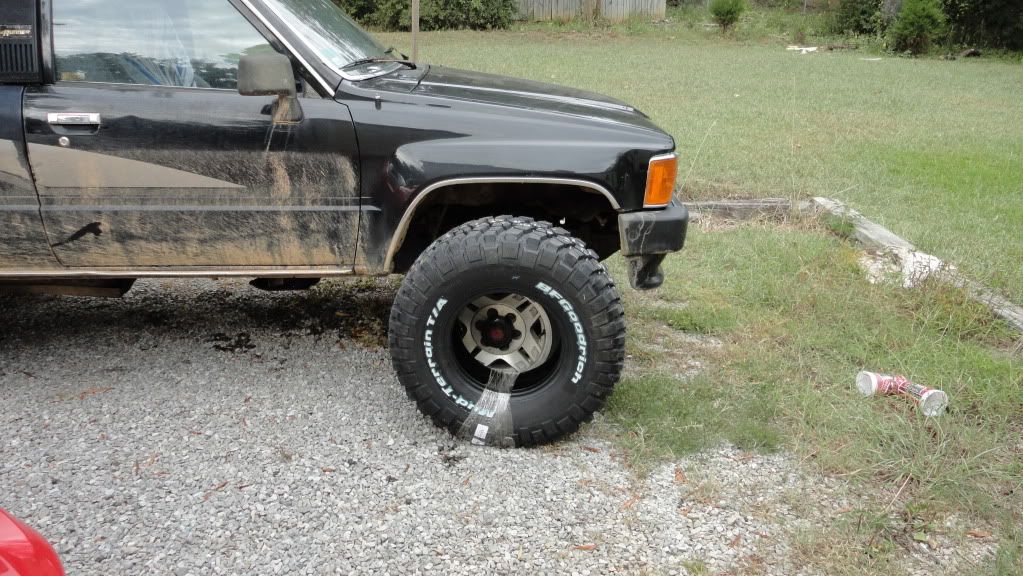
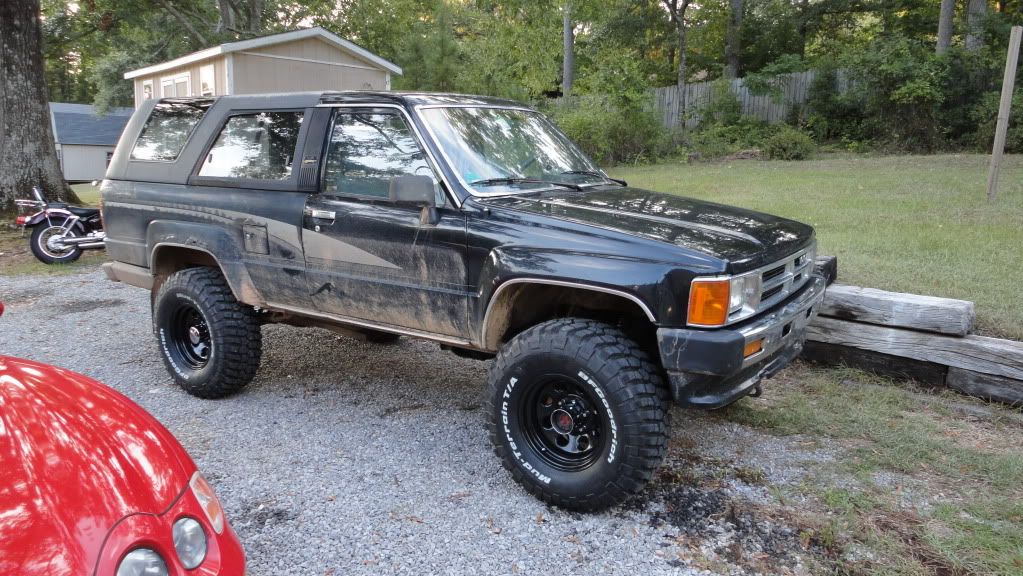
Mounted my new front shocks a few days ago. The stock shocks were almost fully extended with the ball joint spacers in. I got some Rancho RS5000s. What a difference in the ride quality!
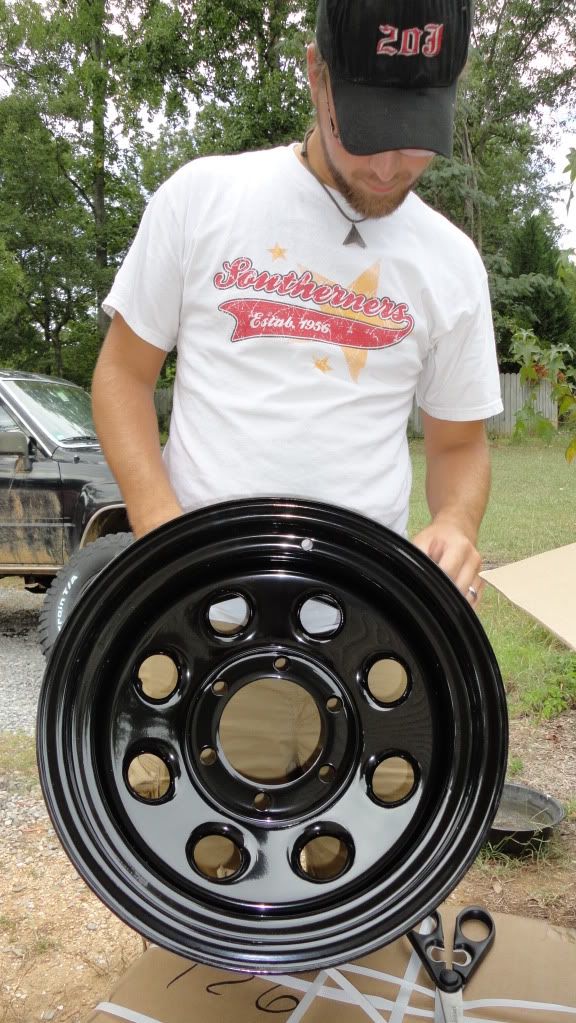
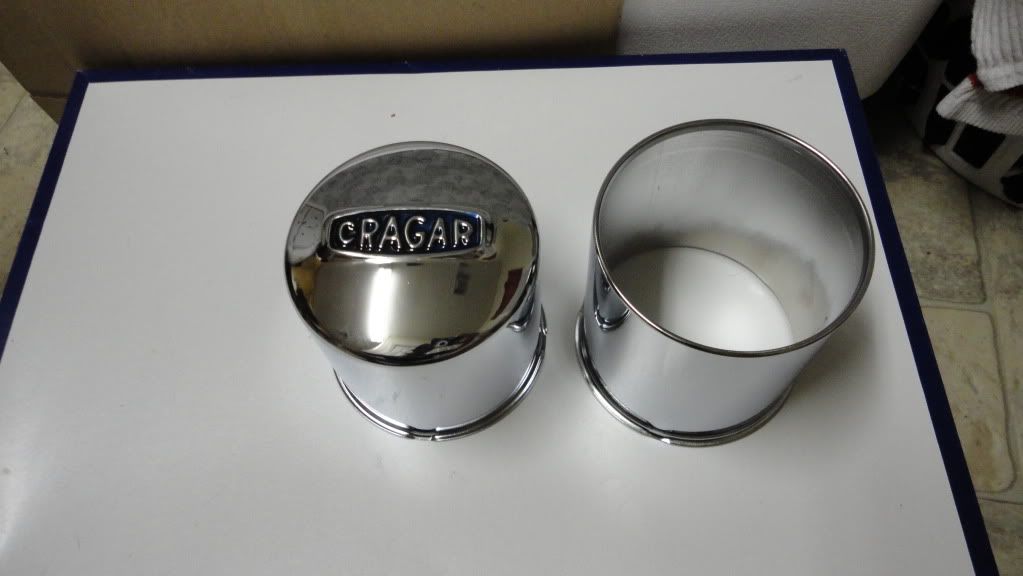
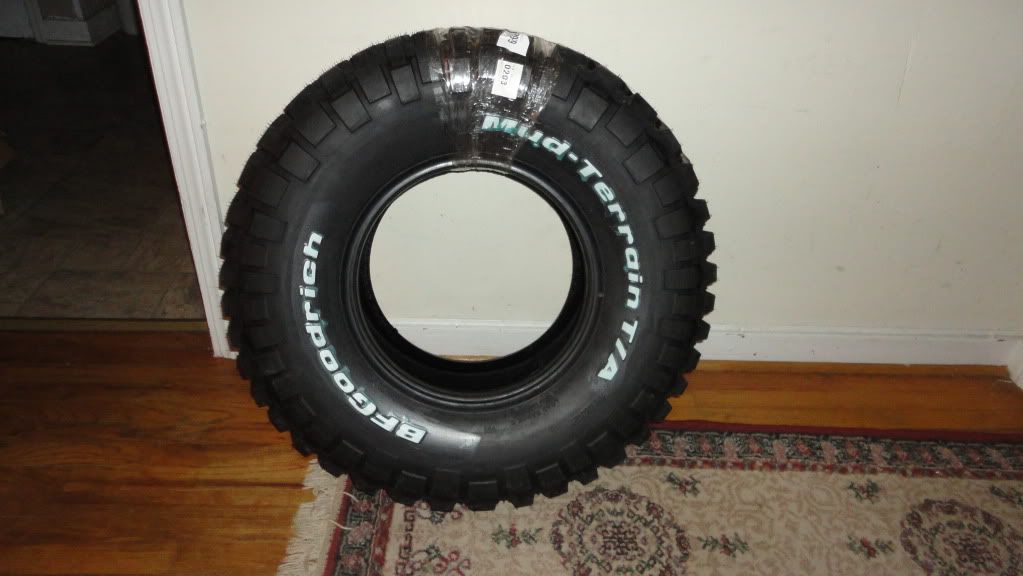
I finally got my new SHOES in today! Hoping to get everything mounted up tomorrow afternoon!
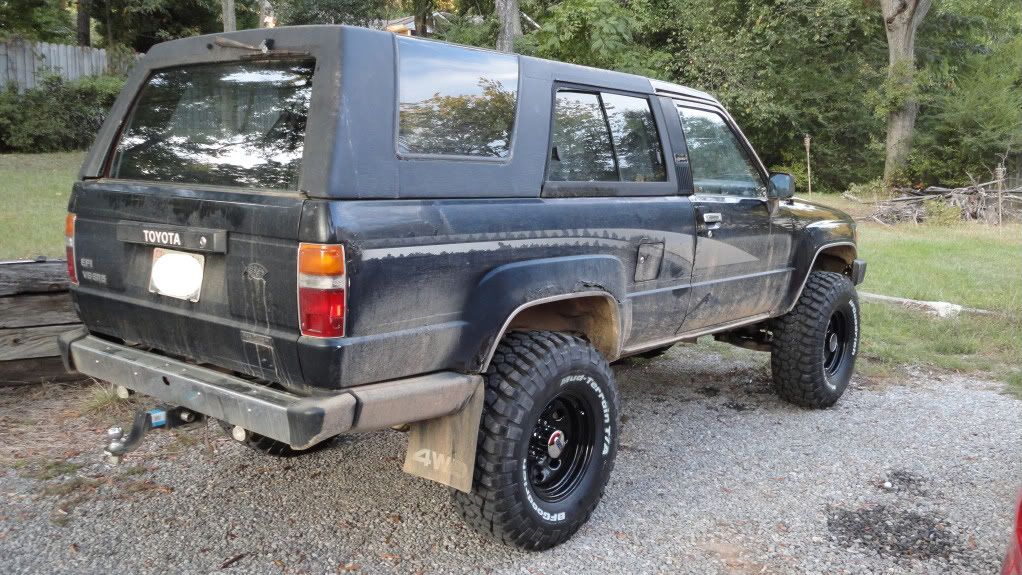
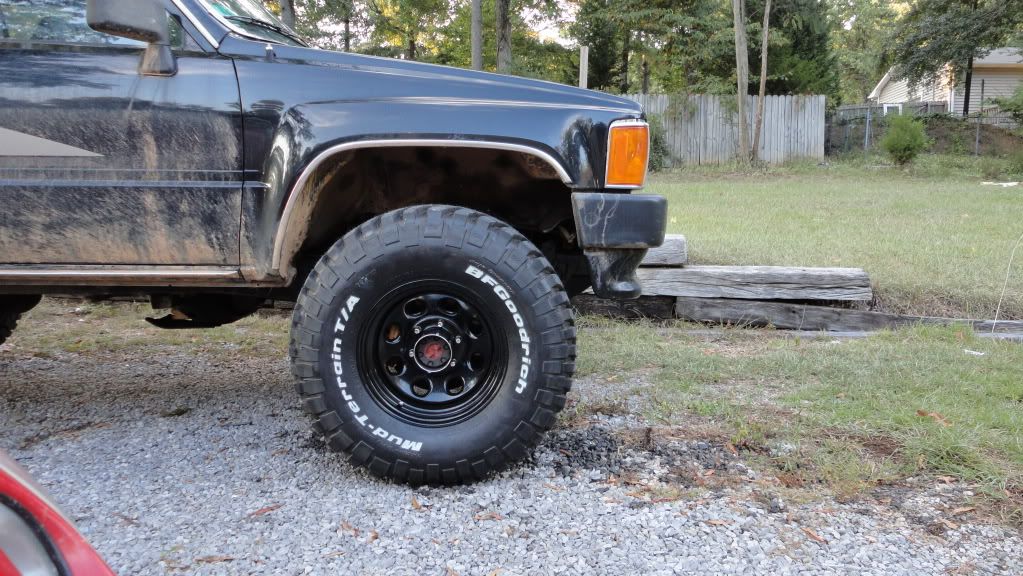
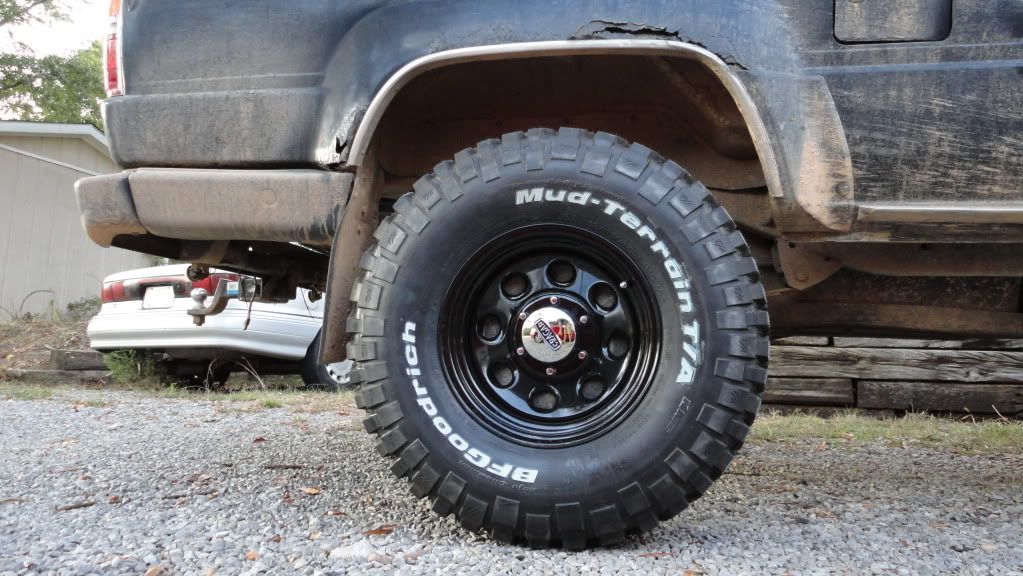
New Wheels - Black Cragar Soft 8's 15x8 3.75" Backspacing
New Center Caps:
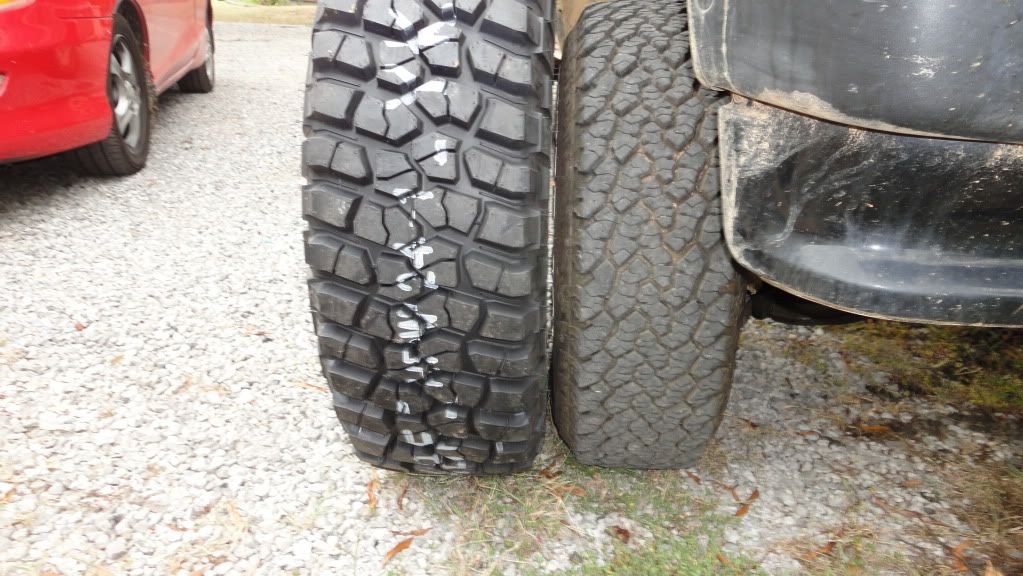
Tires - BFGoodrich Mud-Terrain T/A KM2's 32x11.5R15
A few shots for comparison... well more cause I can't wait till tomorrow.
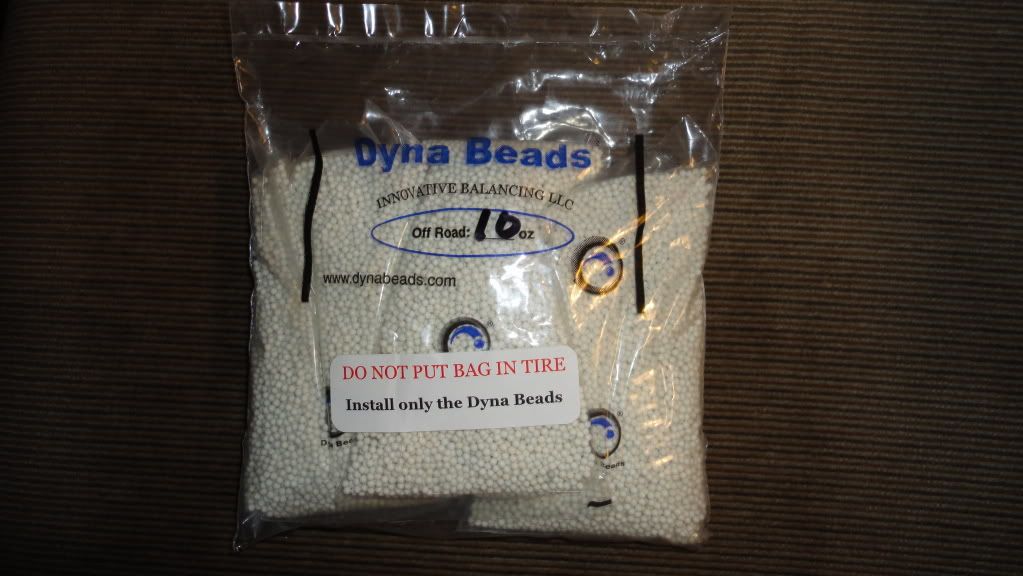
I wanted to try something a bit different when it came to balancing these bad boys... and I didn't want to stick a bunch of ugly lead weights on my new wheels. So after reading up on a few posts here and there I decided to try some Dyna Beads. http://innovativebalancing.com/ Very nice and friendly people to deal with! If these work out I will get some for all of my other vehicles as well.
I'll be posting more pics tomorrow after I get the new tires mounted.
I finally got my new SHOES in today! Hoping to get everything mounted up tomorrow afternoon!
New Wheels - Black Cragar Soft 8's 15x8 3.75" Backspacing
New Center Caps:
Tires - BFGoodrich Mud-Terrain T/A KM2's 32x11.5R15
A few shots for comparison... well more cause I can't wait till tomorrow.
I wanted to try something a bit different when it came to balancing these bad boys... and I didn't want to stick a bunch of ugly lead weights on my new wheels. So after reading up on a few posts here and there I decided to try some Dyna Beads. http://innovativebalancing.com/ Very nice and friendly people to deal with! If these work out I will get some for all of my other vehicles as well.
I'll be posting more pics tomorrow after I get the new tires mounted.
09-14-2010, 05:08 PM
#15
Registered User
Thread Starter
Join Date: Nov 2009
Location: Huntsville, AL
Posts: 45
Likes: 0
Received 0 Likes
on
0 Posts
New Shoes!
Got the tires mounted this afternoon! I'll let the pics do the talking.
So far they seem to work great! I've only had a chance to get her up to 55 though. I'll make another post in a few weeks once I get up to 70.
I'll let the pics do the talking.So far they seem to work great! I've only had a chance to get her up to 55 though. I'll make another post in a few weeks once I get up to 70.
09-19-2010, 06:28 PM
#17
Registered User
Thread Starter
Join Date: Nov 2009
Location: Huntsville, AL
Posts: 45
Likes: 0
Received 0 Likes
on
0 Posts
Thanks!
I finally got around to making the bracket to relocate my LSPV this weekend. I used some 1/8"x2" aluminum plate. I intended to use 1/4" but the store was fresh out so I just doubled up the 1/8" plate instead. Eyeballed where to drill the holes and presto! My rear brakes work as they should again.
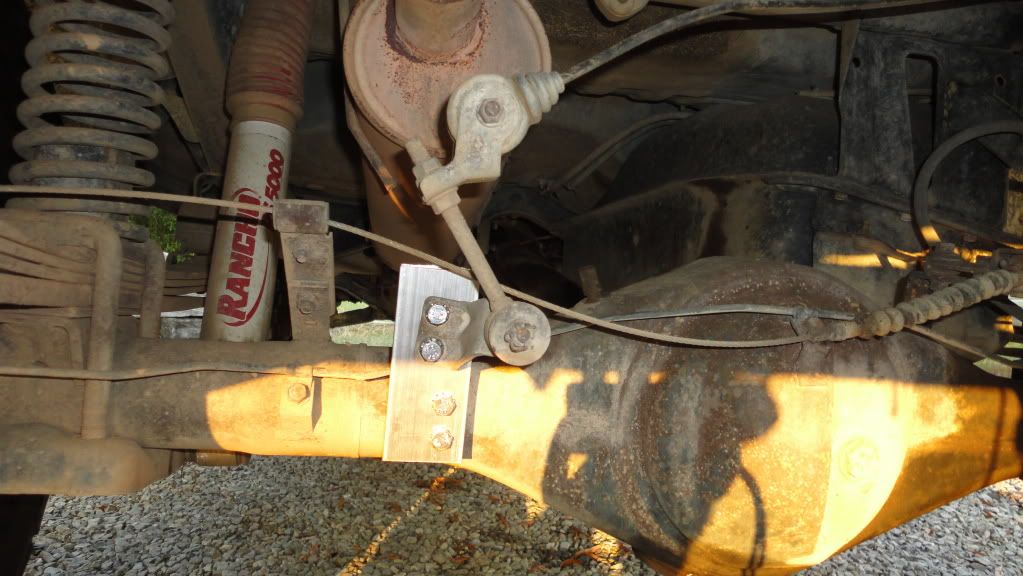
I finally got around to making the bracket to relocate my LSPV this weekend. I used some 1/8"x2" aluminum plate. I intended to use 1/4" but the store was fresh out so I just doubled up the 1/8" plate instead. Eyeballed where to drill the holes and presto! My rear brakes work as they should again.
 09-21-2010, 09:50 PM
#19
Registered User
Thread Starter
Join Date: Nov 2009
Location: Huntsville, AL
Posts: 45
Likes: 0
Received 0 Likes
on
0 Posts
I've had a chance to test the beads up to 70 now. From 0-55/60 smooth as can be. From 55/60-70 it takes the beads a few seconds to "settle out." After that unless I hit a trench in the road its a great smooth ride.
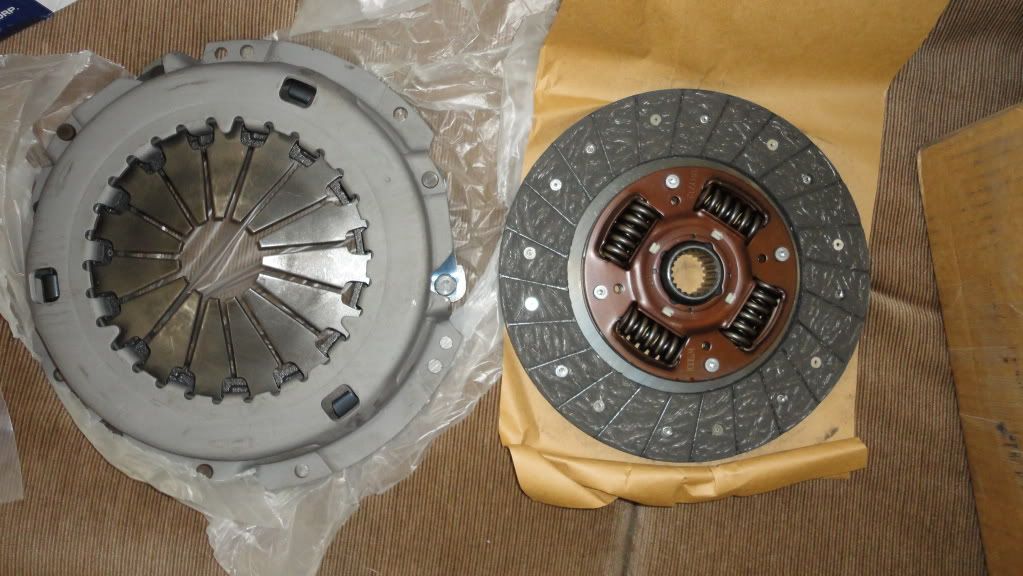
New clutch kit came in today! I would do this job myself, but doing it in a gravel driveway isn't going to be fun so I'm gunna let the shop handle this one. While they've got it I'm also gunna have them replace the oil pan gasket and the rear main seal as they're both leaking. I'm going with the 2,100 ft-lb Heavy Duty Clutch by Marlin.
New Clutch Kit:
 09-28-2010, 04:59 PM
#20
Registered User
Thread Starter
Join Date: Nov 2009
Location: Huntsville, AL
Posts: 45
Likes: 0
Received 0 Likes
on
0 Posts
Picked this up a week or so ago and got it put in over the weekend.
Inclinometer:
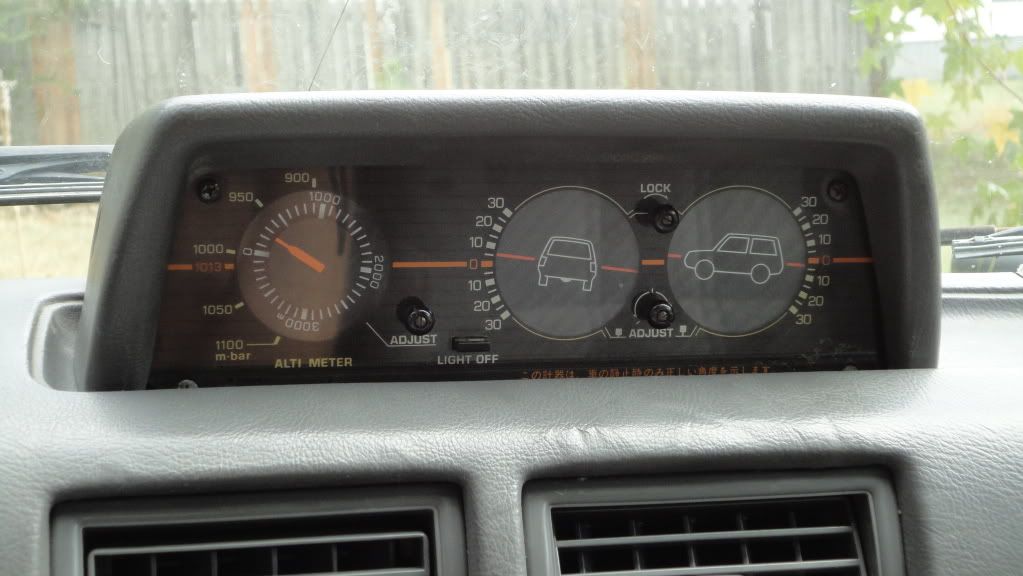
I didn't realize it until after I put it in but the part where it tells you not to exceed 30 degrees is in Japanese on this one.
Dropped her off at the shop yesterday to get the oil pan gasket replaced, a new rear seal put in, and the new clutch put in. She should be ready tomorrow.
Inclinometer:
I didn't realize it until after I put it in but the part where it tells you not to exceed 30 degrees is in Japanese on this one.
Dropped her off at the shop yesterday to get the oil pan gasket replaced, a new rear seal put in, and the new clutch put in. She should be ready tomorrow.


