Stew's paycheck to paycheck build (91 4runner)
 10-17-2012, 07:09 AM
#21
Registered User
Thread Starter
iTrader: (1)
Join Date: Oct 2011
Location: Tahoe, California
Posts: 987
Likes: 0
Received 0 Likes
on
0 Posts
SO I had my brakes inspected about a week ago and they said my bearings need to be repacked. I have a tube of grease and sinse I need to replace a couple wheel studs, I might as well just do it, right? And WestJohn, and CHef for that matter, I plan on doing a manual hub swap pretty soon here, i'd like to before winter hits. ANd it's an automatic, unfortunately 
 10-17-2012, 10:04 AM
#22
Registered User
Thread Starter
iTrader: (1)
Join Date: Oct 2011
Location: Tahoe, California
Posts: 987
Likes: 0
Received 0 Likes
on
0 Posts
Alright first off, sorry for such larger pics.
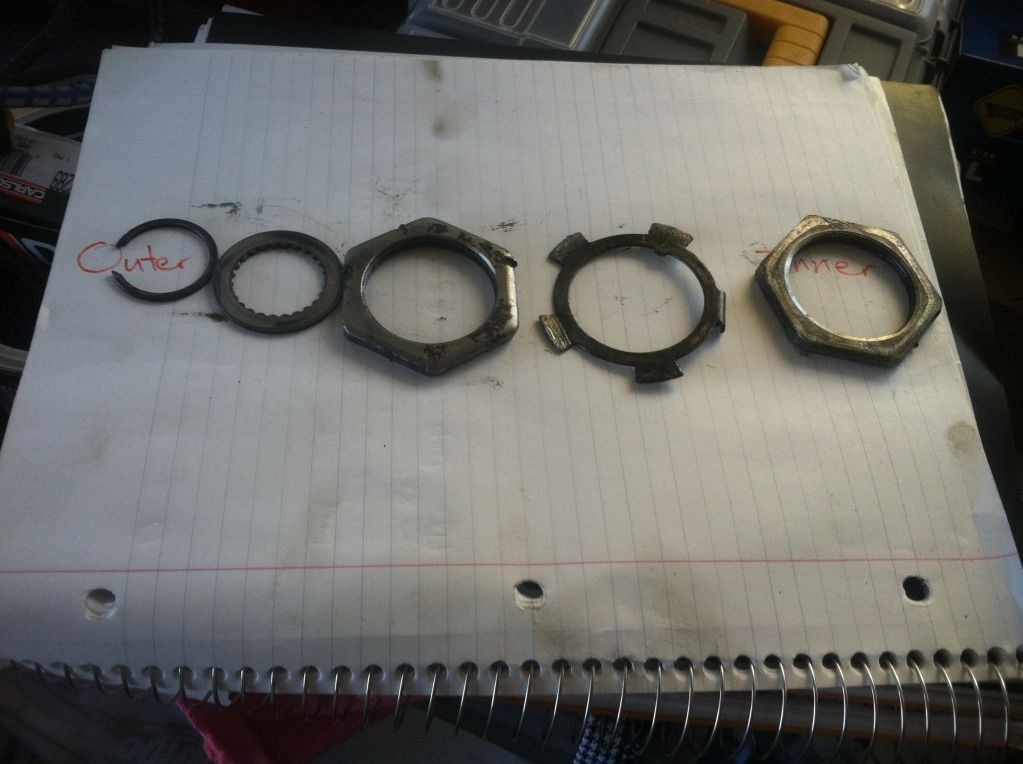
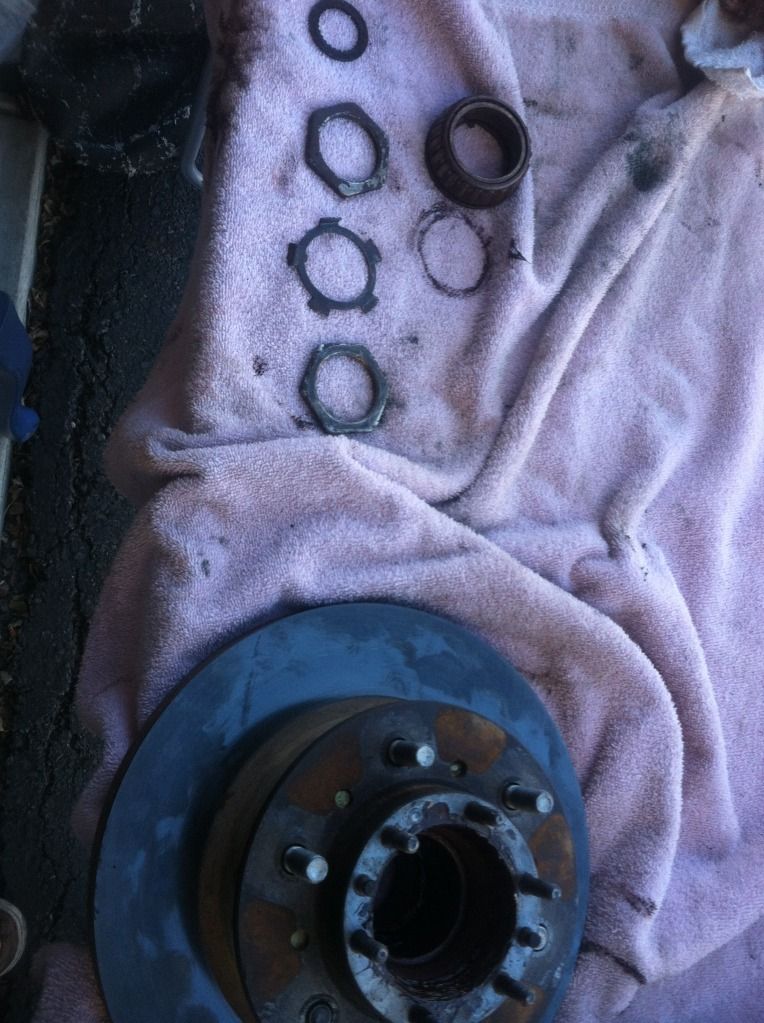
Second, I got the rotor separated from the steering arm, very simple. I kept all the little rings in the order they came off in.
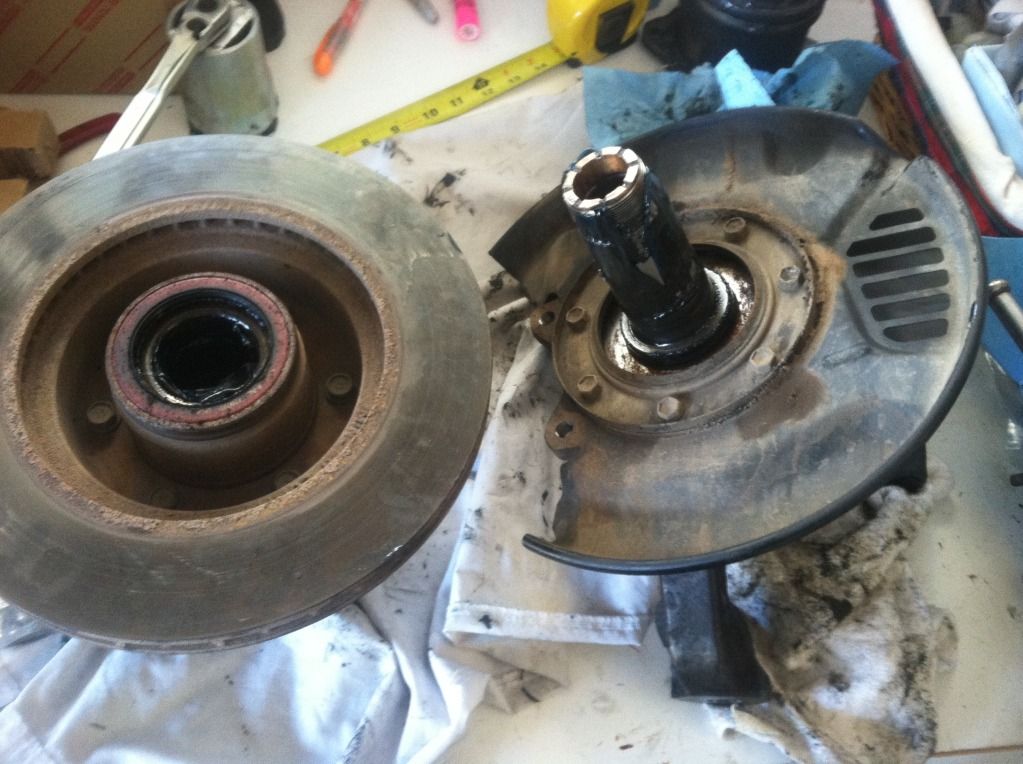
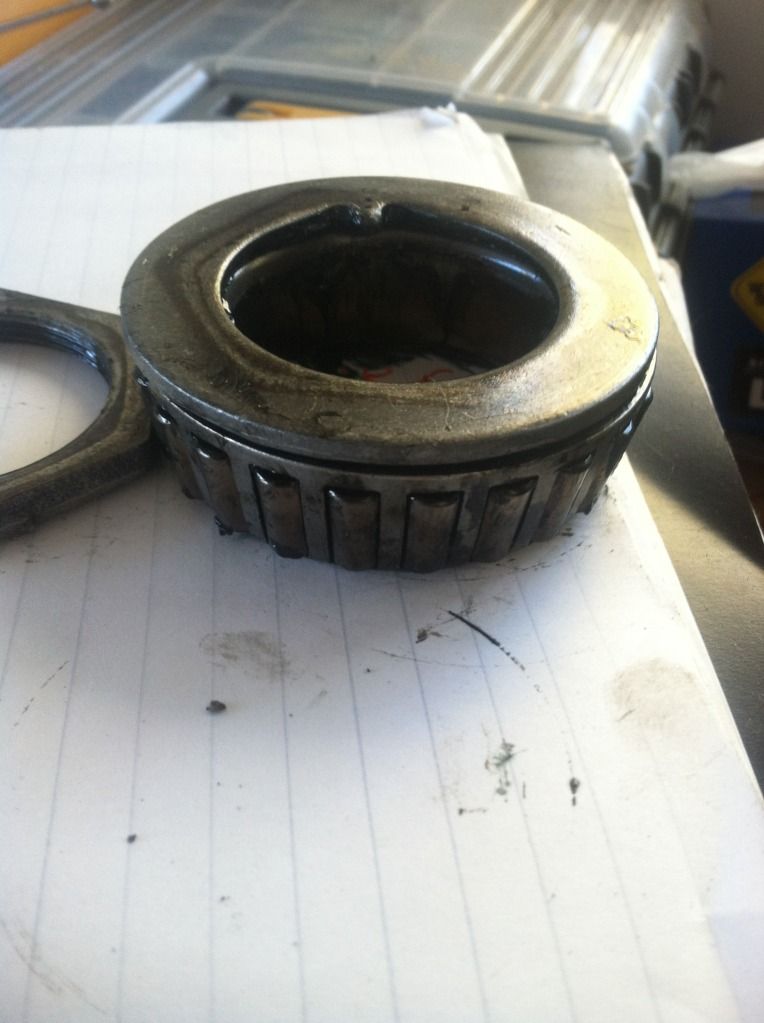
So what I am doing here is repacking the bearings. I was told that I need to remove the seal to repack them however when I pulled the steering arm off, what looks like a bearing to me fell right out. I then cleaned it some but then I got very confused.
So I was told that I need to remove and replace the seal, to repack the bearings. I need to replace it because i'm going to damage it while getting it out?
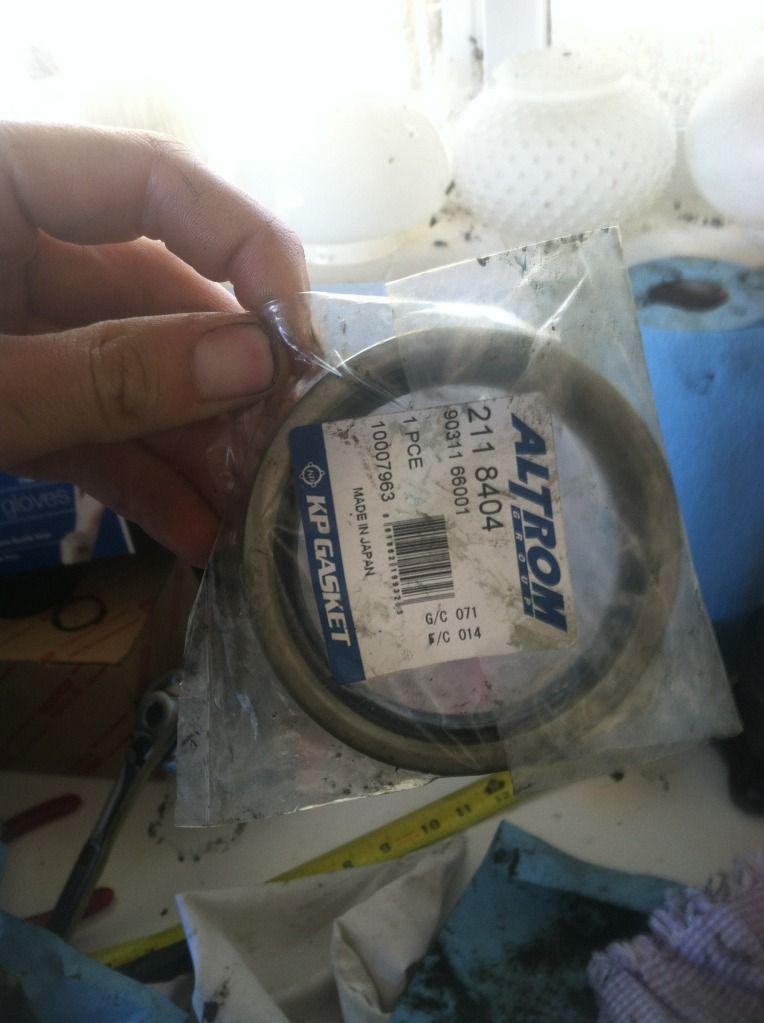
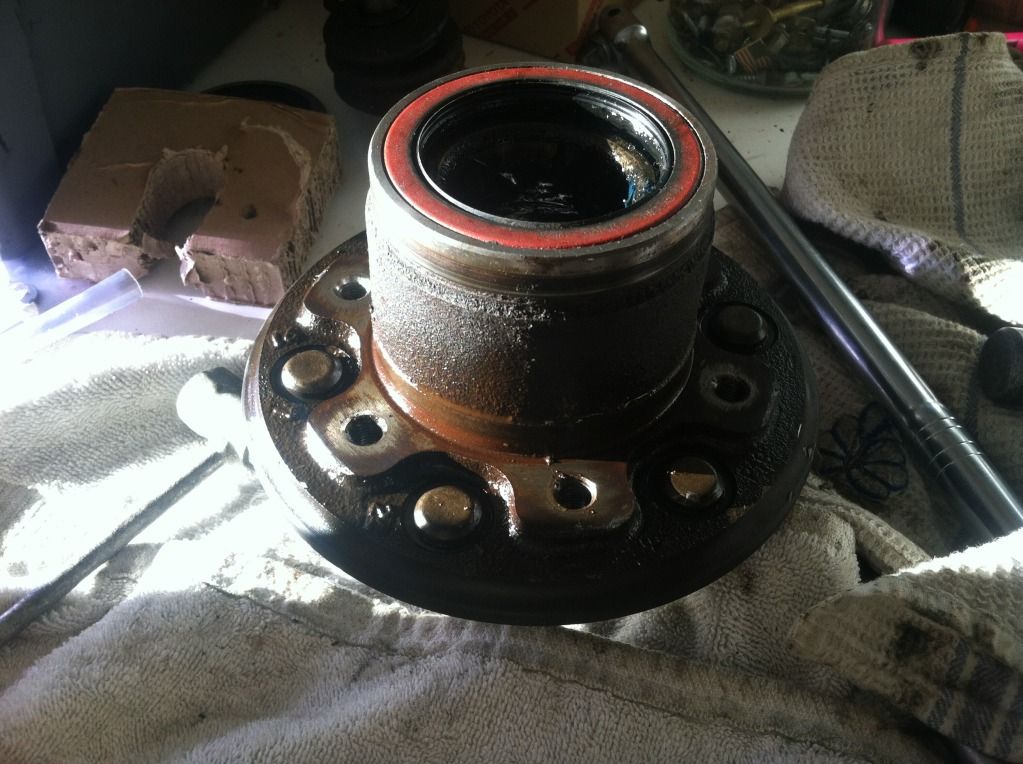
The one bearing looking thing fell right out and I thought well since I have the seal, might as well replace it. I then started prying at the seal looking thing on the back of the steering arm, where the CV enters. I then realized that this is not the correct place. I think I found what I need to remove. Is it on the back side of the hub? This right here?
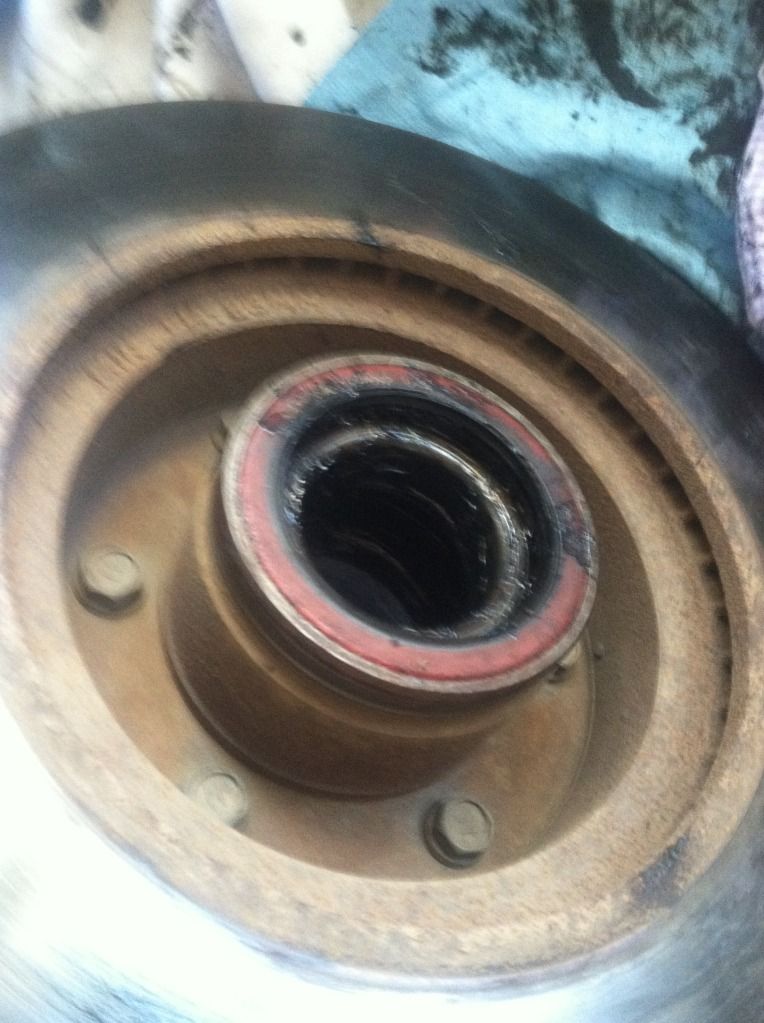
So now is there another bearing underneath that seal? Is that the one I need to remove to repack it? As well as the other one?
Second, I got the rotor separated from the steering arm, very simple. I kept all the little rings in the order they came off in.
So what I am doing here is repacking the bearings. I was told that I need to remove the seal to repack them however when I pulled the steering arm off, what looks like a bearing to me fell right out. I then cleaned it some but then I got very confused.
So I was told that I need to remove and replace the seal, to repack the bearings. I need to replace it because i'm going to damage it while getting it out?
The one bearing looking thing fell right out and I thought well since I have the seal, might as well replace it. I then started prying at the seal looking thing on the back of the steering arm, where the CV enters. I then realized that this is not the correct place.
I think I found what I need to remove. Is it on the back side of the hub? This right here?So now is there another bearing underneath that seal? Is that the one I need to remove to repack it? As well as the other one?
10-17-2012, 01:27 PM
#23
Registered User
Thread Starter
iTrader: (1)
Join Date: Oct 2011
Location: Tahoe, California
Posts: 987
Likes: 0
Received 0 Likes
on
0 Posts
Alright now i'm getting really frustrated. So I got the CV in and connected the hub body, steering arm and cv all connected and IIRC, everything is in there the right way, definitely the right order. But now my drive flange won't fit!!! It's not sliding on correctly and I don't know what to do now! I'll post a video in a minute of what i'm talking about. . .
I'll post a video in a minute of what i'm talking about. . .
 10-17-2012, 08:23 PM
#25
Registered User
Thread Starter
iTrader: (1)
Join Date: Oct 2011
Location: Tahoe, California
Posts: 987
Likes: 0
Received 0 Likes
on
0 Posts
Alright well I got the drive flange on, I realized i'm just simply dumb! Rotating the hub helps, off course I tried that after pouting in my room for an hour while watching the Cleveland Show
Anyways, YAAAAAYYYYY I got the driver side completely done!! Everything is torqued and greased!! I even did the Pitman Arm!! That was a little scary though. I was using a puller from Autozone and what I was doing was tightening and hitting, tightening and hitting. I noticed the puller beginning to bend, it was right on the edge of the nut so I decided to stand up and hit it just incase that thing pops free, I don't want my legs spread wide open right under neath it. . . I think standing up did the trick, maybe more contact force? I hit it once and hear a clunk. I'm thinking okay, time for another puller but there was the pitman arm, sitting right on the floor!
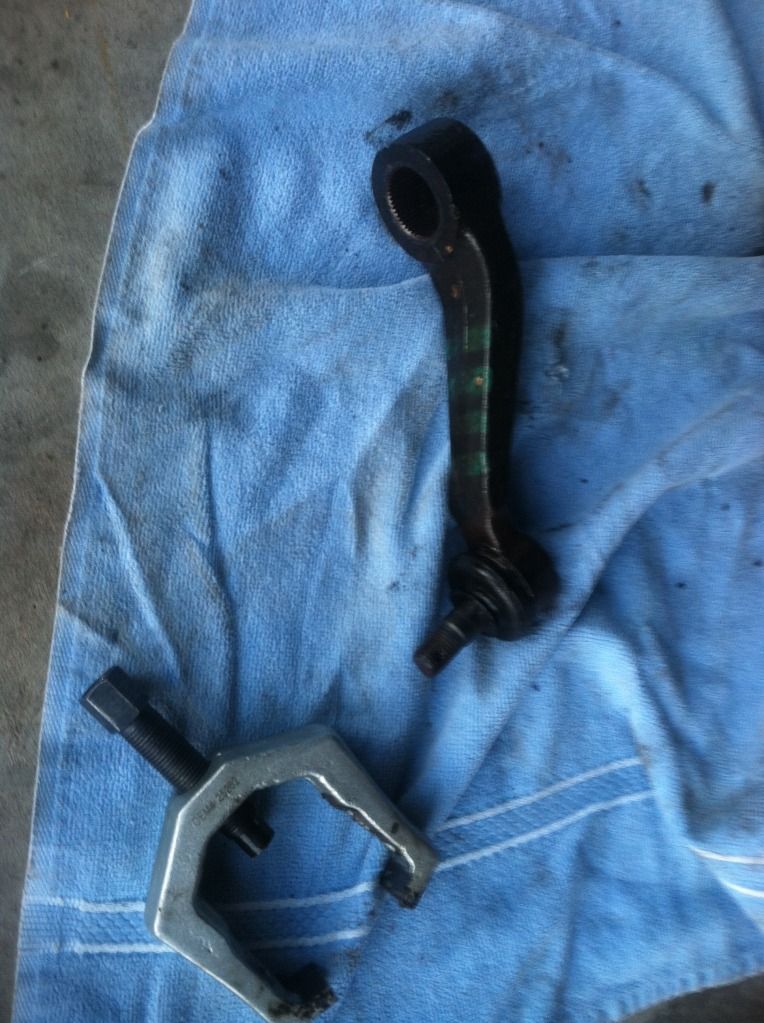
Anyways, YAAAAAYYYYY I got the driver side completely done!! Everything is torqued and greased!! I even did the Pitman Arm!! That was a little scary though. I was using a puller from Autozone and what I was doing was tightening and hitting, tightening and hitting. I noticed the puller beginning to bend, it was right on the edge of the nut so I decided to stand up and hit it just incase that thing pops free, I don't want my legs spread wide open right under neath it. . . I think standing up did the trick, maybe more contact force? I hit it once and hear a clunk. I'm thinking okay, time for another puller but there was the pitman arm, sitting right on the floor!
10-17-2012, 08:27 PM
#26
Registered User
Join Date: Jun 2009
Location: Fresno, Ca
Posts: 719
Likes: 0
Received 0 Likes
on
0 Posts
Looks like you got everything cover so far n good job on the check to check build up. I wish I can buy an ARB bumper with one of my paycheck hahaha looks like you can use some Manual-Locking hubs there 
Last edited by vang_22re; 10-17-2012 at 08:29 PM.
10-17-2012, 08:32 PM
#27
Registered User
Thread Starter
iTrader: (1)
Join Date: Oct 2011
Location: Tahoe, California
Posts: 987
Likes: 0
Received 0 Likes
on
0 Posts
Haha thanks man! I still think that I mounted the bumper wrong, there is a nice plumbers crack all the way around, looks funky. And manual hubs are next, hopefully followed by sliders!! I wish I would have planned ahead and had some Aisins to through on there now but i've read that switching from A.D.D to manual is A LOT easier and A LOT LESS work that auto to manual so i'm not too worried about digging in there again pretty soon.
10-17-2012, 08:49 PM
#28
WTH, .... Yotatech didn't notify me of ONE POST you made since mine... HMMMM... I'm telling my mom!!!!!!!!  hahahaha
Sorry bout the bearing hubbub. The bearings situation, as you now know, is 'inner and outer'..... The inners are the ones that get the beating MUCH worse, as you're not in 4WD 24/7, ya know/ lol... WELL, with ADD, I guess you ARE to some degree, right? ....... Anyway, .... you packed both inner and outer with wheel bearing grease, right? (High Temp, rated to 500-600*F?) Just making sure.
STOKED FOR YA! I know ALL ABOUT pacing in the room, btw! lol.
Was gonna say, while reading, "Just turn the CV a tiny bit?" hehehe. With the manual hubs, you can just reach in and turn it a tiny bit til it pops on .....
.....
NICE WORK, MAN! You're making your deadline, VERY happy for ya, Truckee'ite!
hahahahaSorry bout the bearing hubbub. The bearings situation, as you now know, is 'inner and outer'..... The inners are the ones that get the beating MUCH worse, as you're not in 4WD 24/7, ya know/ lol... WELL, with ADD, I guess you ARE to some degree, right?
....... Anyway, .... you packed both inner and outer with wheel bearing grease, right? (High Temp, rated to 500-600*F?) Just making sure.STOKED FOR YA! I know ALL ABOUT pacing in the room, btw! lol.
Was gonna say, while reading, "Just turn the CV a tiny bit?" hehehe. With the manual hubs, you can just reach in and turn it a tiny bit til it pops on
..... NICE WORK, MAN! You're making your deadline, VERY happy for ya, Truckee'ite!
10-17-2012, 08:51 PM
#29
Haha thanks man! I still think that I mounted the bumper wrong, there is a nice plumbers crack all the way around, looks funky. And manual hubs are next, hopefully followed by sliders!! I wish I would have planned ahead and had some Aisins to through on there now but i've read that switching from A.D.D to manual is A LOT easier and A LOT LESS work that auto to manual so i'm not too worried about digging in there again pretty soon.
10-17-2012, 09:06 PM
#30
Registered User
Thread Starter
iTrader: (1)
Join Date: Oct 2011
Location: Tahoe, California
Posts: 987
Likes: 0
Received 0 Likes
on
0 Posts
Haha hey man, I actually DO NOT feel confident in my bearing/greasing job. I found a pretty good write up, http://toyota.off-road.com/trucks-4x...ent-18322.html
And in that write up, it says roughly 2-3 hours. Well mine was about 10 min? My neighbor is actually a mechanic, he's the one I go to, but he was driving by so I flagged him down and asked him a quick question. I then had him look in the hub and tell me if that looked like enough grease in there and he spun the whole hub/rotor assembly and said the pre-load feels good. I have no clue what Pre-Load is haha. i'm honestly thinking though that when I do my hub swap, I want to find someone that can show me how to PROPERLY repack the bearing and everything included. I would feel a lot more confident that way. Until then, I think i'm going to leave all the grease in there, I know that is not really a DIY attitude but i'd rather wait and do it right from that time on than do it now and possibly wrong from here on out.
And in that write up, it says roughly 2-3 hours. Well mine was about 10 min? My neighbor is actually a mechanic, he's the one I go to, but he was driving by so I flagged him down and asked him a quick question. I then had him look in the hub and tell me if that looked like enough grease in there and he spun the whole hub/rotor assembly and said the pre-load feels good. I have no clue what Pre-Load is haha. i'm honestly thinking though that when I do my hub swap, I want to find someone that can show me how to PROPERLY repack the bearing and everything included. I would feel a lot more confident that way. Until then, I think i'm going to leave all the grease in there, I know that is not really a DIY attitude but i'd rather wait and do it right from that time on than do it now and possibly wrong from here on out.
10-17-2012, 09:19 PM
#31
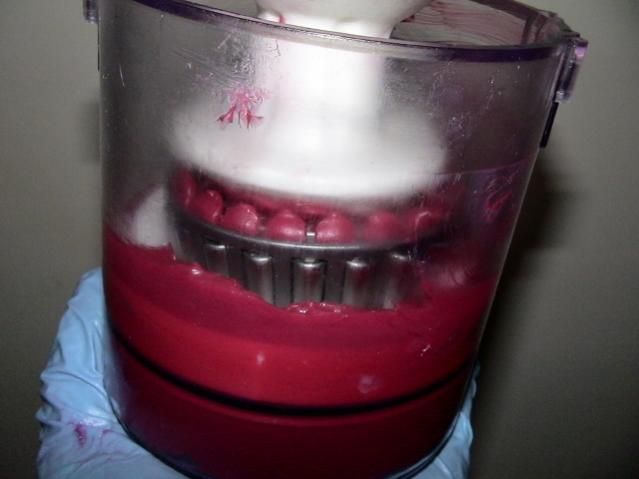
Hey Buddy... pretty sure I did plenty of a write up on that in my build in the beginning(might have been before I did a build).... I have a 12$ "Bearing Packer", because I HATE doing it by hand... Well, I DID, at the time... Now that I've restored CV's, etc., ... I'm not so tripped out by it, and I have a method to keep as lil on my hands as possible at a time. BUT, anyway, you continuously 'PACK' the grease INTO the bearing rollers and through the other side, until you have no really obvious 'AIR POCKET SYMPHONIES' going on, ya know what I'm saying so far, I hope, lol. The packer, the one I bought, you drop grease in there, then the bearing, then grease on top, then you force the grease THROUGH the bearing and out the 'void' beneath all that... Each time, you have to do it 2 times or so... you just clean the dirty grease out you just pulled out the bottom, then start fresh again with new grease, until no massive air pockets are in there and no MASSIVELY dirty grease is coming out the other side. make sense? I'll try to find the pics....... K? I don't think I have them in Photobucket... but I'll look. It takes about 10-15Minutes to pack each of 4 bearings if you do it right and knowing what you're doing... NOT knowing, or doing it the first time, usually a couple hours, not 1-1.5. That's risky, buddy... sorry to say. Soon as you start hauling arse down the road, the center/out force will send all the grease in an underpacked bearing set/races, to the outside... leaving the rollers a lil light on grease where they actually ride on the inner diameter sleeve......... Make sense?
10-17-2012, 09:25 PM
#32
Here's the best way to give you "PRELOAD" explanation... >>>
http://www.pirate4x4.com/tech/billav...20pre-load.pdf
.... It's CRITICAL, Stew.... Bearings are something that, well, when frozen up or seized, can cause the WHEEL TO LITERALLY LOCK UP on you while heading down the highway at 65mph, .. ya know? .... I DON'T mean to be debbie downer, nor push you to 'DO MORE WORK FOR THE HECK OF IT'... BUT, if you're NOT SURE, .. it's really not safe nor practical(because even if nothing dangerous happens... you could cause damage to more than the bearings, K? ) to just 'guess' with bearings. BTW, ... those bearings are easy! lol... Wait til you have to do the rears hahahaha.
http://www.pirate4x4.com/tech/billav...20pre-load.pdf
.... It's CRITICAL, Stew.... Bearings are something that, well, when frozen up or seized, can cause the WHEEL TO LITERALLY LOCK UP on you while heading down the highway at 65mph, .. ya know? .... I DON'T mean to be debbie downer, nor push you to 'DO MORE WORK FOR THE HECK OF IT'... BUT, if you're NOT SURE, .. it's really not safe nor practical(because even if nothing dangerous happens... you could cause damage to more than the bearings, K? ) to just 'guess' with bearings. BTW, ... those bearings are easy! lol... Wait til you have to do the rears
hahahaha.
10-17-2012, 09:32 PM
#33
Registered User
Thread Starter
iTrader: (1)
Join Date: Oct 2011
Location: Tahoe, California
Posts: 987
Likes: 0
Received 0 Likes
on
0 Posts
Okay now it makes some more sense. Inner and outer, maybe i'll go buy this packer you are talking about. using a tool seems easier and probably more effective than your hand. I need to figure out how to remove the seal on the inner one? The one on the back side of the hub. At least doing this all you have too do is remove the rotor, definitely not bad alt all.
10-17-2012, 09:53 PM
#34
Nope, not bad at all... AND, WELL WORTH YOUR LIFE/RIG'S LIFE, am I right? lol...
Lemme find a pic of what I have on the sites.....
This is the one I have.........
This is another type that's most often what you'll ALWAYS find at the parts store....
Lemme find a pic of what I have on the sites.....
This is the one I have.........
This is another type that's most often what you'll ALWAYS find at the parts store....
10-17-2012, 09:56 PM
#35
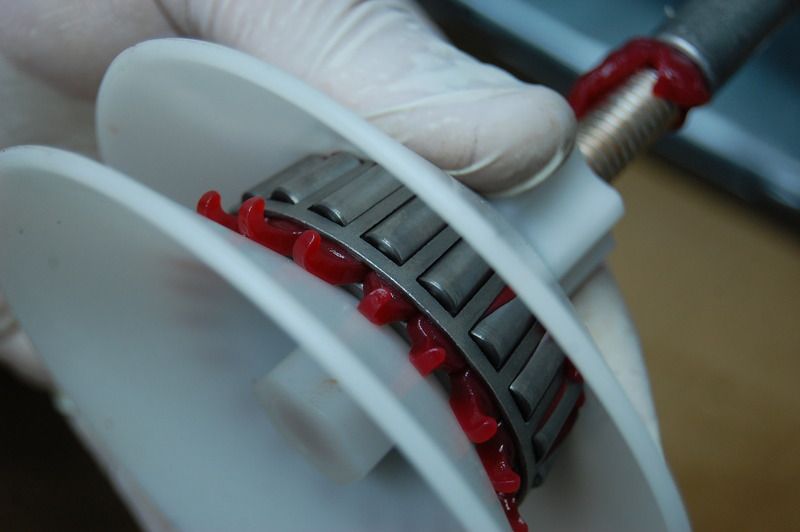
PS> Get a seal puller, Stew.... And say goodbye to that one in the rear... GOTTA replace them both. Otherwise, you'll possibly wind up with bearing grease on your discs! hahaha. NOT GOOD ........ JK, mostly.. cuz you'll NEVER get that thing out without damaging it... I WOULD bet(neither would I! lol)>... Also, if you didn't do the outers like you're seeing they're done? With forcing grease out all sides, etc.. RE DO THE OUTERS, too... Just friendly, concerned advice, ya know?
........ JK, mostly.. cuz you'll NEVER get that thing out without damaging it... I WOULD bet(neither would I! lol)>... Also, if you didn't do the outers like you're seeing they're done? With forcing grease out all sides, etc.. RE DO THE OUTERS, too... Just friendly, concerned advice, ya know?
10-18-2012, 07:45 AM
#36
Registered User
Thread Starter
iTrader: (1)
Join Date: Oct 2011
Location: Tahoe, California
Posts: 987
Likes: 0
Received 0 Likes
on
0 Posts
Hey Chef, when you say "the one in the rear" you mean the one and only seal that holds the inner bearing in place? So what I saw and interupted was when you remove the spindle nuts and washers you pull the rotor off the spindle and the outer bearing falls right in your hand. Then you flip the rotor/hub assembly over, so the hub is facing down, then you see the one and only seal, that i saw, holding the inner bearing in place? This guy here. . .

10-18-2012, 10:11 AM
#37
Registered User
Thread Starter
iTrader: (1)
Join Date: Oct 2011
Location: Tahoe, California
Posts: 987
Likes: 0
Received 0 Likes
on
0 Posts
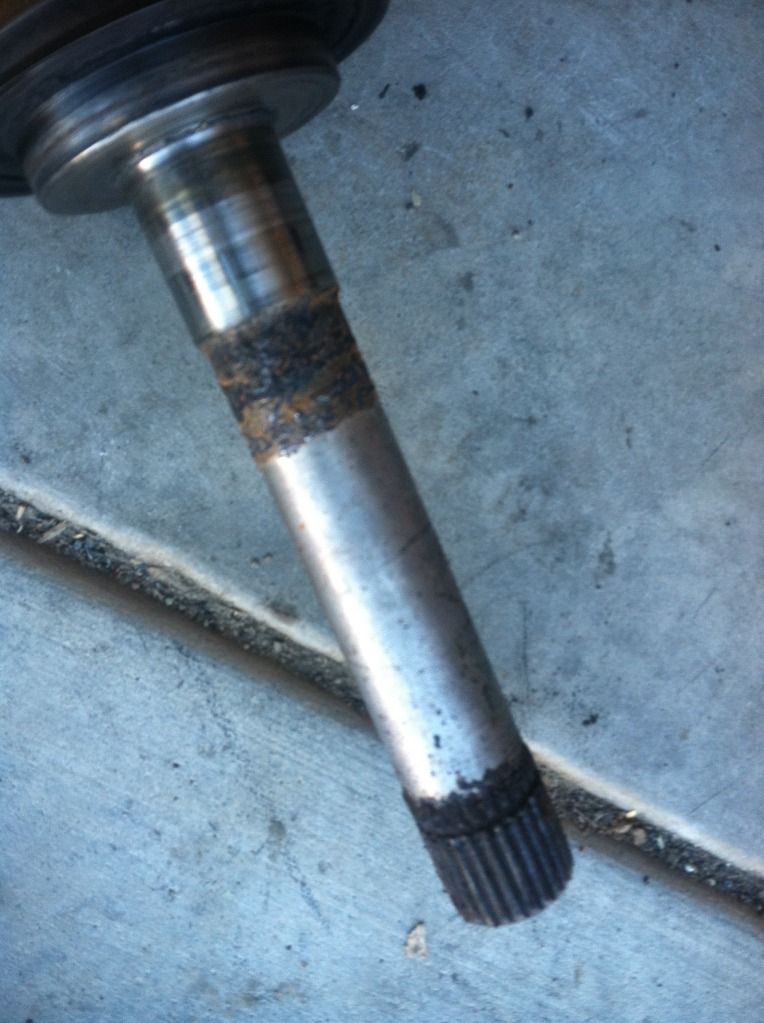
Alright well I just torn down the passenger side, this side was soooo simple. I knew how I wanted to do everything so from cracking the first nut on the CV to Diff to getting it completely dissembled, spindle nuts and all, it took maybe an hour. I'm pretty proud of myself. 
Chef I broke down and wrote a list of things for my Mom too pick up when she's off work and that includes the other CV, a bearing packer and a seal puller. So until she gets home, i'm going to replace my broken wheel studs.
I created a little pool of PB Blaster in the hub where those 6 bolts are haha. They're pretty tough to break free especially sinse the entire assembly just spins. It would be super easy of I had someone to hold while i'll break them free, but i'm by myself so I need to hold and lay on just to get leverage so it doesn't spin then use the breaker bar and go to town on them!
I am also glad I decided to buy new used CVs, remans from Napa. A little but faster than rebooting and i'm glad I did because the pass. CV is no where near worth saving!! Rusted, clunky and all. Maybe i'll sell it to Napa for $11
10-18-2012, 12:17 PM
#38
WOOT! Quick pull McGee now, eh?  hahaha. ..
Yeah, that's the seal... Just be careful, because it's SO TIGHT against the bearing.... you don't want to damage the bearing outer cage..... SO, I'd use the "PRY w/Leverage" method.... Ie. Sticking something wood over and across the center of the hole/circle.... then pry up that seal without making contact with the bearing. I have angled prybar sets that are like screwdrivers, JUST FOR this kinda job.. BUT you can simulate it... You can also use a HD Hook of some kind to just grab onto the lip of the seal/most inner, and just PULL UP A BIT.... Then you have more of a lip for the 'PRY METHOD', too, hahaha. The BEST is a seal puller... the handle with 2 hooks on the end, IMHO.. because I can put something across the OUTER side of the circle, hook into the opposite side of the circle, under the seal, then pry, WITHOUT pushing downward really hard, directly onto the seal. Make sense? Put something across the top over the edge of the seal or so, where it wont cave in, then use THAT to push down on as the hook side pulls up.... It'll pop out pretty easy from there.
BTW, .... I soaked my bearings down with Parts cleaner(REAL PARTS CLEANER, not this crap they have now, lol)... and got them pretty much flushed of old grease before starting with the new grease... TRUST ME, IT'S WORTH A COUPLE CANS OF CLEANER to start with fresh/clean bearings. Just keep them and the races in order... and take extra good looks at the races when fully cleaned, bearing rollers as well... looking for OBVIOUS carnage.... And checking for ease of rolling.
Best wishes ,man!
hahaha. .. Yeah, that's the seal... Just be careful, because it's SO TIGHT against the bearing.... you don't want to damage the bearing outer cage..... SO, I'd use the "PRY w/Leverage" method.... Ie. Sticking something wood over and across the center of the hole/circle.... then pry up that seal without making contact with the bearing. I have angled prybar sets that are like screwdrivers, JUST FOR this kinda job.. BUT you can simulate it... You can also use a HD Hook of some kind to just grab onto the lip of the seal/most inner, and just PULL UP A BIT.... Then you have more of a lip for the 'PRY METHOD', too, hahaha. The BEST is a seal puller... the handle with 2 hooks on the end, IMHO.. because I can put something across the OUTER side of the circle, hook into the opposite side of the circle, under the seal, then pry, WITHOUT pushing downward really hard, directly onto the seal. Make sense? Put something across the top over the edge of the seal or so, where it wont cave in, then use THAT to push down on as the hook side pulls up.... It'll pop out pretty easy from there.
BTW, .... I soaked my bearings down with Parts cleaner(REAL PARTS CLEANER, not this crap they have now, lol)... and got them pretty much flushed of old grease before starting with the new grease... TRUST ME, IT'S WORTH A COUPLE CANS OF CLEANER to start with fresh/clean bearings. Just keep them and the races in order... and take extra good looks at the races when fully cleaned, bearing rollers as well... looking for OBVIOUS carnage.... And checking for ease of rolling.
Best wishes ,man!
10-18-2012, 01:51 PM
#39
Registered User
Thread Starter
iTrader: (1)
Join Date: Oct 2011
Location: Tahoe, California
Posts: 987
Likes: 0
Received 0 Likes
on
0 Posts
Hey man, still waiting on all the supplies but how should I go about regreasing the spindle? My passenger side looks pretty dry so I want to clean it up and put some new grease on it. Does that just consist of putting a good thick amount on, rubbing it around and then putting the hub on?
10-18-2012, 05:50 PM
#40
Registered User
Thread Starter
iTrader: (1)
Join Date: Oct 2011
Location: Tahoe, California
Posts: 987
Likes: 0
Received 0 Likes
on
0 Posts
Alright well I don't think i'm going to be able to finish up tonight, not feelin so hot, maybe because I have been living on chili and Pepsi all week? 
I also got the wheel studs replaced, boy what a process! I managed too get three of the bolts cracked but the other three were fussin. I drenched them in PB, heated them, hit them with a hammer but they wouldn't budge! Finally my neighbor walked by so I said here hold this, handed him the whole rotor and the three bolts popped so easily! Definitely a two person job haha.
Anyways all I have to do now is put the axle in, hook the steering knucle back up, repack the bearing, and put everything back on! Hopefully i'll be done by noon
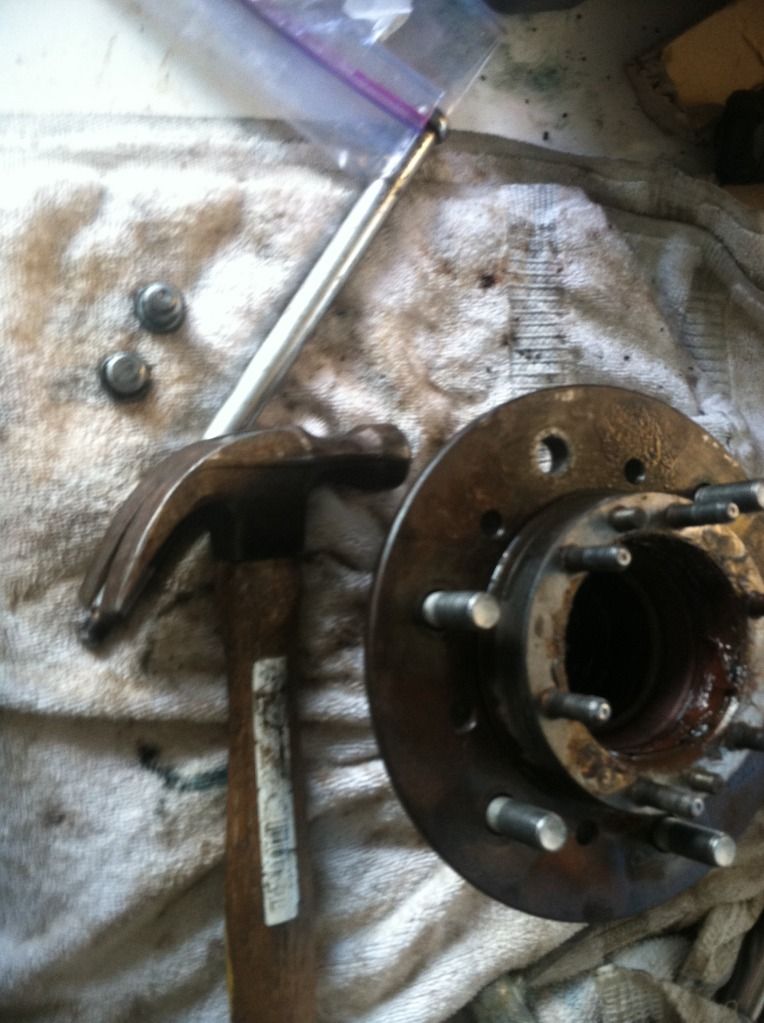


