John4wd's 1993 DLX Pickup Build-Up Thread
 10-02-2011, 01:12 PM
#61
Registered User
Thread Starter

I'm sick with the nasty flu, going to be a while to get up to my aunts barn and work on it and switch TB, I hope it only lasts a few more days...Will update when I'm back at it...
John...
John...
 10-03-2011, 07:15 PM
#62
Registered User
Thread Starter
I hope this isn't premature, but today I swapped the Throttle Bodies out and also made a new gasket out of roll of some Felpro gasket material and got it all back together, I got the throttle body for 30 bucks from the wreaked 92 I got the gauge cluster and the MAFM and hoped since it was running when it was wreaked that it was fully functional and also FSAG I also got the vac. valves on the bracket that sits on the valve cover just in case for 10 bucks but never used it.
I then fired it up and it idled at 1500 RMS's cold (It didn't sputter once) and after it warmed up it went to around 1000 RPM's and then turned the dime size flat head screwdriver slot screw turned down turning to the right 1 and a 1/4 turn and the idle went down to 750 RPM's and just purred except for some valve clatter more than normal I assume because of the 268 RV cam in the prohead from Engnbldr and it was adjusted at the first time the engine got warm and did the timing and valve adjustment.
I am hoping that it does great on the restart tomorrow when it's cold and idle high then when warm go down to 750 RPM's like tonight. We'll see, got fingers crossed and if it checks out I'll be changing the oil too and get hood back on and take it for a test drive in the local housing addition since I don't have plates yet and next month get new plates and decide if I'm going to sell my current ride the B2300 to buy new 30x9.50 or 31x10.50 BFG All Terrain KO's, I had a set of 30x9.50's on my XJ and they did great at the BadLands in Attica Indiana, but I still haven't decided fully on what size, you will all have to wait and see, and then also get around to installing my new toy for the toy I got off Craigslist...
Oh yea I also need new front 1/2 shafts too, both side boots are torn and splattered all the grease out of them, and of course I have to remove the gauge cluster now, got I guess 2 bulbs out, I didn't test out the lights before I buttoned it all up, and I even put it all back together at night, damned brain farts stink!!!! LOL!!!!
Ps. If I think of anything else I'll be sure to add it!!!!
10-03-2011, 08:00 PM
#63
SIIIIIIIIIIIIIIIIIIIIIICK! LOL.
GREAT news, bud! I would bet it will be fine(the idle before/after warm up)..... Normal idle up is 1100-1200rpm, then drops down to 750 once you get it all set up(FULLY WARM)... So, since you dropped it 250rpm to meet recommended idle.... you will probably idle around 1200-1250 when cold... SUWEEEEEET! Love it when a plan comes togetha! lol.
Pulling the gauge cluster is cake, as you know.... no prob, dude!
Far as the tires..... 31x10.50's have been my fav size on our rigs for DD and moderate wheeling needs, for 20 years! I've had a couple sets of 33's, have the 32's you might have seen now... and, well, if you DO need a lil more 'tire' for when you're wheeling, your environment, etc., then I'd say go for the 31's...... If you don't really need em, the 30's are a great 'in the middle' size, ya know?
Have fun, bud!
10-03-2011, 09:06 PM
#64
Registered User
Thread Starter
Oh man Chef, I like you have been up and down with both our toys and I hope it all goes great tomorrow so I can start on other upgrades and get this on the road and trail to see how that 268 cam does in it.
I somehow prefer 30x9.50 BFG AT's, the 87 when I bought it already had 33x12.50's BFG AT's on it and had to have 3 inch body lift from previous owner so not to rub the fenders, which I had the body lift removed and got rid of tires and got the before mentioned non newer KO's 30x9.50 BFG AT's on it and also my 97 XJ later in 05 I had the newer 30x9.50 BFG KO's and it had a 3 inch suspension lift and they (30x9.50) were a good fit and great on and tucked in the wheel wells offroad, a friend had a 86 4-Runner with no lift and he had earlier non KO BFG 31x10.50 and those filled out the fender wells fully and no room to tucking upward if they did go offroad, but they never did.
I have some time to think about it, right now my mind is on the restart tomorrow and see what happens. And then to take apart dash once again after oil change, then I have to do the extended diff breathers and also oh yea put on the new tailgate and also got the window ventshade ventvisors I got off Craigslist for 15 bucks brand new. So much to do!!!!
Wait till you all see what else I got off Craigslist. It's sweeeeeeeet!!!!
Thanks everyone for all your help and support and I'm sure I'll need it again :}LOL
10-04-2011, 10:21 AM
#66
Registered User
Thread Starter
I did this before I got sick and just now getting to the details of the install, it was easy peasy again...
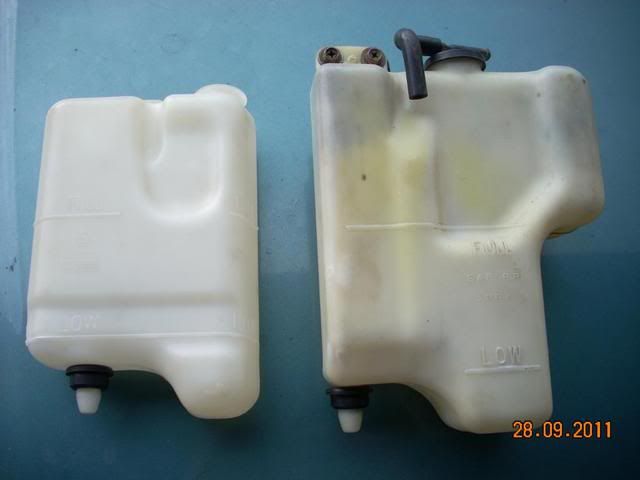
I got the overflow tank/bottle in the mail and here is what old and new look like, the new above the old one that's still in the truck while I messed with the motor to get it to run right and in case it over heated...Never know :}

Another pic of them side by side after removing the old one...
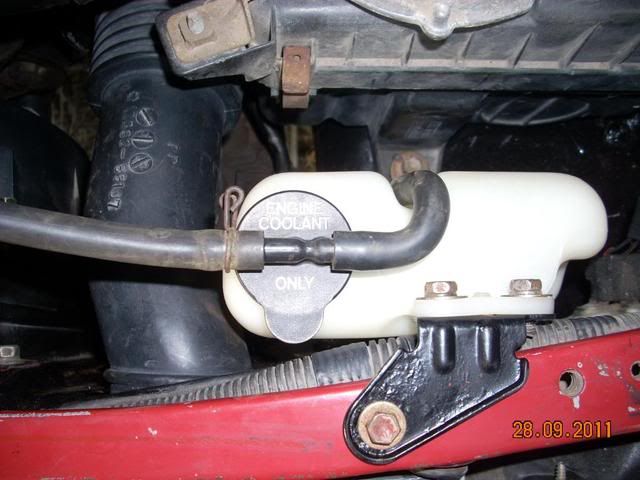
This pic is of the new used overflow tank/bottle installed with the black round air box intake tube inserted into the hole used for that type of box on earlier years that had fuel injection and I assume because I never bothered to look where there intake tubes were mounted either behind headlight or the type I'm currently using. On the generation before my current gen. I know they had an intake tube in the same type of hole because my 87 4wd was carbed and the intake was in same location.
The new used tank/bottle was crusted with black crap inside and I used a piece of cloth zip tied attached to a fiberglass antenna scrubbed the inside with engine greaser and regular window cleaner till it looks new and painted the bracket that attaches to radiator support, both attaching machine screws from bracket to plastic tank/bottle broke but I got them out of the bracket, it was from up in the upper peninsula of Michigan and rusty and below is a pic of it installed with the new intake tube beside it.
How's it look? :}
I got the overflow tank/bottle in the mail and here is what old and new look like, the new above the old one that's still in the truck while I messed with the motor to get it to run right and in case it over heated...Never know :}
Another pic of them side by side after removing the old one...
This pic is of the new used overflow tank/bottle installed with the black round air box intake tube inserted into the hole used for that type of box on earlier years that had fuel injection and I assume because I never bothered to look where there intake tubes were mounted either behind headlight or the type I'm currently using. On the generation before my current gen. I know they had an intake tube in the same type of hole because my 87 4wd was carbed and the intake was in same location.
The new used tank/bottle was crusted with black crap inside and I used a piece of cloth zip tied attached to a fiberglass antenna scrubbed the inside with engine greaser and regular window cleaner till it looks new and painted the bracket that attaches to radiator support, both attaching machine screws from bracket to plastic tank/bottle broke but I got them out of the bracket, it was from up in the upper peninsula of Michigan and rusty and below is a pic of it installed with the new intake tube beside it.
How's it look? :}
Last edited by john4wd; 10-04-2011 at 10:27 AM.
10-04-2011, 11:17 AM
#68
Registered User
Thread Starter
In the first pic you can see it's black at the bottom of the tank/bottle and in the middle pic it looks brand new, took alot of scrubbing but well worth it, I'm about to head up to the barn in an hour and fire it up, still got fingers crossed which makes typing on laptop a pain in the butt, but surviving, hope the feeling comes back in my fingers cause there all numb from lose of blood flow :}LOL
I've been thinking, am I going to be able to put hood back on by myself? Can't ask uncle who staying at aunts house to help cause he can only lift 5 pounds after heart surgery, tailgate will be easy, it's small compaired to the hood.
Oh well not in a hurry I guess right now, I'll drive around neighborhood without a hood to test it out :}LOL
10-04-2011, 11:32 AM
#69
I've pulled and installed the hood, twice, solo. NO PROBLEM,...just think it out, ya know?
What I did was put towels there, so I could rest it near the hinges/windshield, then put up the hood kickstand and place it in the slot, holding up the hood in the front/by bumper.
Then I installed a bolt on each side to NEARLY snug, but enough to pivot, etc., and then installed it till it was aligned.
BTW, I penned in an outline with a pencil, and lined them right back up to the same spots... it wound up perfectly where it was, no issues with fitment.
It's not that difficult to line it up, you'll get it no prob, John!
10-04-2011, 11:56 AM
#70
Registered User
Thread Starter
YEA DUH!!!! Great points!!!! I forgot about the prop/support rod, yea it'll be easy peasy, I got plenty of towels that's for sure to put in the corners to keep from damaging the pointy corners that go towards the cab and put bolts in and line up my removal marks and tighten and then all done, and while that's going on the oil will be draining, I'll be doing multi-tasking :}
I'm heading to aunts house, I bet she'll be happy to get that out of her barn in a month....I'll be back later tonight....Tater!!!!
I'm heading to aunts house, I bet she'll be happy to get that out of her barn in a month....I'll be back later tonight....Tater!!!!
Last edited by john4wd; 10-04-2011 at 11:59 AM.
10-04-2011, 12:07 PM
#71
YEA DUH!!!! Great points!!!! I forgot about the prop/support rod, yea it'll be easy peasy, I got plenty of towels that's for sure to put in the corners to keep from damaging the pointy corners that go towards the cab and put bolts in and line up my removal marks and tighten and then all done, and while that's going on the oil will be draining, I'll be doing multi-tasking :}
I'm heading to aunts house, I bet she'll be happy to get that out of her barn in a month....I'll be back later tonight....Tater!!!!
I'm heading to aunts house, I bet she'll be happy to get that out of her barn in a month....I'll be back later tonight....Tater!!!!
Have fun...Great to see you having less weight/stress over this stuff, John!
Talk to you L8r, t8r! lol.
10-04-2011, 08:07 PM
#72
Registered User
Thread Starter
Dang changing oil filter is a pain in the butt with EFI and AC compressor, my old 87 didn't have either and changing filter was easy! All my oil filter removal tools are wrong size and or long handles don't have enough room to loosen it, So went to wally world and got the cap filter removal for this size filter, I have the large cap one and the really small one for my daughters prizm/corolla oil filter, but didn't have the middle one and using with a short Craftsmen 3/8 ratchet will work perfect, there is room from the filter outward towards the fender from the end of the filter, but not around the outside circumference round area for a long handle filter steel strap wrench's.
I'm going to have it for a while so better get a system for changing the filter that's quick and easy, I tried underneath but still couldn't get it from there on my back trying to reach up, tired inside fender well above the suspension and couldn't do that either, I'll get it with the cap style remover going in where that round thingy attached to that tube from the air cleaner and bolts to the intake runner, undid bolt and moved the item downward and makes room for my fat arm to get in there, easy peasy!!!! Thinking about oil filter relocation like the fuel filter, but to do that takes a kit, I'll have to research it after posting this...
Have fun all, enjoy your toys!!!!
He who dies with the most toys wins!!!! :}LOL
Last edited by john4wd; 10-04-2011 at 08:57 PM.
10-05-2011, 08:39 AM
#74
Registered User
Thread Starter
I believe I have,
I swapped the Throttle Bodies out and also made a new gasket out of roll of some Felpro gasket material and got it all back together, I got the throttle body for 30 bucks from the wreaked 92 I got the gauge cluster and the MAFM and hoped since it was running when it was wreaked that it was fully functional, I then fired it up and it idled at 1500 RMS's cold (It didn't sputter once) and after it warmed up it went to around 1000 RPM's and then turned the dime size flat head screw & turned down turning to the right 1 and a 1/4 turn and the idle went down to 750 RPM's and just purred except for some valve clatter more than normal I assume because of the 268 RV cam in the prohead from Engnbldr and it was adjusted at the first time the engine got warm and did the timing and valve adjustment.
I swapped the Throttle Bodies out and also made a new gasket out of roll of some Felpro gasket material and got it all back together, I got the throttle body for 30 bucks from the wreaked 92 I got the gauge cluster and the MAFM and hoped since it was running when it was wreaked that it was fully functional, I then fired it up and it idled at 1500 RMS's cold (It didn't sputter once) and after it warmed up it went to around 1000 RPM's and then turned the dime size flat head screw & turned down turning to the right 1 and a 1/4 turn and the idle went down to 750 RPM's and just purred except for some valve clatter more than normal I assume because of the 268 RV cam in the prohead from Engnbldr and it was adjusted at the first time the engine got warm and did the timing and valve adjustment.
10-05-2011, 09:03 PM
#75
Registered User
Thread Starter
I tried the socket style oil filter wrench I got at Wally World and it doesn't work on the Toyota OEM oil filters, the area's on the OEM is flat while the other brands have a curved instead of flat and it works for those filters, the dealer only had the oil filter removal sockets for there tiny oil filters, but if anybody is having the problem with finding one for your OEM oil filter you need to go to advance auto store they have a whole bunch in a row from big to small facing outward where you just carry in a filter and find a socket that fits and they had one that fit the YZZD1 and the taller YZZD3 filter perfectly, I'm keeping the wally world one, it was only 4 bucks not worth the time to take back. If I remember I'll put that filter socket info on here tomorrow, I don't have it right now.
I got oil changed and I also put in a working bulb in the new used full gauge cluster that I took from the old cluster since the bulb that was burnt out had the green condom on it, taking dash apart the first time took a while since never did that generation before, this time I did it in no time and was easy once you get it down pat, again easy peasy :}
Tomorrow I have to remove the water in the system and replace with prestone 50/50 mix. I'm also going to run to Tractor Supply and get some vacuum hose to run the extended diff breathers, I got some of those OEM capped breather that are barbed and go into rubber hoses and got a couple fittings off a couple 22R-E intakes at the bone yard and got plenty of different size clamps to put it all together and I'll take plenty of pics of course too.
Then after that next up is to redo the rims and cover up all the surface rust on bed upper edge because of that bed liner it had on it all those years holding moisture. There is no upper windshield moulding and there was surface rust above windshield but no holes TG, so I cleaned up rust up to put some poor-15 on it and then covered it up with touch-up paint (Por-15 doesn't like UV) Replacement upper windshield chrome moulding is almost 60 bucks, RATTS!!!! So much to do and enjoying all of it!!!! :}
10-06-2011, 11:31 AM
#76
I just got a Harbor Freight Adjustable a couple months ago.... Worked just fine...........
Picture of one.......(not HF, lol).........
http://www.fotosearch.com/THK012/c0033162/
Picture of one.......(not HF, lol).........
http://www.fotosearch.com/THK012/c0033162/
10-06-2011, 08:22 PM
#79
Registered User
Thread Starter
The oil filter cap wrench at Advance Auto Parts that fits the D1 and D3 toy oem oil filter is the 73mm 14 facets/flute one for $5.99+tax=$6.41 and works perfect in the limited space around the oil filter on the 22R-E with an AC compressor, now I'm just going to stick with stock location, using a oil filter relocating kit make more chances for leaks...
Yea it's a few bucks away for $60 so I just rounded it there, That is way to much for a aluminum piece for the windshield to buy new, Guess it's off to the pickNpull yards in Indy soon :} The wreaked 2wd truck I got the mechanical parts off of has the upper windshield trim but the rubber part attached to the aluminum and goes against the sheet metal/roof line has some chunks out of the rubber, so that'll be my last stop to get one, plus it's the last truck down the lane all the way in the back, so I'll go look in the Indy yards first, buying a new one is always preferred!!!! Something to keep the toy drivable is ok for that amount, almost $60 on a trim piece is way out there!!!!
Yea it's a few bucks away for $60 so I just rounded it there, That is way to much for a aluminum piece for the windshield to buy new, Guess it's off to the pickNpull yards in Indy soon :} The wreaked 2wd truck I got the mechanical parts off of has the upper windshield trim but the rubber part attached to the aluminum and goes against the sheet metal/roof line has some chunks out of the rubber, so that'll be my last stop to get one, plus it's the last truck down the lane all the way in the back, so I'll go look in the Indy yards first, buying a new one is always preferred!!!! Something to keep the toy drivable is ok for that amount, almost $60 on a trim piece is way out there!!!!
Last edited by john4wd; 10-08-2011 at 09:44 PM.
10-07-2011, 10:57 PM
#80
Registered User
Thread Starter
I ran the front diff breather yesterday and did the rear one today to behind the drivers side tail light all the way to the top, I remover the lower bolt on the inside the bed hold down and screwed in a longer one I had that was tappered below the head area so to match the shorter bolt I removed so it stuck inside the housing so to use a clamp to hold the diff hose and hold straight up, and for the clamp I used a old metal strap that used to surround the rubber isolator for brake lines against the body or frame, just took out the rubber and put hose through the clamp to hold the hose straight up and put it over the extended threads from the longer bed tie-down bolt sticking in and put a nut and cranked the nut down to hold it and put the rear brake light housing back on and waa laa all done!!!! Easy Peasy!!!!
If anybody need pics let me know...
I flushed the cooling system, and then put in new Prestone 50/50 premix, and new bosch wiper blades and checked both diff fluids...
I got 1/2 bottle of Lucas break-in zinc additive left, it says on the bottle only for 1000 miles, or can I put it in for 3000 miles till the toys next oil change?


