toastyjoshs red81 longbed
 12-23-2012, 07:03 AM
#41
Registered User
Thread Starter
iTrader: (1)
Join Date: Dec 2010
Location: new mexico
Posts: 393
Likes: 0
Received 0 Likes
on
0 Posts
No instructions, I did remove the nut and the thing would not move. I dont want to strip he screw anymore, their might be another nut below that one I will have to look.
 01-06-2013, 03:11 PM
#42
Registered User
Thread Starter
iTrader: (1)
Join Date: Dec 2010
Location: new mexico
Posts: 393
Likes: 0
Received 0 Likes
on
0 Posts
Figured I would do a little update.
Have not been working on he truck to much the Holidaysand the fact that it is cold outside and snowboarding season.
Updated plans:
Finish tuning weber
Sort out my heat system issues, may have a stuck door.
Exhaust, turbo muffler, cat removal
Set of front OME springs, med
New bushings front and rear
Shocks, pro comp 1000s for 3in lift
tie rod from SKY with FJ 80 rod ends
http://www.sky-manufacturing.com/new...duct.php?id=62
new windshield, leaks
Tires,
437 3rds out of a 79-80
radio with 6x9s
rust fixing
front and rear bumpers, not sure about front, rear going to make one.
Gave up on the efan
Last edited by toastyjosh; 01-06-2013 at 03:13 PM.
01-07-2013, 04:19 PM
#43
Registered User
Thread Starter
iTrader: (1)
Join Date: Dec 2010
Location: new mexico
Posts: 393
Likes: 0
Received 0 Likes
on
0 Posts
Ok, really drove the truck today since putting on the weber.
First thru 3rd are great, 4th is good then boggs down.
I still have not tune it, other that the 2 turns out for start up. Fuel psi is at 4 need to go down to 3 or so. Timing is at 5, at least that is what it was before.
Oh it does not like when I give it a lot of brake petal. Starts to stumble a bit.
I know I need to tune it.
Also the new t-stat I put in makes her run right in the normal range. Does not get hot any more.
01-07-2013, 07:43 PM
#44
Sounds like your timing my not be advancing properly if it isn't pulling well in 4th. Make sure your vacuum advance to your distributor is connected and not not leaking. If you have dual advance ports on your distributor, make sure you have the port closest to the head connected to a vacuum port on the intake manifold and the port closest to the radiator connected to the vacuum port on the weber.
Per the FSM, You want your timing set to 5* BTDC without the vacuum advance plugged in at no higher than 950 RPM. Your timing should advance to 8-12* BTDC with the vacuum advance connected. The timing should also further advance when you hit the throttle. If it is not advancing then you either have a vacuum leak or your distributor vacuum advance is not working properly.
Per the FSM, You want your timing set to 5* BTDC without the vacuum advance plugged in at no higher than 950 RPM. Your timing should advance to 8-12* BTDC with the vacuum advance connected. The timing should also further advance when you hit the throttle. If it is not advancing then you either have a vacuum leak or your distributor vacuum advance is not working properly.
01-07-2013, 07:55 PM
#45
Registered User
Thread Starter
iTrader: (1)
Join Date: Dec 2010
Location: new mexico
Posts: 393
Likes: 0
Received 0 Likes
on
0 Posts
Ok, thanks for that.
The port closest to the head I have blocked off.
The last time that I timed it, I had the same settings you were talking about. That was with the stock carb and HAC.
Also I do not have the choke hooked up yet, I found this thread just now.
https://www.yotatech.com/forums/f114...-choke-256661/
So I will go hook up that vacumme port closest to the head to the manifold.
Then figure out the choke.
01-08-2013, 09:14 AM
#48
You don't want to do that! If you block off your return line, your fuel pump will build too much pressure causing the pump to fail prematurely, the pump ring on the crankshaft to wear and necessary drag on the engine.
Here's how I have mine ran:
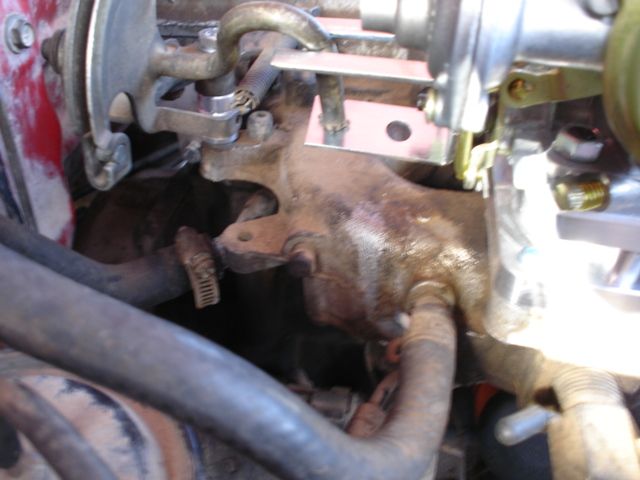
Since I plugged that big goofy vacuum hose fitting directly underneath the carb, I ended up putting a 3/16" barb in one of the unused 3/8" NPT holes in towards the rear of the manifold for my manifold advance vacuum line. I also put an elbow barb in the manifold for my brake booster so it will run cleanly back to the firewall instead of making a big loop over the passenger side fender wall.
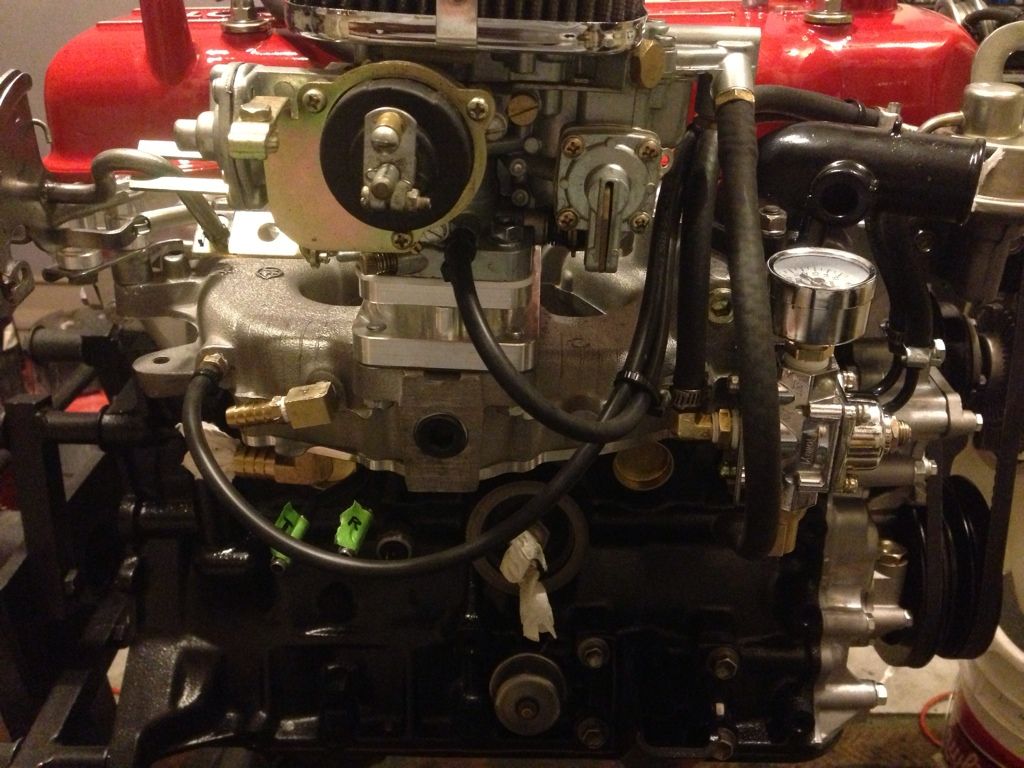
But like I said earlier,
Vacuum port closest to the radiator (Port/Normal vacuum) --> weber carb port
Vacuum port closest to the head (Manifold/Idle Vacuum) --> Intake manifold port
Nice and clean - way better than the spaghetti lines of the factory set up.
Here's how I have mine ran:
Since I plugged that big goofy vacuum hose fitting directly underneath the carb, I ended up putting a 3/16" barb in one of the unused 3/8" NPT holes in towards the rear of the manifold for my manifold advance vacuum line. I also put an elbow barb in the manifold for my brake booster so it will run cleanly back to the firewall instead of making a big loop over the passenger side fender wall.
But like I said earlier,
Vacuum port closest to the radiator (Port/Normal vacuum) --> weber carb port
Vacuum port closest to the head (Manifold/Idle Vacuum) --> Intake manifold port
Nice and clean - way better than the spaghetti lines of the factory set up.
01-08-2013, 09:25 AM
#49
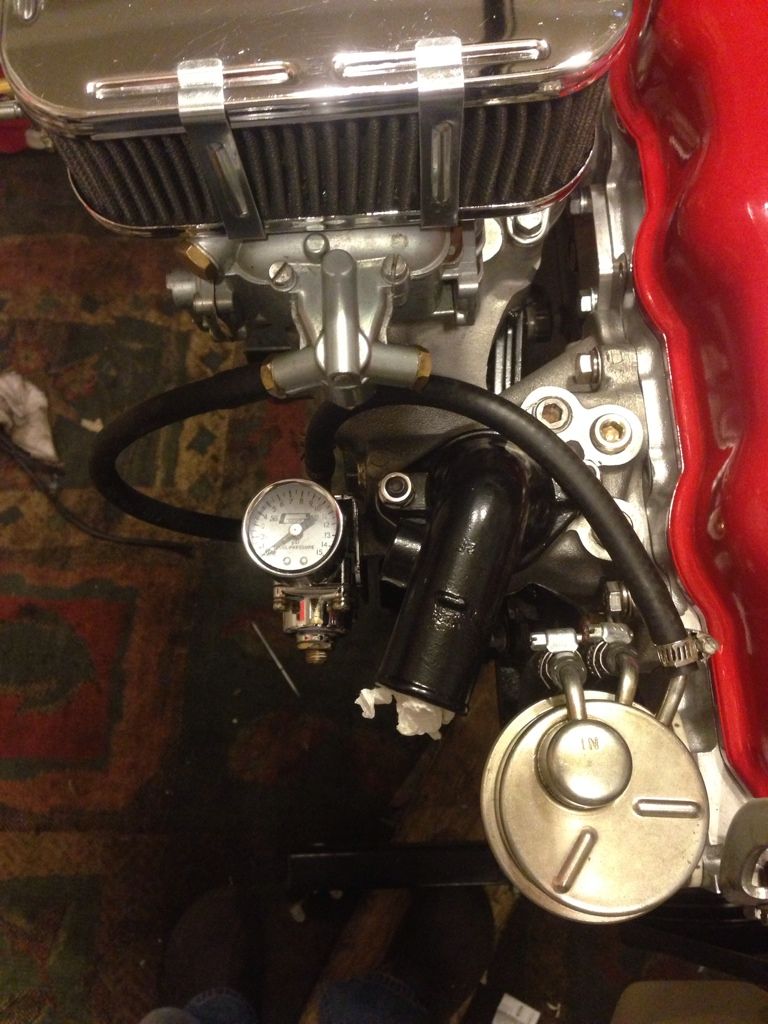
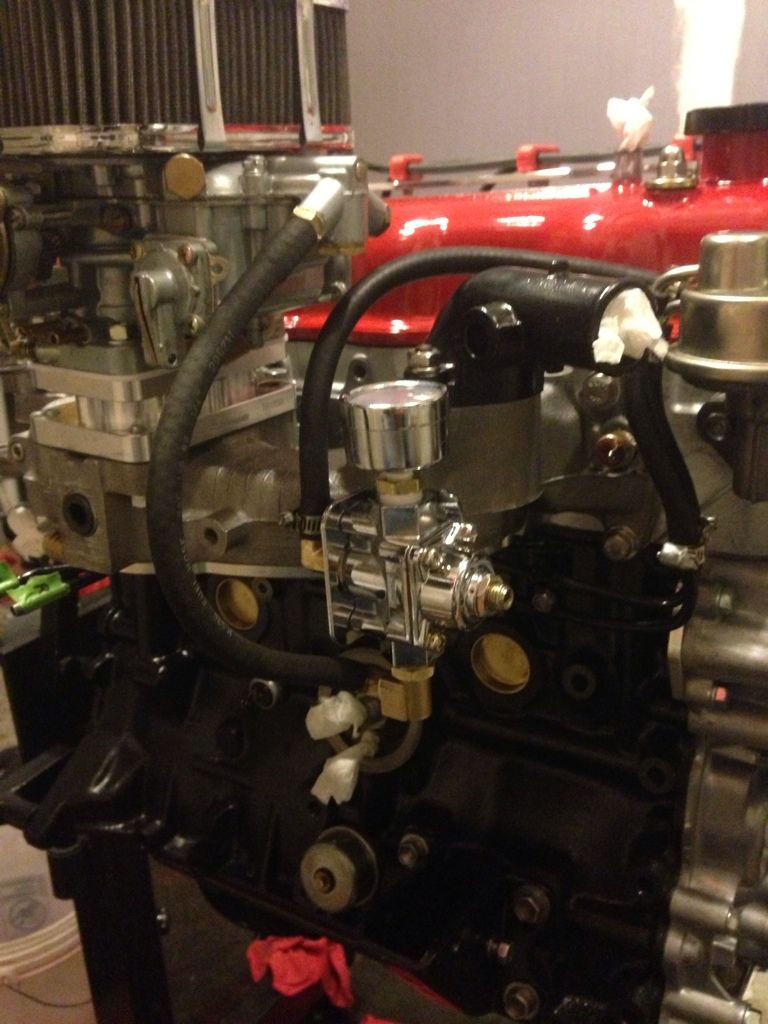
And here is what I did with my fuel lines:
I used the factory hardlines that run under the intake manifold. Believe it or not, they are actually a convenient and clean thing that toyota did on these motors. You'll have an "in" and a "return" line. It doesn't really matter which one your use for in and return as long as you have them hooked up right on the other side of the manifold where you connect to the hoses again. However, I ran my "in" on the hardline closest to the passenger side fenderwall and my "return" on the hardline closest to the head because it was the easiest and the lines didn't have to cross in that tight spot between the manifold and the fuel pump. My "out" goes to the fuel pressure regulator which I mounted directly to the manifold with a gauge (I highly recommend this because it turns out super clean and convenient to read and adjust).

I used the factory hardlines that run under the intake manifold. Believe it or not, they are actually a convenient and clean thing that toyota did on these motors. You'll have an "in" and a "return" line. It doesn't really matter which one your use for in and return as long as you have them hooked up right on the other side of the manifold where you connect to the hoses again. However, I ran my "in" on the hardline closest to the passenger side fenderwall and my "return" on the hardline closest to the head because it was the easiest and the lines didn't have to cross in that tight spot between the manifold and the fuel pump. My "out" goes to the fuel pressure regulator which I mounted directly to the manifold with a gauge (I highly recommend this because it turns out super clean and convenient to read and adjust).
01-09-2013, 09:09 AM
#50
Registered User

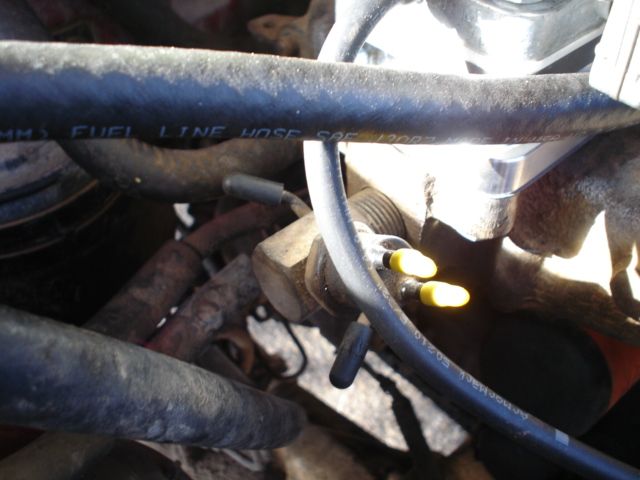
The original Aisin carb had an electric choke, didn't it? If it did, all you have to do is get yourself a male and a female blade connector and a length of wire. The male connector fits right into the original choke wire plug(green three connector plug, 2 of the 3 are 12v hot if I remember correctly) and the female end fits onto the choke housing on the carb.
If the original didnt have an electric choke, or it wasn't hooked up, simply find a wire with 12v when the ignition is on, nothing when it's off, and something that won't be affected by a splice(not a sensor wire or something), and splice into it.
Maybe an adjustment to the choke housing, and the choke is sorted out.
01-10-2013, 06:15 AM
#51
Registered User
Thread Starter
iTrader: (1)
Join Date: Dec 2010
Location: new mexico
Posts: 393
Likes: 0
Received 0 Likes
on
0 Posts
Thanks for the replys!
Ok, kawazx636 I did not block off the return line, I just read some post about people doing it. thanks for the pics I will look in to that on my next day off. I really like your fuel reg set up. I wish I had gone that route.
Jonnyboy, I do have the stock connector, need to go look at the plug, and figure that out.
 01-11-2013, 12:57 PM
#53
That'll work. That's what I used to do prior to my rebuild. Ended up plugging it because that thing looked hideous and put in a single port in on of the other holes for a vacuum advance. Be careful though, those vacuum hose plugs tend to crack and cause vacuum leaks after a while
01-12-2013, 12:12 PM
#55
Registered User
Thread Starter
iTrader: (1)
Join Date: Dec 2010
Location: new mexico
Posts: 393
Likes: 0
Received 0 Likes
on
0 Posts
Allright, It warmed up today to about 25. I went out and put on the vacumme line for my other port.
Started her up and had a fuel and coolent leak. coolent is leaking from the upper rad hose, I knew I should have replaced it while it was off. The fuel leak is where the fuel pressure gauge is. So I think I need to re do my fuel pressure set up.
So because of leaking gas in the engine bay I did not got test her out. Next time.
It needs to warm up before I drain the coolent. As far as hoses, the local autozone has to order them. What do you guys think about the trail-gear ones? There 62 bucks !!
!!
Started her up and had a fuel and coolent leak. coolent is leaking from the upper rad hose, I knew I should have replaced it while it was off. The fuel leak is where the fuel pressure gauge is. So I think I need to re do my fuel pressure set up.
So because of leaking gas in the engine bay I did not got test her out. Next time.
It needs to warm up before I drain the coolent. As far as hoses, the local autozone has to order them. What do you guys think about the trail-gear ones? There 62 bucks
!!
01-18-2013, 02:09 PM
#56
Registered User
Thread Starter
iTrader: (1)
Join Date: Dec 2010
Location: new mexico
Posts: 393
Likes: 0
Received 0 Likes
on
0 Posts
Temp got up to 45 today!!!
Went out and replaced upper and lower hoses.
Fuel leak was where my fuel pressure guage screwed in to the port that goes to the fuel line.
Used some thread sealent, and will let it sit over night.
Also did adjust fuel pressure to 3psi.
New windshield tomorrow, new muffler on sunday!
Getting there!
Good thread for hose info.
https://www.yotatech.com/forums/f114...sticky-202637/
Last edited by toastyjosh; 01-18-2013 at 02:13 PM.
02-14-2013, 04:58 PM
#57
Registered User
Thread Starter
iTrader: (1)
Join Date: Dec 2010
Location: new mexico
Posts: 393
Likes: 0
Received 0 Likes
on
0 Posts
 So I got some 1.5in wheel spacers for all 4 tires, and the sky off road tie rod bar. All I can say about the bar is holy ˟˟˟˟ its heavy duty.
 I cant wait to put this thing on. The guys at sky said it just bolts right on, the fj80 ends will fit right in the stock ones.
So we will see.
Then I will throw my steel tundra rims and spacers on and get after it.
I will let you guys know how I fair, Got some work stuff for a few weeks then I can get to it.
02-14-2013, 05:19 PM
#58
A few weeks?!?! I need to know how that tie rod fits ASAP so I can order mine! What an awful guinea pig you are! LOL Just kidding, my build is no where need ready to slap my tie rod back on. Did you at least hold it up there to see that the length was correct? Post some pics when you get it mounted.
02-14-2013, 05:26 PM
#59
Registered User
Thread Starter
iTrader: (1)
Join Date: Dec 2010
Location: new mexico
Posts: 393
Likes: 0
Received 0 Likes
on
0 Posts
I know I know! I was going to do it this weekend but I am getting sent to OK for a few. Work never ends, but it will pay for some more parts so hey.
I pulled it out of the box did not measure, but it looks right.
I did not have time to hold it up under the truck.
Oh well!! I can tell you its freakin heavy, I think this is the way to go!
Oh yea you were right about the black caps I have Vacumme leaks everywear now. Need to to order the plug kit form LCE.
02-14-2013, 06:12 PM
#60
Maybe you'll have time to hit the gym too so you'll have the strength to get under there and install that beast! LOL I'm definitely going to order it too since that's pretty much the only option for a new rod and it's a really good price. I've got to hold off though because I don't really need to add anything extra to my massive pile of parts that I have accumulated. I'm running out of room in my tiny garage between the new parts that I've bought, the parts that I've cleaned up and the old parts that I'm going to throw away or possibly sell. Technically, a tie rod is the last thing I need until the whole truck is completely built and ready to roll down the road.
As far as the vacuum caps go, they SUCK as you can tell. Especially in dry environments. They make silicone caps that live a little longer, but I have another trick if you're trying to buy time. Go grap yourself about a foot of vacuum hose and cut it into 1.5" sections. Then screw some small machine screws into one end of each section and use those to cap your vacuum ports. Looks like ˟˟˟˟, but It's a good quick fix if you still need to use the truck while you wait for the funds/times to get the LCE stuff.
As far as the vacuum caps go, they SUCK as you can tell. Especially in dry environments. They make silicone caps that live a little longer, but I have another trick if you're trying to buy time. Go grap yourself about a foot of vacuum hose and cut it into 1.5" sections. Then screw some small machine screws into one end of each section and use those to cap your vacuum ports. Looks like ˟˟˟˟, but It's a good quick fix if you still need to use the truck while you wait for the funds/times to get the LCE stuff.


