Weldless ZUK mod vs. Old Man Emu on '87 4runner: installation and comparison
 12-26-2011, 06:37 AM
#1
Registered User
Thread Starter
Weldless ZUK mod vs. Old Man Emu on '87 4runner: installation and comparison
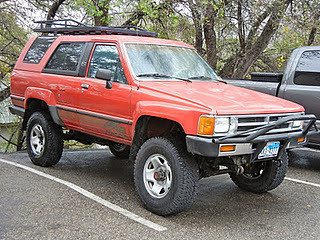
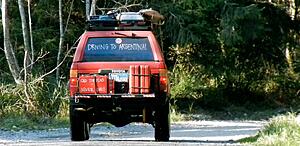
I did the temporary Zuk mod in November 2010 and I've been very happy with it over the past year. We are now preparing our 1987 4runner for a road trip halfway around the world, beginning in Central and South America...so I decided to replace the 24 year old suspension.
I've tried to keep this thread down to the meat and potatoes, but you can read the entire writeup on our website and ask me any questions about my suspension in the comment section at the bottom. Unfortunately my cameras ran out of batteries so I did not thoroughly take pictures during installation...oops.
I have also compared the weldless Zuk mod to the new Old Man Emu suspension.
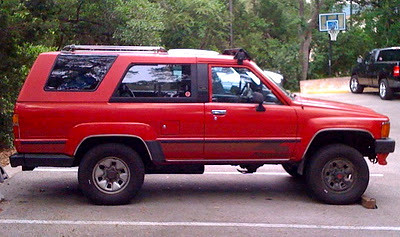
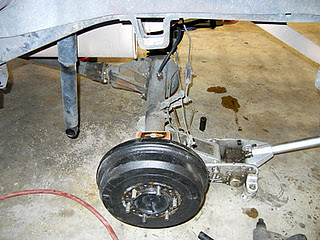
Before Zuk mod or OME/Dakar installation
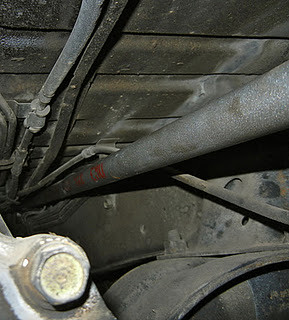
Front Bump Stops
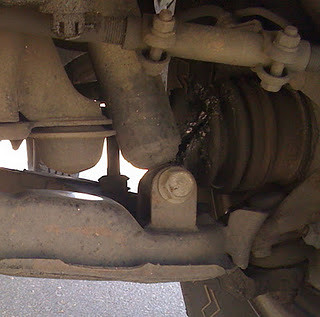
tell R. Kelly that I see something wrong with a little bump n' grind...less than 1" between bump stops
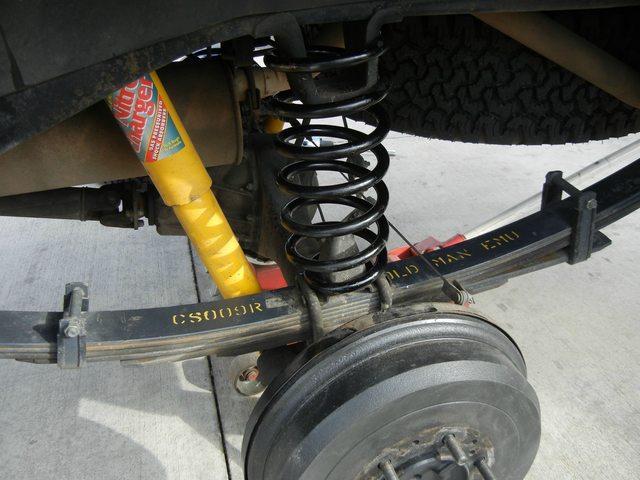
Below is the writeup of the OME-4RUN-1GC-IFS kit. This is the IFS/rear leaf kit designed for Hilux/4runners with medium load applications from 0 lbs. to GVW. We do not want to exceed the GVW so we chose this kit. Never exceed your GVW...
--------------------------------------------------------------------------------------
THE TEMPORARY FIX TO SAGGY-BOTTOM BLUES
One solution that is becoming popular is the "Zuk mod". The general idea is to spread the worn out leaf springs as far apart as possible, then compress a coil spring so that it fits between them, theoretically locked into place by the bump stops. There are several different variations of this modification out there, but this is the simplest form because it requires no welding, it's easy to undo, and only cost me $17 plus a coil spring compressor. It lifted the rear end of the 4runner approx. 3" and performed like a set of "helper/overload springs", riding great when the 4runner was loaded down with camping gear. When the vehicle was empty, it was a rough ride but if it bothers you that much you can just remove them in about an hour. Since the Zuk mod is covered all over Yotatech, I'll focus more on the installation of the OME kit since I did not find too many detailed installs online. You can read more about the different versions of the Zuk mod at the bottom of Zuk's website.
Zuk Weldless Coil mod: I chose the '97-2006 Front Jeep Wrangler/Tj coils

Ride Height after Zuk mod
THE OME INSTALLATION: REAR
I started with the rear leaf springs. This was very simple. Jack up the vehicle by the frame, letting the suspension droop. Put a floor jack under the axle tube and raise it to take the load off whichever side you're removing first. Undo the top nut/bolt that secures the rear shackle to the rear hanger(leave the bottom nut/bolt alone). Tap the bolt out with a rubber mallet and your least favorite screwdriver, freeing the shackle from the frame and hopefully not breaking your screwdriver. Luckily our 4runner hasn't been attacked by cancer yet, so these bolts were all easy to break loose. If you're not so lucky, you may have to use penetrating oil, a pry-bar and fulcrum, or even a torch to get some of these ancient bolts and bushings loose. Next, remove the bottom bolt of the shock to give your axle some free play to articulate. Lower the floor jack and the axle will pivot on the front leaf spring bolt, releasing pressure on the Zuk coil spring.
NOTE: since I had the Zuk coil springs still installed, I felt this was the best way to slowly remove pressure from the compressed coil. Even though it was no longer wedged in there at this point, I had to give it a few love taps with the rubber mallet and pry a little to free the top end from the bump stop. Skeptics of the Zuk mod speculate that the coils can "pop out" under serious articulation, but this should give an idea as to how well the Wrangler/TJ Zuk mod stays in place.
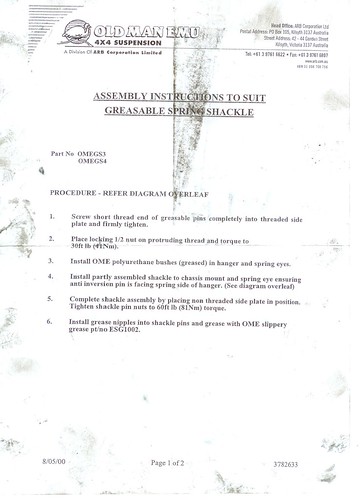
Now you can remove the front bolt for the leaf spring and tap it out of the hanger with the mallet (do not lose this bolt! there is no replacement in your kit). With the leaf pack free of the frame, you can jack the axle back up to get to the nuts underneath that hold the u-bolts secure. Remove the 4 u-bolts and the leaf packs are now completely free. If you're careful enough, you can slide the leafs out, taking care to avoid the brake lines. If you haven't assembled the greasable shackles yet, now would be the time. See instructions below
Leaf pack removed
Greasable shackle assembly instructions
Shackle assembly diagram
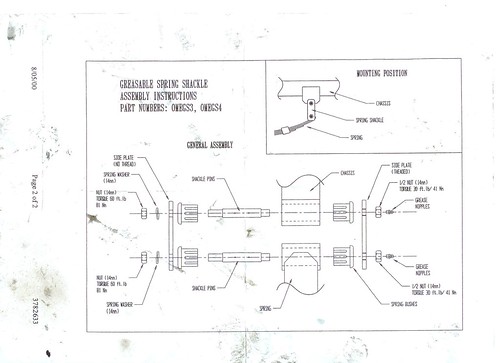
Grease the yellow OME bushings and slip them into the front and rear leaf spring mounts on the frame. Install the new shackle to the OME leaf pack, on the side opposite of the yellow "+" (the yellow + goes toward the front of the vehicle). Slide the leaf pack into place, using caution around the brake lines, and secure them to the axle using the longer u-bolts provided. Start by bolting up the front of the leaf ("+" side) to the front hanger on your chassis. NOTE: a beefy screwdriver or round prybar will make lining up the holes much easier. Jack up the axle again until the rear shackle bolts line up with the rear hanger. Are your new bushings still there? Good. Install the shackle nuts to the greasable bolts. Now you can completely remove the old rear shock to install the new one…
front of leaf springs bolted to front hanger, note which side the "+" is on!

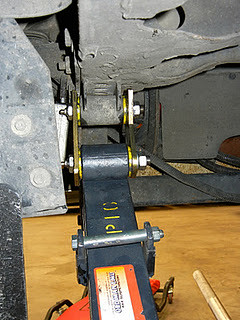
new rear shackle installed in hanger
This is when I realized I was given the wrong rear shocks (N92). As a matter of fact they were front shocks for another vehicle. I can't believe I didn't notice that sooner. No biggie, I called TRDparts4u and talked to Barbara King who was extremely helpful…this is where you'll thank yourself for ordering from a dealer with reputable customer service. I re-installed the old shock and they sent me the correct one overnight. Once I had the correct N92 shocks, it only took me 15 minutes and one wrench to swap them out. LESSON: check your parts and make sure they appear to be the correct parts when they first arrive!
NOTE: installing new bushings on a shock can be tricky, but it can be very simple if you use a vise to place equal pressure on the bushing face and the opposite side of the shock mount.

If you didn't tighten all of the nuts & bolts for this side, now is the time to go back and torque them all down. Be sure to grease the installed shackle while you're at it. Now crack open a beer and drink it slowly as you revel in the fact that you're halfway done…with the rear. Now get back to work you bum! The other side is exactly the same as the other, only you'll probably get it knocked out a little quicker…keep it up you're getting closer!
Success!...well, almost.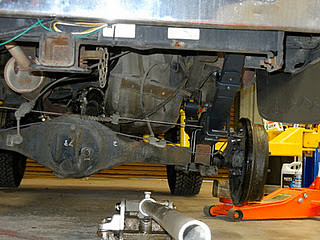
THE OME INSTALLATION: FRONT
Back to the short page of instructions…this is where a shop with a lift can come in handy. We weren't looking forward to this part because my buddy Zack had not-so-fond memories of previous torsion bar jobs on different vehicles. We read the generalized instructions and the Factory Service Manual's removal/installation steps.
The FSM makes it look so easy!

Could it really be that simple? No way, surely there's something that the FSM is leaving out. With our luck Newton's Law will kick in and we'll spend the next 3 hours cussing and destroying the old t-bars with a hammer and prybar. With a little hesitation we lifted the 4runner completely so that we could stand underneath and Zack gave it a go. No problem at all. We measured the threads remaining on the protruding bolt and made note of it for later reference. We then loosened and completely removed the adjusting nut, next we moved to the front mount of the t-bars. After removing the torque arm mounting nuts the torsion bar was theoretically ready to come out. The passenger side was a little stubborn and we had to knock it out of the rearward "cradle" using an air hammer. Other than that, the t-bars just pop up then you wiggle it rearward until the splines are free of the front mount. This whole time Zack was doing all the work and I was anxiously waiting to take over so he could get back to his other projects…fortunately it went so fast, that he was able to get it done in 15 minutes and I just held the flashlight! NOTE: this is another opportunity to drink a cold beer, while your t-bars are installing themselves with magic.
Once the old t-bars are out you can swap out all of the attached pieces to the new torsion bars (OME303003). (Torque arm, anchor arm, and dust boots)
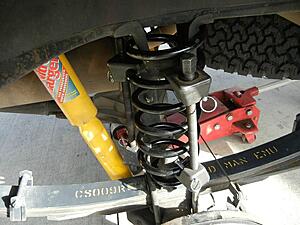
New torsion bars, looking good!
The key to installing the new torsion bars is to be sure and clean the splines well with a wire brush and then apply a little grease. The t-bar was designed for a snug fit on the splines, so it takes some gentle wiggling to get it in place. Remember the threads that you measured on the adjusting bolt? That's the other key to proper installation. As long as that measurement matches up at the end, you should be good to go. Replace the front N98 shocks and steering stabilizer, which is very simple so I won't go into that. The kit does not have the larger bottom bolts for the front shocks, but it does include new hardware for the upper shock mount. The steering stabilizer (OMESD33) comes with a new nylon lock nut to replace the castle nut & cotter pin. Now you're ready to get an alignment! Total installation time was 6 hours (for a novice!), but I could easily see this being done in less than 4 hours.
---------------------------------------------------------------------------------------
FIRST IMPRESSIONS ON OME PERFORMANCE:
PROS: I love the way this suspension handles. Everything feels much tighter all around and my ride has never been so quiet. Cornering even feels a little improved, but I never expect the 4runner to handle like a corvette. The suspension feels very responsive and does a great job of absorbing bumps with some weight in the back.
CONS: Although it's stupid to classify this as a negative remark…I completely unloaded the 4runner to have it weighed and the suspension was pretty rough (completely empty, with the rear seats, cargo panels, and spare tire removed). This is completely expected when a vehicle is underweight but I just wanted to make note of it so nobody spends $1000 on suspension, expecting to drive an empty 4runner and end up disappointed. However with a little gear in the back this kit really does perform well so take that poor note with a grain of salt! My biggest complaint with the OME shocks? The obnoxious yellow color! Okay now I'm just splitting hairs, but I feel like it gives the 4runner that "ricer" look...

A few thousand miles on Latin American roads and jungle treks should clean this ugly yellow paint right off!
COMPARISON OF OME SUSPENSION TO THE ZUK COIL MOD:
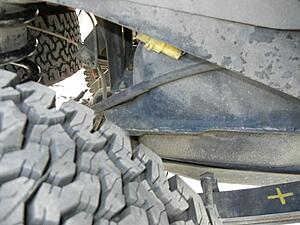
I will honestly say that so far the OME rear springs feel pretty similar to the ZUK coil spring mod. All around (front and back) it's definitely an improvement but the rear is comparable. After I installed the N94 shocks though, I could definitely feel the difference. The feel of the Zuk coil mod can also really depend on the load rating or length of the coil spring used. I used the front coils from a '97-2006 Jeep Wrangler/TJ and I honestly don't remember the spring rating. They were originally a little too long, around 17" I think, so I cut the widest end short so that they ended 14" long which made the rear sit level again (approx. 3" of lift in the rear). These coils are nice because one end is wide enough to fit over the upper bump stop perfectly while the other end is a little tapered so it fits snug around the bottom bump stop. After I installed the Zuk coils I noticed a few popping sounds (which is common) as the springs were settling into place on the bump stops. After that I never heard another sound from them.
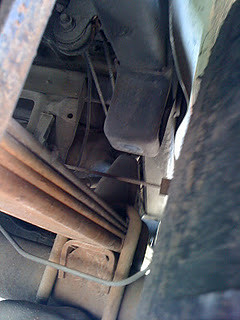
A little more space for the front bump stops to breathe

Do I regret my decision to spend $1000 on the OME kit instead of sticking with my $17 Zuk coil springs? Absolutely not. Even though the ride height looks pretty much the same. The Zuk coils were great but I still worried about the longevity and reliability of slightly used coils supporting VERY used leaf springs. There's always the paranoia of the coils popping out on an extreme articulation, but honestly I don't think that would happen.
I COULD have replaced all 4 shocks, steering stabilizer, and bushings while keeping the Zuk coils and old leaf-springs & t-bars. MAYBE it would feel the same as the OME kit for 1/2 the price…but I'd still have 24 year old t-bars and leaf springs holding it all together. NOTE: After I replaced the old rear shocks with the N92 shocks, the ride in the rear does feel much better than with the Zuk mod. Would it have felt the same if I had the N92 shocks and Zuk coils? I guess I'll never know. I would be fine driving with that if it were just cruising around town or hitting the local trails. Since we're driving half way around the world and hoping to frequently wander off the beaten path, I feel the extra $500 was worth the price. Call it insurance. Call me a sucker, I don't care.
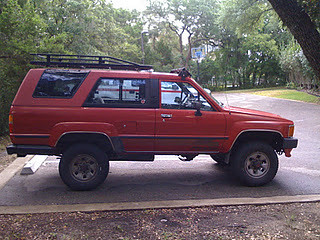
Ride height with Zuk mod
Ride height with Old Man Emu kit
Hopefully this writeup helps out someone who's deciding what to do about their suspension. Whether it be a cheap band-aid for their saggy butt or a more permanent solution for a comfortable ride.
~Happy wrenching & safe travels from Ruined Adventures
I've tried to keep this thread down to the meat and potatoes, but you can read the entire writeup on our website and ask me any questions about my suspension in the comment section at the bottom. Unfortunately my cameras ran out of batteries so I did not thoroughly take pictures during installation...oops.
I have also compared the weldless Zuk mod to the new Old Man Emu suspension.
Before Zuk mod or OME/Dakar installation
Front Bump Stops
tell R. Kelly that I see something wrong with a little bump n' grind...less than 1" between bump stops
Below is the writeup of the OME-4RUN-1GC-IFS kit. This is the IFS/rear leaf kit designed for Hilux/4runners with medium load applications from 0 lbs. to GVW. We do not want to exceed the GVW so we chose this kit. Never exceed your GVW...
--------------------------------------------------------------------------------------
THE TEMPORARY FIX TO SAGGY-BOTTOM BLUES
One solution that is becoming popular is the "Zuk mod". The general idea is to spread the worn out leaf springs as far apart as possible, then compress a coil spring so that it fits between them, theoretically locked into place by the bump stops. There are several different variations of this modification out there, but this is the simplest form because it requires no welding, it's easy to undo, and only cost me $17 plus a coil spring compressor. It lifted the rear end of the 4runner approx. 3" and performed like a set of "helper/overload springs", riding great when the 4runner was loaded down with camping gear. When the vehicle was empty, it was a rough ride but if it bothers you that much you can just remove them in about an hour. Since the Zuk mod is covered all over Yotatech, I'll focus more on the installation of the OME kit since I did not find too many detailed installs online. You can read more about the different versions of the Zuk mod at the bottom of Zuk's website.
Zuk Weldless Coil mod: I chose the '97-2006 Front Jeep Wrangler/Tj coils
Ride Height after Zuk mod
THE OME INSTALLATION: REAR
I started with the rear leaf springs. This was very simple. Jack up the vehicle by the frame, letting the suspension droop. Put a floor jack under the axle tube and raise it to take the load off whichever side you're removing first. Undo the top nut/bolt that secures the rear shackle to the rear hanger(leave the bottom nut/bolt alone). Tap the bolt out with a rubber mallet and your least favorite screwdriver, freeing the shackle from the frame and hopefully not breaking your screwdriver. Luckily our 4runner hasn't been attacked by cancer yet, so these bolts were all easy to break loose. If you're not so lucky, you may have to use penetrating oil, a pry-bar and fulcrum, or even a torch to get some of these ancient bolts and bushings loose. Next, remove the bottom bolt of the shock to give your axle some free play to articulate. Lower the floor jack and the axle will pivot on the front leaf spring bolt, releasing pressure on the Zuk coil spring.
NOTE: since I had the Zuk coil springs still installed, I felt this was the best way to slowly remove pressure from the compressed coil. Even though it was no longer wedged in there at this point, I had to give it a few love taps with the rubber mallet and pry a little to free the top end from the bump stop. Skeptics of the Zuk mod speculate that the coils can "pop out" under serious articulation, but this should give an idea as to how well the Wrangler/TJ Zuk mod stays in place.
Now you can remove the front bolt for the leaf spring and tap it out of the hanger with the mallet (do not lose this bolt! there is no replacement in your kit). With the leaf pack free of the frame, you can jack the axle back up to get to the nuts underneath that hold the u-bolts secure. Remove the 4 u-bolts and the leaf packs are now completely free. If you're careful enough, you can slide the leafs out, taking care to avoid the brake lines. If you haven't assembled the greasable shackles yet, now would be the time. See instructions below
Leaf pack removed
Greasable shackle assembly instructions
Shackle assembly diagram
Grease the yellow OME bushings and slip them into the front and rear leaf spring mounts on the frame. Install the new shackle to the OME leaf pack, on the side opposite of the yellow "+" (the yellow + goes toward the front of the vehicle). Slide the leaf pack into place, using caution around the brake lines, and secure them to the axle using the longer u-bolts provided. Start by bolting up the front of the leaf ("+" side) to the front hanger on your chassis. NOTE: a beefy screwdriver or round prybar will make lining up the holes much easier. Jack up the axle again until the rear shackle bolts line up with the rear hanger. Are your new bushings still there? Good. Install the shackle nuts to the greasable bolts. Now you can completely remove the old rear shock to install the new one…
front of leaf springs bolted to front hanger, note which side the "+" is on!
new rear shackle installed in hanger
This is when I realized I was given the wrong rear shocks (N92). As a matter of fact they were front shocks for another vehicle. I can't believe I didn't notice that sooner. No biggie, I called TRDparts4u and talked to Barbara King who was extremely helpful…this is where you'll thank yourself for ordering from a dealer with reputable customer service. I re-installed the old shock and they sent me the correct one overnight. Once I had the correct N92 shocks, it only took me 15 minutes and one wrench to swap them out. LESSON: check your parts and make sure they appear to be the correct parts when they first arrive!
NOTE: installing new bushings on a shock can be tricky, but it can be very simple if you use a vise to place equal pressure on the bushing face and the opposite side of the shock mount.
If you didn't tighten all of the nuts & bolts for this side, now is the time to go back and torque them all down. Be sure to grease the installed shackle while you're at it. Now crack open a beer and drink it slowly as you revel in the fact that you're halfway done…with the rear. Now get back to work you bum! The other side is exactly the same as the other, only you'll probably get it knocked out a little quicker…keep it up you're getting closer!
Success!...well, almost.
THE OME INSTALLATION: FRONT
Back to the short page of instructions…this is where a shop with a lift can come in handy. We weren't looking forward to this part because my buddy Zack had not-so-fond memories of previous torsion bar jobs on different vehicles. We read the generalized instructions and the Factory Service Manual's removal/installation steps.
The FSM makes it look so easy!
Could it really be that simple? No way, surely there's something that the FSM is leaving out. With our luck Newton's Law will kick in and we'll spend the next 3 hours cussing and destroying the old t-bars with a hammer and prybar. With a little hesitation we lifted the 4runner completely so that we could stand underneath and Zack gave it a go. No problem at all. We measured the threads remaining on the protruding bolt and made note of it for later reference. We then loosened and completely removed the adjusting nut, next we moved to the front mount of the t-bars. After removing the torque arm mounting nuts the torsion bar was theoretically ready to come out. The passenger side was a little stubborn and we had to knock it out of the rearward "cradle" using an air hammer. Other than that, the t-bars just pop up then you wiggle it rearward until the splines are free of the front mount. This whole time Zack was doing all the work and I was anxiously waiting to take over so he could get back to his other projects…fortunately it went so fast, that he was able to get it done in 15 minutes and I just held the flashlight! NOTE: this is another opportunity to drink a cold beer, while your t-bars are installing themselves with magic.
Once the old t-bars are out you can swap out all of the attached pieces to the new torsion bars (OME303003). (Torque arm, anchor arm, and dust boots)
New torsion bars, looking good!
The key to installing the new torsion bars is to be sure and clean the splines well with a wire brush and then apply a little grease. The t-bar was designed for a snug fit on the splines, so it takes some gentle wiggling to get it in place. Remember the threads that you measured on the adjusting bolt? That's the other key to proper installation. As long as that measurement matches up at the end, you should be good to go. Replace the front N98 shocks and steering stabilizer, which is very simple so I won't go into that. The kit does not have the larger bottom bolts for the front shocks, but it does include new hardware for the upper shock mount. The steering stabilizer (OMESD33) comes with a new nylon lock nut to replace the castle nut & cotter pin. Now you're ready to get an alignment! Total installation time was 6 hours (for a novice!), but I could easily see this being done in less than 4 hours.
---------------------------------------------------------------------------------------
FIRST IMPRESSIONS ON OME PERFORMANCE:
PROS: I love the way this suspension handles. Everything feels much tighter all around and my ride has never been so quiet. Cornering even feels a little improved, but I never expect the 4runner to handle like a corvette. The suspension feels very responsive and does a great job of absorbing bumps with some weight in the back.
CONS: Although it's stupid to classify this as a negative remark…I completely unloaded the 4runner to have it weighed and the suspension was pretty rough (completely empty, with the rear seats, cargo panels, and spare tire removed). This is completely expected when a vehicle is underweight but I just wanted to make note of it so nobody spends $1000 on suspension, expecting to drive an empty 4runner and end up disappointed. However with a little gear in the back this kit really does perform well so take that poor note with a grain of salt! My biggest complaint with the OME shocks? The obnoxious yellow color! Okay now I'm just splitting hairs, but I feel like it gives the 4runner that "ricer" look...
A few thousand miles on Latin American roads and jungle treks should clean this ugly yellow paint right off!
COMPARISON OF OME SUSPENSION TO THE ZUK COIL MOD:
I will honestly say that so far the OME rear springs feel pretty similar to the ZUK coil spring mod. All around (front and back) it's definitely an improvement but the rear is comparable. After I installed the N94 shocks though, I could definitely feel the difference. The feel of the Zuk coil mod can also really depend on the load rating or length of the coil spring used. I used the front coils from a '97-2006 Jeep Wrangler/TJ and I honestly don't remember the spring rating. They were originally a little too long, around 17" I think, so I cut the widest end short so that they ended 14" long which made the rear sit level again (approx. 3" of lift in the rear). These coils are nice because one end is wide enough to fit over the upper bump stop perfectly while the other end is a little tapered so it fits snug around the bottom bump stop. After I installed the Zuk coils I noticed a few popping sounds (which is common) as the springs were settling into place on the bump stops. After that I never heard another sound from them.
A little more space for the front bump stops to breathe
Do I regret my decision to spend $1000 on the OME kit instead of sticking with my $17 Zuk coil springs? Absolutely not. Even though the ride height looks pretty much the same. The Zuk coils were great but I still worried about the longevity and reliability of slightly used coils supporting VERY used leaf springs. There's always the paranoia of the coils popping out on an extreme articulation, but honestly I don't think that would happen.
I COULD have replaced all 4 shocks, steering stabilizer, and bushings while keeping the Zuk coils and old leaf-springs & t-bars. MAYBE it would feel the same as the OME kit for 1/2 the price…but I'd still have 24 year old t-bars and leaf springs holding it all together. NOTE: After I replaced the old rear shocks with the N92 shocks, the ride in the rear does feel much better than with the Zuk mod. Would it have felt the same if I had the N92 shocks and Zuk coils? I guess I'll never know. I would be fine driving with that if it were just cruising around town or hitting the local trails. Since we're driving half way around the world and hoping to frequently wander off the beaten path, I feel the extra $500 was worth the price. Call it insurance. Call me a sucker, I don't care.
Ride height with Zuk mod
Ride height with Old Man Emu kit
Hopefully this writeup helps out someone who's deciding what to do about their suspension. Whether it be a cheap band-aid for their saggy butt or a more permanent solution for a comfortable ride.
~Happy wrenching & safe travels from Ruined Adventures
Last edited by Ruined Adventures; 05-02-2012 at 12:34 PM.
 05-02-2012, 12:56 PM
#2
Registered User
Thread Starter
A few months later...
After being on the road for a while, we noticed that we were beginning to sag a little once we added the weight from water, fuel, and all our gear.
Lucky for me, James of Home on the Highway has been using the same OME suspension on their similar trip thru Central & South America. James was able to point out a minor issue with the OME leaf springs. The Old Man Emu CS009R springs have a leaf pack added toward the front hanger, unlike the factory springs. If the vehicle is loaded down enough and bouncing along just right, it's possible that the nut/bolt from the leaf pack can rub on the fuel tank lip. Unfortunately James had that exact same thing happen in Belize, which caused a leak in his fuel tank. ARB was no help to their cause unfortunately...he had the gas tank repaired and notched out to clear the bolt in the future.
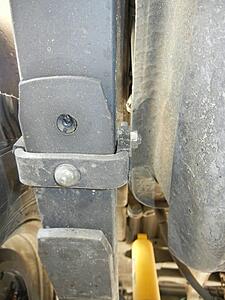
After the vehicle was loaded down, this nut was only 1" away from the fuel tank lip.
I didn't want to have any issues later down the road, so I ended up doing the Zuk coil spring mod (again) as overload protection. Since I had used them in the past with much success, I figured it was worth a shot but honestly that was my plan B. I had originally inquired (a couple times) about getting the OME add-a-leaf spring with a reputable dealer, but apparently my request wasn't important to them and I was running out of time. I won't mention names...

Now there's no chance that the suspension will sag enough to have an issue with rubbing on the fuel tank. I should've originally gone with the Old Man Emu heavy kit originally, but I believe this will be a great temporary solution. On the plus side, after it's days as an overlanding vehicle the "Border-Runner" can one day easily be retired to a "Grocery-Runner" by easily removing the coil springs for a softer ride :sombrero:
That's a little better!
Lucky for me, James of Home on the Highway has been using the same OME suspension on their similar trip thru Central & South America. James was able to point out a minor issue with the OME leaf springs. The Old Man Emu CS009R springs have a leaf pack added toward the front hanger, unlike the factory springs. If the vehicle is loaded down enough and bouncing along just right, it's possible that the nut/bolt from the leaf pack can rub on the fuel tank lip. Unfortunately James had that exact same thing happen in Belize, which caused a leak in his fuel tank. ARB was no help to their cause unfortunately...he had the gas tank repaired and notched out to clear the bolt in the future.

After the vehicle was loaded down, this nut was only 1" away from the fuel tank lip.
I didn't want to have any issues later down the road, so I ended up doing the Zuk coil spring mod (again) as overload protection. Since I had used them in the past with much success, I figured it was worth a shot but honestly that was my plan B. I had originally inquired (a couple times) about getting the OME add-a-leaf spring with a reputable dealer, but apparently my request wasn't important to them and I was running out of time. I won't mention names...

Now there's no chance that the suspension will sag enough to have an issue with rubbing on the fuel tank. I should've originally gone with the Old Man Emu heavy kit originally, but I believe this will be a great temporary solution. On the plus side, after it's days as an overlanding vehicle the "Border-Runner" can one day easily be retired to a "Grocery-Runner" by easily removing the coil springs for a softer ride :sombrero:

That's a little better!


Thread
Thread Starter
Forum
Replies
Last Post
djpg2000
Tires & Wheels
11
11-11-2020 04:56 AM
icentropy
86-95 Trucks & 4Runners
10
07-11-2015 07:21 AM


