Yet another 3.4 Swap...trying to complete under $2K
 04-04-2008, 01:10 PM
#21
Registered User
The AutoZone part number for a lower radiator hose is: M-1068 or 62120. Those are the 2 numbers on the hose. This hose will work if you are NOT using a body lift.
You have to cut a little off the hose. I'll get some picture of where to make the cut.
You have to cut a little off the hose. I'll get some picture of where to make the cut.
 04-04-2008, 02:44 PM
#22
Registered User
Thread Starter
I just spent about 2 hours downloading and printing off of techinfo.toyota.com. I have about 100 pages of info. Hopefully I won't need to much more. Anything specific that I should get while I still have access to the site? I downloaded all I thought I needed, but there is so much on there I'm sure I missed some stuff.
Parts are all ordered. Going to pick up my flywheel right now. Gonna start prepping the 3.4L on Wednsday.
 04-05-2008, 02:29 PM
#25
Registered User
04-05-2008, 03:39 PM
#26
Registered User
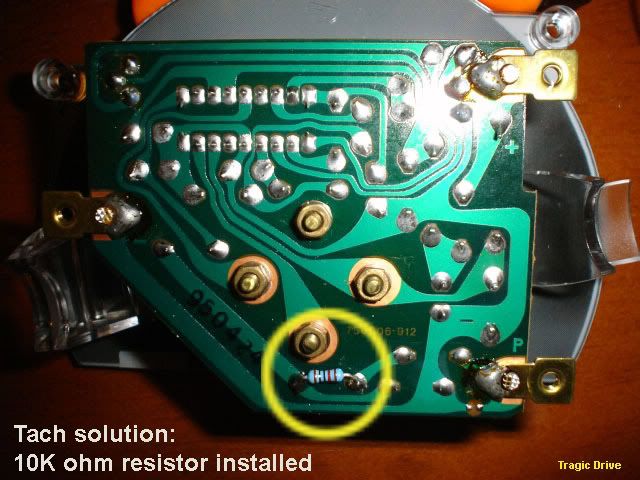
Yeah, that's the back of it. You'll need to disassemble your dash, starting from your glovebox, to the key trim and dash trim. Pull your instrument cluster out and remove the gauges from the front of the panel. Remove the screws holding your tach in from the front and carefully remove it from the white housing. Takes about half an hour to 45 minutes or so.
04-05-2008, 08:12 PM
#28
Registered User
You're welcome. When I pulled mine, I thought it was the back of the instrument cluster. I wondered why it didn't look like the pic. The I realized you had to pull the tach out of the front, solder the 10k resistor (go to Radio Shack) across the two terminals, then pop it all back in.
Not sure what it will read if you run the 3.0 with it, if you're going to do it before you start your 3.4 swap.
Not sure what it will read if you run the 3.0 with it, if you're going to do it before you start your 3.4 swap.
04-06-2008, 05:16 AM
#29
Contributing Member
Here's a little more on the tach:
https://www.yotatech.com/888831-post45.html
https://www.yotatech.com/888831-post45.html
04-06-2008, 04:10 PM
#31
Registered User
Thread Starter
Thanks a lot!
Ok here we go....I did just a few things on the motor. I pulled the automatic flywheel pulled some old cut hoses and attempted to put it up on the engine stand but need to buy the correct bolts for the bellhousing.
Still awaiting the rest of my parts.
2 questions....
Does anyone have a better write up or better pictures of the oil dipstick move? I still only semi understand the directions, and spaces looked tight when I was looking at it today.
Also, does anyone know what the pitch and length is of the manual flywheel bolts for the 3.4L? I need all of them. Or does anyone have some they want to sell?
Thats it for now...Thanks for everyones help
04-06-2008, 05:44 PM
#32
Registered User
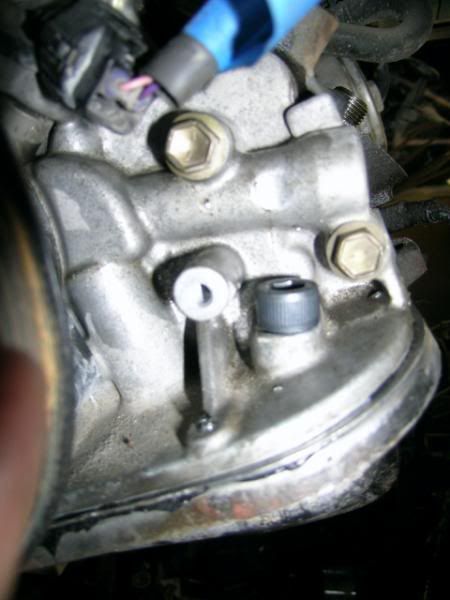
On the front of the engine, you'll notice that you probably have the dipstick tube going down into the driver's side front corner. You'll need to pull the dipstick (held in by the mount and a rubber O ring) and smack the guide (the part where the tube mounts) out with a chisel or punch and hammer.
Take a 1/4" tap and thread the hole. Take a matching 1/4" plug, wrap some Teflon tape around it and tighten it into the hole, On the driver side, matching the dipstick tube on your 3.0, you'll probably notice a spot where the hole is plugged or can be drilled out to match. I'm sorry I don't have pics of it.
Bolts...hit a wrecking yard or go to a dealership. Mine all came with the motor...
Last edited by RobD; 04-06-2008 at 05:50 PM.
04-06-2008, 05:47 PM
#33
Registered User
http://www.pirate4x4.com/forum/showt...1&pp=30&page=2
Scroll down about 1/3 of the way to post 36 and you'll see him tapping the front hole. Post 44 you'll see the new location.
Scroll down about 1/3 of the way to post 36 and you'll see him tapping the front hole. Post 44 you'll see the new location.
Last edited by RobD; 04-06-2008 at 05:48 PM.
04-07-2008, 01:46 PM
#35
Registered User
 04-07-2008, 02:00 PM
#36
Contributing Member
http://www.pirate4x4.com/forum/showt...1&pp=30&page=2
Scroll down about 1/3 of the way to post 36 and you'll see him tapping the front hole. Post 44 you'll see the new location.
Scroll down about 1/3 of the way to post 36 and you'll see him tapping the front hole. Post 44 you'll see the new location.
04-08-2008, 12:50 AM
#37
Contributing Member
For the original dipstick hole in the front of the block, I tapped it to 10x1.5mm. Didn't even have to drill. Then RTV and screwed in a plug:
Seems to be working so far.
Seems to be working so far.
04-08-2008, 05:49 PM
#38
Registered User
Thread Starter
Finally some motor pics
Here's the 3.4 and some of the parts. Should see the rest of the parts Friday. The wiring harness probably not till next week from what yotaman tells me.
Anyway the pics...

The Downey Headers...

Went wheeling today. It was awesome. I love my rig. Can't wait for the extra power of the 3.4!
Anyway the pics...
The Downey Headers...
Went wheeling today. It was awesome. I love my rig. Can't wait for the extra power of the 3.4!
04-09-2008, 08:17 PM
#39
Registered User
Thread Starter


