Supercharged 3.4 into '88 4Runner 3.0 5 Speed
 07-29-2010, 11:26 PM
#41
I got back to the swap today and made some progress and had a few setbacks. I started to finalized the 3.4 setup and here is what I am going with.
My major setback right now is that the bolt hole on the block that the dynamic tensioner for the SC mounts to has the threads rusted out since it was a previously unused bolt hole. Tomorrow I hope to locate a helicoil in 10mm 1.25 that I can put in there and get past this.
Once this is resolved and the clutch shows up from URD I'll be ready to put the 3.4 in. Here is a "almost ready" engine stand shot. I have some hardware to swap over yet to stainless. (all the rusty bolts you see)
 07-29-2010, 11:59 PM
#42
Registered User
Thread Starter
I had the same problem when installing my sc. find a bolt that matches the threads of the tensioner bolt cut slits in the threads running up and down the bolt. Spray it up with pb blaster and work the bolt in and out of the hole and finish with compressed air. Worked just fine for me. Also.. may want to replace the valve cover gaskets before you throw the sc on.
As for VC gaskets. I did quite a few preventative maintenance steps while I was waiting for the opportunity to start the swap. I did water pump, timing belt, timing idler pulleys, timing hydraulic tensioner, spark plug tube gaskets, VC gaskets, freeze-out plugs, thermostat, etc, etc.
I first was going to send the motor out for a full re-build, then I decided that it was a waste of Toyota engineering to do so. Hell, why did I fall in love with Toys in the first place...their dependability. I can't wait to tune this thing when it's up and running. I'm not going to settle for less than twice the factory HP.
The following users liked this post:
mightymouse1st (06-03-2023)
07-30-2010, 09:05 AM
#44
Registered User
Thread Starter
08-06-2010, 09:32 PM
#47
Registered User
Thread Starter
Days 3 and 4
So I have been tied down at work again, but managed to make some progress.
I changed out the electrical connectors on the 3.4 Harness for the reverse light switch and the 4WD switch and oil sender. I simply cut the 3.0 ones off and soldered them onto the 3.4 Harness. I probably could have simply swapped switches from the 3.4 to the 3.0, but I am selling the 3.4 R150 and wanted to keep it as complete as possible.
I also got the stuff together and prepped for final drop-in of the 3.4. I cut three of the 3.4's trans bolts heads off and sawed a slit into the top for a flat head screwdriver. These were used as guide bolts for the transmission.
I got the 3.4 off the engine stand and onto the crane so I could finish up with the back of motor prep. I changed out the pilot bearing (used 3.4 one) using the wet paper and 8mm socket trick. This worked fantastically. My clutch showed up earlier this week from URD a stage 3 dual friction. I will be starting a seperate thread for a review of this clutch since I couldn't find one myself when I was buying it. I swapped out the slave cylinder with a brand new one while I had everything apart. Put in the new 3.0 throw-out bearing and greased everything up.
Had a friend come over to give a hand for the drop-in tonight and things went pretty smoothly overall. The guide bolts came in very handy with lining everything up. It still took a little rocking, etc., but she popped right in.
So this was a huge benchmark moment for me. I should be able to get the majority of the accessories all together and on before the weekend is up.
I am still waiting on the ECU from URD for the 7th injector kit, but I have 95% of the wiring mapped out. I'll probably put off making my harness till that ECU shows up.
Here's a pic of the 5VZ in.
08-06-2010, 11:20 PM
#48
that urd stage 3 clutch sounds like it won't be very streetable. I'm interested to see how it does. Have you thought about where you're gonna mount the 7th injector controller? It takes up a bit of space. Also have you looked into guages to monitor afr and egt? And of course a boost gauge for eye candy.
08-07-2010, 01:28 PM
#49
Registered User
Thread Starter
that urd stage 3 clutch sounds like it won't be very streetable. I'm interested to see how it does. Have you thought about where you're gonna mount the 7th injector controller? It takes up a bit of space. Also have you looked into guages to monitor afr and egt? And of course a boost gauge for eye candy.
"This Stage III Performance Clutch Kit provides approximately 180% increase in torque capacity, but because of the dual friction design retains stock clutch like drivabilty. This clutch is ideally suited for modified normally aspirated engines and high power forced induction applications. The segmented bronze ceramic material used on the flywheel side gives the clutch its incredible torque holding capability, while the carbon/Kevlar material on the pressure plate side provides the stock like smooth engagement. This provides all the qualities you want in a performance clutch upgrade."
I have not figured out exactly where the 7th injector controller is going, but I think I'm going to mount it in the glove box. This will allow easy access for the serial port and is close to the stock ECU where all the wires get spliced in.
I have a wideband on the way and I already have a boost gauge, I was going to try and get by without the EGT gauge for now, but I am having a bung for it welded into the Y-pipe while I'm there having the one for the wideband put in. I also have a PLX OBDII gauge which will aloow for real time monitoring of all of the sensor info, etc all the time. Thus will allow me to not have to have a laptop in the truck all the time while diagnosing the inevitable bugs that I am sure will pop up.
08-07-2010, 01:36 PM
#50
Registered User
Thread Starter
Day 5 - progress and Major setback!! HELP!!
Got up bright and early today and worked for 6 hours dry fitting headers, test fitting accessories, running wire harness, etc. Made lots of progress. Then I decided to button up the underside of the truck. When I went to put the clutch inspection cover back in WHAM!!!!. I realized that I didn't transfer the plate that sits between the engine and trans over to the 3.4 from the 3.0.
So needless to say I am very reluctant to pull this thing back out for this plate. Do you think I need to? What actual purpose does it serve other than to spacer out the engine for the inspection plate? DO you think not having that spacer plate in there will have any adverse effects on the clutch pressure?
I can get the bottom half of the plate in to seal things up, but I am afraid that this mistake is going to haunt me if I don't pull everything apart again to put it in.
So what do you guys think? Can I go without it?
08-08-2010, 03:58 AM
#51

I'd put it in.
What headers are those? Hows the clearance on the passenger side? Have you had to relocate any brake lines or the fuel line?
Would they be hard to put on if the engine is already in?
What headers are those? Hows the clearance on the passenger side? Have you had to relocate any brake lines or the fuel line?
Would they be hard to put on if the engine is already in?
08-08-2010, 09:29 AM
#53
Registered User
Thread Starter
The headers are from Downy (now defunct). They actually fit pretty well. They are tight to the frame on both the driver and passenger sides. I had to tweak the brake line coils and the fuel line that are on the pass side a little to give the collector adequate room. The drivers side I had to bend back the heat shield for the torsion bar mount and the heat shield for the stock exhaust pipe. Other than that they look pretty good. I'll try and take some picts for you before I pull the motor back out today. And I put them in after the motor was in, so this shouldn't be a problem for you.
08-08-2010, 09:37 AM
#54
Registered User
Thread Starter
So my next question would be do you think I can get away with putting it in without the one bolt that holds it to the engine block? If I can not use that bolt then I can just split the motor and trans a few inches, put the plate in, and put it back together again. Otherwise I would have to pull it completely out, remove the clutch flywheel, etc. Much more of a pain.
08-08-2010, 03:35 PM
#55
Registered User
Thread Starter
Horay... back on track.
So back to where I was yesterday when I realized the stupid mistake I made with leaving out that plate. Got it in there now and it wan't that difficult overall. I was able to slip it in without completely removing the motor.
Here are those picts of the headers fitted in.
Passenger side: I am going to move that fuel line back closer to the firewall to get it away from the collector.
Here are those picts of the headers fitted in.
Passenger side: I am going to move that fuel line back closer to the firewall to get it away from the collector.
08-08-2010, 03:39 PM
#56
Registered User
Thread Starter
Drivers side header
And here is the drivers side: I had to cut the EGR bung off and weld a nut into the tube so I can plug it. This was to allow for the clearance for the steering shaft as I have no body lift and don't intend on one.
Last edited by theMonch; 08-26-2010 at 07:04 PM.
08-08-2010, 05:17 PM
#57
I recomend a 1" body lift. Had i used one when i swaped my 3.4 in.. i wouldn't have a hole in the hood. Did a body lift to get sliders on and now theres an obvios hole.. I do have a hood scoop.. just havent' had time to install it. Are you going with a scoop?
08-08-2010, 08:41 PM
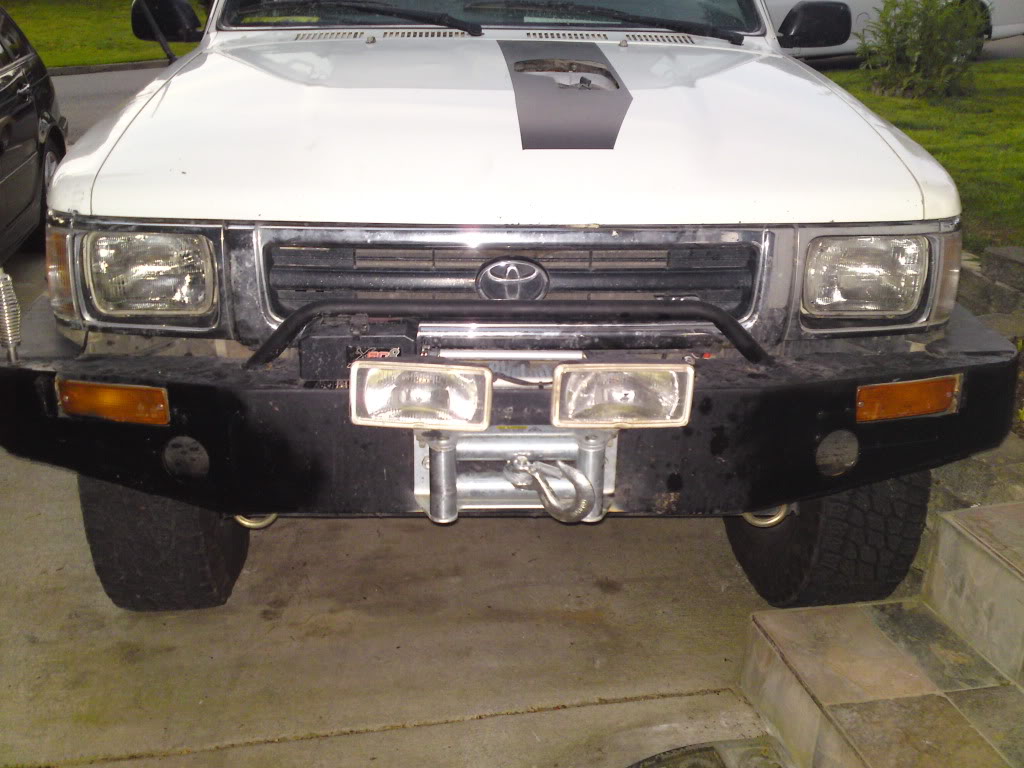
#58
Registered User
Thread Starter
Here's the scoop I went with. It fits perfect to the contour of the 1st gen hood and doesn't interfere with the custon paint that I already have on there.