88 Pickup v6 Manual 4x4 - 3.4 Swap


 01-11-2017, 06:14 PM
#63
Registered User

Join Date: Jun 2011
Location: Orford,NH
Posts: 85
Likes: 0
Received 0 Likes
on
0 Posts
Your last post had some pics. I was just following your build and wanted to see them. Most of your pics show up but some don't. Just wondering if anybody else was having the same issue
01-12-2017, 09:28 AM
#64
Registered User
Thread Starter
That is really odd, I have been linking my pictures from a public google photo album I made for this. They always seem to load up for me when I have check with out being logged in to anything, but please if anyone else is having this issue I would like to know so I can try and figure something out. I dont want to just be talking to my self here! Thanks for letting me know bklf7.
Look at that, the thing dreams are made of! At least my dreams lately. Fortunately I think I have figured out most of the wiring at this point, but if you wouldnt mind taking a look i would be curious to know if they have any Plug reference sheets in there that have pinouts or information about the different body/dash harness plugs and where they fall into the wiring diagrams. That was one big thing that made it hard on the 88, my wiring PDF i found online had no reference to the plugs at all, just the end points, so you kind of are flying blind trying to figure out where the harness connectors actually fall into place in the diagrams.
On my 88, from Monarchs research I believe the connects I have been using are named "N3" and "N5", does your book have any information on those plugs? Thanks very much for sharing! How did you get your hands on that book?
A few more things crossed off the list the last few days.
Got my crossover installed with new gaskets finally. Should be able to start putting in the whole drivetrain finally.

Heater hoses plumbed up, hopefully i got the flow directions figured out, that was harder to find a good resource than I expected.

Fuel pressure and return lines reversed and mostly hooked up, I have been running into a constant problem with my fuel line fittings on this truck. From what I can tell everything is original and has never been replaced by anyone but me since it came from the factory. Whoever tightened down these fuel lines cranked on them so hard all of the flare nuts have stretched out causing the threads to be insanely tight 100% of the way when installing and removing any fitting. When I replaced my fuel filter last year it took me probably 3 hours of swearing to finally get the nuts off both ends, I had to file down the threads very carefully to get the new filter in. I am having the same problem with the fuel pressure line in the engine bay, the double female connector from the 3.0 was a pain in the ass to get off, and trying to thread the 3.0 flare nut into the 3.4 fuel line is crazy tight right away.. I don't like having to file down the threads. Only other option might just have to be a new fuel line? Anyone else ever run into this issue?

Look at that, the thing dreams are made of! At least my dreams lately. Fortunately I think I have figured out most of the wiring at this point, but if you wouldnt mind taking a look i would be curious to know if they have any Plug reference sheets in there that have pinouts or information about the different body/dash harness plugs and where they fall into the wiring diagrams. That was one big thing that made it hard on the 88, my wiring PDF i found online had no reference to the plugs at all, just the end points, so you kind of are flying blind trying to figure out where the harness connectors actually fall into place in the diagrams.
On my 88, from Monarchs research I believe the connects I have been using are named "N3" and "N5", does your book have any information on those plugs? Thanks very much for sharing! How did you get your hands on that book?
A few more things crossed off the list the last few days.
Got my crossover installed with new gaskets finally. Should be able to start putting in the whole drivetrain finally.
Heater hoses plumbed up, hopefully i got the flow directions figured out, that was harder to find a good resource than I expected.
Fuel pressure and return lines reversed and mostly hooked up, I have been running into a constant problem with my fuel line fittings on this truck. From what I can tell everything is original and has never been replaced by anyone but me since it came from the factory. Whoever tightened down these fuel lines cranked on them so hard all of the flare nuts have stretched out causing the threads to be insanely tight 100% of the way when installing and removing any fitting. When I replaced my fuel filter last year it took me probably 3 hours of swearing to finally get the nuts off both ends, I had to file down the threads very carefully to get the new filter in. I am having the same problem with the fuel pressure line in the engine bay, the double female connector from the 3.0 was a pain in the ass to get off, and trying to thread the 3.0 flare nut into the 3.4 fuel line is crazy tight right away.. I don't like having to file down the threads. Only other option might just have to be a new fuel line? Anyone else ever run into this issue?


 01-12-2017, 11:29 AM
#66
Registered User
Thread Starter
Thanks 88 Red Runner!!! That is the first reference I have ever seen of those connectors. How did you get that book? Is there any special version number to it indicating that it contains info for the 3vz-e? A lot of the wiring info I have found for the 88 omits the 3vz-e details.
01-12-2017, 02:44 PM
#67
Registered User
Join Date: Dec 2012
Location: Montana
Posts: 223
Likes: 0
Received 0 Likes
on
0 Posts
Thanks 88 Red Runner!!! That is the first reference I have ever seen of those connectors. How did you get that book? Is there any special version number to it indicating that it contains info for the 3vz-e? A lot of the wiring info I have found for the 88 omits the 3vz-e details.
let me know if I can help with anything else. I know it's frustrating, but keep after it.
01-12-2017, 08:39 PM
#68
Registered User

Join Date: Jun 2015
Location: WI
Posts: 147
Likes: 0
Received 0 Likes
on
0 Posts
...............................
Heater hoses plumbed up, hopefully i got the flow directions figured out, that was harder to find a good resource than I expected.
.................. I don't like having to file down the threads. Only other option might just have to be a new fuel line? Anyone else ever run into this issue?
Heater hoses plumbed up, hopefully i got the flow directions figured out, that was harder to find a good resource than I expected.
.................. I don't like having to file down the threads. Only other option might just have to be a new fuel line? Anyone else ever run into this issue?
As for the fuel lines, all of mine threaded very easy. I ended up buying new tubes though so it's likely that's why they worked out so well. Maybe have a shop make you new ones? Sounds like a PITA and personally, I'd gladly pay $40 now to save 3 hours of headache every time I need to change a filter. I'm pretty sure the fuel tubes were roughly $20 something from the dealer.... A local garage could likely make them for much less. Just a thought!
01-13-2017, 12:41 PM
#69
Registered User
Thread Starter
Heater hoses look right! I could have taken a better picture of these in my build thread but if you need any help/verification on anything else I can gladly take some pics just let me know.
As for the fuel lines, all of mine threaded very easy. I ended up buying new tubes though so it's likely that's why they worked out so well. Maybe have a shop make you new ones? Sounds like a PITA and personally, I'd gladly pay $40 now to save 3 hours of headache every time I need to change a filter. I'm pretty sure the fuel tubes were roughly $20 something from the dealer.... A local garage could likely make them for much less. Just a thought!
As for the fuel lines, all of mine threaded very easy. I ended up buying new tubes though so it's likely that's why they worked out so well. Maybe have a shop make you new ones? Sounds like a PITA and personally, I'd gladly pay $40 now to save 3 hours of headache every time I need to change a filter. I'm pretty sure the fuel tubes were roughly $20 something from the dealer.... A local garage could likely make them for much less. Just a thought!
In other news, went and picked up all new belts, and found an alternator belt that should be close enough to work until I get the supercharger installed, i believe its 41.25" Ideally I think 41" exactly would be a perfect fit but I wasn't able to find one locally.
Also got the remaining exhaust gaskets delivered so I can start bolting up the front pipe/collector and put the drive train back in this weekend. while its not much progress on the engine itself, it will be great to get that whole thing buttoned up and should feel like a big step forward.
Completely off topic: Price seems high but I cant stop looking at this posting.. 88 4Runner for sale: http://sfbay.craigslist.org/sby/cto/5915723390.html
Last edited by mbomberz1; 01-13-2017 at 12:44 PM.
01-16-2017, 07:47 PM
#70
Registered User
Join Date: Jun 2015
Location: WI
Posts: 147
Likes: 0
Received 0 Likes
on
0 Posts
 The tubes I found for an 88 are approximately 23 and 29 dollars each. Part numbers are;
Rear - 77252-35240
Front - 77205-35090
These are for an 88 but I don't know what frame code your truck is so make sure you double check. Go to this website;
www.japan-parts.eu
Then type in your VIN number. Go to the Body tab > Fuel tank & tube > Page 2 and select the tube you want to buy. Part number will pop up for you to give to your local dealer or an online vendor. Most local dealers will rape you though so just keep that in mind. I was in Ohio 2 weeks ago and bought some small items... They priced above MSRP. I have a dealer by me that won't give online prices but at least they are well below MSRP if I buy anything small. Most of the parts I bought were bought months in advance so I could put a very large order in from Boch Toyota and benefit from their savings.
..........................................
Thanks for all your help duck! Keep up the pictures and posts on your rebuild, one of my favorite threads to follow right now, I am jealous every time I see new pictures of all your new clean crisp factory toyota parts getting bolted onto that frame up job. This may sound silly but I would love to do that to my truck one day, there is something I really enjoy about renewing parts on my old truck that makes it all the more fun to drive. Cant imagine now that first drive of yours is gonna feel, like going back in time.
..............................
Very rewarding and learned a ton. If you do, just make sure you set aside the room and time. Lots of frustration at first when life was getting in the way of the build 
Enough about that... lets see some 3.4 swap
 01-17-2017, 09:27 AM
#71
Registered User
Thread Starter
Should be easy for you to find The tubes I found for an 88 are approximately 23 and 29 dollars each. Part numbers are;
Rear - 77252-35240
Front - 77205-35090
These are for an 88 but I don't know what frame code your truck is so make sure you double check. Go to this website;
www.japan-parts.eu
Then type in your VIN number. Go to the Body tab > Fuel tank & tube > Page 2 and select the tube you want to buy. Part number will pop up for you to give to your local dealer or an online vendor. Most local dealers will rape you though so just keep that in mind. I was in Ohio 2 weeks ago and bought some small items... They priced above MSRP. I have a dealer by me that won't give online prices but at least they are well below MSRP if I buy anything small. Most of the parts I bought were bought months in advance so I could put a very large order in from Boch Toyota and benefit from their savings.
Anytime. If you need any pics I didn't put in my build about the swap that I might be able to help with just lemme know! Doesn't sound silly at all my friend! I think everyone should do a frame off Very rewarding and learned a ton. If you do, just make sure you set aside the room and time. Lots of frustration at first when life was getting in the way of the build
Enough about that... lets see some 3.4 swap
The tubes I found for an 88 are approximately 23 and 29 dollars each. Part numbers are;Rear - 77252-35240
Front - 77205-35090
These are for an 88 but I don't know what frame code your truck is so make sure you double check. Go to this website;
www.japan-parts.eu
Then type in your VIN number. Go to the Body tab > Fuel tank & tube > Page 2 and select the tube you want to buy. Part number will pop up for you to give to your local dealer or an online vendor. Most local dealers will rape you though so just keep that in mind. I was in Ohio 2 weeks ago and bought some small items... They priced above MSRP. I have a dealer by me that won't give online prices but at least they are well below MSRP if I buy anything small. Most of the parts I bought were bought months in advance so I could put a very large order in from Boch Toyota and benefit from their savings.
Anytime. If you need any pics I didn't put in my build about the swap that I might be able to help with just lemme know! Doesn't sound silly at all my friend! I think everyone should do a frame off
Very rewarding and learned a ton. If you do, just make sure you set aside the room and time. Lots of frustration at first when life was getting in the way of the build Enough about that... lets see some 3.4 swap
One day I will have the space and time to do that frame off. I can only imagine some of your frustrations!
Back to the swap, made some good progress over the weekend. As usual, I didnt get as far as I would have liked because everything always takes long than you expect. Either way progress is progress and I am inching along. I got the whole drive-train back together and in the truck which is a huge relief and kind of a big headache off my mind, not much else though, it ended up taking all of my free time since friday.
Trans finally going in..

Front/Down pipe installed with a new gasket, what a relief everything lined up like I hoped.

Drivelines, transfer case and slave cylinder all installed. Clutch pedal felt great, although almost too soft. Will be hard to say for sure until I get to take it out on the first drive, but the 2100lb clutch feels smoother than my old one that is for sure, might have a lot to do with the fact that everything is basically brand new with fresh grease too on the input shaft and throwout bearing, clutch fork and spring.

And one final present to myself for getting this far, thanks to 88 Red Runner. A new set of Toyota factory service manuals with wiring


Last edited by mbomberz1; 01-17-2017 at 10:27 AM.
01-17-2017, 03:48 PM
#72
Registered User
Join Date: Jun 2015
Location: WI
Posts: 147
Likes: 0
Received 0 Likes
on
0 Posts
Good find on the fuel lines, not sure why I wasn't able to locate them on my normal parts websites I frequent. As for the above MSRP issue, I have the same issue around here and I can't understand it. I only end up getting parts from the local dealer if its something small and outside of a larger order. They wanted nearly 45$ for the knock sensor pigtail when Toyota MSRP was i think about 32$, and the best online price I found was 22$ about if I an remembering correctly. Add tax onto that 45$ and its kind absurd, I would buy a lot more stuff from them since its convenient and they can get parts quicker but they are just so far off on price for most things its just not worth giving them my business unless I am really in a bind.
...............................................
...............................................
 01-17-2017, 04:16 PM
#73
Registered User
Thread Starter
I haven't had it so bad in Wisconsin as most of the dealers I've bought from are usually below MSRP. I can't speak for all of Ohio but that one was terrible... Similar to what you experienced with that knock wire. I don't understand it either because they have to know it's much cheaper online. I have no issues waiting a few days if it's going to save me 25%
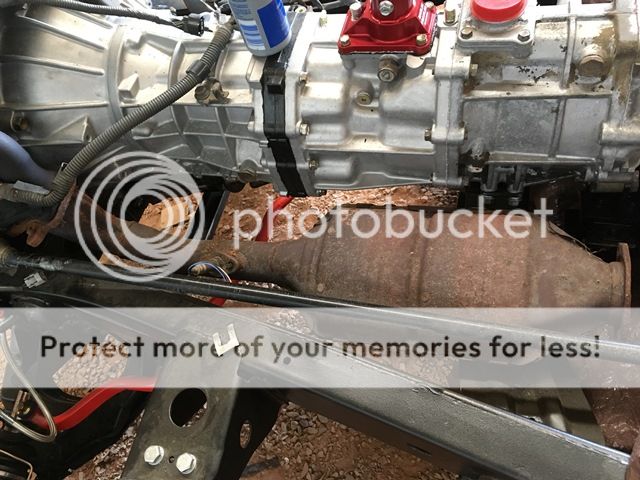
This pic has me intrigued.... Which downpipe and cat are you using? Did you put your crossmember on yet? How is the clearance there? I ask because I was going to use the original setup from my donor 4runner but I felt like it would have burned the paint off the x-member due to the lack of clearance. I was planning on routing everything the same as the 3.0 where the cat and muffler nearly butt up and are behind the x-member. This is what mine would have looked;
This pic has me intrigued.... Which downpipe and cat are you using? Did you put your crossmember on yet? How is the clearance there? I ask because I was going to use the original setup from my donor 4runner but I felt like it would have burned the paint off the x-member due to the lack of clearance. I was planning on routing everything the same as the 3.0 where the cat and muffler nearly butt up and are behind the x-member. This is what mine would have looked;
So i do have the cross member installed, not sure if it was in that picture though.. I have the dual cat system on my engine so that is the newer style front/down pipe that has the first cat installed, I have to stuff a 2nd o2 and cat before the muffler after that, still not exactly sure what that is going to look like yet. I can get some more pics if it will help.
That reminds me, if anyone knows the precise distances between all of the o2 sensors, cats and flanges on the dual cat exhaust specifically a 99 4runner that would be great! I know when i take it to see CARB they are gonna break out the measuring tape.
01-17-2017, 09:05 PM
#74
Registered User
Just wondering, if your truck originally had only one cat, why are you thinking you are going to need the second cat after the engine swap? It that in the rule book anywhere? I went out and looked at the piping from my 2000 model donor truck which had a single cat setup. My second O2 is 7" downstream from the cat flange. That is downstream edge of the cat flange to the center of the sensor hole. The two sensors are 28" apart.
On a two cat setup, is the second sensor upstream or downstream of the second cat? If it's upstream, you shouldn't have any performance issues without the second cat providing that it's legal. If it wasn't legal, I don't see how a truck purchased outside of CA would ever be able to smog there.
On a two cat setup, is the second sensor upstream or downstream of the second cat? If it's upstream, you shouldn't have any performance issues without the second cat providing that it's legal. If it wasn't legal, I don't see how a truck purchased outside of CA would ever be able to smog there.
01-17-2017, 09:16 PM
#75
Registered User
Thread Starter
Just wondering, if your truck originally had only one cat, why are you thinking you are going to need the second cat after the engine swap? It that in the rule book anywhere? I went out and looked at the piping from my 2000 model donor truck which had a single cat setup. My second O2 is 7" downstream from the cat flange. That is downstream edge of the cat flange to the center of the sensor hole. The two sensors are 28" apart.
On a two cat setup, is the second sensor upstream or downstream of the second cat? If it's upstream, you shouldn't have any performance issues without the second cat providing that it's legal. If it wasn't legal, I don't see how a truck purchased outside of CA would ever be able to smog there.
On a two cat setup, is the second sensor upstream or downstream of the second cat? If it's upstream, you shouldn't have any performance issues without the second cat providing that it's legal. If it wasn't legal, I don't see how a truck purchased outside of CA would ever be able to smog there.
As for the o2 sensor locations, I am pretty sure there was a sensor before each catalytic converter. So like this: o2 #1 > Cat #1 > o2 #2 > Cat #2
01-23-2017, 03:40 PM
#76
Registered User
Thread Starter
Hey Duck, I snapped a picture with a better angle of the cat and crossmember alignment. Hopefully this is a good view so people know what to expect with the dual cat system in terms of alignment of the first cat.

Feels like I have either been working or it has been raining the last several weeks. Things sure have slowed down, but there seems to be a break in the weather starting this week so I should get some time to take a few big chunks out of the to do list. My plan is to get as much of the 'frabrication' finished as I can. Battery tray, evap mount, exhaust and a few brackets made up. Fingers crossed it all goes according to plan!
Feels like I have either been working or it has been raining the last several weeks. Things sure have slowed down, but there seems to be a break in the weather starting this week so I should get some time to take a few big chunks out of the to do list. My plan is to get as much of the 'frabrication' finished as I can. Battery tray, evap mount, exhaust and a few brackets made up. Fingers crossed it all goes according to plan!
01-25-2017, 11:10 AM
#77
Registered User
Thread Starter
Little victory for today, 4WD indicator and my reverse lights work! Swapped out the plugs, extended the leads a bit and solved one more wire connection issue I had in the backlog. Ended up grounding the 4WD indicator line from the II3 to the passenger kick panel since the new wiring harness isnt like the 3vz's. From what I can tell in the wiring manual the 3vz ground source for the 4wd indicator went through the engine harness and termindated on the cam bolt ground, so it never made it back into the cab. On the 5vz wiring harness that line comes all the way into the cab so I just grounded it to kickpanel and it came to life! Just need to rework the wrap on the harness extension that goes back to the o2/trans sensors and permenently hang them under the body and that should be all buttoned up. Ill post some pics of it once I get it done.
Victory shot

Victory shot
Last edited by mbomberz1; 01-25-2017 at 11:23 AM.
 01-25-2017, 01:23 PM
#79
Registered User
Thread Starter
Thanks for posting that bklf7, if you don't mind me asking, what are you viewing this page on, your phone? I am wondering maybe if it has to do with the width of the pictures, when I imbed the link I set most of the pictures to about 1200px wide. Here is a few pictures with different widths, ill make one really small and see if that solves it!
After a little more time outside today I re-wrapped and organized the harness with some heat reflective loom, and temporarily mounted it to the bottom of the truck with some zip ties. Trying to figure out a better method.. suggestion are welcomed if you dont think the zipties will hold up.
Rewrapped ready to hang:


Finally in place


Let me know if that helped!
After a little more time outside today I re-wrapped and organized the harness with some heat reflective loom, and temporarily mounted it to the bottom of the truck with some zip ties. Trying to figure out a better method.. suggestion are welcomed if you dont think the zipties will hold up.
Rewrapped ready to hang:
Finally in place
Let me know if that helped!
Last edited by mbomberz1; 01-25-2017 at 01:25 PM.


