
Solid Brass Idler Arm Bushing Kit!!!!!!!!
 05-07-2007, 07:22 PM
#21
Registered User
Thread Starter
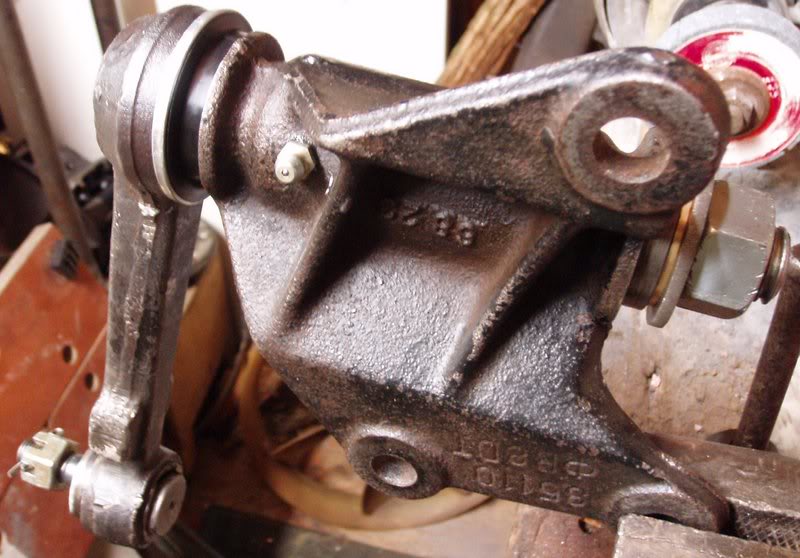
Anywho, that wasn't the only fitment issue. I will need to put some sort of spacer/washer on the bottom of the shaft to compensate for the lip of the bushing being slightly skinnier. No big deal there. I measured the gap at 1/8" or about 3.5mm.
But, what year idler arms have the thicker shafts? Anyone? New thread time?
Here's what the mock-up looked like.
Last edited by MudHippy; 05-08-2007 at 09:55 AM.
 05-07-2007, 09:36 PM
#22
Contributing Member
Join Date: Dec 2005
Location: Los Osos, CA (we can't agree on crap!)
Posts: 2,124
Likes: 0
Received 0 Likes
on
0 Posts
What year is your vehicle? Also, is your arm a Toyota arm or other? I think the writeup on 4x4wire concerning idler arm rebuild may have some answers for the years. I will try to find it.
Here:
http://www.4x4wire.com/toyota/maintenance/idler/
unfortunately it doesn't give years only that there is a difference.
As for your washer problem, if I remember correctly when using the idler arm brace it takes the place of the stock washer. If you still have the stock washer, you can place that on the bottom.
Last edited by slosurfer; 05-07-2007 at 09:42 PM.
05-07-2007, 09:49 PM
#23
Registered User
Thread Starter
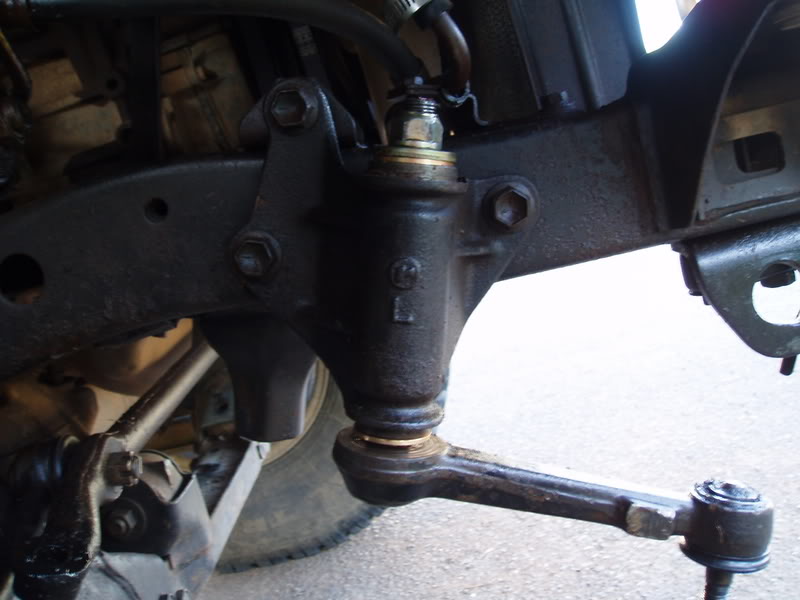
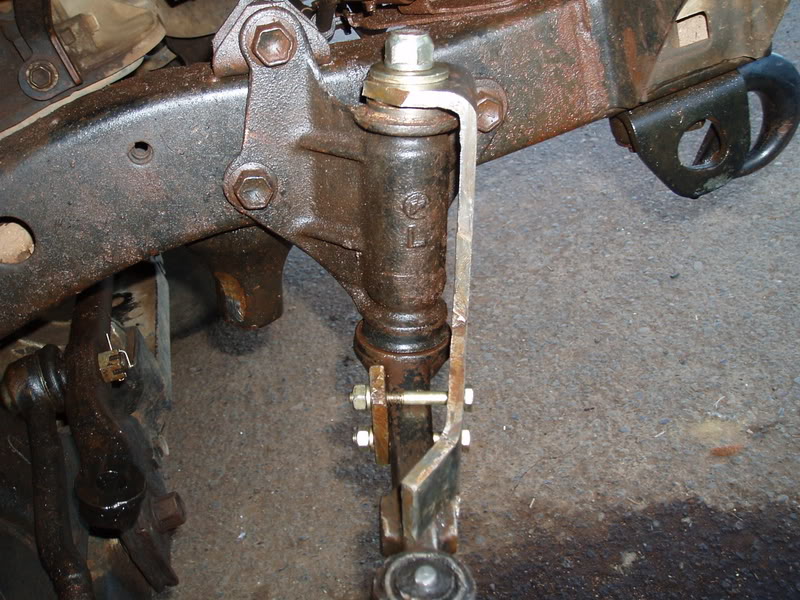
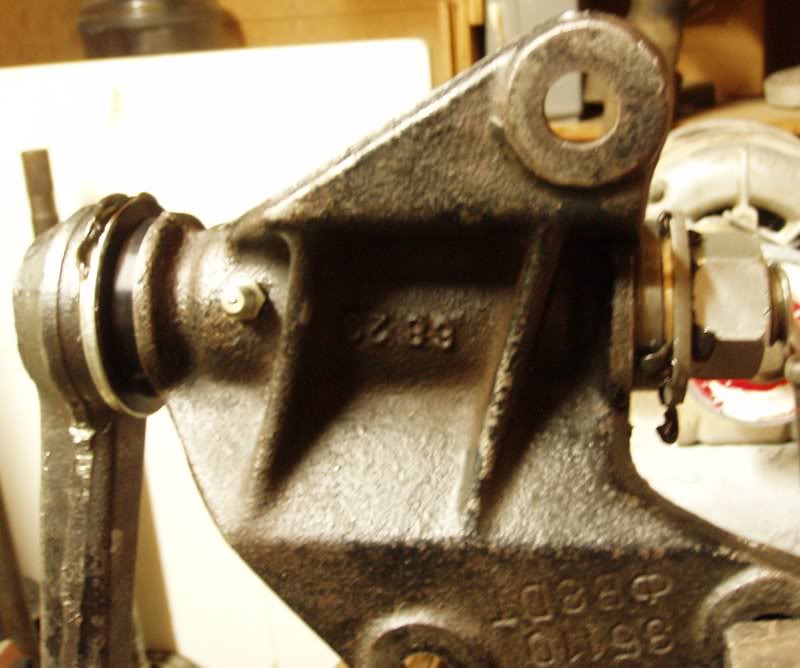
It's an 88 stock idler arm. I actually have 2 of those washers (one also from a 87 idler arm), so I could use both if I widened the hole on one. Or, I could just use one on the bottom like your sayin', if the brace is too thick for both. I was using the washer on top of the brace (see pic), no real need to though.
I think I've got it figured, 89-95 idler arm bushings have a different part # than 86-88. So, I'll pick one of those up (idler arms) and give it a try.
I didn't do too much other searchin', so if you find anything I would be interested.
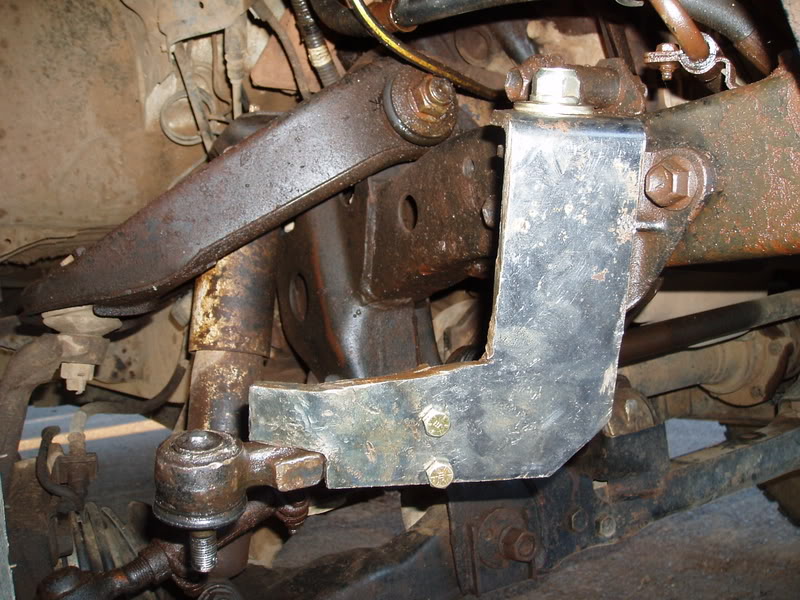
Here's my home-made brace, patent pending. It ain't pretty but it's tough as hell, that's 1/4" plate. I'd be suprised if it isn't the strongest idler arm brace in existence. Grade 8 bolts, if your wonderin'. Done everything I could to test it's strength, ended up with hammered bushings. BAD!!! Smashed the sh.. out of 'em.
I think I've got it figured, 89-95 idler arm bushings have a different part # than 86-88. So, I'll pick one of those up (idler arms) and give it a try.
I didn't do too much other searchin', so if you find anything I would be interested.
Here's my home-made brace, patent pending. It ain't pretty but it's tough as hell, that's 1/4" plate. I'd be suprised if it isn't the strongest idler arm brace in existence. Grade 8 bolts, if your wonderin'. Done everything I could to test it's strength, ended up with hammered bushings. BAD!!! Smashed the sh.. out of 'em.
Last edited by MudHippy; 05-07-2007 at 10:02 PM.
05-07-2007, 09:51 PM
#24
Contributing Member
Join Date: Dec 2005
Location: Los Osos, CA (we can't agree on crap!)
Posts: 2,124
Likes: 0
Received 0 Likes
on
0 Posts
https://www.yotatech.com/forums/show...idler+bushings
Only one I have found so far that has useful info.
Only one I have found so far that has useful info.
05-07-2007, 10:16 PM
#25
Registered User
Thread Starter
I've seen the arms with the skinnier ears, I think mine are the thicker ones. Don't know for sure, I'll mod my brace or fab up a new one, if need be. The different size bushings were mentioned, that's encouraging. Thanks for the thread, I'm getting there, slowly. No rush, all good things take time.
Last edited by MudHippy; 06-16-2007 at 10:24 PM.
06-01-2007, 03:35 PM
#27
Registered User
Why?
This was linked in the other thread.
If anything, these stiffer bushings should kill the arm faster. I was bending the arms into V's. These bushings would not have made any difference.
Either swap it or use a Total Chaos arm. Those work.
This was linked in the other thread.
If anything, these stiffer bushings should kill the arm faster. I was bending the arms into V's. These bushings would not have made any difference.
Either swap it or use a Total Chaos arm. Those work.
06-01-2007, 03:47 PM
#28
Registered User
Thread Starter
Right, I agree. I thought made a step in the right direction with an idler arm brace. Which has worked to keep the arm from bending. I bought brand new bushings when I put the brace on. The next trail trashed the plastic bushings(actually split the lower one in 2) and I discovered harder bushings, IN COMBINATION WITH an idler arm brace may be the only thing shy of the Total Chaos unit that will hold up. I need other things, like tires and e-locker/ARB first, or I'd be all over it.
06-01-2007, 04:14 PM
#30
Registered User
I do not see why you would use bronze since it is kind of soft. Wouldn't be easier to buy an idler arm from an autopart store and warranty it? That is what I did. Not really hard to change either. It took me 15 minutes to do mine.
Now why doesn't anyone make these bushings out of Delrin?
James
Now why doesn't anyone make these bushings out of Delrin?
James
06-01-2007, 04:43 PM
#31
Registered User
Join Date: May 2007
Location: Kelowna, B.C. Canada
Posts: 30
Likes: 0
Received 0 Likes
on
0 Posts
Question. I've never inspected my idler arm for wear or damage, or had the skid plate off. I'm hearing a funny sound from the front passenger side, not very loud, sounds kinda like loose metal jangling. Any idea if this could possibly be my idler arm? I really want to track it down before I go off road again. Hear it mostly on small bumps and braking at slower speeds.
Last edited by dirtroads_33; 06-01-2007 at 04:46 PM.
06-01-2007, 05:49 PM
#32
Contributing Member
Join Date: Dec 2005
Location: Los Osos, CA (we can't agree on crap!)
Posts: 2,124
Likes: 0
Received 0 Likes
on
0 Posts
Right, for what you were using your rig for, this wouldn't do a bit of good. But for me, with the brace installed, those plastic bushings are wearing out damn fast and not even just from rock crawling but just driving around. I haven't bent anything yet. I believe that spending the money on these they will last longer than if you spent the same amount on plastic bushings. If I had the $$$ for the TC arm, I would get it because it is the answer. This could help me in the time till I put a solid axle on it. I really don't want to throw too much money on my front end.
06-01-2007, 06:07 PM
#33
Registered User
Thread Starter
I do not see why you would use bronze since it is kind of soft. Wouldn't be easier to buy an idler arm from an autopart store and warranty it? That is what I did. Not really hard to change either. It took me 15 minutes to do mine.
Now why doesn't anyone make these bushings out of Delrin?
James
Now why doesn't anyone make these bushings out of Delrin?
James
I'm a little miffed to just NOW be hearing of warrantied idler arms.
 No, it's cool, I will be doing the TC next. Spent my $ on what I think might be good enough.
 Delrin, you did your homework I see. I had considered getting a cut length of some and seeing if I could fashion it into bushings. I'm skilled on a lathe, don't have one in my shop though.
Last edited by MudHippy; 06-01-2007 at 06:13 PM.
06-02-2007, 01:27 PM
#35
Registered User
Thread Starter
Hey, it's cool. I kinda figured you'd find your way to the answer your lookin' for. If you have any trouble after exhausting all your search options, feel free to post a new thread. This ain't the type of place where you'll be totally blowtorched for any "newbie can't find" thread/posts. Nor is it a place where threads stay so "on topic" as to ignore your question in most cases. Apologies, for the cold-shoulder treatment.
I don't know if it's your idler arm, maybe. You might try searching for "spindle bushing" to see if that sounds right. I really don't know. Good luck.
Oh, welcome to YT. Sheesh, what's wrong with me?
2 more posts makes 1k{dancing happy jig}
I don't know if it's your idler arm, maybe. You might try searching for "spindle bushing" to see if that sounds right. I really don't know. Good luck.
Oh, welcome to YT. Sheesh, what's wrong with me?
2 more posts makes 1k{dancing happy jig}
Last edited by MudHippy; 06-02-2007 at 01:36 PM.
06-02-2007, 08:25 PM
#36
Registered User
Join Date: Mar 2007
Location: Orange County, CA
Posts: 352
Likes: 0
Received 0 Likes
on
0 Posts
SLOSURFER, dont ask me how, but i clicked on your myspace link in your sig and i had to log in, but as i looked at the Screen name and PW, YOUR INFO WAS ALREADY THERE!!!
I clicked sign in, and now im on your personal page. how weird.
I clicked sign in, and now im on your personal page. how weird.
06-05-2007, 07:24 PM
#38
Registered User
Join Date: May 2007
Location: Kelowna, B.C. Canada
Posts: 30
Likes: 0
Received 0 Likes
on
0 Posts
Thanks MudHippy. Gonna try the stock idler arm bushing replacement fix tomorrow. I've got a friend with some shop space and so we'll do the repair there. Ya never know till you try, and I like cheap fixes.
06-16-2007, 10:02 PM
#39
Registered User
Thread Starter
Alright, so I ordered an after-market idler arm and it didn't have the right diameter shaft either, oh well...
I thought it over for a few days here. Came up with a grand plan. Off to the hardware store I goes. Took one of the bushings with me, started down the nuts&bolts aisle. Got to lookin' around and found a 3/4"x8" bolt. Damned if it wasn't a nice fit. Purchased at a cost of $4.60, with a nut and a couple washers for another $1 or so.
Got it home and went to fabbin' it all up. Using the idler arm pictured previously, I re-shafted it with the 3/4"x8" bolt. Chopped the head off and welded it for eternity. Here's the results unassembled.
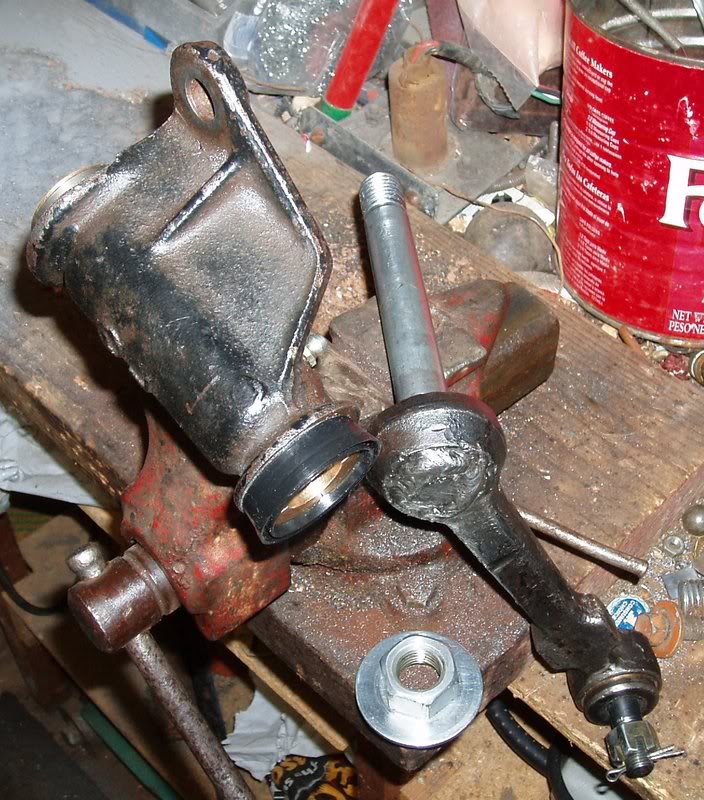
Here it is assembled showing the zerk I installed (provided in the kit).
Finally, after filling with grease. Notice it flowing from both bushings as it should. I have a custom made brace (pic shown prev.) which took some minor grinding to make fit. I just wanted to show what it would look like w/o it.
I thought it over for a few days here. Came up with a grand plan. Off to the hardware store I goes. Took one of the bushings with me, started down the nuts&bolts aisle. Got to lookin' around and found a 3/4"x8" bolt. Damned if it wasn't a nice fit. Purchased at a cost of $4.60, with a nut and a couple washers for another $1 or so.
Got it home and went to fabbin' it all up. Using the idler arm pictured previously, I re-shafted it with the 3/4"x8" bolt. Chopped the head off and welded it for eternity. Here's the results unassembled.
Here it is assembled showing the zerk I installed (provided in the kit).
Finally, after filling with grease. Notice it flowing from both bushings as it should. I have a custom made brace (pic shown prev.) which took some minor grinding to make fit. I just wanted to show what it would look like w/o it.
06-16-2007, 10:57 PM
#40
Registered User
Join Date: May 2007
Location: Kelowna, B.C. Canada
Posts: 30
Likes: 0
Received 0 Likes
on
0 Posts
Nice work. That setup you built looks tough.
I checked out my idler arm for wear and play and it seems tight. I'd really like to build a spindle lubing cap to lube my spindles though. I'll have to take it to a shop to get welded or braised.
BTW that's a nice weld bead on your bolt, no grinding required.
In Canada where I live we call zerks grease nipples.


