
My Cruiser Coil/BJ Spacer Lift Thread.
 01-26-2007, 06:23 AM
#21
Contributing Member
Join Date: Dec 2005
Location: Los Osos, CA (we can't agree on crap!)
Posts: 2,124
Likes: 0
Received 0 Likes
on
0 Posts
Looks good, those things are a bi@#$ to get in there. It definately helped to have a second set of hands and muscles. Feels good when done and you didn't have to pay anyone to do it and now you know more about what is going on around your rear axle.
 01-26-2007, 04:44 PM
#22
Registered User
Thread Starter
My friend came over today and helped me reconnect everything (sway bar, upper control arms, bolts keeping the brake line down, panhard).
Once I had that all back on I decided to put the tires on and let it off the jacks...a big moment in this whole thing haha. Let's just say that once i dropped it...it didnt really move at all, but this of course gave me a big
 .
.
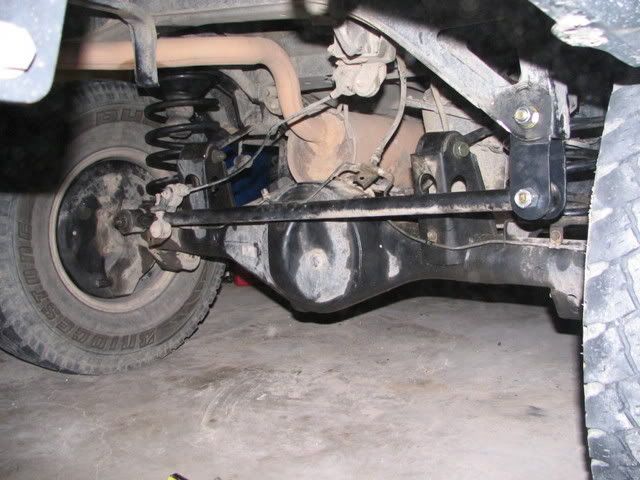
Yet again I find myself waiting for the conversion brackets, which luckily are supposed to arrive here monday. I'm also still looking for manual hubs and I'm thinking I might have to go with warn premium's from expert offroad (local place). I really would prefer aisin's but none of you yotatechers have come through for me, how sad. Do you guys think I'll be able to get along without them if i stick strictly to the road until I get them? Finally, on the lspv I'm planning on fabbing a bracket. This is going to sound like a stupid question, but I swear I saw someone selling a bracket that was going a different way. So my question is, in the picture below, would i make the bracket going the way in red...or the way in blue? I'm pretty sure it's supposed to be the way in red, but I swear I saw it going the way in blue one time...
I'm planning on doing the BJ Spacers tomorrow after I get off work. I'll post pics if I get to it then.
Last edited by traben27; 01-26-2007 at 05:00 PM.
01-26-2007, 05:18 PM
#24
Registered User
Thread Starter
Thanks slosurfer. You've been a big help on this whole thing, since I didn't even know about this lift until I saw your rig. I'm going to do that tomorrow then.
01-26-2007, 08:51 PM
#26
Registered User
Thread Starter
well i've only done the rear and i measured at the same exact point at the top of the bumper...yeah i know its a random spot...but before lift it was 24 3/8" and after its 30".
01-27-2007, 08:57 PM
#27
Registered User
Thread Starter
I got some more done tonight...a little bit. I know I probably seem like I'm making this a lot bigger deal than it really is, but I'm taking my time because the only other real work on a car i've done was my steering stabilizer and isr mod. Also, it's taking a lot longer because I have to document everything for my project.
I made a bracket for the lspv, took about 5 minutes and works. It's not exactly impressive looking, but I'm okay with a ghetto look.
I also got the ball joint on the passenger side apart, got the studs knocked out (really easy, I thought it was going to be a lot harder), and started cutting with a cutting blade.

Unfortunately the 2 I had ended up breaking so I'm going to have to go buy some more monday. I plan on finishing everything up that day actually.
I made a bracket for the lspv, took about 5 minutes and works. It's not exactly impressive looking, but I'm okay with a ghetto look.
I also got the ball joint on the passenger side apart, got the studs knocked out (really easy, I thought it was going to be a lot harder), and started cutting with a cutting blade.
Unfortunately the 2 I had ended up breaking so I'm going to have to go buy some more monday. I plan on finishing everything up that day actually.
01-29-2007, 06:12 PM
#28
Registered User
Thread Starter
I'M DONE!!! ..well pretty much.
I told them I couldn't work today so that I could finish my lift and finally I am
All I had left to do was to mount the back shocks (I'd been waiting for the pro comp shock mounts to come, which they did finally). At first I took them out and tried to push the shock in and I was like crap its too skinny. Then I decided to do it ghetto style and I sorta chiseled off a little bit of the bushing and then it fit in pretty well.

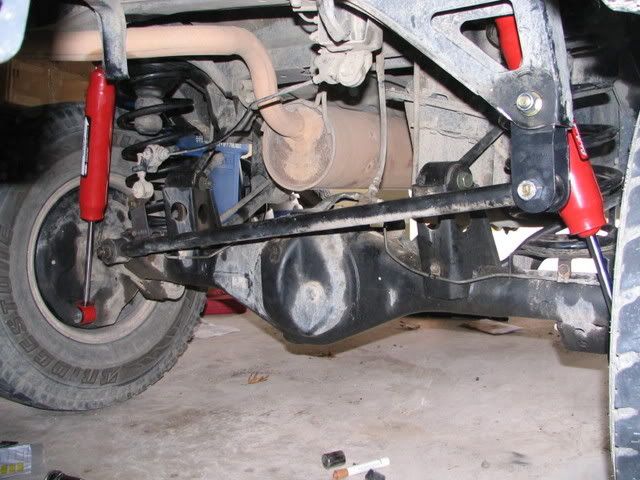
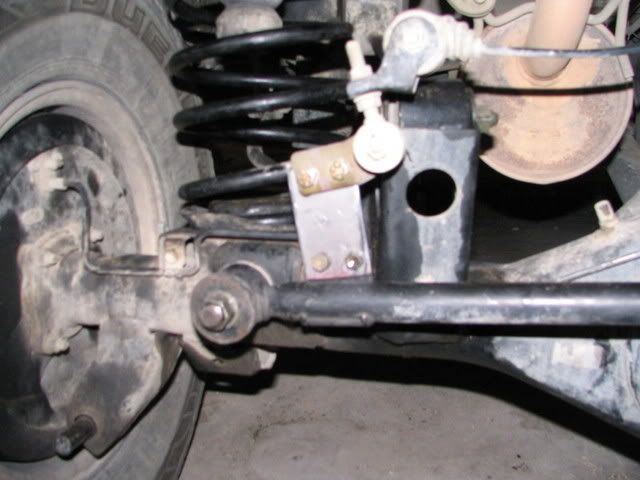
Then I had the ball joint spacers. I went and bought (5) 4 and a half inch cutting blades just to be on the safe side since they always break on me. I went home and got to grinding. I got everything ground down and the spacer fit.
Then I had the hardest time getting the spacer in but my friend came over and pointed out... "hey you didn't disconnect the swaybar, that might help." So I did that and it went in pretty easily.
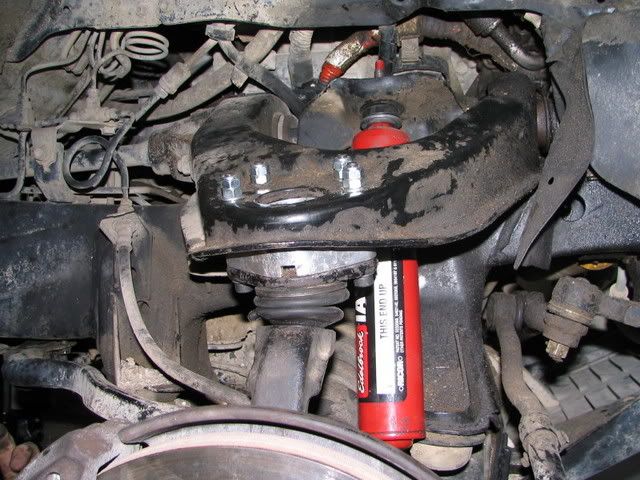
The other side was a different story. My boots are both ripped on that side of my axle and the cv's pretty messed up...so basically it would hyper extend very easily, making getting the ball joint back together impossible. After putting together a few good attempts, I finally got it back in (with the help of my friends of course, gotta give them credit)

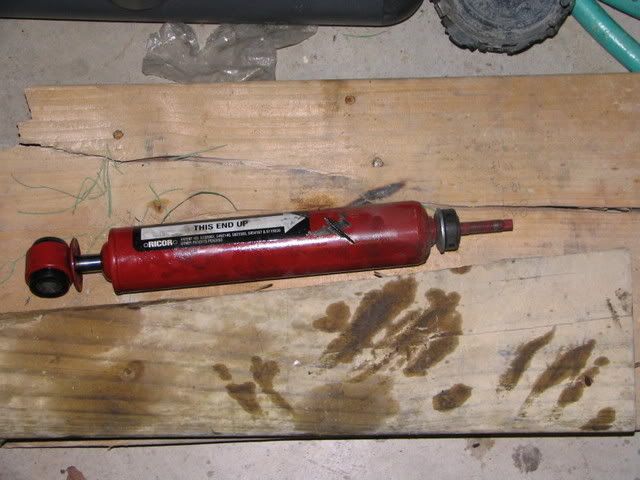
Oh I did have a little incident when I was cutting the driver's side a-arm...I kinda cut through my shock and it started leaking all over. So I guess I'm going to have to order a new one. Luckily they were only 20 bucks off of summit racing.
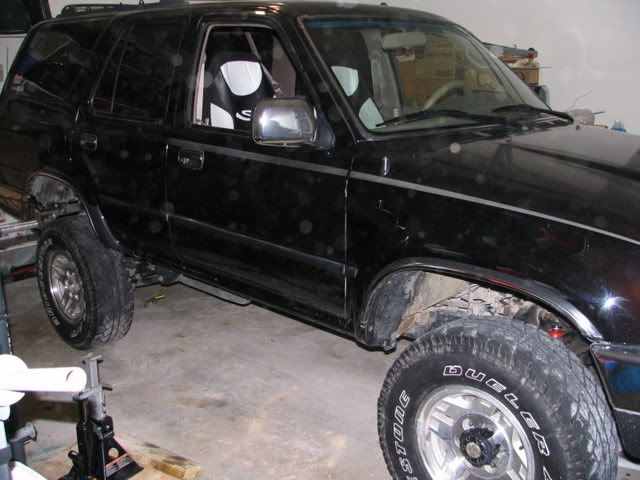
Well after cranking the torsion bars and getting ready to pull it out of the garage, I went to start the car and it started honking and the lights were flashing. So apparently I have an alarm which I didn't know I had. I finally figured out how to turn it off and here's how she sits now compared to a few weeks ago. I actually forgot to take a good before picture somehow...so here's one I got when I first got it.
Before:
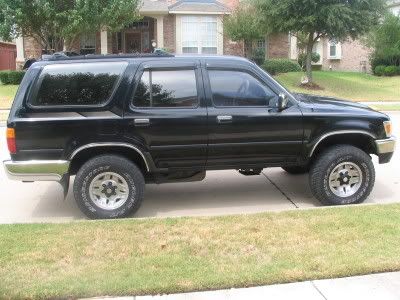
After:
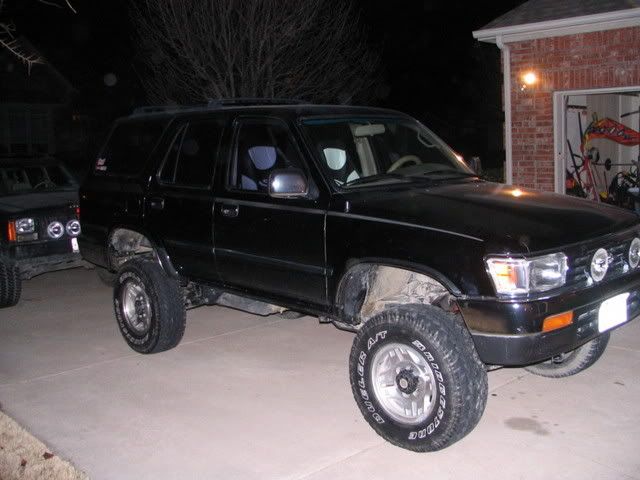
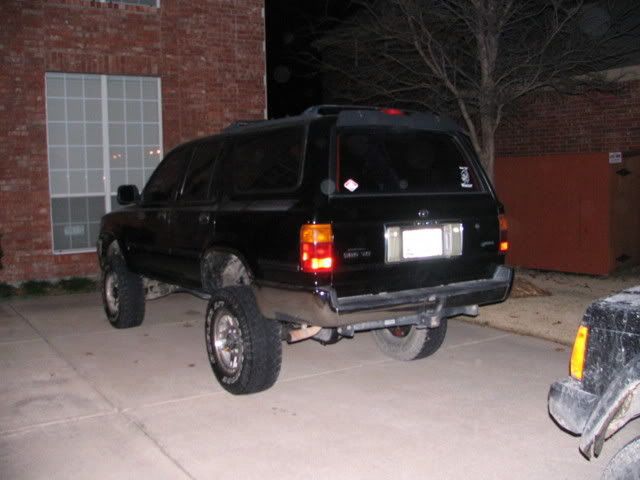
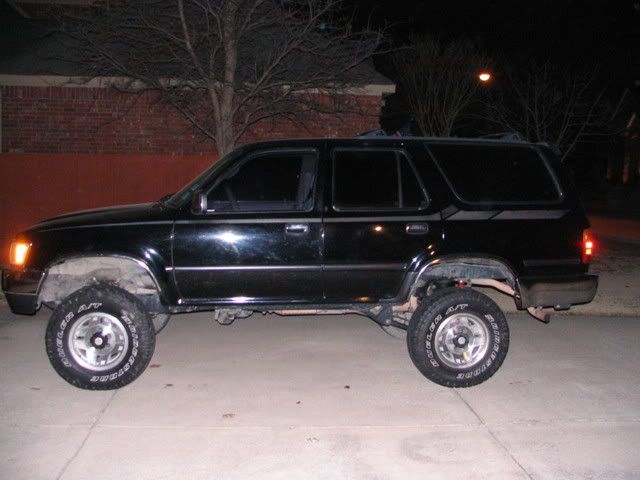
I still need to raise the front a little with the t-bars but I'm not too worried at the moment..Looks like some 33's are on the agenda
I told them I couldn't work today so that I could finish my lift and finally I am
All I had left to do was to mount the back shocks (I'd been waiting for the pro comp shock mounts to come, which they did finally). At first I took them out and tried to push the shock in and I was like crap its too skinny. Then I decided to do it ghetto style and I sorta chiseled off a little bit of the bushing and then it fit in pretty well.
Then I had the ball joint spacers. I went and bought (5) 4 and a half inch cutting blades just to be on the safe side since they always break on me. I went home and got to grinding. I got everything ground down and the spacer fit.
Then I had the hardest time getting the spacer in but my friend came over and pointed out... "hey you didn't disconnect the swaybar, that might help." So I did that and it went in pretty easily.
The other side was a different story. My boots are both ripped on that side of my axle and the cv's pretty messed up...so basically it would hyper extend very easily, making getting the ball joint back together impossible. After putting together a few good attempts, I finally got it back in (with the help of my friends of course, gotta give them credit)
Oh I did have a little incident when I was cutting the driver's side a-arm...I kinda cut through my shock and it started leaking all over. So I guess I'm going to have to order a new one. Luckily they were only 20 bucks off of summit racing.
Well after cranking the torsion bars and getting ready to pull it out of the garage, I went to start the car and it started honking and the lights were flashing. So apparently I have an alarm which I didn't know I had. I finally figured out how to turn it off and here's how she sits now compared to a few weeks ago. I actually forgot to take a good before picture somehow...so here's one I got when I first got it.
Before:
After:
I still need to raise the front a little with the t-bars but I'm not too worried at the moment..Looks like some 33's are on the agenda
Last edited by traben27; 01-29-2007 at 06:19 PM.
01-29-2007, 06:22 PM
#29
Contributing Member
Join Date: Dec 2005
Location: Los Osos, CA (we can't agree on crap!)
Posts: 2,124
Likes: 0
Received 0 Likes
on
0 Posts
Looks good! bummer about the shock. Did you do the full droop test to see if you needed to shim your upper bumpstops? Check other forums like ih8mud for some manual hubs. You will definately need them. How much did you crank your tbars? Once again, looks good.
01-29-2007, 06:25 PM
#30
Registered User
Thread Starter
Thanks! And no I'm going to the droop thing tomorrow. My dad's making me work on some scholarship essay's for college, way to rain on my parade. I actually dont know how much I cranked my t-bars because I sorta accidentally cranked them all the way down on accident...don't even ask. I'm looking at some manual hubs right now...probably going to buy them from a yotatech member.
01-29-2007, 07:00 PM
#32
Contributing Member
Join Date: Dec 2005
Location: Bucklesberry, North Carolina
Posts: 1,167
Likes: 0
Received 2 Likes
on
2 Posts
Fronts http://store.summitracing.com/partde...0&autoview=sku
Rears http://store.summitracing.com/partde...0&autoview=sku
Both are $19.98
Very nice work! Glad to see you did it all yourself with just minor help from friends. Time for some bigger shoes huh? Do you think you could get some pics of the grinding you did on the upper a-arms?
Rears http://store.summitracing.com/partde...0&autoview=sku
Both are $19.98
Very nice work! Glad to see you did it all yourself with just minor help from friends. Time for some bigger shoes huh? Do you think you could get some pics of the grinding you did on the upper a-arms?
01-29-2007, 07:06 PM
#33
Registered User
Thread Starter
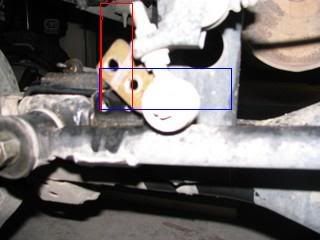
Unfortunately this is the only picture I took of the grinding, but I wouldn't follow my example anyway. I basically used cutting blades as grinding blades..and I went through 4 of them

You really don't have to take off very much, but the million sparks will make you panic if you've never done anything like that before. Mostly concentrate on the back of the opening, as it has a little bubble sorta thing that gets in the way that you really gotta shave down.
I'd also recommend taking the shocks off completely because I didn't and as you can see I scraped one up and then went completely through the other one. Thanks for the links by the way, I ordered a replacement already.
Last edited by traben27; 01-29-2007 at 07:07 PM.
01-29-2007, 07:18 PM
#34
Contributing Member
Join Date: Dec 2005
Location: Bucklesberry, North Carolina
Posts: 1,167
Likes: 0
Received 2 Likes
on
2 Posts
Considering I don't have a grinder, ill be going the sawzall and big hammer method. Honestly, do you think I stand a chance or should I just bite the bullet and buy a grinder? Thanks for the pics. That sucks about the shock, hahah but its pretty funny as well.
Where did you get the procomp shock bracket thing from?
Where did you get the procomp shock bracket thing from?
01-29-2007, 07:21 PM
#35
Registered User

Join Date: Jan 2007
Location: Marietta GA
Posts: 309
Likes: 0
Received 0 Likes
on
0 Posts
That looks incredible. My truck looks almost identical to yours... mine is just smaller right now. I just ordered those shocks from Summit on Friday ($20 is a steal) where did you get those procomp adapters? Price? Did you have to extend the brake lines? Are you running 33X 12.50's or 10.50's? Great job... Mine's next!
01-29-2007, 07:43 PM
#36
Registered User
Thread Starter
Kyle- I don't have a grinder either but luckily my friend has one. They're relatively inexpensive I think (20 to 30 bucks) and the blades are only 1.50 each so it's a pretty good investment.
AuburnRunner- I didn't extend the brake lines yet, as I'm not exactly comfortable doing it and would rather leave it to the pro's. I'm going to do it before I do any offroading though. I think I'm going to go with 33x10.5..
The two of you- It's pro comp part number 690001 and it was 29.99 shipped (they come in a pair). Just to let you know, you'll have to shave down the rubber bushings on the top of the shock a bit to get them to fit right, but I dont think it really matters that much. It worked for me to just use a grinding blade on it.
01-29-2007, 07:58 PM
#37
Registered User
Join Date: Jan 2007
Location: Marietta GA
Posts: 309
Likes: 0
Received 0 Likes
on
0 Posts
Thanks man... I just found myself a set of Aisin's, but I cant find any cruiser coils for sale. As soon as I do everything is getting thrown on. Let us know how you like the new shocks, I wont have mine on right away.
BTW, I just took off the factory stripe and I think it looks much much better, especially with the black paint and blacked out windows. NO paint fade after 16 years! go toyota. ha
Im going 10.50 too
BTW, I just took off the factory stripe and I think it looks much much better, especially with the black paint and blacked out windows. NO paint fade after 16 years! go toyota. ha
Im going 10.50 too
Last edited by AuburnRunner; 01-29-2007 at 08:05 PM.
01-29-2007, 08:07 PM
#38
Contributing Member
Join Date: Dec 2005
Location: Bucklesberry, North Carolina
Posts: 1,167
Likes: 0
Received 2 Likes
on
2 Posts
Auburn - Check on www.ih8mud.com There is always a pair or two floating around there. Should help you out.


