
Fuel leak near tank.
 10-12-2010, 01:27 PM
#61
Registered User
Join Date: Jul 2009
Location: hubert nc
Posts: 1,151
Likes: 0
Received 0 Likes
on
0 Posts
i say fix your old tank and run, a dual tank setup.. it would be cool and ge ya pleanty of weight when your wheeling in the snow..
you could double your fuel mileage.. aswell
you could double your fuel mileage.. aswell
 10-12-2010, 05:52 PM
#64
Registered User
Thread Starter
Join Date: Nov 2008
Location: Somerset, KY
Posts: 272
Likes: 0
Received 0 Likes
on
0 Posts
Im going to put everything back together a week or two before coating it just to make sure there are no leaks and everythings in good shape. Ill probably just do all the frame under the bed if I have enough left.
10-12-2010, 08:48 PM
#65
when i did mine, i had trouble getting the undercoating to stick 'cause of the gas
and i do think that a good water rinse followed immediately by an alcohol rinse (to dry up the left-over water and prevent rust) will work. also, if you do use water to rinse, make sure to use "heet" to get remaining moisture from the tank for the first fill-up or two
Last edited by irab88; 10-12-2010 at 08:50 PM.
 10-17-2010, 06:04 PM
#68
Registered User
Thread Starter
Join Date: Nov 2008
Location: Somerset, KY
Posts: 272
Likes: 0
Received 0 Likes
on
0 Posts
I picked up new bolts for the bracket at lowes. Got everything back together and have no leaks. The truck started up after turning over for about 10-15 seconds a couple times.
Im gonna give it a day or two and then coat everything with something, haven't decided yet. Glad to have it somewhat back together!
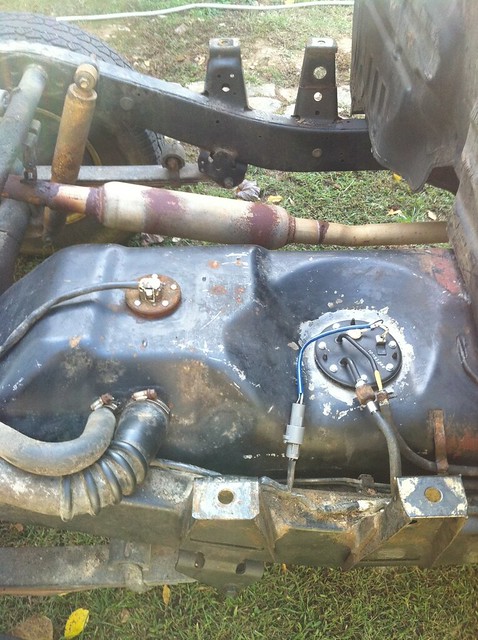
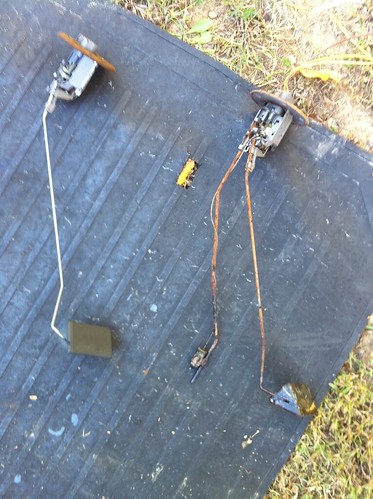
The sending unit from the new tank had two pieces instead of 1... looks like a little warming plug for diesel. I dunno
I ziptied my lights and plate up, its pretty rigged for now.
 10-18-2010, 10:27 AM
#71
Just go through the fender, removing the skirt first. I did mine by reaching down through the plenum gap! hahaha.... Took me 30 Min.... but left me with some war wounds, hahaha. Right after, I read on the 'remove the skirt from the fender well and use extension' thingy, lolol.
Best wishes, .....it's really not bad at all. Make SURE that you flush the line that's before and after the filter before assembling it all again. I did not, and I wound up with a piece of Debris landing in my newly cleaned #2 Injector....had to tear down the intake again just because of that mistake. Just a thought, lol.
Best wishes, .....it's really not bad at all. Make SURE that you flush the line that's before and after the filter before assembling it all again. I did not, and I wound up with a piece of Debris landing in my newly cleaned #2 Injector....had to tear down the intake again just because of that mistake. Just a thought, lol.
10-18-2010, 01:43 PM
#72
Registered User
Join Date: Jul 2009
Location: hubert nc
Posts: 1,151
Likes: 0
Received 0 Likes
on
0 Posts
thats what the drain plug is for on the bottom of the tank... lol
i would scotch brite that tank and scuff it up and then hit iut with some purple degreaser.. the free stuff they were given away at autozone.. ya i just broke out the the bottle last week, i had the bottle for almost 2 yrs now.. still does the trick.. it worked really well..
then i would by the spray can bed liner stuf and hit up the gas tank... that cheap stuff take several days to dry.. dont be fooled by instruction on the can... and wear some gloves or your hand will smell like gas after you use a about a gallon of gas to clean your hand to get the stuff off....
10-19-2010, 04:36 AM
#73
Registered User
Thread Starter
Join Date: Nov 2008
Location: Somerset, KY
Posts: 272
Likes: 0
Received 0 Likes
on
0 Posts
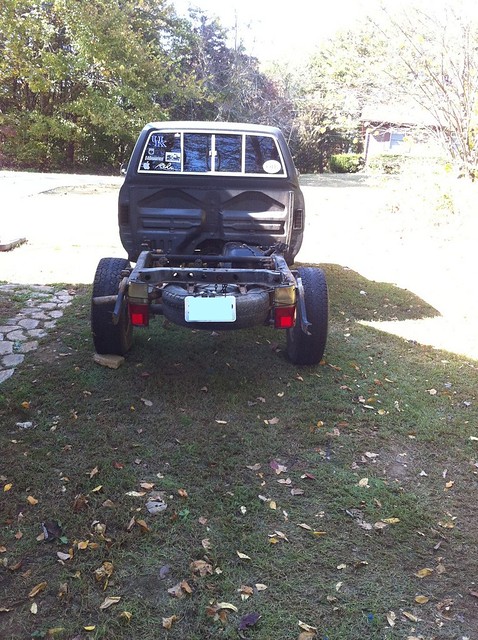
Drove it to work this morning, man I missed it. Its a little bouncy in the rear without the bed especially at highway speeds. Im gonna give it a day or two and then seal it all up with the bedliner stuff I have. I think we are supposed to have a day later this week that almost 80� so it should cure up pretty good.
If i didnt need the bed so much I would just leave it off. Looks cool and saves weight!
If i didnt need the bed so much I would just leave it off. Looks cool and saves weight!
10-20-2010, 05:00 AM
#74
Registered User
Thread Starter
Join Date: Nov 2008
Location: Somerset, KY
Posts: 272
Likes: 0
Received 0 Likes
on
0 Posts
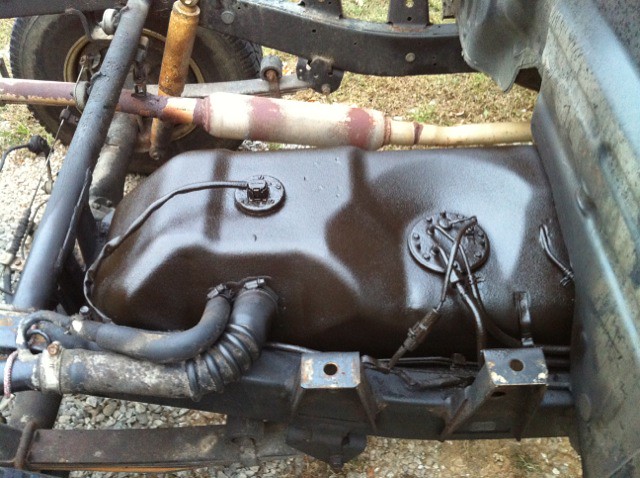
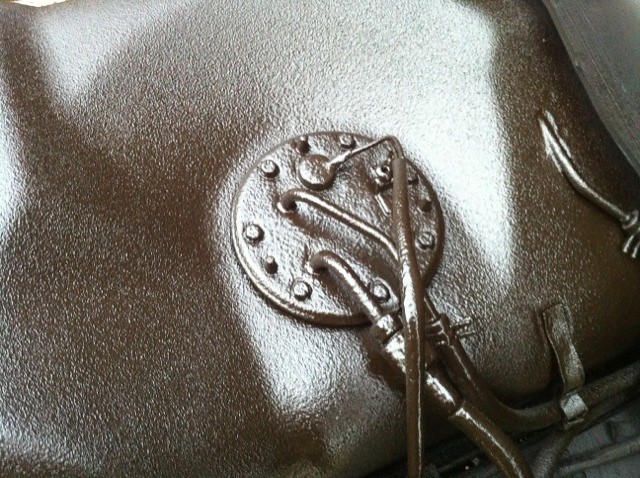
Cleaned up the tank last night with a scuff pad and a wire brush and some simple green.
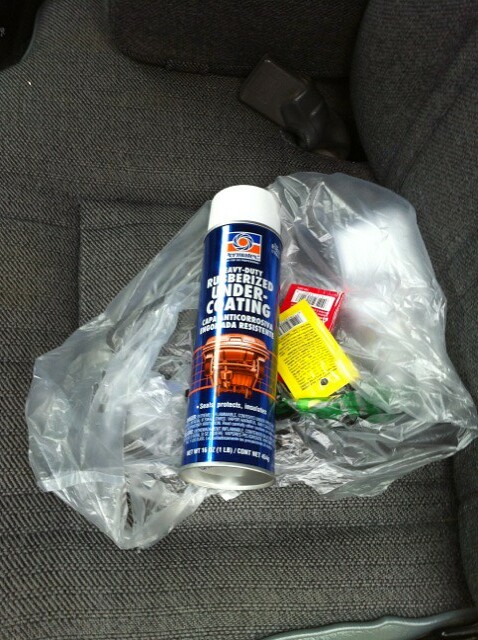
I used a whole can of permatex undercoating. I used electrical grease on the connections prior to coating everything.
Stuff comes out kinda brownish when wet but dries darker.
I used a whole can of permatex undercoating. I used electrical grease on the connections prior to coating everything.
Stuff comes out kinda brownish when wet but dries darker.
10-20-2010, 05:26 AM
#75
hey, good job getting to everything. i'm actually quite impressed that nothing broke (other than the fuel line and that one bolt). when i did mine, i broke 2 or 3 bolts and one of the screws by the gas filler
are you going to clean and undercoat the bed while it's off? at the very least, replace all the bed's bolts (imho)
are you going to clean and undercoat the bed while it's off? at the very least, replace all the bed's bolts (imho)
10-20-2010, 05:46 AM
#76
Registered User
Thread Starter
Join Date: Nov 2008
Location: Somerset, KY
Posts: 272
Likes: 0
Received 0 Likes
on
0 Posts
I actually had to drill out one of the screws on the filler neck as well.
I'm going to try and clean up everything on the frame and under the bed and coat it with the bedliner stuff I have. The bed is actually clean underneath except for the area where the exhaust sticks out like just about every other toyota bed I have seen.
I have to order new bed bolts as a couple of them were in bad shape and the tab was bent up.
10-20-2010, 07:54 AM
#78
Registered User
Thread Starter
Join Date: Nov 2008
Location: Somerset, KY
Posts: 272
Likes: 0
Received 0 Likes
on
0 Posts
yeah I am going to let the tank cure up real good a day or two and then pressure wash the frame and cab.
10-22-2010, 05:41 PM
#79

Poynter, mind if I borrow your thread for a while??
I'd mentioned earlier that I need to replace the fuel pump bracket on my 4Runner. Today I got the camera out and managed to look above the tank and saw that everything was dry from my side of the road repair with JB weld. I put a big glob of it on there and it looks like its held perfectly. So I had to figure out where the raw fuel smell was coming from. I couldnt see anything wet around the tank so I thought it might be a vent or something.
Wrong!! The high pressure line on the bracket is attached to a small length of pipe which then connects to the hard line, which runs down the frame rail. At the connection of the flex line to the hard line, the hard line had a tiny tiny hole in it which was weeping fuel onto the top of the tank, slowly enough to not pool up.
Getting the connection undone was a total bitch. I ended up with a 2ft breaker bar on each end before I could get it to turn.
I struggled to find a fitting that mated with the flex pipe end. The only one I have found is a 90 degree converter to a hose fitting. Will the 90 degree adversely effect fuel flow and pressure? Is there enough overhead in the system to overcome the pressure loss? Can I fit high pressure fuel line on the end of this fitting and run it all the way to the fuel filter without issue?
10-22-2010, 07:35 PM
#80
iiiiii..... probably wouldn't do that.... it looks a bit too "iffy" for me. try going to the lowes depot pluming section, find the thread size, and ordering the right part. as for fuel pressure, i would assume the loss would be negligible, if the id is kept the same (or larger)


