Rear Differential Breather Mod: YotaTech D.I.Y.

Extend your Toyota 4Runner’s rear differential breather for safer water crossings and other off-road adventures.
What is a differential breather and why it is important? As you drive, your rear axle heats up. This in turn causes pressure to build up within the axle. To release this pressure, automotive manufacturers design axle housings with a plug mounted on top. As the axle heats up, the breather plug’s spring-loaded cap pops up, releasing this pressure.

Once the pressure is released, the cap closes to prevent any debris from entering into the axle. However, this cap can malfunction; especially when driving through the harsh elements off road. Mud or debris can easily get clogged in the spring-loaded cap and prevent it from closing. If you happen to later drive through water, what do you know, now water has an open door directly to your differential housing!
4Runners with 4wd and from 1996 to 2002 came stock with an extended front differential breather. (Take a look in your engine bay. Locate the breather hose/cap located on the driver’s side engine bay near the wheel well.) Yet Toyota decided against installing an extended rear axle differential breather. Instead, the rear differential has a small breather cap mounted directly on top of the axle.
Here, we will show you how to extend your rear differential breather to keep your axle internals free of contaminants! This modification will allow the rear axle pressure to vent to a location much higher than the OEM plug’s current location and will in turn, keep the breather cap clean and dry. This mod is not only quick and easy, but it requires next to no mechanical know-how. It costs approximately $20 and just 30 minutes of your time.

You’ll need the following items:
- Breather Plug, part# 90930-03136
- Union Fitting, part# 90404-51319
(You can purchase both items above from ToyotaParts4U.)
- 6 Feet of Fuel Hose Line (ID 3/8″, OD 1/2″)
- 2 Small 1/4″ – 5/8″ Hose Clamps
- Pipe Thread Tape
- Zip Ties
Pictured: breather plug, union fitting, fuel line hose, and clamps.
Step 1: Remove your spare tire.
Clear this area to make yourself some room to comfortably work under the vehicle.
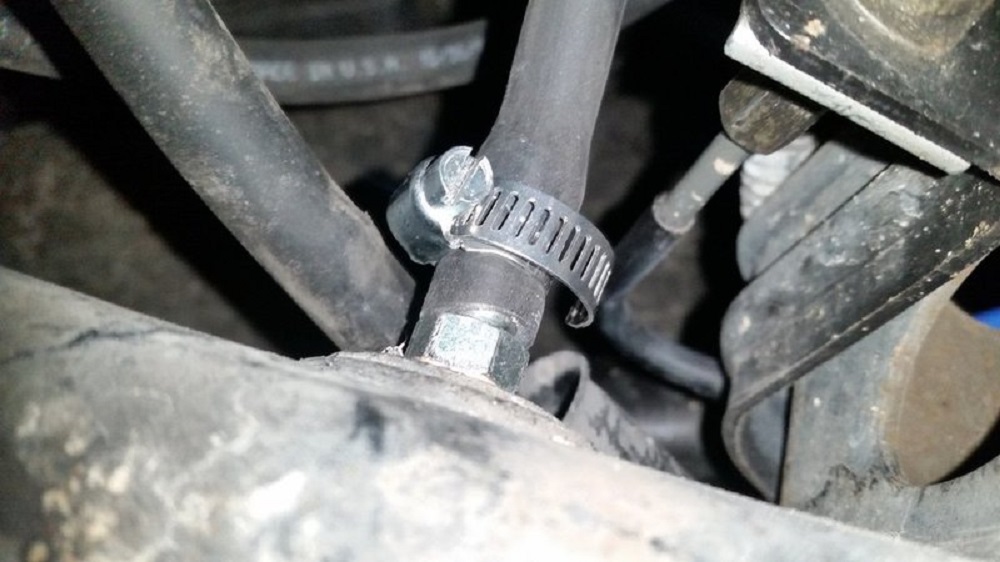
Step 2: Locate the factory breather plug on the rear axle.
Use a small adjustable wrench to remove the old breather plug. Replace it with your new union fitting. Be sure to wrap the threads of the union fitting with pipe thread tape before installing it.
Step 3: Attach one end of the fuel line to the new union fitting.
Then, secure it with a small hose clamp.
Step 4: Run the hose up along the brake line and up to the gas tank fill tube.
You may need to remove the lower clip that holds the fuel filler neck dust cover in place to gain access. Leave yourself some extra slack in the tube for axle articulation. Use zip ties to secure the hose to your vehicle.
Step 5: Open the gas hatch.
Cut a small hole in the rubber fitting gasket around the fill tube to allow the hose to stick through.
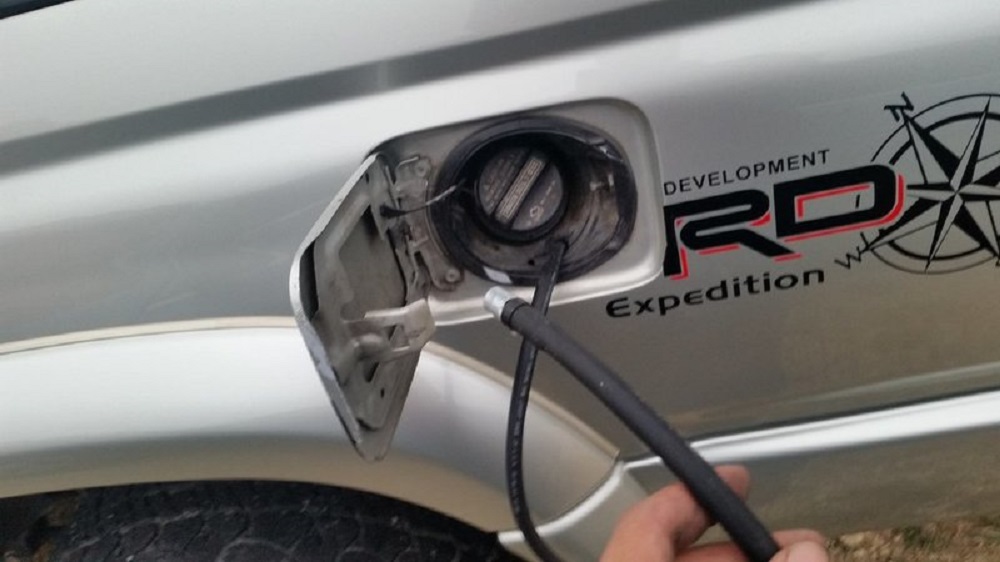
Step 6: Attach the new breather plug to the end of the hose, secure with hose clamp.
Make sure you have the proper length of hose needed before cutting it to the desired length.
Step 7 (optional): Zip-tie the new breather hose to the fill tube in the event the new breather plug starts to rattle.
That’s it! Now you can have the peace of mind knowing your rear axle is will be safe during water crossings and free of debris for many miles ahead!
You must be logged in to post a comment.