WIKID get more eyes
 03-22-2009, 07:29 PM
#21
Registered User
Thread Starter
Join Date: Jul 2007
Location: AZ
Posts: 53
Likes: 0
Received 0 Likes
on
0 Posts
Great point
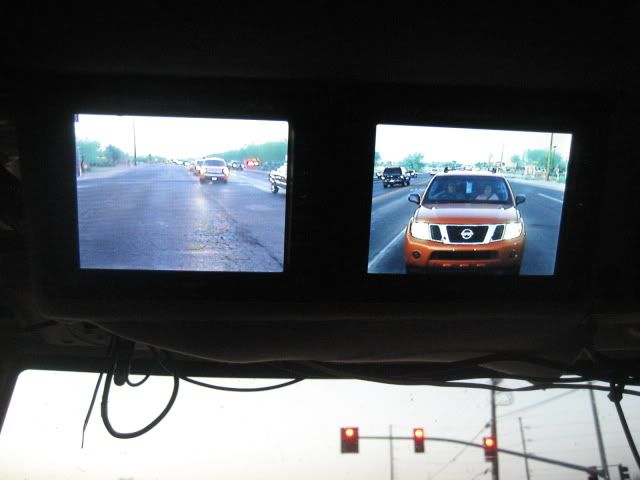
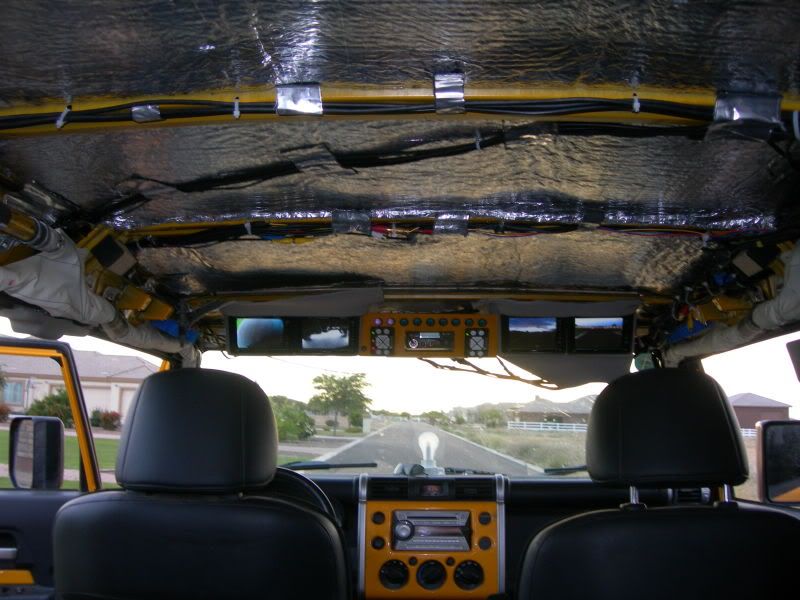
I will start with a view from the drivers seat while driving home from Tucson. The left picture is facing forward from one of the 2 front facing roof cams. The right picture is the long view rear roof cam picture. I was hoping to catch this guy pickin his nose
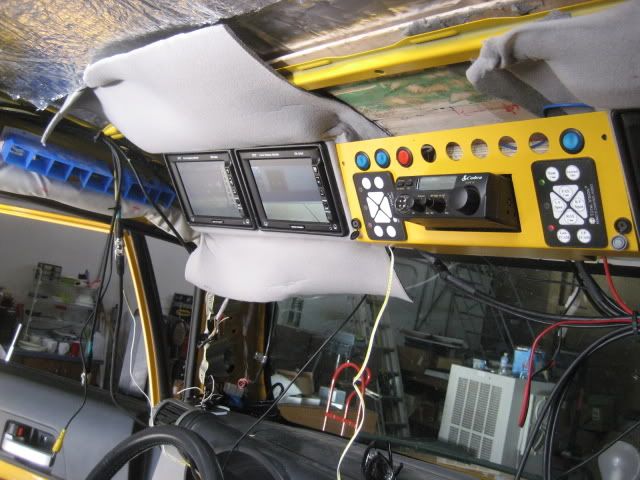
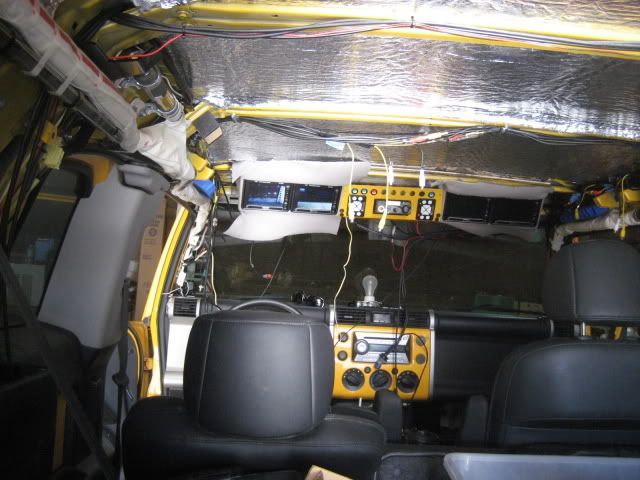
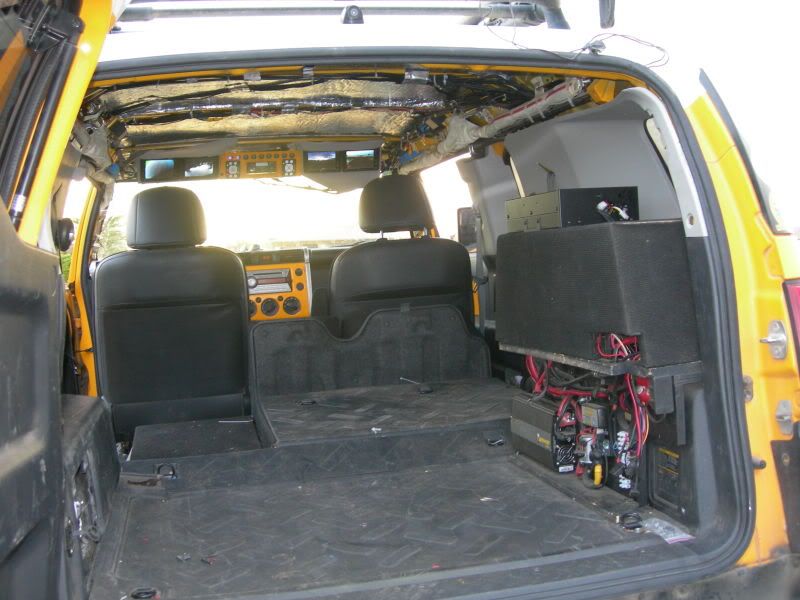
We have most of the system in and 2 of the cameras viewing.
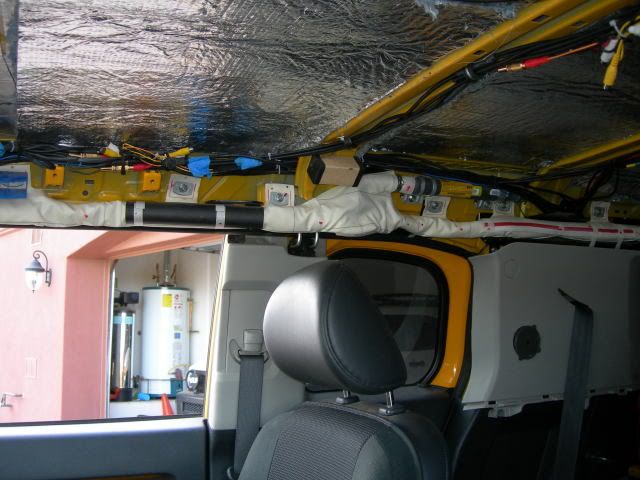
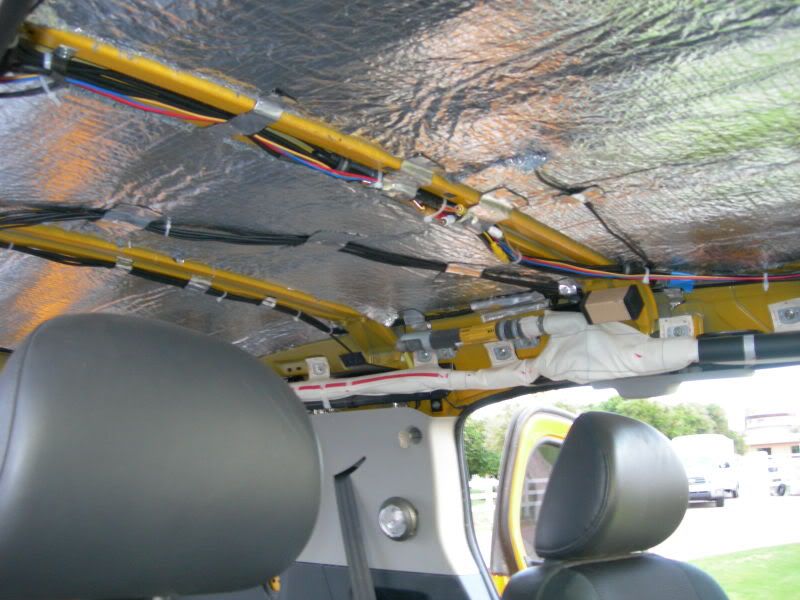
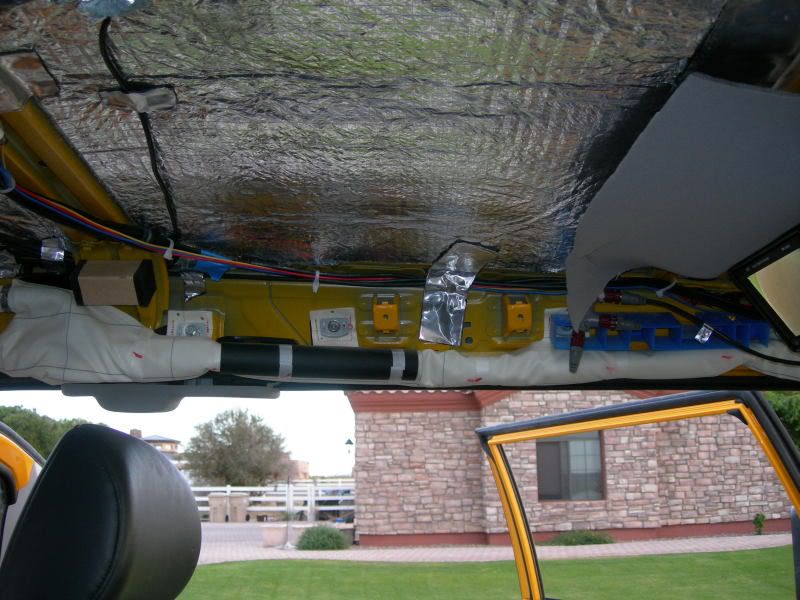
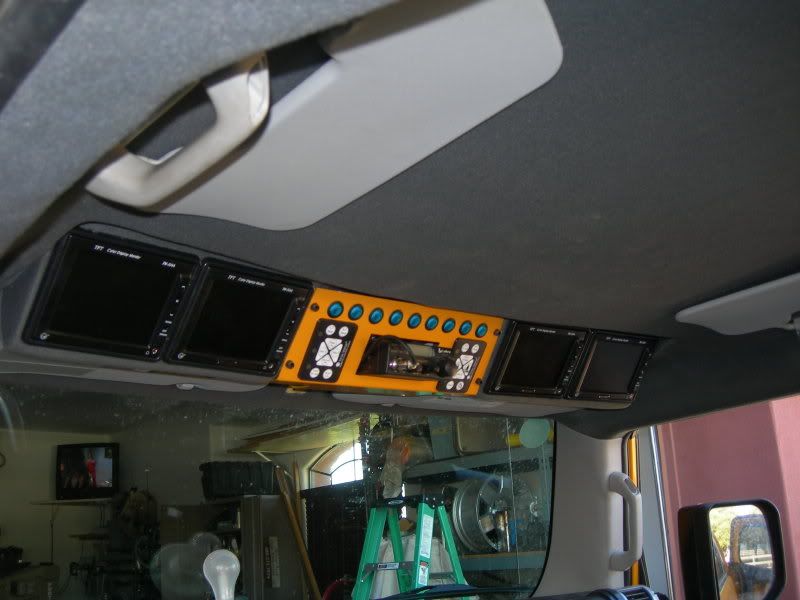
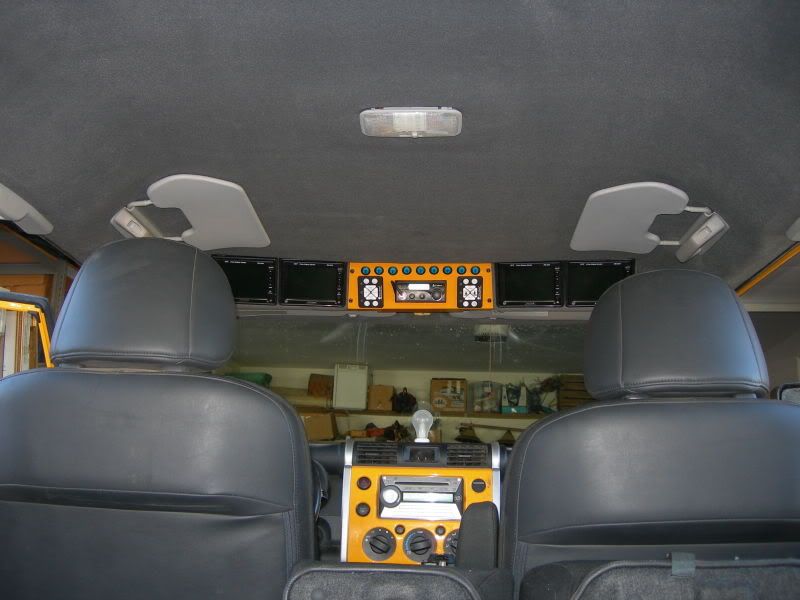
There is lots of wiring and configuring to do. This is the semi complete oh console after today's progress
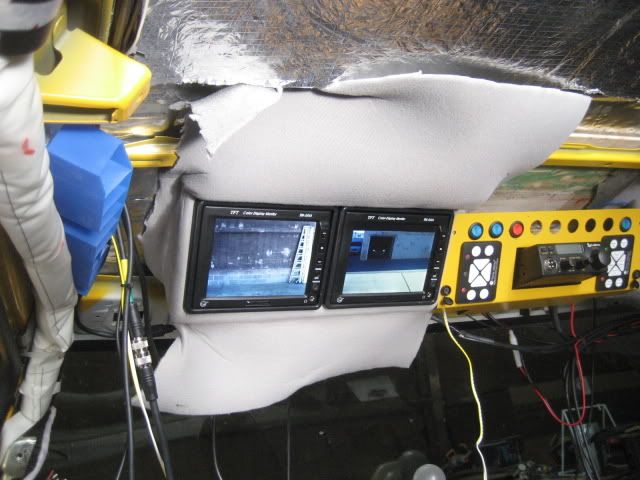
Even though it doesn't look like it, we are fairly close to trimming everything out and doing final adjustments, before the headliner goes back up. Its a slow process because this is totally custom and there are many things that come up while we progress
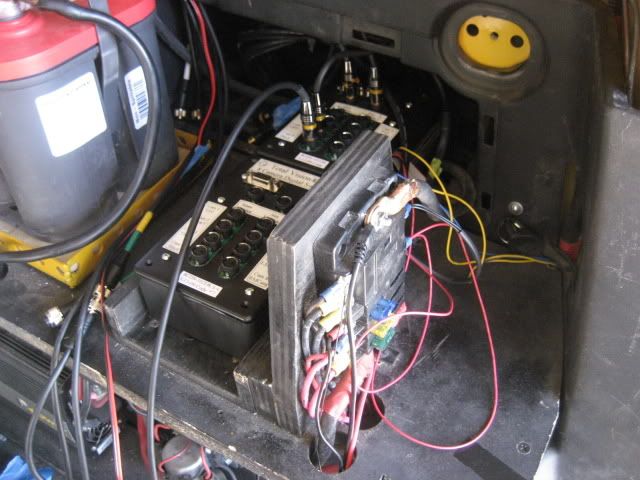
Wiring in the 2 ecu's that are controlled from the keypads on the console
I can't wait till I can start putting stuff back together. It seems like the more we do the more we take apart, but that's the fun of making something from nothing.
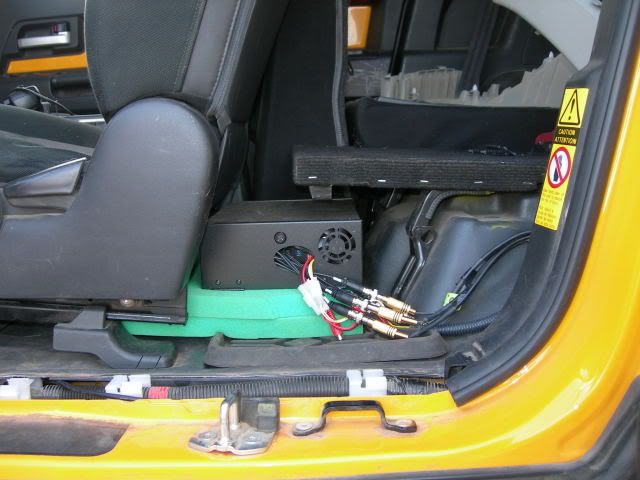
The part you don't see is the DVR. I forgot pictures of it, but pictures will follow
More to follow...
I will start with a view from the drivers seat while driving home from Tucson. The left picture is facing forward from one of the 2 front facing roof cams. The right picture is the long view rear roof cam picture. I was hoping to catch this guy pickin his nose
We have most of the system in and 2 of the cameras viewing.
There is lots of wiring and configuring to do. This is the semi complete oh console after today's progress
Even though it doesn't look like it, we are fairly close to trimming everything out and doing final adjustments, before the headliner goes back up. Its a slow process because this is totally custom and there are many things that come up while we progress
Wiring in the 2 ecu's that are controlled from the keypads on the console
I can't wait till I can start putting stuff back together. It seems like the more we do the more we take apart, but that's the fun of making something from nothing.
The part you don't see is the DVR. I forgot pictures of it, but pictures will follow
More to follow...
Last edited by puulboy; 03-22-2009 at 07:34 PM.
 03-29-2009, 07:04 PM
#22
Registered User
Thread Starter
Join Date: Jul 2007
Location: AZ
Posts: 53
Likes: 0
Received 0 Likes
on
0 Posts
Today is camera install day part 2
Here is a rock spotting camera located on the front drivers side. The passenger side has the same

I drilled a 1" hole angled down and painted the exposed edge. The camera's have brackets that are epoxied in place
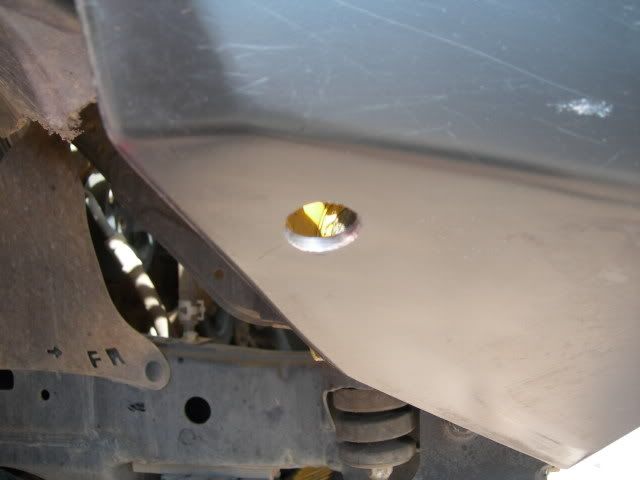
Approach angle camera
Here is the departure camera or backup cam
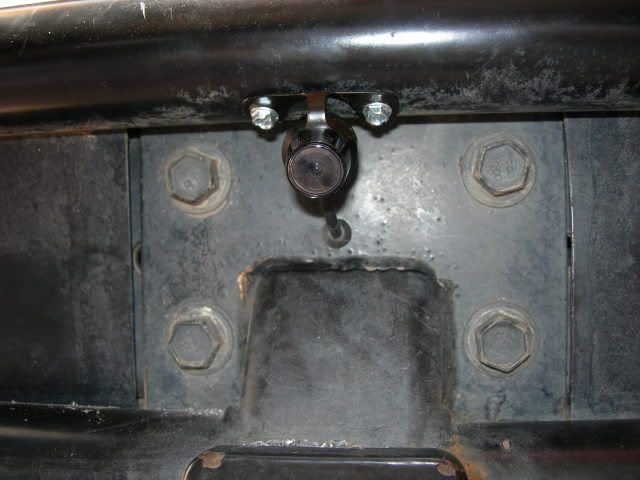

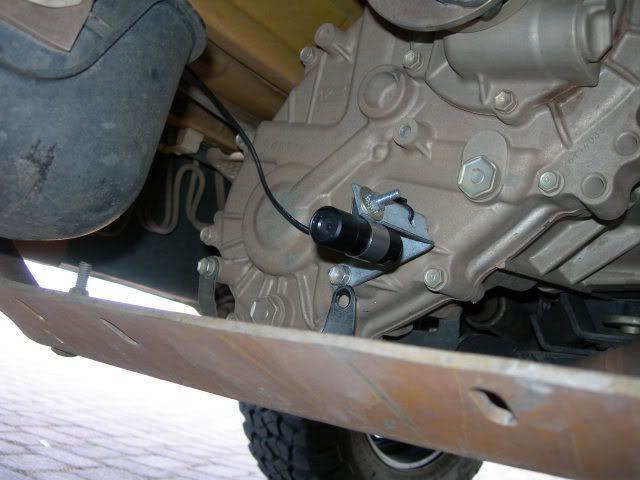
Rear axle cam protected buy my skids and with clear view of the dif and inner tires
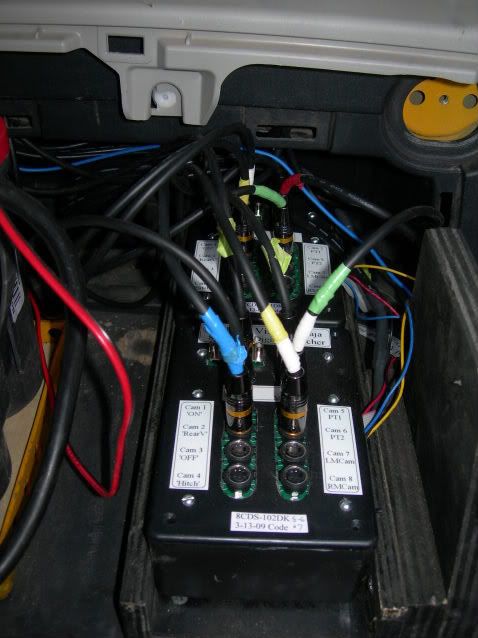
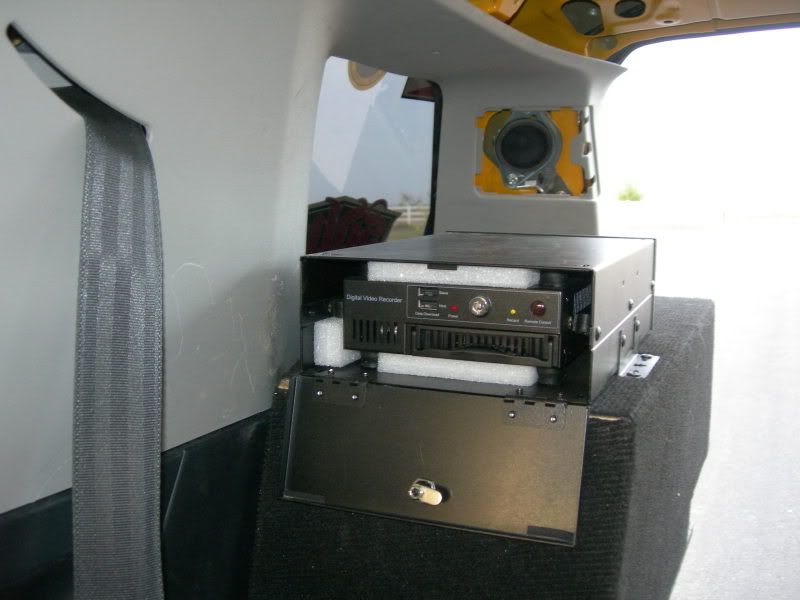
Quad channel DVR with GPS tracking and alarm mode
Here is the wiring finalized. It will not move or show after the headliner is installed. We still have to test the whole system before the headliner goes up just in case..
Here are the 2 ecu's wired and ready for testing. I am going to make a wire keeper for the top of this where all the wires that come out of the ecu's will so have support above them so they won't wiggle out. Testing mode doesn't require neat appearance til I know its right
For some reason I could not get this image to turn the right way up.
More to come
Here is a rock spotting camera located on the front drivers side. The passenger side has the same
I drilled a 1" hole angled down and painted the exposed edge. The camera's have brackets that are epoxied in place
Approach angle camera
Here is the departure camera or backup cam
Rear axle cam protected buy my skids and with clear view of the dif and inner tires
Quad channel DVR with GPS tracking and alarm mode
Here is the wiring finalized. It will not move or show after the headliner is installed. We still have to test the whole system before the headliner goes up just in case..
Here are the 2 ecu's wired and ready for testing. I am going to make a wire keeper for the top of this where all the wires that come out of the ecu's will so have support above them so they won't wiggle out. Testing mode doesn't require neat appearance til I know its right
For some reason I could not get this image to turn the right way up.
More to come
 04-04-2009, 07:18 PM
#24
Registered User
Thread Starter
Join Date: Jul 2007
Location: AZ
Posts: 53
Likes: 0
Received 0 Likes
on
0 Posts
As part of my Camera mod I have had to relocate a few things
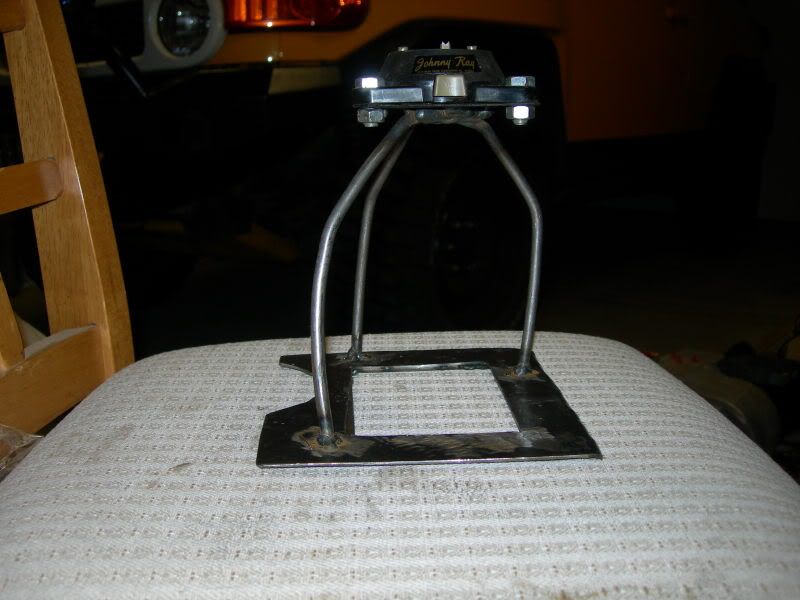
This is a picture of the way my GPS was mounted before the Camera Mod

Since this is close to the configuration I am dealing with now the GPS needed a new home
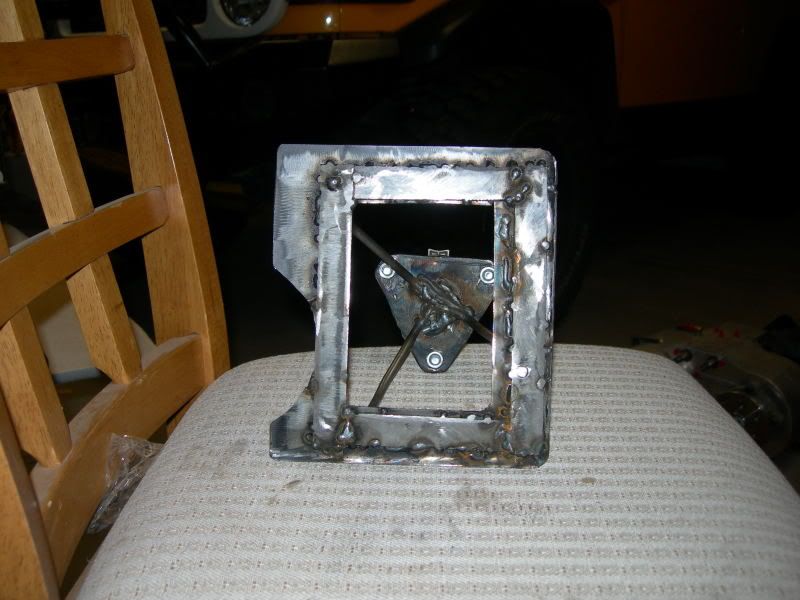
Here is what I fabbed up today to make that new home for my Lowrance
Pardon the sloppy look I tack welded it in many places not to distort the metal. I will clean it up and paint it.
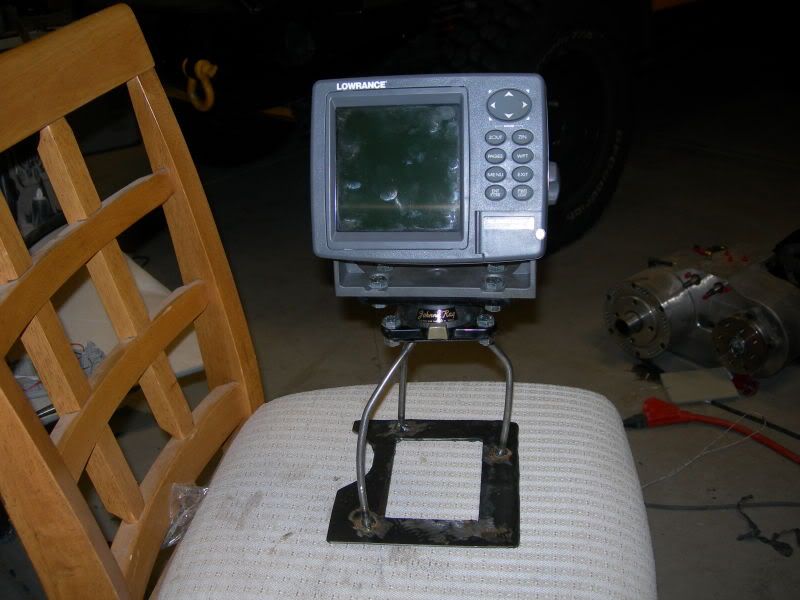
This has a swivel mount from a fishfinder like it was in it's previous location
Here it is where it will be mounted. I still have access to the transfer case shifter and all the controls on the dash along with still being able to see the radio controls
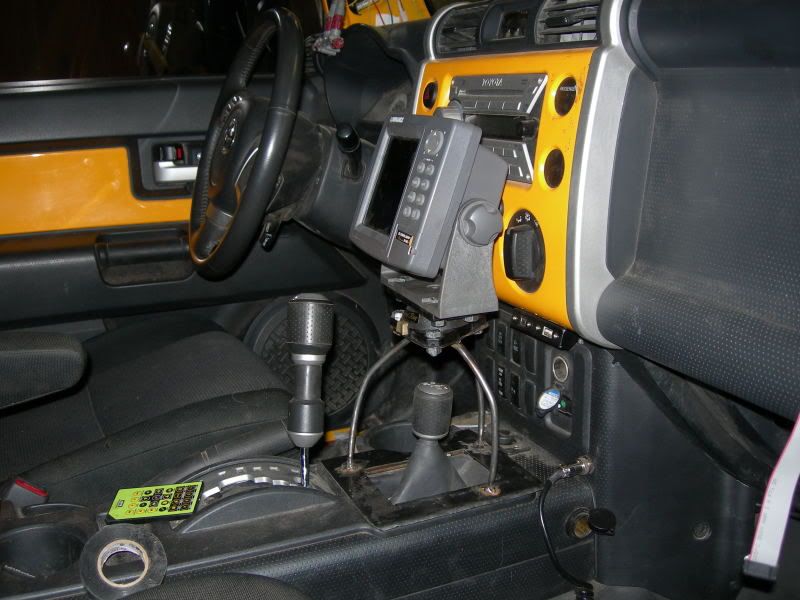
I made the angles specific so I could still shift with no interference. Its 16 gauge steel with formed edges and 1 inch bar stock to re enforce the lower plate then 1/4 inch dowl rod bend and joined in the middle with a baseplate welded on top to attach the mount
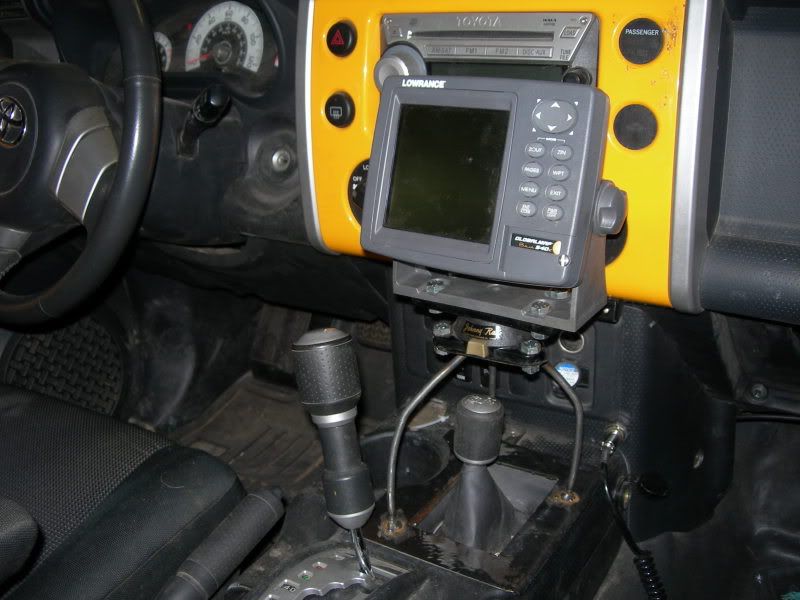
I can now reattach my rear view mirror.
I may mount it with industrial strength velcro but am still pondering it as of now. I am open for suggestions on the mounting though.
Thanks
Don
This is a picture of the way my GPS was mounted before the Camera Mod
Since this is close to the configuration I am dealing with now the GPS needed a new home
Here is what I fabbed up today to make that new home for my Lowrance
Pardon the sloppy look I tack welded it in many places not to distort the metal. I will clean it up and paint it.
This has a swivel mount from a fishfinder like it was in it's previous location
Here it is where it will be mounted. I still have access to the transfer case shifter and all the controls on the dash along with still being able to see the radio controls
I made the angles specific so I could still shift with no interference. Its 16 gauge steel with formed edges and 1 inch bar stock to re enforce the lower plate then 1/4 inch dowl rod bend and joined in the middle with a baseplate welded on top to attach the mount
I can now reattach my rear view mirror.
I may mount it with industrial strength velcro but am still pondering it as of now. I am open for suggestions on the mounting though.
Thanks
Don
 04-04-2009, 08:09 PM
#26
Registered User
Thread Starter
Join Date: Jul 2007
Location: AZ
Posts: 53
Likes: 0
Received 0 Likes
on
0 Posts
Actually that belongs to bellydoc If you don't know who he is you should check out his way over the top 40 build on the FJ Cruisers forum
04-04-2009, 08:12 PM
#27
Registered User
Join Date: Jan 2009
Location: bellingham,wa
Posts: 256
Likes: 0
Received 0 Likes
on
0 Posts
this is an awesome build, what do you do for a living, do you prerun or what??? or are you some kind of mad scientist. your fj's are beautiful!!!!!
i bow down to thee
i bow down to thee
04-04-2009, 08:21 PM
#28
Registered User
Thread Starter
Join Date: Jul 2007
Location: AZ
Posts: 53
Likes: 0
Received 0 Likes
on
0 Posts
Most of my mods I do myself. I try to create stuff instead of just going out and buying it. I have a small business refinishing wood doors in the phoenix area. I do have lots of pride in my work and that gets me mostly referral work.
I have tinkered with most of my vehicles Its my way of having fun that's all .
I want to do trail videos. Maybe have my truck in a magazine at some point. I would love to travel the country seeing places and video recording it. Work prevents me from doing that right now

Thanks for the compliments No need to bow. Just be happy with what you have or make moves to get what makes you happy.
thanks
Don
04-05-2009, 07:47 PM
#30
Registered User
Thread Starter
Join Date: Jul 2007
Location: AZ
Posts: 53
Likes: 0
Received 0 Likes
on
0 Posts
Like most weekends I was consumed with finishing this project. We had all of the cameras going today and actually recorded on the DVR. Its cool because you can use one screen to play back anything you have recorded. You can choose to playback all of the channels at once with a quad split on the screen and also pull up any recording you have done with a time stamp on it . It will also record GPS tracks where the recording took place. There is an option to have it power on with motion and also track braking, turning backing up etc. As a simple backup feature it will power on by itself when you put it in reverse to view as many as 4 cameras if you choose to but for sure I will have the rear cameras active on backup. Pictures will follow when I have more light to take them, with all the bells and whistles going.
04-10-2009, 07:09 PM
#31
Registered User
Thread Starter
Join Date: Jul 2007
Location: AZ
Posts: 53
Likes: 0
Received 0 Likes
on
0 Posts
Ok After testing my system in a local rough wash area, I cannot get the video system to mess up so I think it's ready to finalize. The picture reflects wires secured with the sound deadening. I used strips of it to stop possible wires coming loose and rattling in the headliner. The sound deadening is extremely sticky, so I doubt it will come loose. Everything else was wire tied into position
Everything in the rear is secure and the next step will be to secure the OH console and tie wires out of the way.
The DVR is now mounted in a different location so it will be easier to control it with the remote. Top of my rear Battery box is where I chose. If you look at my gear box, on my build, it fits against the battery box so you only see the carpeted boxes instead of wiring
View from the passenger front. If you look closely you will see that the DVR is actually recording
It felt good to install trim panels. It makes me feel like progress is made
Next stop, drop my truck off to I-10 upholstery, to make the headliner transition to the new monitors.
This will be more of a temporary solution, I plan on having the headliner remade after Overland Expo.2009 . Wikid's Camera system will be displayed at Total Vision Products: The new standard in mobile vision products booth
04-18-2009, 08:06 PM
#32
Registered User
Thread Starter
Join Date: Jul 2007
Location: AZ
Posts: 53
Likes: 0
Received 0 Likes
on
0 Posts
Next stop, drop my truck off to I-10 upholstery, to make the headliner transition to the new monitors.
This will be more of a temporary solution, I plan on having the headliner remade after Overland Expo.2009 . Wikid's Camera system will be displayed at Total Vision Products: The new standard in mobile vision products booth
This will be more of a temporary solution, I plan on having the headliner remade after Overland Expo.2009 . Wikid's Camera system will be displayed at Total Vision Products: The new standard in mobile vision products booth
04-19-2009, 08:31 PM
#33
Registered User
Thread Starter
Join Date: Jul 2007
Location: AZ
Posts: 53
Likes: 0
Received 0 Likes
on
0 Posts
Taking matters into my own hands I will post up the headliner install
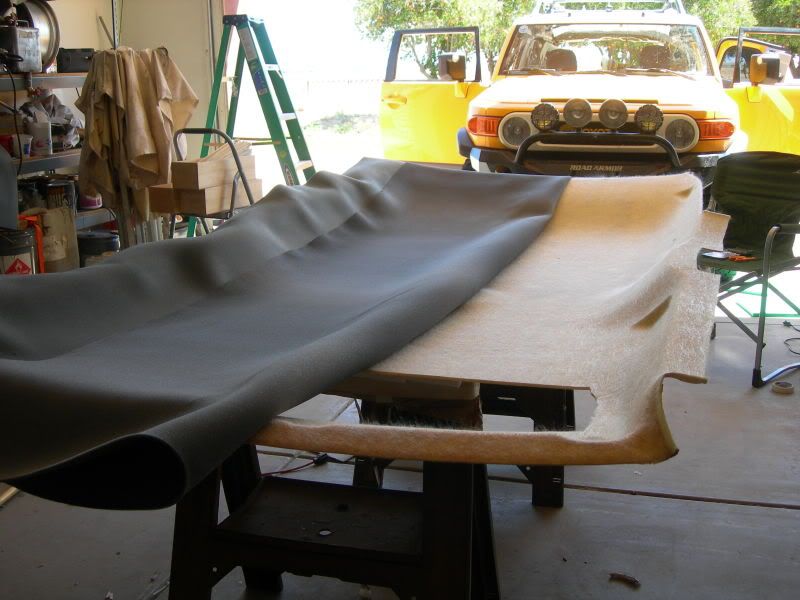
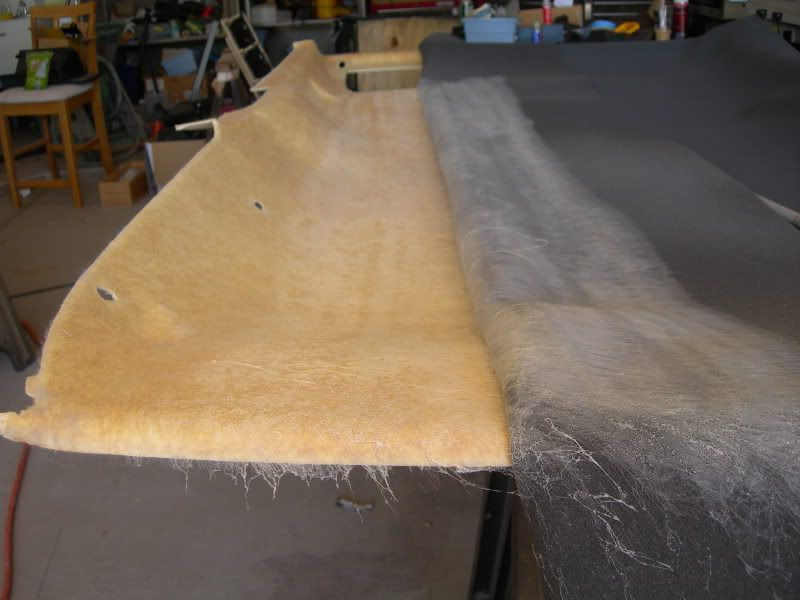
First picture is what needed to happen to get this project underway. My wife and I peeled the old skin off the headliner. It took some time and patience, but came off nicely
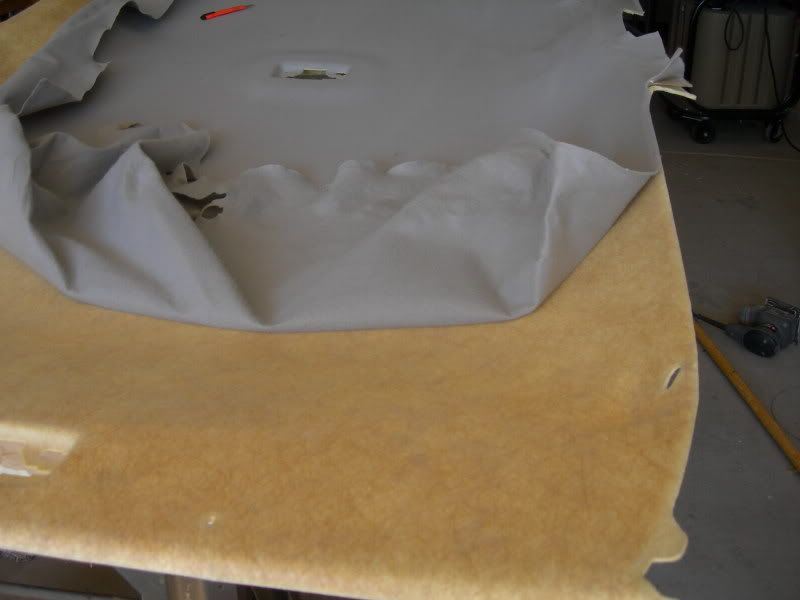
Presto its magic. Off with the old
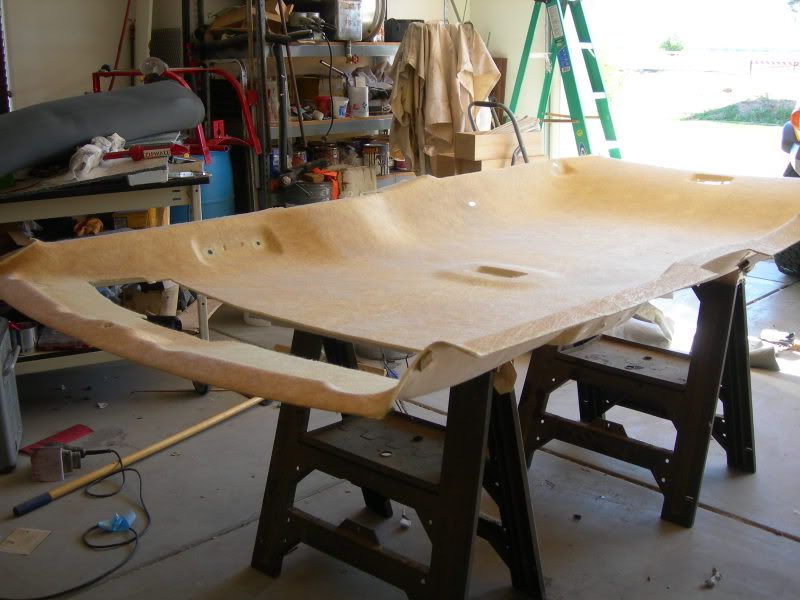
The headliner color I chose was a graphite. I wanted to rich it up some, since I was changing it anyway.
The method we chose was to lay it out then fold it half over and begin spraying the headliner glue in a section at a time
The last part was where the modification was needed for my monitor pods
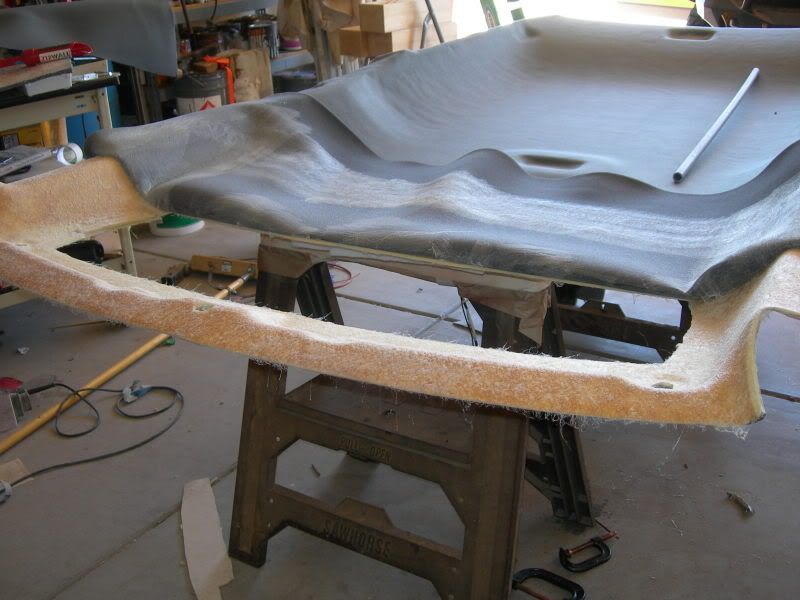
Since I changed my mind on colors I had to redo the monitor pods in the correct color. That took the most time since I had to pull everything down and pull all the monitor cases out to make a clean install over my custom console. It was worth the extra effort for sure.
Installed and making small adjustments on it
After taking a ride it is more quiet than it was before all the insulation.
I bought too much headliner material because I wanted to be ready for problems. 8 yards of headliner, 3 cans of headliner adhesive and 6 hours is what it took to do it from start to finish. $99.89 is what the project cost me.
My wife was a really big help on this end of the project. I am fortunate she allows me to play with my toys and humors me when I ask her opinion of my latest brainfarts
I am so glad I didn't leave it up to an incompetent shop to do this. It came out the way I wanted it to.
The jury is out on the gray accents, visors etc they actually look pretty good when you see it in person. I may or may not recover them to match the headliner
This project is pretty close to being complete. I have to put my Don box back in, the frig, the dvr and I am ready for some awesome trail video.
First picture is what needed to happen to get this project underway. My wife and I peeled the old skin off the headliner. It took some time and patience, but came off nicely
Presto its magic. Off with the old
The headliner color I chose was a graphite. I wanted to rich it up some, since I was changing it anyway.
The method we chose was to lay it out then fold it half over and begin spraying the headliner glue in a section at a time
The last part was where the modification was needed for my monitor pods
Since I changed my mind on colors I had to redo the monitor pods in the correct color. That took the most time since I had to pull everything down and pull all the monitor cases out to make a clean install over my custom console. It was worth the extra effort for sure.
Installed and making small adjustments on it
After taking a ride it is more quiet than it was before all the insulation.
I bought too much headliner material because I wanted to be ready for problems. 8 yards of headliner, 3 cans of headliner adhesive and 6 hours is what it took to do it from start to finish. $99.89 is what the project cost me.
My wife was a really big help on this end of the project. I am fortunate she allows me to play with my toys and humors me when I ask her opinion of my latest brainfarts
I am so glad I didn't leave it up to an incompetent shop to do this. It came out the way I wanted it to.
The jury is out on the gray accents, visors etc they actually look pretty good when you see it in person. I may or may not recover them to match the headliner
This project is pretty close to being complete. I have to put my Don box back in, the frig, the dvr and I am ready for some awesome trail video.
 04-20-2009, 12:09 PM
#35
Registered User
Thread Starter
Join Date: Jul 2007
Location: AZ
Posts: 53
Likes: 0
Received 0 Likes
on
0 Posts
Thank you
Its been rewarding to accomplish something that has been in my mind for awhile.. The bonus is, it worked out better than I even expected to. It's been a long 6 or 8 weeks , but I really enjoyed the challenge.
Its been rewarding to accomplish something that has been in my mind for awhile.. The bonus is, it worked out better than I even expected to. It's been a long 6 or 8 weeks , but I really enjoyed the challenge.
 04-27-2009, 03:00 PM
#37
Registered User
Thread Starter
Join Date: Jul 2007
Location: AZ
Posts: 53
Likes: 0
Received 0 Likes
on
0 Posts
Here are the some shots from the first show of the Baja Camera System
I ran the off-road course at Overland Expo with camera's only
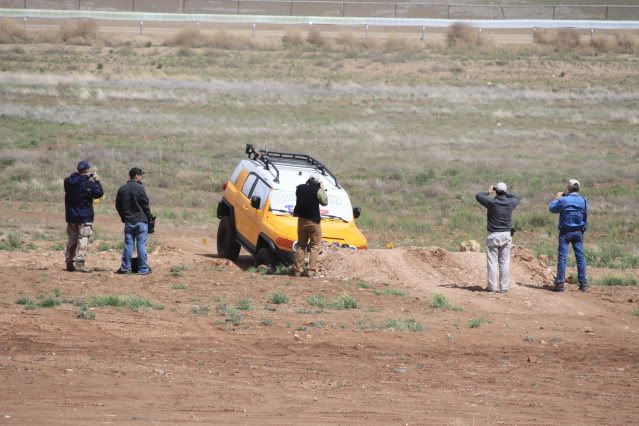
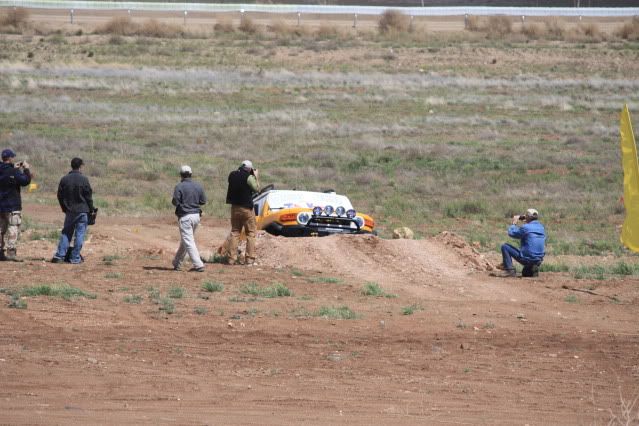

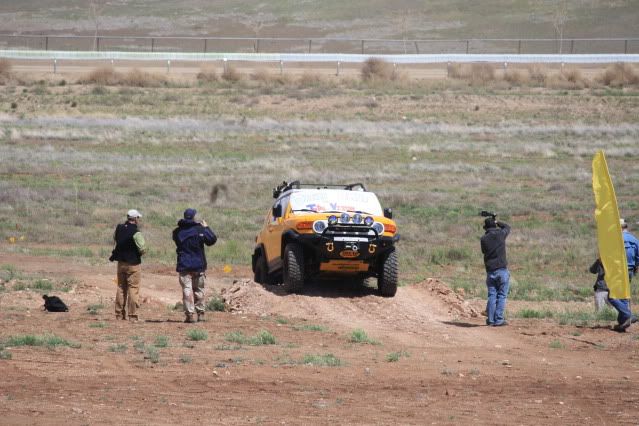
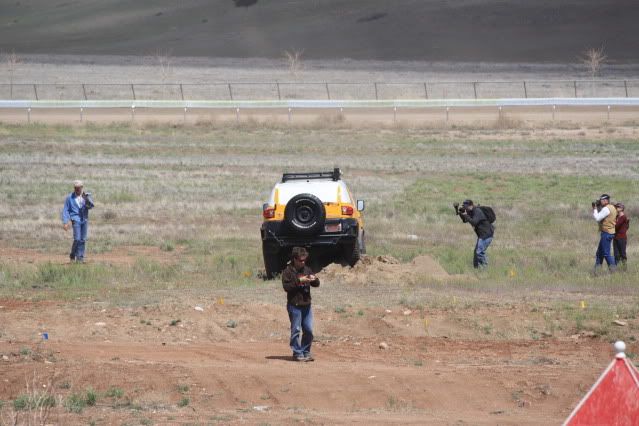
This was the very first time I have ever tried to drive without having the use of windows. It went well. I found a few views I still need, to make it easier, but it was fun to do. Best thing is wikid is still in one piece
The response to the Baja Camera System and my truck in general was overwhelming and very rewarding.
Thank you Dan and Jessa For helping out with the window coverings and especially to you Jessa for doing some creative writing on the front windshield
I ran the off-road course at Overland Expo with camera's only
This was the very first time I have ever tried to drive without having the use of windows. It went well. I found a few views I still need, to make it easier, but it was fun to do. Best thing is wikid is still in one piece
The response to the Baja Camera System and my truck in general was overwhelming and very rewarding.
Thank you Dan and Jessa For helping out with the window coverings and especially to you Jessa for doing some creative writing on the front windshield
04-27-2009, 03:10 PM
#38
Very cool. I had not seen your build before. I have drooled over similar installs before though I am thinking yours is the most extensive yet. Great work on the install.
Looks like all you are missing is an extra transfer case
edit: are the sidefacing sunvisors stock FJC? don't remember them. I have a set of double Chevy Visors i was going to mount in my truck but I kind of like those better...
Keep up the quality work, it is way above the usual stuff we see here
Looks like all you are missing is an extra transfer case
edit: are the sidefacing sunvisors stock FJC? don't remember them. I have a set of double Chevy Visors i was going to mount in my truck but I kind of like those better...
Keep up the quality work, it is way above the usual stuff we see here
Last edited by dropzone; 04-27-2009 at 03:13 PM.
04-27-2009, 03:49 PM
#39
Registered User
Thread Starter
Join Date: Jul 2007
Location: AZ
Posts: 53
Likes: 0
Received 0 Likes
on
0 Posts
Very cool. I had not seen your build before. I have drooled over similar installs before though I am thinking yours is the most extensive yet. Great work on the install.
Looks like all you are missing is an extra transfer case
edit: are the sidefacing sunvisors stock FJC? don't remember them. I have a set of double Chevy Visors i was going to mount in my truck but I kind of like those better...
Keep up the quality work, it is way above the usual stuff we see here
Looks like all you are missing is an extra transfer case
edit: are the sidefacing sunvisors stock FJC? don't remember them. I have a set of double Chevy Visors i was going to mount in my truck but I kind of like those better...
Keep up the quality work, it is way above the usual stuff we see here
Maybe this year I can hit him up for an inchworm lefty

Last edited by puulboy; 04-27-2009 at 03:51 PM.


