Toyota Hydraulic Hood Lifts
 06-30-2008, 09:32 PM
#1
Toyota Hydraulic Hood Lifts
Toyota 4Runner Hydraulic Hood Lift
 Disclaimer: Every effort was made to ensure a correct and safe installation of this modification. All modifications were accomplished using simple hand tools and used parts from various motor vehicles. While every attempt has been made to simplify the installation, not all situtations can be foreseen. Anyone attempting this or any other modification knows or should know and understand the risks involved. That a basic knowledge of mechanics is implied. Any attempt to duplicate this or any other modification performed by this author is done so at the risk to both the installer and the vehicle into which it is installed. Please use common sense in all your modification efforts. Do not attempt this or any other modification without fully understanding the undertaking and the risks involved. Neither Yota Tech nor the author will be responsible for any modifications that are performed using these or any other instructions. They are for entertainment only. All photographs and instructions are the copyright of the author. Any other use without written permission is strictly prohibited.
We all like to work on our trucks. How many times have you tried to do a simple tune-up and had to deal with working around the hood lift bar that is standard on almost every motor vehicle today? Well for you 4Runner guys I have a solution. Install a set of hydraulic lift gate struts!
Yes I know there are pre-made kits out there that are very good and simple to install, but I like to do my own work and found an inexpensive way for you to do the same thing. Also if you need to replace the struts you can obtain them as well.
I recently completed an install of a set of rear lift gate struts from a 1991 Toyota Land Cruiser fitted to the hood of my 1998 4Runner. In this write up I will show you how you too can perform this simple and rewarding modification in under 2 hours. Here is what you are going to need to perform this modification:
3/8” drill (cord or cordless)
9/64th drill bit
11/32nd drill bit
Pop rivet gun
12mm combination wrench
utility knife
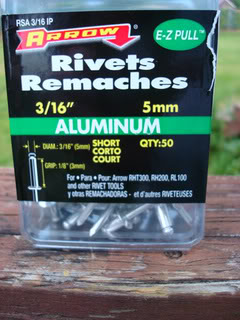
3/16th 5mm aluminum pop rivets
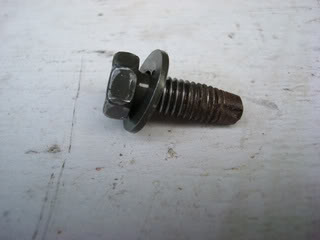
12mm OEM bolt with captive washer
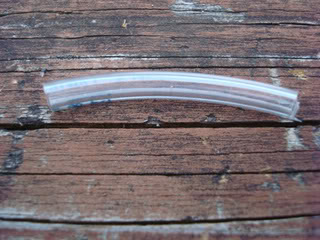
2” � OD vinyl tubing (aquarium air line)
pair rear lift gate struts 1991-1998 Land Cruiser
Tape measure
Sharpie pen
Most items listed are going to be easy to find. The pop rivets I used were obtained at the local hardware store and only came in a box of 50, but now I have plenty for other projects.
The 12mm OEM bolt I obtained on one of my “field trips” to the local wrecking yard. You can pick up a few of these and most yards will just let you have them. Ask, its what I do and they usually just give them to you. Otherwise a 12 mm bolt �” with a flat washer will do fine.
The vinyl tubing was another “give me”. You need to find the �” outside diameter (OD) vinyl aquarium air line and just need about one to two inches as you cut this in 1/8” thick sleeves that will act as a bushing for the pop rivets. This can be found anywhere aquarium supplies are sold
The existing hole in the strut flanges is slightly larger then �” while the pop rivet is 3/16”. This will provide for a nice snug fitting around the pop rivet holding the strut firmly in place so it can not vibrate and eventually weaken the pop rivet over the life of usage.
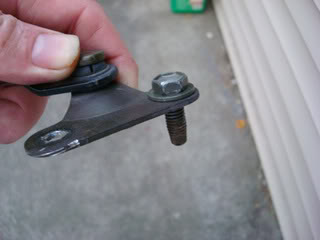
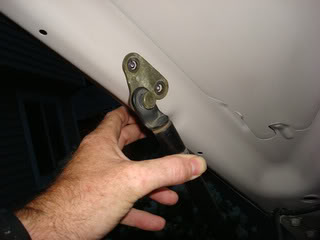
The Land Cruiser rear lift gate struts were an almost perfect match for the hood configuration of the 4Runner. The strut is not very thick and just the right length to tuck neatly inside the hood area. The strut uses two triangle flanges that are bolted in place allowing easy removal from the donor vehicle as well providing for easy installation.
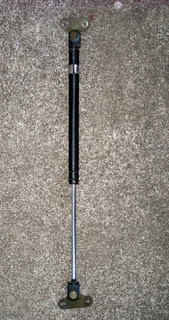
The rod end has a flat mounting flange with a slightly raised plane.
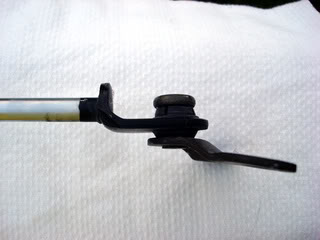
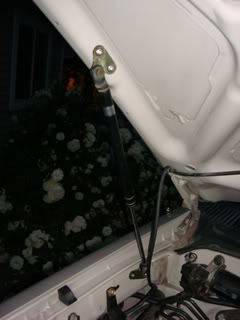
The cylinder end has an angled flange that will mate almost perfectly to the hood ridge.
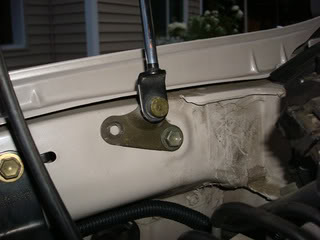
First locate the two OEM nuts mounted inside the fender near the firewall. On the right side you will see it just to the rear of the windshield washer hose.
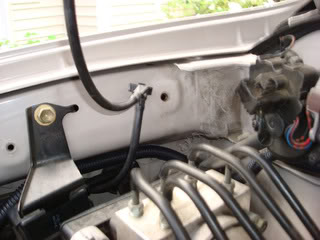
The driver side is in the same location but should not have anything attached to the hole.
Carefully remove the washer hose and let it just hang free.
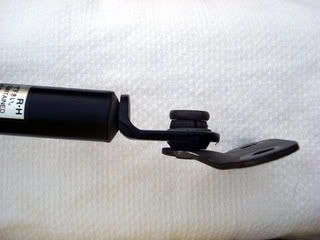
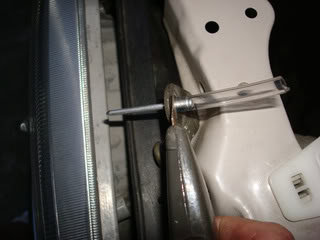
If you obtain the pair of struts from the same vehicle (which is always nice) you will note they are marked LH and RH For our application it really doesn’t matter, but if you put the left on left and right on right, it just makes it look a bit more professional. You will need to obtain one of the struts. Note which end of the flange will be mating to the OEM threaded hole in the fender. You will need to drill out this flange hole with the 11/32nd inch drill bit. Use caution when performing this as the bit will bite into the flange and can rip it away from your hand causing injury.
Check that the hole is large enough for the bolt.
 .
.
Using the 12 mm wrench or socket if you desire, begin to thread the bolt into the threaded OEM hole.
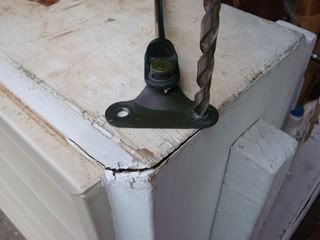
Do not fully tighten this bolt yet. Next you will position the other end of the flange approximately �” below the edge of the fender. Mark the hole location with the sharpie.

Using the 9/64th inch bit, drill out the mounting hole for the pop rivet.
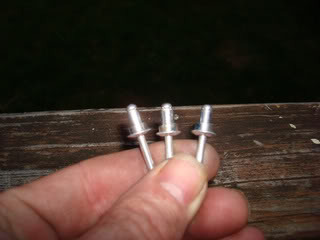
Next you should prepare the rivets. You will need 3 rivets per side as well as 3 bushings. To make the rivets and bushing, slip the vinyl tubing onto a rivet. Ensure you have a flat straight cut on the end of the tubing.
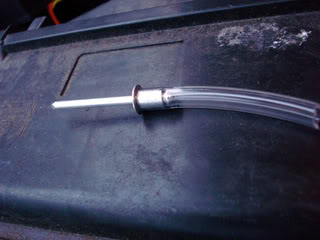
Slip the tubing through the flange of the strut until flush. Now using a utility knife at the edge of the flange, cut the tubing all the way around the rivet.
prepare at least the first three rivets in this manner.
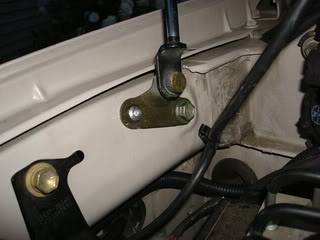
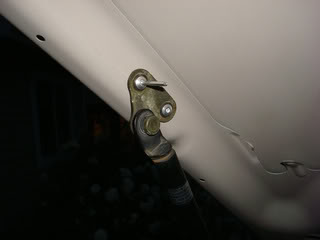
Locate the flange in the correct location and insert the premade rivet and bushing into the drilled hole. Use a pop rivet gun to set the rivet. Ensure it is flush before you begin clamping down on the rivet gun handle.
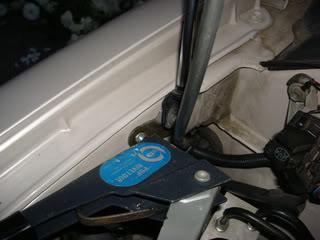
The flange should be securely mounted at this point.
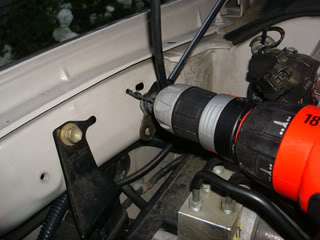
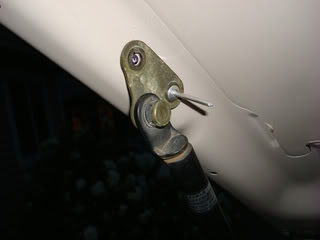
Next you will need to push the strut inward towards the engine bay slightly to put a slight bend in the lower flange to aid in aligning the upper flange with the hood. After each slight movement, check for fit at the hood flange and hood ridge.
After you have verified the correct angle of the upper flange to the hood ridge, measure from the hood front edge to the radiator support for a distance of approximately 30 inches.

I used the hood support rod to hold the hood at this location which is slightly higher then the height of the hood using the hood support rod.
Mark the location of the flange using the Sharpie.
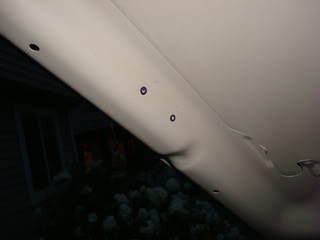
Drill out the first hole and then test fit the rivet for correct placement. Pop rivet in place
Drill the next pilot hole and install the second rivet.
You have now completed a strut install on that side. Repeat the procedure on the opposite side and youre done!
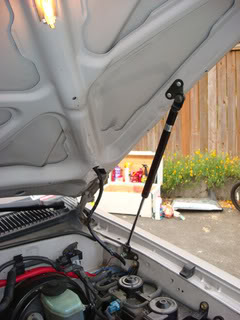
You are now complete. With both struts installed the hood will definitely want to stay open! It requires a bit of heft to get it started to come shut, but once you are about a foot from closing the hood will drop shut without much effort at all. Opening is easy, release the hood latch and lift slightly and the struts will lift the hood up quickly. If you do not catch the hood on its way up not to worry as the struts have a built in hydraulic damper which slows the hood until it is fully open! By the way my total cost to install these lifts was less the $30
Disclaimer: Every effort was made to ensure a correct and safe installation of this modification. All modifications were accomplished using simple hand tools and used parts from various motor vehicles. While every attempt has been made to simplify the installation, not all situtations can be foreseen. Anyone attempting this or any other modification knows or should know and understand the risks involved. That a basic knowledge of mechanics is implied. Any attempt to duplicate this or any other modification performed by this author is done so at the risk to both the installer and the vehicle into which it is installed. Please use common sense in all your modification efforts. Do not attempt this or any other modification without fully understanding the undertaking and the risks involved. Neither Yota Tech nor the author will be responsible for any modifications that are performed using these or any other instructions. They are for entertainment only. All photographs and instructions are the copyright of the author. Any other use without written permission is strictly prohibited.We all like to work on our trucks. How many times have you tried to do a simple tune-up and had to deal with working around the hood lift bar that is standard on almost every motor vehicle today? Well for you 4Runner guys I have a solution. Install a set of hydraulic lift gate struts!
Yes I know there are pre-made kits out there that are very good and simple to install, but I like to do my own work and found an inexpensive way for you to do the same thing. Also if you need to replace the struts you can obtain them as well.
I recently completed an install of a set of rear lift gate struts from a 1991 Toyota Land Cruiser fitted to the hood of my 1998 4Runner. In this write up I will show you how you too can perform this simple and rewarding modification in under 2 hours. Here is what you are going to need to perform this modification:
3/8” drill (cord or cordless)
9/64th drill bit
11/32nd drill bit
Pop rivet gun
12mm combination wrench
utility knife
3/16th 5mm aluminum pop rivets
12mm OEM bolt with captive washer
2” � OD vinyl tubing (aquarium air line)
pair rear lift gate struts 1991-1998 Land Cruiser
Tape measure
Sharpie pen
Most items listed are going to be easy to find. The pop rivets I used were obtained at the local hardware store and only came in a box of 50, but now I have plenty for other projects.
The 12mm OEM bolt I obtained on one of my “field trips” to the local wrecking yard. You can pick up a few of these and most yards will just let you have them. Ask, its what I do and they usually just give them to you. Otherwise a 12 mm bolt �” with a flat washer will do fine.
The vinyl tubing was another “give me”. You need to find the �” outside diameter (OD) vinyl aquarium air line and just need about one to two inches as you cut this in 1/8” thick sleeves that will act as a bushing for the pop rivets. This can be found anywhere aquarium supplies are sold
The existing hole in the strut flanges is slightly larger then �” while the pop rivet is 3/16”. This will provide for a nice snug fitting around the pop rivet holding the strut firmly in place so it can not vibrate and eventually weaken the pop rivet over the life of usage.
The Land Cruiser rear lift gate struts were an almost perfect match for the hood configuration of the 4Runner. The strut is not very thick and just the right length to tuck neatly inside the hood area. The strut uses two triangle flanges that are bolted in place allowing easy removal from the donor vehicle as well providing for easy installation.
The rod end has a flat mounting flange with a slightly raised plane.
The cylinder end has an angled flange that will mate almost perfectly to the hood ridge.
First locate the two OEM nuts mounted inside the fender near the firewall. On the right side you will see it just to the rear of the windshield washer hose.
The driver side is in the same location but should not have anything attached to the hole.
Carefully remove the washer hose and let it just hang free.
If you obtain the pair of struts from the same vehicle (which is always nice) you will note they are marked LH and RH For our application it really doesn’t matter, but if you put the left on left and right on right, it just makes it look a bit more professional. You will need to obtain one of the struts. Note which end of the flange will be mating to the OEM threaded hole in the fender. You will need to drill out this flange hole with the 11/32nd inch drill bit. Use caution when performing this as the bit will bite into the flange and can rip it away from your hand causing injury.
Check that the hole is large enough for the bolt.
.Using the 12 mm wrench or socket if you desire, begin to thread the bolt into the threaded OEM hole.
Do not fully tighten this bolt yet. Next you will position the other end of the flange approximately �” below the edge of the fender. Mark the hole location with the sharpie.
Using the 9/64th inch bit, drill out the mounting hole for the pop rivet.
Next you should prepare the rivets. You will need 3 rivets per side as well as 3 bushings. To make the rivets and bushing, slip the vinyl tubing onto a rivet. Ensure you have a flat straight cut on the end of the tubing.
Slip the tubing through the flange of the strut until flush. Now using a utility knife at the edge of the flange, cut the tubing all the way around the rivet.
prepare at least the first three rivets in this manner.
Locate the flange in the correct location and insert the premade rivet and bushing into the drilled hole. Use a pop rivet gun to set the rivet. Ensure it is flush before you begin clamping down on the rivet gun handle.
The flange should be securely mounted at this point.
Next you will need to push the strut inward towards the engine bay slightly to put a slight bend in the lower flange to aid in aligning the upper flange with the hood. After each slight movement, check for fit at the hood flange and hood ridge.
After you have verified the correct angle of the upper flange to the hood ridge, measure from the hood front edge to the radiator support for a distance of approximately 30 inches.
I used the hood support rod to hold the hood at this location which is slightly higher then the height of the hood using the hood support rod.
Mark the location of the flange using the Sharpie.
Drill out the first hole and then test fit the rivet for correct placement. Pop rivet in place
Drill the next pilot hole and install the second rivet.
You have now completed a strut install on that side. Repeat the procedure on the opposite side and youre done!
You are now complete. With both struts installed the hood will definitely want to stay open! It requires a bit of heft to get it started to come shut, but once you are about a foot from closing the hood will drop shut without much effort at all. Opening is easy, release the hood latch and lift slightly and the struts will lift the hood up quickly. If you do not catch the hood on its way up not to worry as the struts have a built in hydraulic damper which slows the hood until it is fully open! By the way my total cost to install these lifts was less the $30
Last edited by Ritzy4Runner; 10-21-2019 at 07:54 AM.
 06-30-2008, 09:42 PM
#2
Registered User

Looks good. I did the same thing on mine but used the land cruiser hood struts. The mounting was a little different but the same idea. I figured if its heavy duty enough to be used on a land cruiser, its enough for any 4runner
The following users liked this post:
Ritzy4Runner (10-18-2019)
07-01-2008, 08:51 AM
#3
Registered User
Join Date: May 2007
Location: Denver metro area-CO
Posts: 2,175
Likes: 0
Received 2 Likes
on
2 Posts
Nicely done. Thanks for the writeup, Ritzy. Your writeups are the cream of the crop with nicely added photos along the way.
I agree that this is a classy touch when working under the hood.
I like my set from Redline Tuning but willingly accept I could have saved some cash going this route.
You guys that are willing to cut into your own rides really amaze me. Quite a skill set.
I agree that this is a classy touch when working under the hood.
I like my set from Redline Tuning but willingly accept I could have saved some cash going this route.
You guys that are willing to cut into your own rides really amaze me. Quite a skill set.
The following users liked this post:
Ritzy4Runner (10-18-2019)
07-01-2008, 09:16 AM
#5
Thanks Ron, its always nice to hear from other Yota Techer's who appreciate the work that others do. That shows REAL "class" when it comes to others mods.
And as for whats wrong with the hood prop rod? No one said there was anything wrong with it. But Ron answered your question.
And as for whats wrong with the hood prop rod? No one said there was anything wrong with it. But Ron answered your question.
07-01-2008, 11:32 AM
#7
Contributing Member
Join Date: Sep 2003
Location: Littleton,CO
Posts: 10,549
Likes: 0
Received 0 Likes
on
0 Posts
That would have been a nice mod on my Eclipse but since I'm now with a Toyota the hood is rarely up and isn't worth the cost to me but it is nice when you do have the hood open. 
Trending Topics
07-01-2008, 07:38 PM
#9
Registered User
Join Date: Oct 2007
Location: San Antonio, TX
Posts: 797
Likes: 0
Received 0 Likes
on
0 Posts
I like the way it looks and operates. I like the rod cause it will never wear out. I work at a shop part time and I always have to use something to prop up the cars with bad hood shocks.
Last edited by 98runner210; 07-02-2008 at 09:41 AM.
The following users liked this post:
Ritzy4Runner (10-18-2019)
07-02-2008, 10:13 AM
#11
As for the wearing out of the hood lifts, I used the rear lift gate supports from a LandCruiser. I only had one installed for the last 5 months while I tried to locate the other side and it opened and supported the 4runner hood without issue at all. After installing the second lift, it now literally jumps upward after I start lifting the hood. The struts have a builtin damper that slows the opening before it reaches full extention so you should not have to worry about the lifts pulling themselves out of the hood mounts.
 Another note, because they were designed for the heavier LC lift gate, the 4runner hood weight will not create undue wear or pressure on the struts as the lift gate would. In theory, they should last longer. The LC rear lift gate weights roughly twice that of the 4runner hood. And ToyTech mentioned, I still have the hood prop rod, it just lives peacefully in its hold down for emergencies
 07-02-2008, 04:27 PM
#12
The following users liked this post:
Ritzy4Runner (10-18-2019)
07-07-2010, 09:28 AM
#17
 is modifications that pretty much any one can do with basic hand tools and a minimum expense. Having alot of mechnical expertise should not be required. So using the the factory bolt hole helps to secure the strut while at the same time not requiring the installer to try to figure out the right location of the lower mounting location. Once you get the bottom location attached the hood attachment is cake.
Pop-rivets are cheap, easy to use and have many other uses besides the mod at hand. Another inexpensive tool to add to your tool chest. They can be drilled out and re-installed without damage to the vehicle or the struts if needed for extensive repairs and then easily re-installed. Trying to tig weld blind nuts in the fender sheet metal is way beyond the level of about 90% of the 4runner/Tacoma owners, not to mention how much it costs for a tig machine, wire, cleaning tools, primer and repaint of the factory color ...
 Should it be done that way? Probably, but then again if Toyota wanted to add these to make life easier they could have like the Land Cruiser but then you would have had to add a bit more expense. so for under $20 you can have a $200 option write ups I have been doing. Hope you can do this simple and fun Mod
07-07-2010, 12:38 PM
Should it be done that way? Probably, but then again if Toyota wanted to add these to make life easier they could have like the Land Cruiser but then you would have had to add a bit more expense. so for under $20 you can have a $200 option write ups I have been doing. Hope you can do this simple and fun Mod
07-07-2010, 12:38 PM
#18
Just curious as to what kit you got and how they work for you. I love the idea of this mod, but I'd rather spend $80 up front for a professional deal than spend $20 sourcing junk parts for a mod that doesn't work out. If I could find some LC lifts it'd be a different story.
Last edited by 98SR54RUNNER; 07-07-2010 at 06:58 PM.
07-07-2010, 05:30 PM
#19
Registered User


