Locked_SR5 1987 4Runner Build-Up Thread
 08-01-2011, 07:31 PM
#1
Registered User
Thread Starter
Locked_SR5 1987 4Runner Build-Up Thread
I finally got the thumb out of my ass and is starting my build thread. Hopefully, others will find this useful.
For starters: I picked the runner for 500.00 off of CL in March 2010. Had it towed home, where it sat while I started collecting parts for the build.
Currently, I'm about 1/4 of the way through my build (where I would ultimately like to finish it). Good thing is, I've taken LOTS pics along the way, because I know a thread is not worth a damn without any pics.
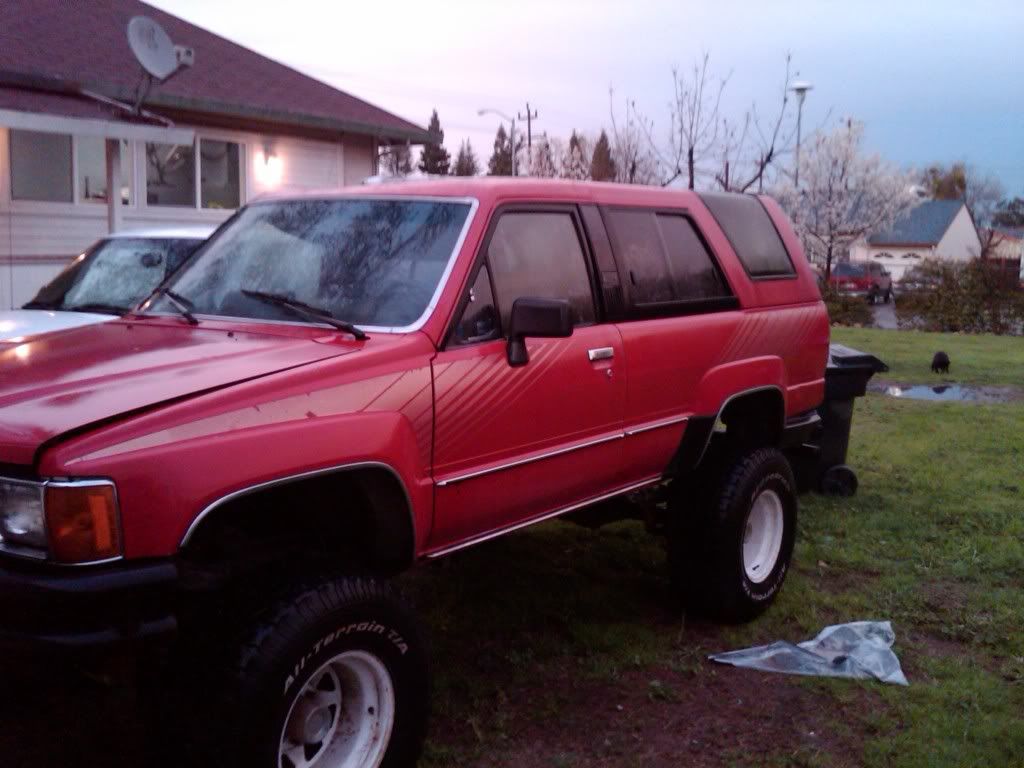
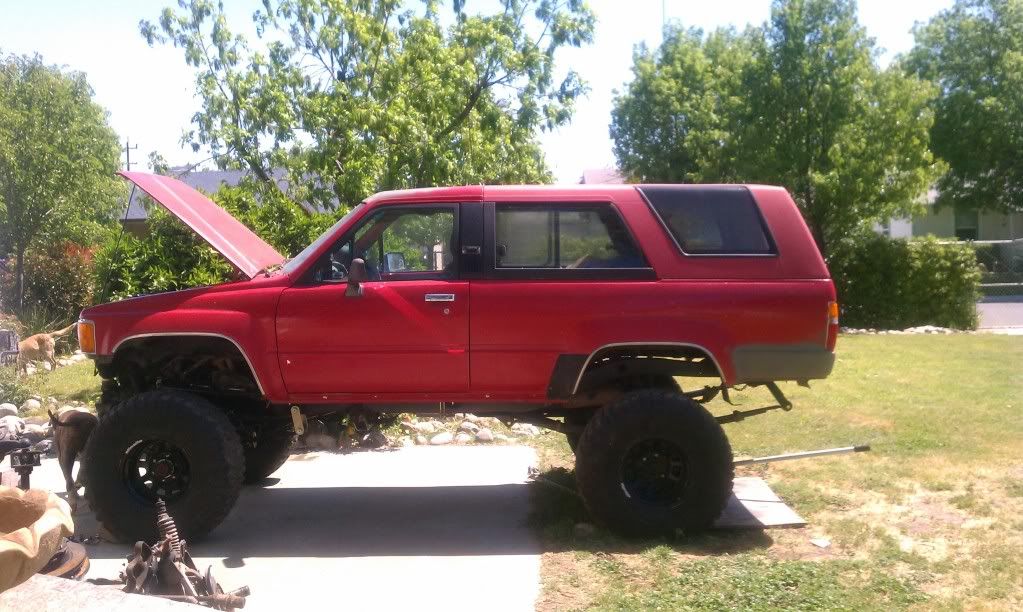
So here are a couple of teaser pics and I'll fill in the rest when I have time.
Cheers!


For starters: I picked the runner for 500.00 off of CL in March 2010. Had it towed home, where it sat while I started collecting parts for the build.
Currently, I'm about 1/4 of the way through my build (where I would ultimately like to finish it). Good thing is, I've taken LOTS pics along the way, because I know a thread is not worth a damn without any pics.
So here are a couple of teaser pics and I'll fill in the rest when I have time.
Cheers!
 08-01-2011, 07:58 PM
#3

Can't wait to see the 3.4 in there, please describe everything on it's install, plus lots of pics, especially interested in the engine mounts, I'm very interested it it's progress, Sweet!!!!
Last edited by john4wd; 08-01-2011 at 08:00 PM.
08-02-2011, 12:32 PM
#7
Registered User
Thread Starter
Thanks for the words of encouragement..
My first car was a Toyota truck and I've been a fan ever since.
My first was an 1987 single cab w/ 22r that I IFS lifted, regeard, and started doing some basic rock crawling. But with 350,000 on the clock, reliablity was becoming an issue. I sold the truck and bought an 1998 Tacoma 3.4 TRD.
No major modifications to the Tacoma other than the 3" revteck lift and the ARB bumper. After having the Tacoma for 11 years, I decided I was tired of the manual transmission and the rough ride caused by the Revteck lift, and parted ways with it. Traded it in towards a Outback XT and ever since, I've been kicking myself in the ass for doing that (I wanted to do the All Pro coilover SAS to Tacoma), and the fact that I'm a truck guy.
Will post pics of the 87 when I scan, but here is the Tacoma right before I traded it in.

Back to when I purchased the truck
My first car was a Toyota truck and I've been a fan ever since.
My first was an 1987 single cab w/ 22r that I IFS lifted, regeard, and started doing some basic rock crawling. But with 350,000 on the clock, reliablity was becoming an issue. I sold the truck and bought an 1998 Tacoma 3.4 TRD.
No major modifications to the Tacoma other than the 3" revteck lift and the ARB bumper. After having the Tacoma for 11 years, I decided I was tired of the manual transmission and the rough ride caused by the Revteck lift, and parted ways with it. Traded it in towards a Outback XT and ever since, I've been kicking myself in the ass for doing that (I wanted to do the All Pro coilover SAS to Tacoma), and the fact that I'm a truck guy.
Will post pics of the 87 when I scan, but here is the Tacoma right before I traded it in.
Back to when I purchased the truck
Trending Topics
08-03-2011, 02:33 PM
#8
Registered User
Thread Starter
About 2 months of thinking and regretting why I traded the Tacoma in, I was determined to build a crawler. I've always loved the versatility, practicality, and looks of first generation 4Runners (i think it had to do something with my old 87 pick up) and started to look for a project with great potential.
I found my current build on CL for 500.00 in March 2010. The PO had it for 12 years, and the previous owner was female (I'm the third owner). PO posted the CL add at 0545 and was sold by 0600. When talking to the PO, the runner had a rebuilt motor with about 26K, but overheated because of a loose hose and non functional water temp gauge. He planned on redoing the head gasket, but we experienced some nasty weather in Sacramento. During a storm, a falling branch damaged the hood/roof, and broke the sunroof glass and tailgate window.
Here are some pics of the truck when I first got her home.


Ever since i picked up the truck, I've become a CL whore, looking for parts to build up the truck. So far I have everything I need with the exception of the R150 to geared transfer case adapter, shortened rear drive line and long slip front drive line.. Feel free to chime in on recommended shops for drive lines in the Sacramento area. Thanksn
I found my current build on CL for 500.00 in March 2010. The PO had it for 12 years, and the previous owner was female (I'm the third owner). PO posted the CL add at 0545 and was sold by 0600. When talking to the PO, the runner had a rebuilt motor with about 26K, but overheated because of a loose hose and non functional water temp gauge. He planned on redoing the head gasket, but we experienced some nasty weather in Sacramento. During a storm, a falling branch damaged the hood/roof, and broke the sunroof glass and tailgate window.
Here are some pics of the truck when I first got her home.
Ever since i picked up the truck, I've become a CL whore, looking for parts to build up the truck. So far I have everything I need with the exception of the R150 to geared transfer case adapter, shortened rear drive line and long slip front drive line.. Feel free to chime in on recommended shops for drive lines in the Sacramento area. Thanksn


 08-03-2011, 08:44 PM
#14
Registered User
Thread Starter
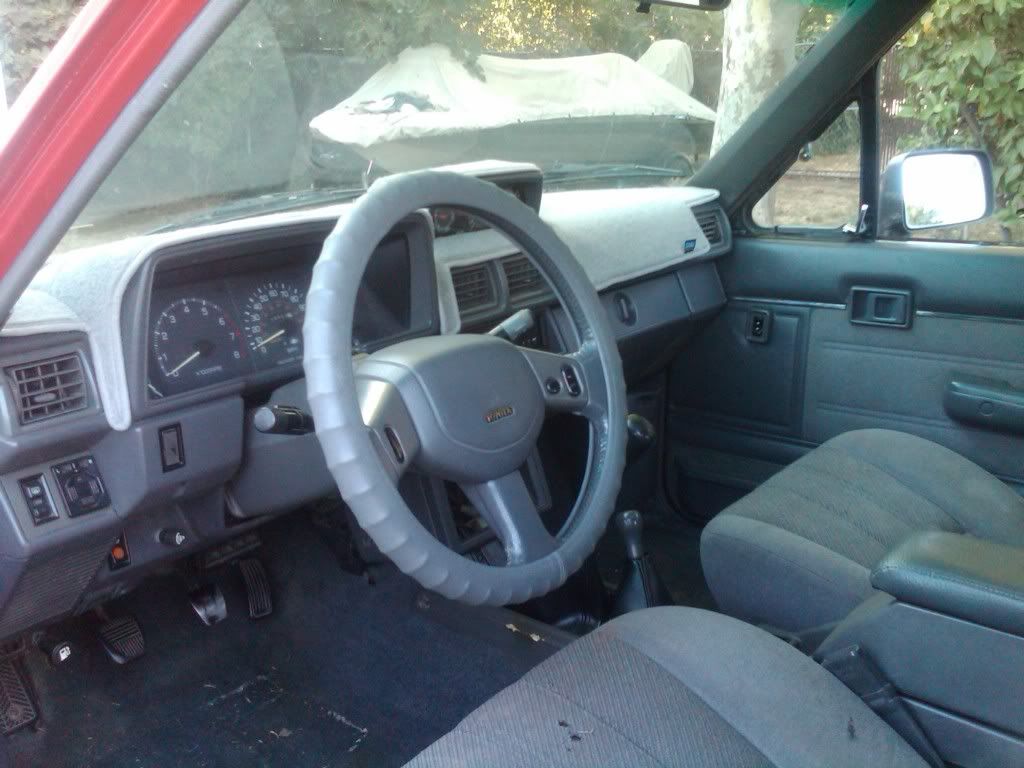
My first concerns with the runner was rust or mildew from the broken sunroof, and secondly, I noticed a decent about of dog hair in the cab and mud under the chassis. One the first things I did was remove the entire interior to clean the carpet and see if there was any rust. Much to my surprise the metal under the carpet was immaculate. In fact, there wasn't even one scratch in the paint in the bed of the runner.

The next thing I did was remove the headliner so I could use a floor jack to push the corner of the sunroof frame back up so I could repair the roof (the branch basically pushed the right front corner down a bit. I used the jack and a 2x4 to raise it back level, massaged the sheet metal a little, and used minimal bondo to smooth things out. While I had the headliner out, I also cleared out the 4 drain tubes (not sure if that's something that commonly gets clogged in Toyota's).


I also used my ingenuity and used ABS plastic sheeting to replace the broke sunroof glass (If you're careful enough you can remove the glass from the frame and felt line rubber gasket that is on the perimeter of the sunroof glass. Be careful removing the butyl putty adhering the glass to the metal frame. Will post pic of "fixed" sunroof). This was a temporary fix until I sourced a factory sunroof.
After taking care of the interior, I moved on to the exterior body work. Pics are self explanatory.


I was also able to score a red hood for 10.00 and a working gray tailgate w/ glass for 50.00 off CL (only needed the glass and still have the gray tailgate if anyone in the Sacramento area is interested).
The next thing I did was remove the headliner so I could use a floor jack to push the corner of the sunroof frame back up so I could repair the roof (the branch basically pushed the right front corner down a bit. I used the jack and a 2x4 to raise it back level, massaged the sheet metal a little, and used minimal bondo to smooth things out. While I had the headliner out, I also cleared out the 4 drain tubes (not sure if that's something that commonly gets clogged in Toyota's).
I also used my ingenuity and used ABS plastic sheeting to replace the broke sunroof glass (If you're careful enough you can remove the glass from the frame and felt line rubber gasket that is on the perimeter of the sunroof glass. Be careful removing the butyl putty adhering the glass to the metal frame. Will post pic of "fixed" sunroof). This was a temporary fix until I sourced a factory sunroof.
After taking care of the interior, I moved on to the exterior body work. Pics are self explanatory.
I was also able to score a red hood for 10.00 and a working gray tailgate w/ glass for 50.00 off CL (only needed the glass and still have the gray tailgate if anyone in the Sacramento area is interested).
08-03-2011, 09:21 PM
#15
Registered User
Thread Starter
Also have to thank my dad with showing me how to do body work. I'll post up his restoration project too (He did a frame up by himself with the exception of the seats and headliner. Everything else was done by him, and him only).

 08-03-2011, 10:30 PM
#17
Registered User
Thread Starter
Man, I have a lot of posting to do to get current on my build (have about 6 months of pics to go through!).
As I already mentioned, I've become a CL whore since purchasing the truck, searching daily, and scoring some pretty sweet deals on the way. I'll begin by posting things by category i.e., 3.4 swap, sas, e-locker axle builds, ARB bumper mod, brake cylinder/diaphram swap, rear disc swap, and rear spring swap..
I can provide technical details later if people have questions, but for the time being I just want to post the catalog of pics I have until I get current.
I work quite a bit in the Bay Area and searched Bay Area CL on the way there and the Sacramento CL on the way back (gotta love smart phones).
I scored this 1999 Tacoma 3.4 about 2 months after purchasing the runner. has 129K on the clock and it included everything you'll need for the swap with the exception of the cat converter, IK2 male body plug, and the Female E6 plug to the ECU (if anyone has either plugs laying around or a source. LMK, i'd sure like to get a hold of them so I can finish my 3.4 to 22re adapter). I picked up the motor, MT engine harness, MT ECU, and all related engine components for 500.00. I plan on doing the timing belt and water pump when I'm getting closer to doing the swap. Here are some pics.

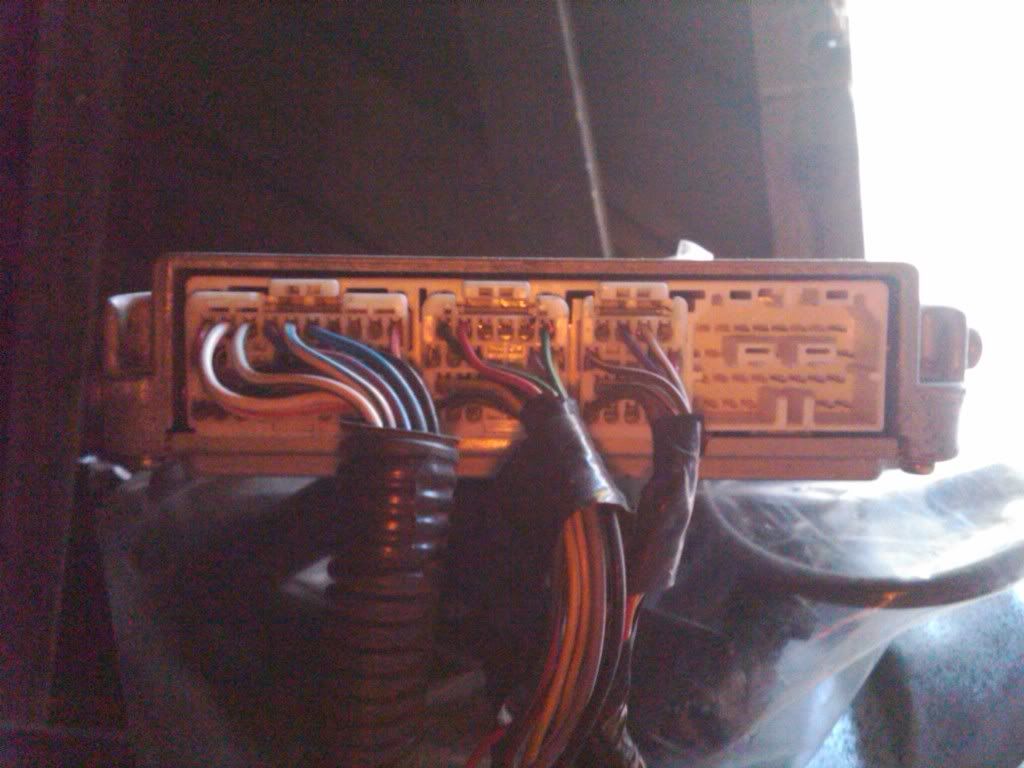
IK2 Plug I need!!

Shortly after scoring the 3.4, I came across an 2003 4runner assembled e-locker for 240.00 and about 1.5 months later I scored a disassembled e-locker with broken R&P for 150.00. I wasn't too worried about that because I was going to regear with 4.88s. Took both of the E-lockers here:

And a week later they ended up looking like this: The assembled e-locker hand a broken carrier locking mechanism and that ended up costing me an extra 250.00 parts and labor (The good thing is that I have a completely rebuilt third for my rear axle. The other e-locker just needed a new pinion bearing.

So with the thirds out of the way, I started looking for front and rear axles to modify to accept the e-lockers. Sourced a pair of minus the thirds for 180 for the front and 80 for the rears.


Installed front axle:


Installed rear axle:

I knew I was doing rear discs so I prepped the rears:

As I already mentioned, I've become a CL whore since purchasing the truck, searching daily, and scoring some pretty sweet deals on the way. I'll begin by posting things by category i.e., 3.4 swap, sas, e-locker axle builds, ARB bumper mod, brake cylinder/diaphram swap, rear disc swap, and rear spring swap..
I can provide technical details later if people have questions, but for the time being I just want to post the catalog of pics I have until I get current.
I work quite a bit in the Bay Area and searched Bay Area CL on the way there and the Sacramento CL on the way back (gotta love smart phones).
I scored this 1999 Tacoma 3.4 about 2 months after purchasing the runner. has 129K on the clock and it included everything you'll need for the swap with the exception of the cat converter, IK2 male body plug, and the Female E6 plug to the ECU (if anyone has either plugs laying around or a source. LMK, i'd sure like to get a hold of them so I can finish my 3.4 to 22re adapter). I picked up the motor, MT engine harness, MT ECU, and all related engine components for 500.00. I plan on doing the timing belt and water pump when I'm getting closer to doing the swap. Here are some pics.
IK2 Plug I need!!
Shortly after scoring the 3.4, I came across an 2003 4runner assembled e-locker for 240.00 and about 1.5 months later I scored a disassembled e-locker with broken R&P for 150.00. I wasn't too worried about that because I was going to regear with 4.88s. Took both of the E-lockers here:
And a week later they ended up looking like this: The assembled e-locker hand a broken carrier locking mechanism and that ended up costing me an extra 250.00 parts and labor (The good thing is that I have a completely rebuilt third for my rear axle. The other e-locker just needed a new pinion bearing.
So with the thirds out of the way, I started looking for front and rear axles to modify to accept the e-lockers. Sourced a pair of minus the thirds for 180 for the front and 80 for the rears.
Installed front axle:
Installed rear axle:
I knew I was doing rear discs so I prepped the rears:
 08-04-2011, 12:32 PM
#19
Registered User
Thread Starter
I'm running 63s in the rear, so I'm going to have to run with blocks in the rear. Need to do this to keep my ride height level with the front. I'm currently running TG 3"/RUF hybrids up front (I have a story about TG 3" front springs and my ignorance about SAS). Didn't know that the TG 3" springs were shorter than the 4/5" front springs.
Good eye on noticing the perches weren't welded yet. The rear housing was from a 1990s V6 truck and the spring perches were too wide for the U-bolt flip kit. So I cut them off and got the right size spring perches. I was in the process of mocking up the pinion angle with the drive shaft (my dad told me that I would want a 1-2 degree difference as it helps the needle bearings rotate and prevent early wear and tear. Have you heard differently?).
My frame height is 26" at drivers door and hoping to have things drop about an inch once the springs settle.. The current set up I'm running are 35" KM2, 3" TG/RUF hybird up front, 63" chevys with 3.5" lift blocs in rear (IFS lift blocks), double shackle set up (rear shackle is chevy 2" drop shackle), and 4Crawler 1.5" BL (prep for 3.4 swap). Space between front wheel and fender is 11" and space between rear is 10" (I also need suggestions on the distance between bumpstops, as I don't want my springs to go past flat). All of the things mentioned above will have your truck looking like this.
Thanks..
08-05-2011, 11:49 PM
#20
Registered User
Thread Starter
This post is something I actually did today because it directly relates to my previous post. I installed my Bilstien 5125 12 inch travel today and found the optimal distance between the rear bump stops and the longest travel shocks to use. The optimal distance with my suspension my current setup between frame and bumps top is 5".

The best distance between shock bolt holes is 23" center to center.

when you have that distance between shock bolt holes with the 12" travel shock, you'll have 5 1/8" shock shaft exposed and will give you the most "up" travel with the 12" shock.

Drivers side rear upper shock mount does not need to be changed as it will be 23" with my current set up. However, the passenger side measures 21 1/2 inches and would not work with a 12" travel shock.

What I did to get the 23" center to center measurement was to simply flip the upper shock mount 180 degrees. when you do this, you'll get the 23" measurement from center to center. This is the passenger side upper shock mount that I flipped 180 degrees.

The best distance between shock bolt holes is 23" center to center.
when you have that distance between shock bolt holes with the 12" travel shock, you'll have 5 1/8" shock shaft exposed and will give you the most "up" travel with the 12" shock.
Drivers side rear upper shock mount does not need to be changed as it will be 23" with my current set up. However, the passenger side measures 21 1/2 inches and would not work with a 12" travel shock.
What I did to get the 23" center to center measurement was to simply flip the upper shock mount 180 degrees. when you do this, you'll get the 23" measurement from center to center. This is the passenger side upper shock mount that I flipped 180 degrees.


