IFS inner axle seal replacment info needed
 12-17-2012, 05:17 PM
#1
Registered User
Thread Starter

Join Date: Dec 2012
Posts: 4
Likes: 0
Received 0 Likes
on
0 Posts
IFS inner axle seal replacment info needed
Searched several threads on this site and found some great information but not exactly what I need. Need information on replacing the inner axle seals on a 90 4wd toyota pickup w/ IFS. The hubs, rotors, and "half shafts" have been removed along with the differential cover. The local dealer is saying the axles have a spring clip holding them in place but I don't see a spring clip. Do you have to remove the "pinion shaft" to push the axles in to remove the clips? If so, what is the best method to accomplish this. Your help is greatly appreciated.
 12-17-2012, 06:02 PM
#2
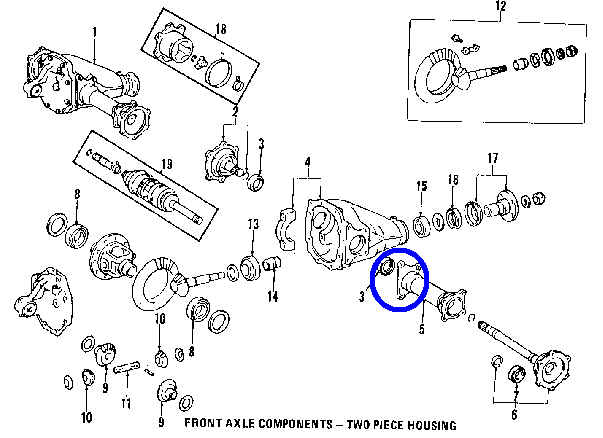
Ive never taken one of those apart before. You may have to take off the pinion and pull out everything. Here is a diagram from a site I use. Not everything is labeled but It might help. You may have to remove #4 and pull the diff out. Dont lose your shims and make sure they all go back in the same exact way, same order and side and everything.
It might work differently than I am thinking as I have not seen that differential apart.
Good luck!
http://parts.olathetoyota.com/parts/...iagram=F809205
It might work differently than I am thinking as I have not seen that differential apart.
Good luck!
http://parts.olathetoyota.com/parts/...iagram=F809205
12-17-2012, 06:06 PM
#3
Registered User
Join Date: Jan 2011
Location: 46 50' 36.82'' N 122 19' 41.01'' W
Posts: 1,746
Likes: 0
Received 6 Likes
on
5 Posts
Ive never taken one of those apart before. You may have to take off the pinion and pull out everything. Here is a diagram from a site I use. Not everything is labeled but It might help. You may have to remove #4 and pull the diff out. Dont lose your shims and make sure they all go back in the same exact way, same order and side and everything.
The spring clip means it just needs to be pryed out. The stubs in the diff I mean. They just pop out.
Literally, Big pry bar.
Last edited by ThatGuy1295; 12-17-2012 at 06:11 PM.
The following users liked this post:
Ronim3.4 (03-09-2024)
12-18-2012, 02:32 AM
#4
Registered User
Thread Starter
Join Date: Dec 2012
Posts: 4
Likes: 0
Received 0 Likes
on
0 Posts
Thanks for the help and fast responses. Is it best to pry on the differntial side of the axle (inside the housing) or at the flange where the cv "half" shafts are affixed? In the diagram posted by ZPD426, the clip in question is between the seal (#3) and the drive axles but looks like a c-clip rather than a spring clip.
12-18-2012, 04:53 AM
#5
Registered User
Join Date: Jan 2011
Location: 46 50' 36.82'' N 122 19' 41.01'' W
Posts: 1,746
Likes: 0
Received 6 Likes
on
5 Posts
Sorry. Last time I did that I unbolted where the blue circle is, and pryed apart were #5 bolts to the housing. Basically taking that whole piece out. Then you can dismantle it and replace seals bearings ect. But Im pretty sure you dont have to do it that way, you should ba able to just pop the shaft out. But on the short stub side it literally just pops of.
Last edited by ThatGuy1295; 12-18-2012 at 04:55 AM.
12-18-2012, 05:00 AM
#6
Registered User
I just did this recently.
Since you have the cover off, this will be easy. Get a big screw driver and use it as leverage between the spider gear rod (number 11 in that diagram) and the end of each axle shaft, in turn. Be gentle, it won't take much to work them loose, and you don't want to damage the spider gear rod. Wrap the screw driver in a rag or something.
Since you have the cover off, this will be easy. Get a big screw driver and use it as leverage between the spider gear rod (number 11 in that diagram) and the end of each axle shaft, in turn. Be gentle, it won't take much to work them loose, and you don't want to damage the spider gear rod. Wrap the screw driver in a rag or something.
12-18-2012, 05:48 PM
#7
Registered User
Thread Starter
Join Date: Dec 2012
Posts: 4
Likes: 0
Received 0 Likes
on
0 Posts
How much effort does it normally take to get the driver's drive axle to come free? Made an attempt to get it out but it started taking a great deal of effort so I stopped. Thanks for the help.
Trending Topics
12-18-2012, 05:54 PM
#8
Registered User
You've got to overcome the c-clip on the end of the axle. I wouldn't use a cheater bar or anything, but you may need to be a little firm with a fairly thick screwdriver.
12-19-2012, 04:34 PM
#11
Registered User
Thread Starter
Join Date: Dec 2012
Posts: 4
Likes: 0
Received 0 Likes
on
0 Posts
05-10-2018, 11:39 AM
#13
Registered User

They haven't changed any in the intervening time.
Just put a couple pry bars, or large screwdrivers between the CV flange and the diff case and pop the stub out.
It's all heavy metal, you can't really hurt anything.
Don't make the mistake of seating the new seal in too deeply, or it will not set on the CV flanges sealing surface correctly. (Ask how I know).
Flush with the diff case edge is right. I always use a genuine Toyota seal.
Last edited by millball; 05-10-2018 at 11:48 AM.
05-12-2018, 04:16 AM
#14
Registered User
I took about 3 minutes the other day and tried the "long" side and sure enough it just pops right out, so I no longer fear breaking anything. But does that long tube get filled with oil? According to the diagram, the seal is on the chunk, and the tube end is just a bushing/bearing. The "axle" shaft looked like it had been wet at some point.
And another question, is it OK for the stubby shafts to have a bit of play in and out? About 1/8"?
And another question, is it OK for the stubby shafts to have a bit of play in and out? About 1/8"?

Thread
Thread Starter
Forum
Replies
Last Post
AustinTaco
84-85 Trucks & 4Runners
4
06-21-2015 09:54 AM


