

 02-09-2016, 10:13 AM
Last edit by: IB Advertising
See related guides and technical advice from our community experts:
Browse all: Interior Guides
- Toyota 4Runner 1984-1995 How to Swap Gauge Cluster
Step by step instructions for do-it-yourself repairs
Browse all: Interior Guides

SR5 Gauge Cluster Swap - How-to, with pics!
11-24-2013, 05:04 AM
#301
Registered User

I bought my SR5 Cluster on Ebay from LKQ for $48.80 Free Shipping
I have no way of knowing if it came from a 4cyl or 6cyl
The only details on the ad are:
- 93 Toyota 4runner
- 30 day warranty
- Part # 83010-3590
- Will fit 4 Runner 92-94 MPH ( Head only )
- Will fit Toyota Pickup 92-95 MPH ( Head only )
I have a '93 hilux
With regards to the potentiometer on the tach
I have a Centech meter from Harbor Freight Tools and i have never used it and wouldn't even know how to.. :brickknock:
As such is the case with me ... Would you know how many turns clockwise or counterclock-wise would have to turn to get it to where i need to be at 60.0 approx ?
Last edited by The Jewish Guy; 11-24-2013 at 05:28 AM.
 11-24-2013, 01:02 PM
#302
The reason they use a potentiometer instead of a simple resistor is because variations in the electronics mean that every cluster is going to need a slightly different adjustment to be accurate.
11-24-2013, 05:47 PM
#303
Registered User
The problem is it's not a number of turns, it's not even a quarter turn, it's more like two widths of a human hair and that wont even hold true for every cluster.
The reason they use a potentiometer instead of a simple resistor is because variations in the electronics mean that every cluster is going to need a slightly different adjustment to be accurate.
The reason they use a potentiometer instead of a simple resistor is because variations in the electronics mean that every cluster is going to need a slightly different adjustment to be accurate.
I need to get this multimeter to work so i can get this thing done.
I also have the vin# JT3VN39W9P0126940 that came with the LKQ tag...
I found a website called vin decoder and it shows that its from a V6 4runner
I hope that i can get this multimeter to work properly
Last edited by The Jewish Guy; 11-24-2013 at 05:52 PM.
11-24-2013, 05:54 PM
#304
Registered User
Join Date: Nov 2003
Location: Missouri
Posts: 4
Likes: 0
Received 0 Likes
on
0 Posts
11-24-2013, 06:45 PM
#305
Registered User
-------------------------------
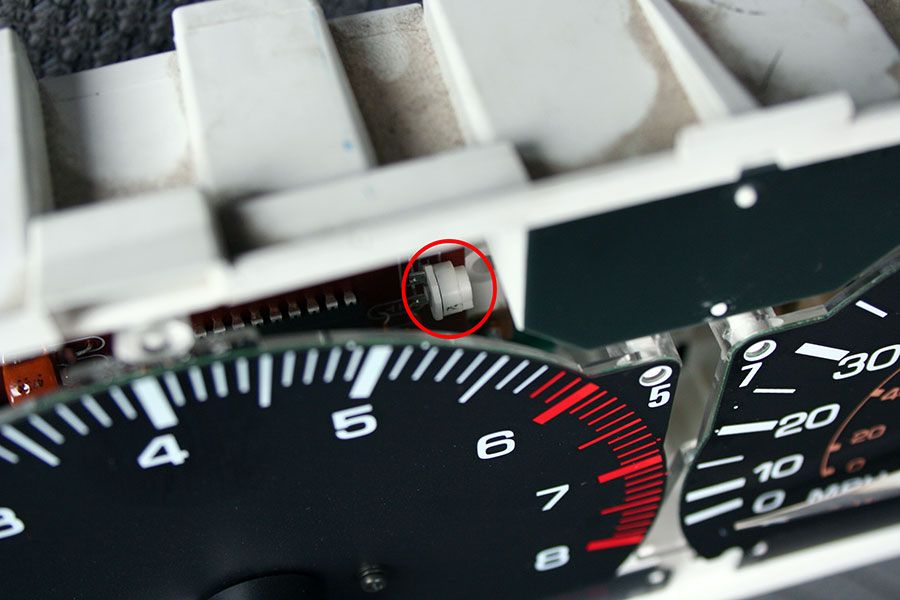
The adjustment potentiometer:

Then use your multimeter to measure resistance across these two points on the rear of the electronics board that the tach is mounted on:
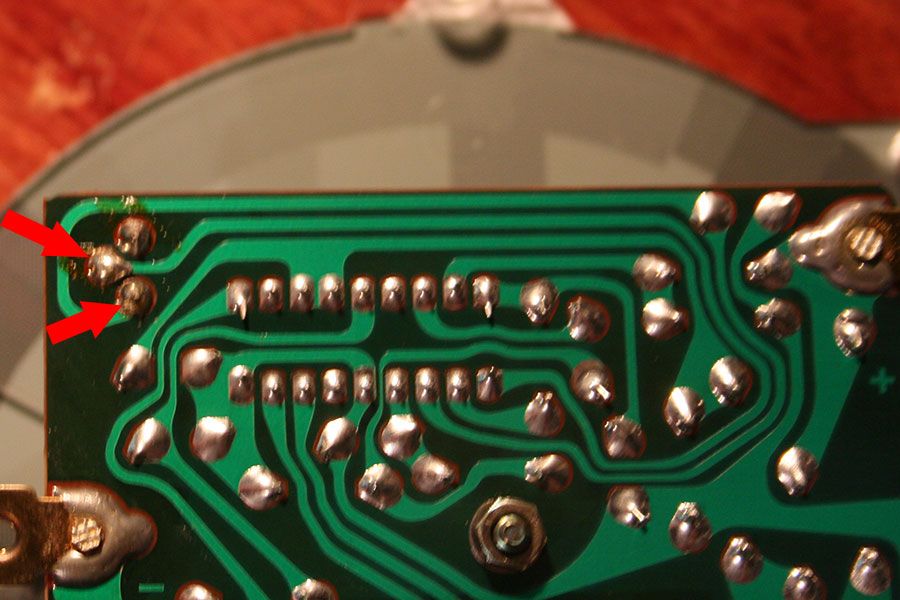
The V6 was originally setup with a value of 44.9K ohms, I adjusted it to 63.8K ohms.
I would recommend people converting a 6cyl cluster to a 4cyl cluster to simply add 20K ohms to whatever they started with.
This cluster came out of a 1992 4Runner Automatic V6 SR5, and I installed it in my 1989 Pikcup 5-speed 22re Deluxe, so considering that, you can make work

I got the multimeter to work from watching some youtube videos but im getting weird readings on it where i have a single digit on the far side of the screen and on ocassion i see a 44.9k and then it doesnt stay long enough to get a definite figure...
Did you have to move the potentiometer clockwise in order to give a 20k increase or is it counter clockwise...?
I dont know if its the meter on the fritz but i moved the potentiometer counter clockwise and it increased somehow but somehow i dont think that is correct...
Can you tell me in which direction it increases ? Please
11-24-2013, 06:56 PM
#306
Registered User
I tried the ohm meter trick. Couldn't really get a stable reading either. If your meter is flashing an O or 0 it means it's seeing an Open circuit or infinite resistance. I had better luck with removing my dash, setting the new cluster in place, plugging in and adjusting to match a diagnostic tach at idle. Plus, it's dead on my way. No readjusting if its not accurate. And if I remember right, mine adjusted backwards of the previously posted guide. Which is why I did it the way I did.
Sent from my NSA screened iPhone using YotaTech
Sent from my NSA screened iPhone using YotaTech
11-24-2013, 07:25 PM
#307
My question is the following:
I got the multimeter to work from watching some youtube videos but im getting weird readings on it where i have a single digit on the far side of the screen and on ocassion i see a 44.9k and then it doesnt stay long enough to get a definite figure...
Did you have to move the potentiometer clockwise in order to give a 20k increase or is it counter clockwise...?
I dont know if its the meter on the fritz but i moved the potentiometer counter clockwise and it increased somehow but somehow i dont think that is correct...
Can you tell me in which direction it increases ? Please
It doesn't matter though because you moved it before you got your baseline reading, so really you're pretty much hosed in terms of adjusting based on the pot value.
I tried the ohm meter trick. Couldn't really get a stable reading either. If your meter is flashing an O or 0 it means it's seeing an Open circuit or infinite resistance. I had better luck with removing my dash, setting the new cluster in place, plugging in and adjusting to match a diagnostic tach at idle. Plus, it's dead on my way. No readjusting if its not accurate. And if I remember right, mine adjusted backwards of the previously posted guide. Which is why I did it the way I did.
Sent from my NSA screened iPhone using YotaTech
Sent from my NSA screened iPhone using YotaTech
11-25-2013, 05:14 PM
#309
Registered User
I had my junkyard gauge cluster all apart to paint and clean. When I reinstalled the tach needle was doing weird things. All I did was connect the gauge cluster without the front glass or tach needle on. I then turned the key on and slid the tach needle into place so it was just sitting on the rest. Turned the key off and reinstalled everything as it should be. Never had an issue after that. Not saying it's right, but it worked for me.
11-26-2013, 05:55 PM
#310
Registered User
I had tried to set mine with an external tach and it wasn't even close. Set it with the pot and a cheap HF meter set to Ohms suggested in the post and it was dead on. Make sure to hold the leads on the points pictured well and move the pot very slightly to adjust. I set mine from a 6cyl to the 4 cyl to the nearest tenth. Take your time and make small adjustments.
11-27-2013, 05:14 PM
#311
Registered User
I had tried to set mine with an external tach and it wasn't even close. Set it with the pot and a cheap HF meter set to Ohms suggested in the post and it was dead on. Make sure to hold the leads on the points pictured well and move the pot very slightly to adjust. I set mine from a 6cyl to the 4 cyl to the nearest tenth. Take your time and make small adjustments.
Also will this Oil Pressure Sender work..I saw it on ebay for $13.99
item# 161145068915
NEW OIL SWITCH
FITS NEXT AND MORE:
Isuzu I-Mark (81)
Isuzu Trooper (91-88)
Toyota 4Runner (91-84)
Toyota Celica (89-76)
Toyota Cressida (84-82)
Toyota Land Cruiser (83-74)
Toyota MR2 (89-85)
Toyota Pickup (92-84)
Toyota Supra (93-86)
Toyota Van (89-84)
Toyota Van Wagon (88)
Standard PS186 Engine Oil Pressure Sender With Gauge
HsTSP1BSf!Fvu2QQ~~60_35.JPG)
or would this one be better at $19.99 ebay item # 310802109234
Toyota Supra Corolla MR2 Land Cruiser & Pickup New Oil Pressure Switch 201-1130 Beck Arnley Worldparts

Last edited by The Jewish Guy; 11-27-2013 at 05:26 PM.
11-27-2013, 07:07 PM
#312
Registered User
I don't remember which way I turned the POT, the meter should show you. It doesn't take much to move it as it is extremely sensitive. Have a friend hold the test leads on the contacts while you adjust the POT or have a friend who is more electrically inclined help???
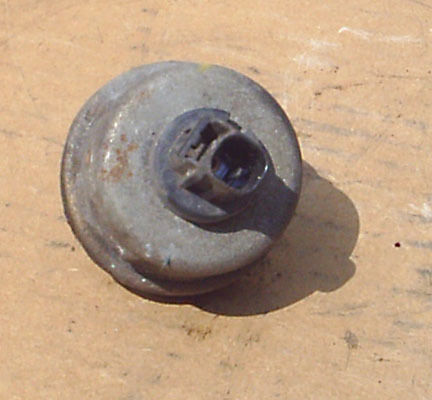
Make sure the oil sending unit terminal will work with the one you bought. Mine had a very thin male end surrounded by plastic the one pictured below. The advantage to this is it will keep the elements out. If you have already bought the one pictured above use dielectric grease on the terminal.
The gauge purchased had faded tach and speedo needles..almost white. I decided to take my chances and gently pry off the needles. Once done a razor blade was used to scrape the old paint off the back side. Testors florescent paint worked great, bad thing is the other four needles looked bad. I was afraid to pry those needles off for fear of breaking. So another approach was tried. Needles are held on by four bent Aluminum tabs, these were bent back and needles removed, scraped, painted and allowed to dry, then put back on. The only bad thing was the speedo and tach needles back side which goes into the black center couldn't be painted and was still faded. So I just painted that part semi gloss black.
Before putting tach needle on, install guage, turn on ignition then put the needle on.
Before Painting-
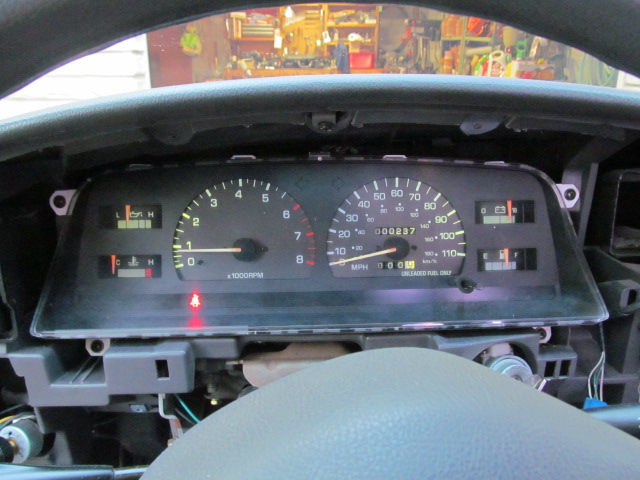
After Painting-
Make sure the oil sending unit terminal will work with the one you bought. Mine had a very thin male end surrounded by plastic the one pictured below. The advantage to this is it will keep the elements out. If you have already bought the one pictured above use dielectric grease on the terminal.

The gauge purchased had faded tach and speedo needles..almost white. I decided to take my chances and gently pry off the needles. Once done a razor blade was used to scrape the old paint off the back side. Testors florescent paint worked great, bad thing is the other four needles looked bad. I was afraid to pry those needles off for fear of breaking. So another approach was tried. Needles are held on by four bent Aluminum tabs, these were bent back and needles removed, scraped, painted and allowed to dry, then put back on. The only bad thing was the speedo and tach needles back side which goes into the black center couldn't be painted and was still faded. So I just painted that part semi gloss black.
Before putting tach needle on, install guage, turn on ignition then put the needle on.
Before Painting-

After Painting-

Last edited by 93 Toyota 4x4; 11-27-2013 at 07:23 PM.
12-09-2013, 08:08 AM
#314
Registered User
im having a hard time locating the answer to my problem..
I put in an SR5 cluster in my '93 Hilux
The tach is adjusted via potentiometer to read rpm correctly
The speedo wouldnt work at first until i drove for about two miles and now it is fine.
I rolled the miles to match my actual mileage using the following link:
YotaTech Forums - View Single Post - SR5 Gauge Cluster Swap - How-to, with pics!
The odomoter and Trip meter are not moving.. Nor advancing and i cant figure out why.
A local speedometer shop wants $125.00 to $160.00 to fix it which i think is a bit much.
The VSS has been replaced a while back so its not that.
Any suggestions ?
 05-06-2014, 01:05 PM
#316
Registered User
iTrader: (1)
Join Date: Jul 2011
Location: York,Pa
Posts: 13
Likes: 0
Received 0 Likes
on
0 Posts
I swapped my cluster on my 86 today....I just measured the ohms on the two prongs on the rear of the poteniometer....I got 44, then adjusted CLOCKWISE a very small movement to 68.3....It doesn't take very much of a movement to change the ohm reading ALLOT...
Good luck and I do hope this is of some help to someone....
Good luck and I do hope this is of some help to someone....
Last edited by Zumer; 05-06-2014 at 01:08 PM.
05-20-2014, 07:15 AM
#317
Registered User
Join Date: Apr 2014
Location: El Paso, TX
Posts: 60
Likes: 0
Received 0 Likes
on
0 Posts
just wanted to chime in since I'm doing this to my '88 deluxe...
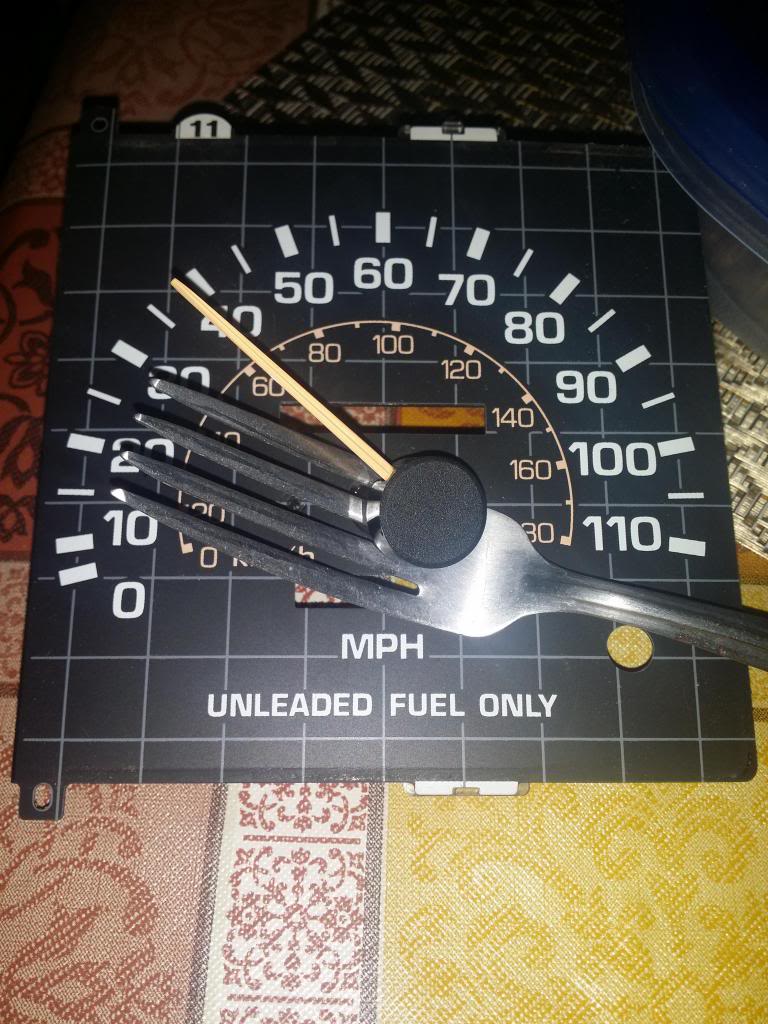
I found that to remove the needle from the sr5 cluster and not damage it, just take a fork and slowly pry it in further and further in and then just wiggle it till it just pops off
as for the odometer... my standard cluster says 175XXX which are the original miles and this sr5 cluster says 231XXX, about 56K off...
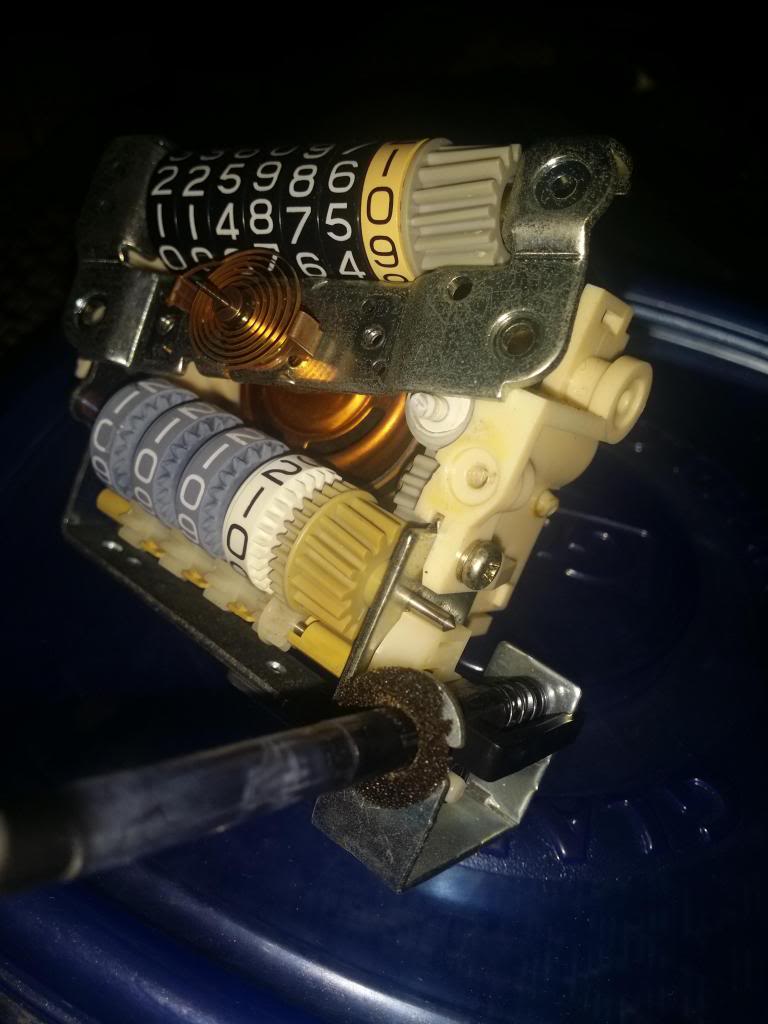
If you remove the speedometer and go thru the whole process as stated in this thread, just stop at the point where youre about to remove the odometer but just lift off enough to get off the second gear. At this point youre able to move the odometer with your fingers forward or backwards but only being able to move the 1/10 mile number first. After about and hour, I was able to adjust it 6000 miles so Im at 225XXX. Again i'm only doing this to have an accurate odometer reading... here are some pics...
I found that to remove the needle from the sr5 cluster and not damage it, just take a fork and slowly pry it in further and further in and then just wiggle it till it just pops off
as for the odometer... my standard cluster says 175XXX which are the original miles and this sr5 cluster says 231XXX, about 56K off...
If you remove the speedometer and go thru the whole process as stated in this thread, just stop at the point where youre about to remove the odometer but just lift off enough to get off the second gear. At this point youre able to move the odometer with your fingers forward or backwards but only being able to move the 1/10 mile number first. After about and hour, I was able to adjust it 6000 miles so Im at 225XXX. Again i'm only doing this to have an accurate odometer reading... here are some pics...


Last edited by martinezoi; 05-20-2014 at 07:27 AM.
06-04-2014, 08:55 PM
#318
Registered User

Join Date: Jun 2014
Posts: 2
Likes: 0
Received 0 Likes
on
0 Posts
Alright guys i have a 1994 4runner SR5 4x4 3.0 auto.
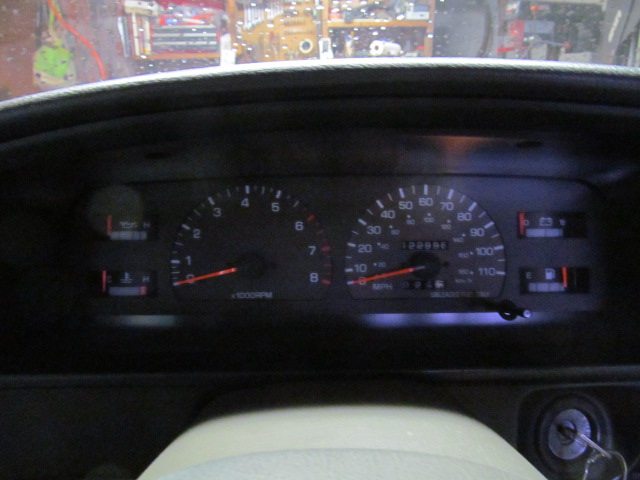
i wanted to just change the bulbs so i took apart my dash took out the cluster and took out the bulbs in the climate control, transmission box light, and the rest of the dash is in my basement so the only blub that is in the car is the key asset. i took the gauge cluster out to look at it. when i did this i looked at the bulbs. i put the cluster back in with the bulbs and all the lights work in the cluster expect the temp, oil, rpm, mph, battery, and the gas gauges do not light up! and also i put my ac button back in after looking at it as well and for my hazard light as well and they do not light up ether!!? SO GUYS PLEASE HELP!!
and yes i tried turning around the bulbs and still nothing.
i have blue leds on the way to replace my stock bulbs.


