Ready to buy
 11-07-2008, 06:11 AM
#21
Contributing Member
Thread Starter
Join Date: Oct 2008
Location: Georgia
Posts: 224
Likes: 0
Received 0 Likes
on
0 Posts
Picture Log
Here are some pictures of the new carpet I got from qualitycarinteriors.com, I bought a dash cover from them too but I sent it back. It really wasn't what I wanted so now I'm trying to get a hold of the guys at justdashes to see if they'll do it.


Last edited by Flek23; 11-11-2008 at 06:13 AM.
 11-09-2008, 05:59 AM
#22
Contributing Member
Thread Starter
Join Date: Oct 2008
Location: Georgia
Posts: 224
Likes: 0
Received 0 Likes
on
0 Posts
Didn't get as far with the engine as I'd hoped this weekend. I've decided to replace the timing cover and couldn't get one locally. Also don't have the new head bolts yet and definitely will need new ones. Several bolts have carbon build up and pitting from the head leaks.
While I was getting frustrated at how many things I was ready to do but didn't have the parts to do, the new retrosound model one showed up! So I got into mounting the thing. The fit is slick as assembly lube and I'm stoked. It took some customizing of the brackets but nothing big. A dremel took care of it no prob. Might not be the prettiest install behind the panel but is fully a functional solid fit. More to come as I get it wired up. I'll let y'all now how it sounds.
I'm not hooking up an amp or anything because all I listen to is James Taylor, Johnny Cash, and David Wilcox so I don't really need any boom. But I do want crisp clear sound so I'll let ya know how it goes.


Oh yeah, I also ordered a 4x8 sheet of curly cherry veneer for the dash and steering wheel trim ($$$$$$$$$ four bucks a sq ft x32) I think it will look sweet if I can pull off making the pieces. I took off the old sticker and have been working on a template to cut out the cherry veneer.
While I was getting frustrated at how many things I was ready to do but didn't have the parts to do, the new retrosound model one showed up! So I got into mounting the thing. The fit is slick as assembly lube and I'm stoked. It took some customizing of the brackets but nothing big. A dremel took care of it no prob. Might not be the prettiest install behind the panel but is fully a functional solid fit. More to come as I get it wired up. I'll let y'all now how it sounds.
I'm not hooking up an amp or anything because all I listen to is James Taylor, Johnny Cash, and David Wilcox so I don't really need any boom. But I do want crisp clear sound so I'll let ya know how it goes.
Oh yeah, I also ordered a 4x8 sheet of curly cherry veneer for the dash and steering wheel trim ($$$$$$$$$ four bucks a sq ft x32) I think it will look sweet if I can pull off making the pieces. I took off the old sticker and have been working on a template to cut out the cherry veneer.
Last edited by Flek23; 11-11-2008 at 06:00 AM.
11-11-2008, 09:19 AM
#23
Contributing Member
Thread Starter
Join Date: Oct 2008
Location: Georgia
Posts: 224
Likes: 0
Received 0 Likes
on
0 Posts
Radio Knob Shims
Now that I have the new radio mounted I'm not satisfied with how BIG the new knobs are. They are awsome since they are solid metal but I'd rather use the old knobs since they are intact. Problem is that the shafts are different. I'm wondering if anyone has ever seen a shim or any other idea that would make them fit? The old posts are larger and shaped like a star, the new ones are smaller and smooth. I've thought about using an epoxy or something but that might be a little more perminent than I'd like. Especially considering that the dash panel would then become permanent as well.


Last edited by Flek23; 11-11-2008 at 09:30 AM.
11-11-2008, 10:44 AM
#24
You have got a very clean dash...mine is fubar compared to yours...
that radio is a very nice addition. Does it have a connection for an IPod?
as far as making some shims, might get a hold of Roger Brown AKA: 4Crawler (4crawler.com ) he seems to have machined just about anything for these things...
edit: I wonder if some silicone might work instead of epoxy to retain the knobs. Still pliable but easy to get off it did not work..
Last edited by dropzone; 11-11-2008 at 10:45 AM.
11-11-2008, 08:26 PM
#25
Registered User

Join Date: Nov 2008
Posts: 23
Likes: 0
Received 0 Likes
on
0 Posts
It's hard to tell from the photos but your original pistons look like pop ups or ring tops. Which is what came in the 81-84 22r engines, but the new ones look like flat tops which came in the 85 and up 22r and re engines. If this is the case then you have the wrong rebuild kit, hence the wrong thrust washers. As well the T-chain, guides, and water pump won't fit. The 81-84 22 r and re blocks were a 1/4 inch taller than the 85 and up block and the 81-84 cylinder head is also a taller casting by nearly a 1/4 inch. This will leave your pistons low in the cylinders and cause you to have approximatly a 6:1 compression ratio. The crank, rods, cam, valves, and followers/rockers are common between the two engines, but as to the best of my memory nothing else is.
P.S.
If the block has been decked then the new timing cover should also have the same ammount shaved from it's top. (be sure it's for the 81-84).
If I'm wrong about the pistons then please disregard this message.
Just thought if I saw what I think I did, I could save you some time and money.
Good luck with the build up.
TOYDOC
 11-12-2008, 02:09 PM
#28
Contributing Member
Thread Starter
Join Date: Oct 2008
Location: Georgia
Posts: 224
Likes: 0
Received 0 Likes
on
0 Posts
Ipod Connection
The Retrosound Model One has a mini USB jack and will play music from a thumb drive through that. It also has a stereo mini jack auxiliary input and supposedly will play any electronic device through that. I'm hoping to be able to play an iPhone through the mini jack but still have to get a cable to fit.
Last edited by Flek23; 11-12-2008 at 05:03 PM.
11-12-2008, 02:10 PM
#29
Contributing Member
Thread Starter
Join Date: Oct 2008
Location: Georgia
Posts: 224
Likes: 0
Received 0 Likes
on
0 Posts
The Good and The Bad
Today I finished wiring the new retrosound model one radio and it sounds so much better even through the old crappy stock speakers. I'm thinking about using the holes in the dash - where the defrost vent would go if I had them - for speakers. I also discovered today that a camshaft retainer bolt is stripped. I've not done a tap/helicoil operation before so it should be interesting to see how that goes.
Last edited by Flek23; 11-12-2008 at 05:04 PM.
11-13-2008, 03:45 AM
#30
Registered User
Join Date: Nov 2008
Posts: 23
Likes: 0
Received 0 Likes
on
0 Posts
From the most recent picture it is clear that these are the correct pistons. Therefor I will assume that the rest of the kit is correct. Tapping and Helicoiling is very simple, I'm sure you'll be able to do it with ease. Seeing your build is inspiring me to get out my 79 short box and do a restore. Its been in storage since 1985. Most likly it'll start in less than 1/2 an hour.
Keep on with the good work.
TOYDOC
Keep on with the good work.
TOYDOC
11-13-2008, 12:17 PM
#32
Contributing Member
Thread Starter
Join Date: Oct 2008
Location: Georgia
Posts: 224
Likes: 0
Received 0 Likes
on
0 Posts
Upholstery Scheme Selection
I Picked up a few yards of a plaid fabric for accent trim as well as a swatch of the vinyl that will be used on the dash pad, center console, gauge housing and seats. The vinyl looks like a rawhide leather which is what I originally wanted to do but couldn't deal with the expense. I spoke with the guys at "Justdashes", they can make the dashpanel look brand new (they say) but it will cost about $750. I found an auto upholstery shop in Atlanta that I'm working with to do the whole thing as a package more to come on their price. Still waiting on the head bolts, timing cover, water pump, veneer and boston speakers so no progress currently.


Last edited by Flek23; 11-13-2008 at 12:20 PM.
11-15-2008, 05:32 AM
#33
Contributing Member
Thread Starter
Join Date: Oct 2008
Location: Georgia
Posts: 224
Likes: 0
Received 0 Likes
on
0 Posts
Cylinders Sealed Up
The helicoil operation really was very straightforward and took longer to clean up than the actual installation (to bad aluminum isn't magnetic). Got the new head bolts, water pump and timing cover so was able to get her all buttoned up yesterday. Had a "small" snafu with the timing cover install. The Haynes manual did not show that the tensioner bolts needed to be installed before putting on the timing cover. For some reason I was thinking that they were bolts that went through the cover. Duh! So had to take it off, go to auto zone for a new gasket and start over when I noticed I had two bolts left on my engine bolt box. Got me a little aggrivated but nothing a few beers at the VFW didn't fix.


Last edited by Flek23; 11-15-2008 at 05:37 AM.
11-16-2008, 06:49 AM
#34
Contributing Member
Thread Starter
Join Date: Oct 2008
Location: Georgia
Posts: 224
Likes: 0
Received 0 Likes
on
0 Posts
Looking at it makes me feel funny inside.
Got her all sealed up while I get all the brackets, pulleys and other stuff ready to put back on. It's getting a little windy here in GA so I may need a tent or something to finish paining. Once I get everything back together I'll get into the carb. I don't want to start that until I have less parts all over the place.

11-16-2008, 09:35 AM
#36
Registered User
Join Date: Oct 2008
Location: Manitoba Canada
Posts: 283
Likes: 0
Received 0 Likes
on
0 Posts
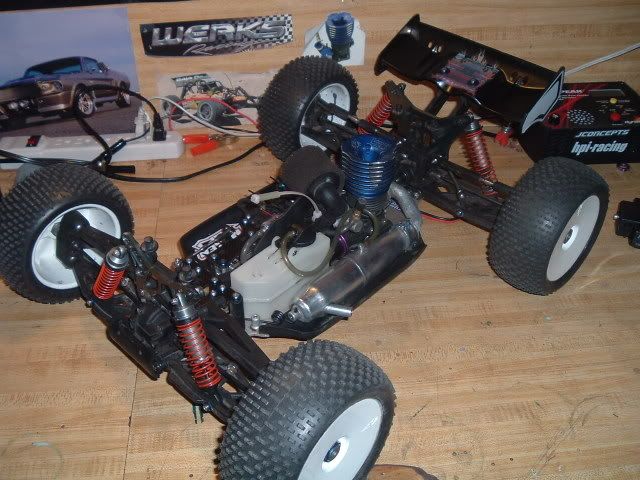
not to get off topic or anything but i see a nitro powered radio controled airplane in the backround witch motor u putting in it?, i race nitro buggys and truggys
11-16-2008, 10:16 AM
#37
Contributing Member
Thread Starter
Join Date: Oct 2008
Location: Georgia
Posts: 224
Likes: 0
Received 0 Likes
on
0 Posts
History
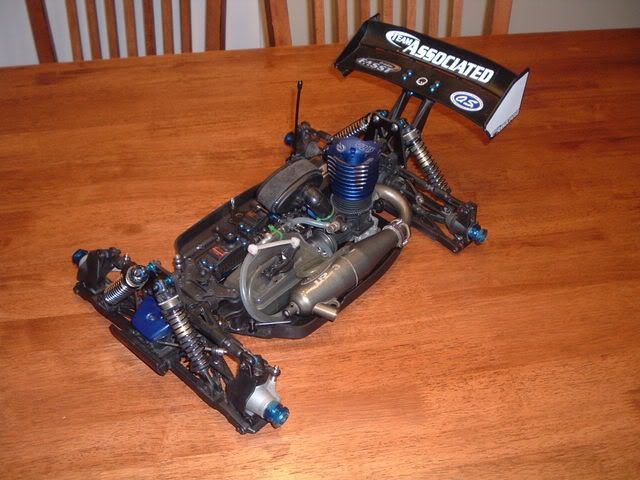
I was stationed at Osan AFB, South Korea from 03 to 04 and kinda got into RC to make the time away from my family go by. I've always been into building planes but have had too much inadvertent ground contact to try to fly em' anymore. I just gave a seriously hopped up HPI to a buddy who is currently in Korea and going through some rough stuff with his family back home. My daughter and I still get out the Losi XXXT's once in a while but I don't mess with nitro much anymore. They don't store well and with the electrics we can get em' out once a year and just have to charge the batteries. If you know anyone interested in my OFNA Titan or my Team Associated RC10GT let me know I'd let em go for a reasonable offer.


 11-17-2008, 06:18 AM
#40
Contributing Member
Thread Starter
Join Date: Oct 2008
Location: Georgia
Posts: 224
Likes: 0
Received 0 Likes
on
0 Posts
Veneer
The Veneer was delivered today. 2' x 8' sheet ended up being $60. Should be plenty to cover goof-ups. It has a pressure sensitive adhesive already on it so we'll see how that adheres, may end up having to use an epoxy but we shall see.

The gasket I picked up at Advanced was a felpro so hopefully it will seal, fingers crossed.
Something really cool happened this morning when I was taking my 10 year old daughter to school. We were talking about the sound the engine makes in my 91 and how we probably ought to rebuild it soon. She says "Dad it's probably those timing chain guides are shot just like in the 83". I couldn't have been more proud because she was exactly right. It has the old timing chain slap and my 10 year old diagnosed it like a pro. Just goes to show the value of letting her help. This knowledge will be with her for the rest of her life. It just tickled me and I wanted to tell somebody about it.
Last edited by Flek23; 11-17-2008 at 06:32 AM.


