
Yes, Chef, that's the one - thanks for the video - what service! And great looking header BTW  I saw that in the FSM as well - using RTV instead of gasket/RTV and was confused since, you know, it's basically the same darn motor! I think I'll check out the dealer RTV- at this point, spending $8 more is so worth doing it right. I didn't know about doing RTV **IN THE BOLT HOLES** - that may help. Also, I had put RTV on the pan, snugged it up to the bottom of the block, then let it sit a few days before torquing to spec - that may also have hurt me (ran out of time!).
Repo - thanks for the suggestion on the gasket. I think I'm going to take off the PS pump/bracket again when I re-attack this.
Lumpy - thanks as well for chiming in. Hope to get to this over the weekend but parents are in town and I'm out most of next week :? Will keep ya'll posted and get some pics up too.
To prep the pan and bottom of block, I scraped clean with razor blade, then used brake parts cleaner/carb cleaner and a rag, then brake parts cleaner/air drying to prep it - is this correct?
I saw that in the FSM as well - using RTV instead of gasket/RTV and was confused since, you know, it's basically the same darn motor! I think I'll check out the dealer RTV- at this point, spending $8 more is so worth doing it right. I didn't know about doing RTV **IN THE BOLT HOLES** - that may help. Also, I had put RTV on the pan, snugged it up to the bottom of the block, then let it sit a few days before torquing to spec - that may also have hurt me (ran out of time!).Repo - thanks for the suggestion on the gasket. I think I'm going to take off the PS pump/bracket again when I re-attack this.
Lumpy - thanks as well for chiming in. Hope to get to this over the weekend but parents are in town and I'm out most of next week :? Will keep ya'll posted and get some pics up too.
To prep the pan and bottom of block, I scraped clean with razor blade, then used brake parts cleaner/carb cleaner and a rag, then brake parts cleaner/air drying to prep it - is this correct?
Registered User
Quote:
I saw that in the FSM as well - using RTV instead of gasket/RTV and was confused since, you know, it's basically the same darn motor! I think I'll check out the dealer RTV- at this point, spending $8 more is so worth doing it right. I didn't know about doing RTV **IN THE BOLT HOLES** - that may help. Also, I had put RTV on the pan, snugged it up to the bottom of the block, then let it sit a few days before torquing to spec - that may also have hurt me (ran out of time!).
Repo - thanks for the suggestion on the gasket. I think I'm going to take off the PS pump/bracket again when I re-attack this.
Lumpy - thanks as well for chiming in. Hope to get to this over the weekend but parents are in town and I'm out most of next week :? Will keep ya'll posted and get some pics up too.
To prep the pan and bottom of block, I scraped clean with razor blade, then used brake parts cleaner/carb cleaner and a rag, then brake parts cleaner/air drying to prep it - is this correct?
SUP HOMIE? lol. No problem, and yeah, with the water pipe, I had a lil trouble since it bolts behind the oil stick housing(do it carefully but DON'T TAKE too much time, as you want the goop at least to still be tacky, eh?), ....but that one, honest, was way less trouble than the wrap around that goes up into the bottom of the intake. Had to remove the entire intake to get that one 'RIGHT'. Just be sure NOT to clean up the pipe....I recommend NOT AT ALL! lol. I removed just enough electrolysis from the Aircraft alum. to create leaks through the tapered-through pipe-to-flange, which actually caused it to leak through the flange on the outside. Originally Posted by Philbert
Yes, Chef, that's the one - thanks for the video - what service! And great looking header BTW I saw that in the FSM as well - using RTV instead of gasket/RTV and was confused since, you know, it's basically the same darn motor! I think I'll check out the dealer RTV- at this point, spending $8 more is so worth doing it right. I didn't know about doing RTV **IN THE BOLT HOLES** - that may help. Also, I had put RTV on the pan, snugged it up to the bottom of the block, then let it sit a few days before torquing to spec - that may also have hurt me (ran out of time!).Repo - thanks for the suggestion on the gasket. I think I'm going to take off the PS pump/bracket again when I re-attack this.
Lumpy - thanks as well for chiming in. Hope to get to this over the weekend but parents are in town and I'm out most of next week :? Will keep ya'll posted and get some pics up too.
To prep the pan and bottom of block, I scraped clean with razor blade, then used brake parts cleaner/carb cleaner and a rag, then brake parts cleaner/air drying to prep it - is this correct?
Far as the Oil pan, I don't have the book in front of me, but I believe it says "RTV THE BOLTS AND STUD HOLES" ...but don't go heavy, just enough to coat the bolts/studs as they drive-out the RTV to really serve as coating each pan hole and leave no area for oil to escape. Also, I can't prove it, but that Oil Pan/Cam Cover sealant seems to be one of the best that I've used for resistance to oil seepage. I think torque was 9lbs? I know the book says. And MAKE SURE to get the corners as instructed in FSM(or haynes)
BEST WISHES, PHIL! Watching and hoping the best for ya! Anything I can add, pics or whatever, please let me know, K?
PS> Updated my thread if you have any thoughts, GREAT! If not, still grateful for a 'checked it out-sorry!' lol!
Hey guys - been a while since my last update, since I haven't had a chance to get into the garage until now.
I took off the driver side water pipe, inspected it, and decided to just do the entire timing cover and oil pan seals again - the right way. I'm planning on leaving the oil pump and water pump as is on the timing cover, as they seem not to be leaking.
It's amazing how much faster it goes the second or third time - I started at about 4:00 and had the whole front off by 7:30 or so (that may not be fast for YOU guys, but it's all about relativity!).
So here's my plan (quesitons in red):
FOR THE TIMING COVER:
- Scrape gaskets off timing cover and block, clean with brake cleaner/rags to prep
- Clean ALL bolts this time before re-using
- Use a new timing cover gasket (do I use the gaskets for the water pipe fittings, or cut them out and "make new ones from cardboard"?)
- Use RTV on both sides of new gasket, install and start torquing down immediately (I waited a few days last time in between mounting and torquing down).
FOR THE OIL PAN:
- remove pan, scrape and wire brush off old gaskets, clean with brake cleaner and rag to prep
- Use Toyota FIPG (I finally got some a the dealer - $24!!)
- Clean all the bolts
- When installing bolts into block, dab FIPG into each bolt hole before inserting and tightening bolts (is this correct? Chef mentioned this is in the FSM, but my crappy Chilton's has no mention...)
- I removed the oil pick up tube last time and it helped to get the pan on/off - and I had to re-mount it when putting the pan back, which added a lot of time to the job...is there a best way to do this, save time, and not smear FIPG everywhere???
- Torque down immediately (What's the best method to torque down the oil pan to 9 ft/lbs - "star" pattern, alternating from corner to corner?)
Hopefully that will solve the leaking coolant and oil issues I have now. I'm just looking to you guys for tips on the best, foolproof way to button this thing back up once and for all so I can get this thing out on the road - I miss it, and want to get it topless!
Thanks in advance for any tips!
Registered User
Hey Phil,
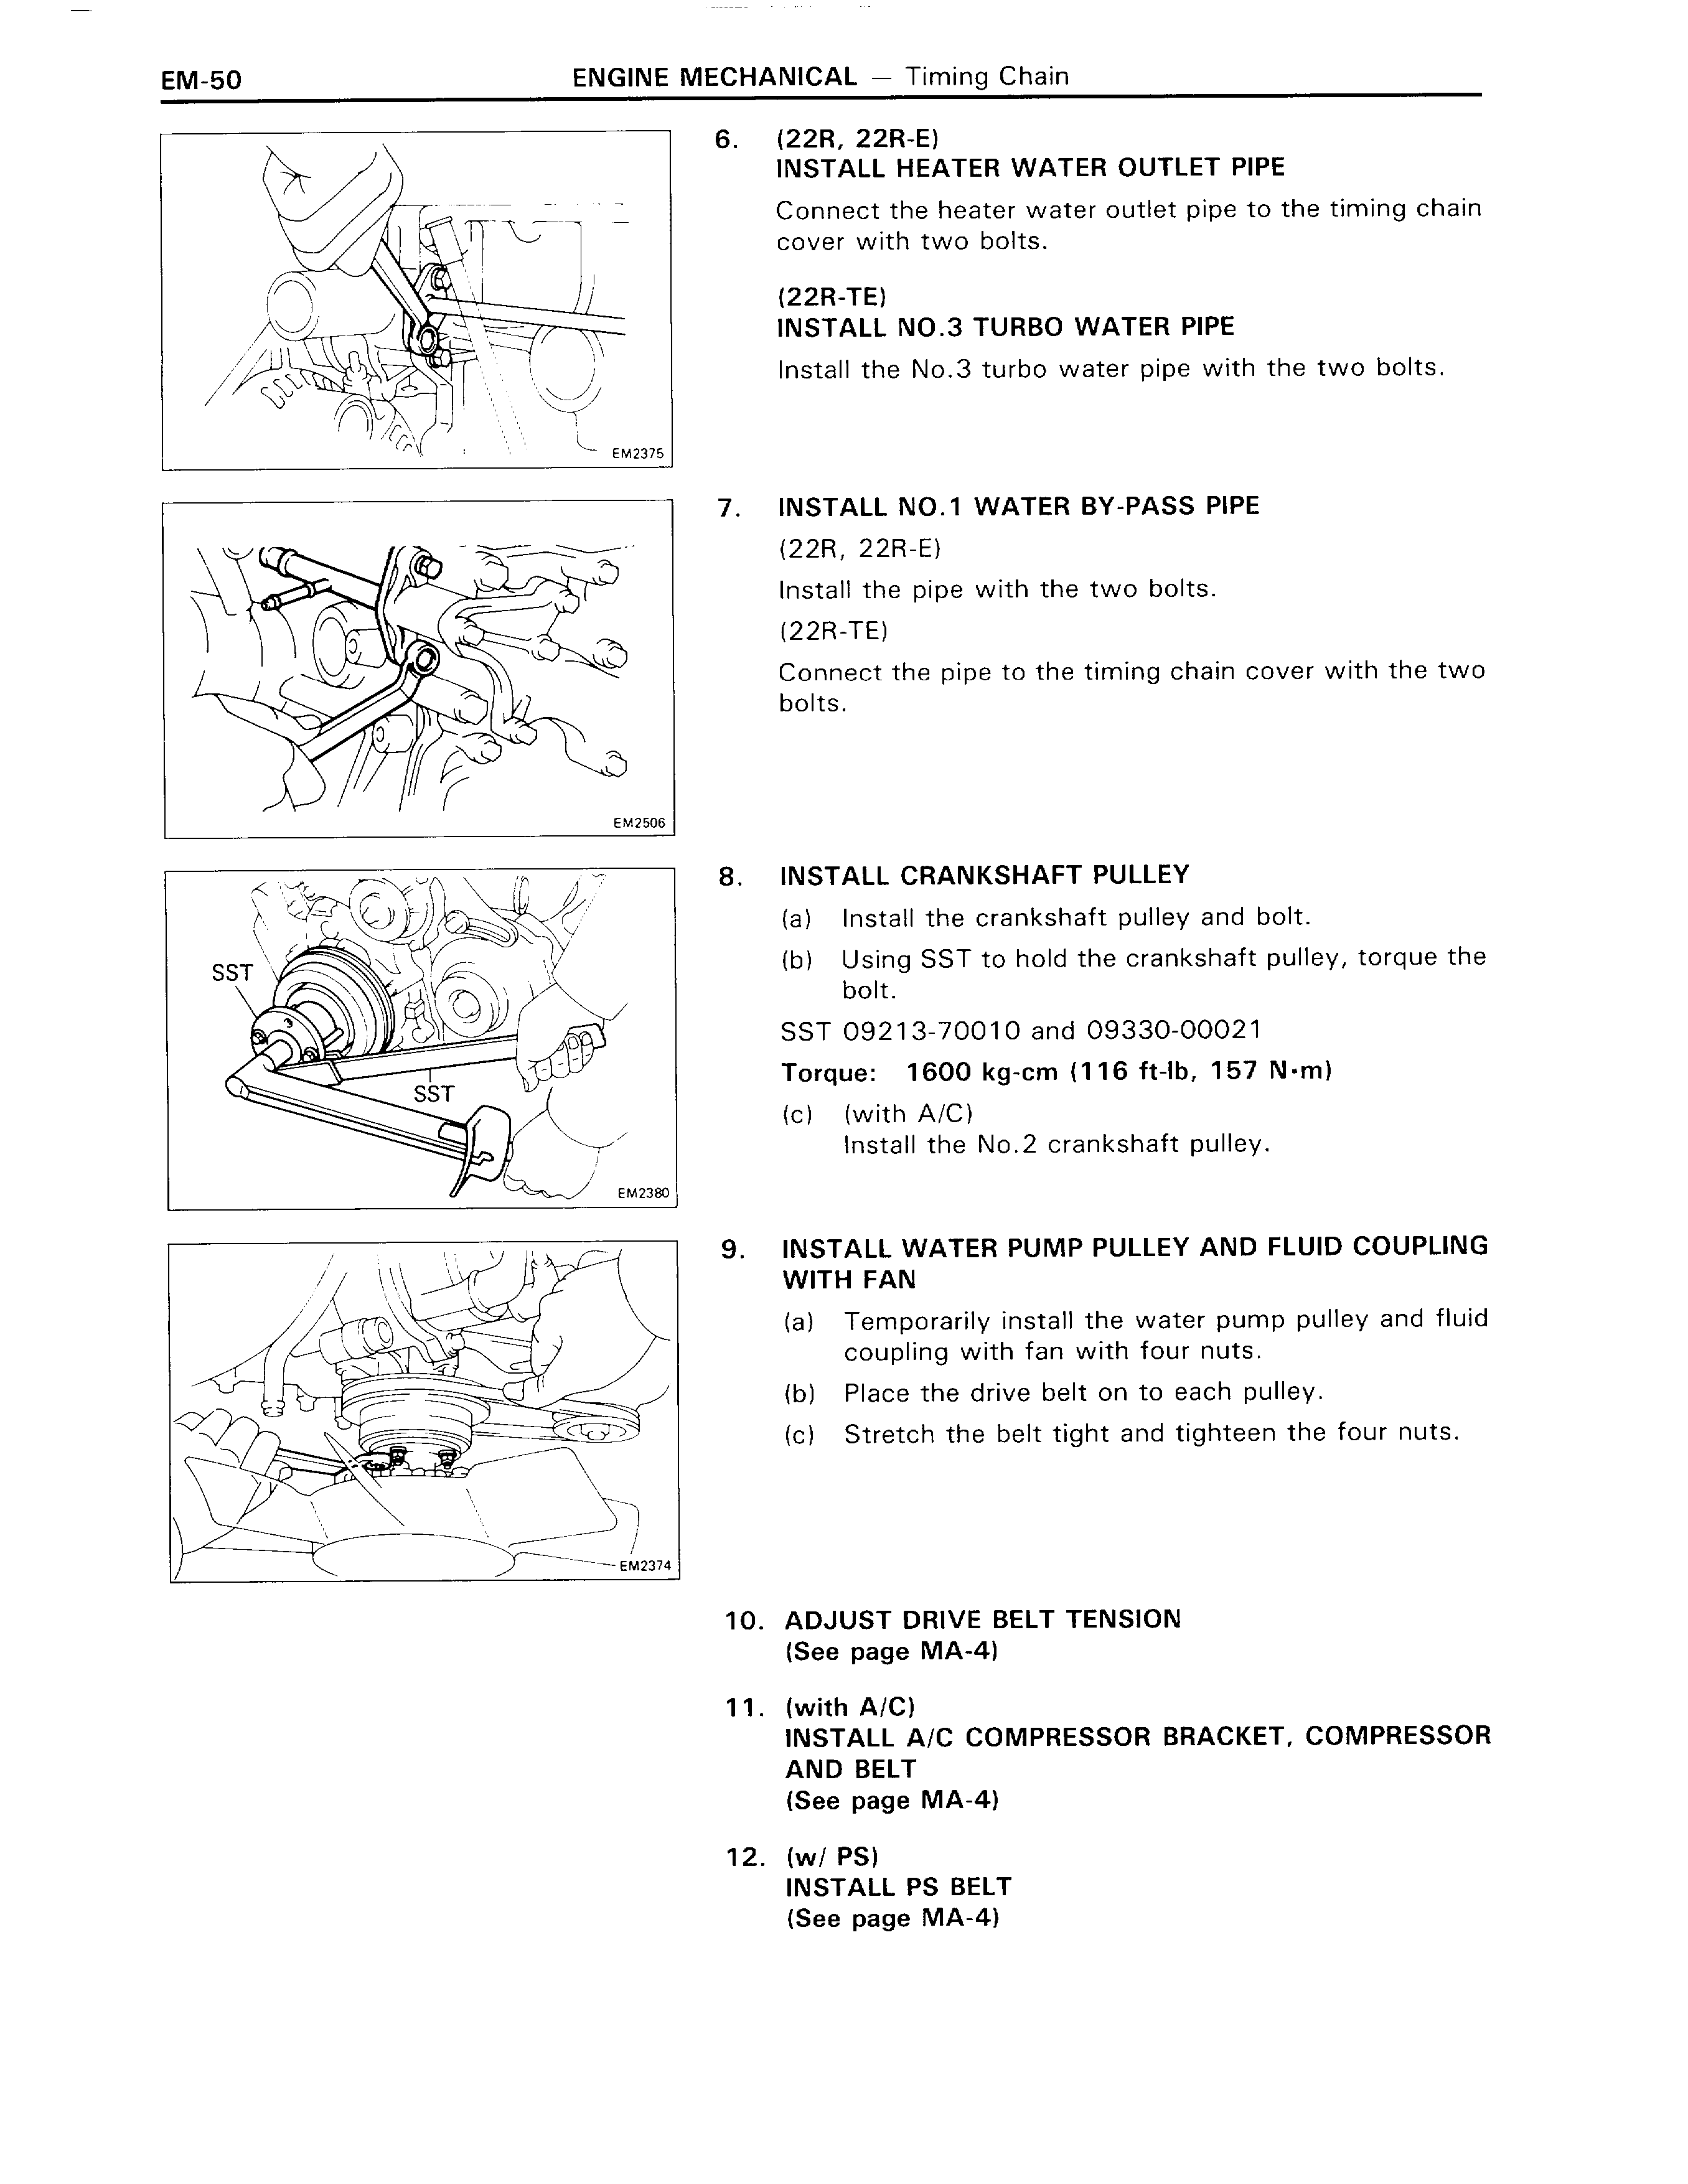
Are you sure your Chiltons doesn't have a section for the oil pan where it shows where exactly to put it on, how much, how much in the bolt holes, how much in the "corners"(seams between the block and cover and in rear as well on the two 'rough' spots). You NEED a diagram that shows you, along with the pattern. I don't remember it being so anal on the pattern, other than spreading it around and hand tightening first, then back and forth and such until they're all snug. Another main thing I remember was it said, "Work QUICKLY as it will dry VERY fast." Trust me, it does, lol.
My scanner is giving me problems or I'd scan the page for you in my Haynes. I remember typing it all out for you or someone, ...not sure if that was you. ??
Thanks Mark - yes, there is a diagramt that shows where in the grooves on the pan to put the FIPG but I can't recall it calling out the beading on the bolts before putting them in - I'll check it over one more time.
I have a 4" lift, which makes it easier to drop the pan. I disconnec the steering damper and swing out of the way, which gives me some room....but it's still a PITA!
Any more tips welcome
I have a 4" lift, which makes it easier to drop the pan. I disconnec the steering damper and swing out of the way, which gives me some room....but it's still a PITA!
Any more tips welcome
Registered User
PITA indeed, from everything I've read. I actually had the luxury of doing it on the hoist, but it was still a lil bit of a pain, hahaha.
Just like how I missed the "85 and newer use NO GASKET", LOL, I re-read and it said, "put an equal/small amount in each bolt hole and around the base of the studs in the front". I will look in my book again when I get up but please, don't just take my word for it, your absolutely right to TRIPLE CHECK and get it 'in writing', hahaha. Tomorrow's monday, call the shop and ask one of the mechanics bay reps to put a question to the Master Mechanic for the details on that. I'd hope they'd help you. Either way, MANY Guru's on here respect you a lot and I'm sure they'll chime in and give you the what's/what!
Have a great week, Phil, so sorry you're having to go through all this. I'm sure it'll be SUWWWWWWEET by the time you're done!
Mark
One more question in red that I forgot....
When putting in the timing cover bolts (the ones that secure it to the block), somone here I think mentioned coating them with RTV to create a better seal...is that true? If so, what's the technique...just dab the threaded end before inserting?
When putting in the timing cover bolts (the ones that secure it to the block), somone here I think mentioned coating them with RTV to create a better seal...is that true? If so, what's the technique...just dab the threaded end before inserting?

Registered User
Phil,
Here are a few pages from my FSM. Hopefully this will help with a few of your questions.
Marktoyota_truck_and_4runner_88_Pg EM-51.pdf
Here are a few pages from my FSM. Hopefully this will help with a few of your questions.
Marktoyota_truck_and_4runner_88_Pg EM-51.pdf

Registered User
WOOT, WOOT! lol.... Mel, you da man! lol..
Phil, maybe Mel has some of those for the Oil pan section? (nudge, nudge), hehe.
Watching and taking notes, ......go get em, Phil!
Phil, maybe Mel has some of those for the Oil pan section? (nudge, nudge), hehe.
Watching and taking notes, ......go get em, Phil!
Thanks a ton Mel - those are great imags and I've saved/printed them out. Funny how it doesn't mentioned the "hidden" bolt by the cam sprocket Also the torque specs on the water pump bolts is 9 ft/lbs instead of the Chilton's 12 ft/lbs....maybe THAT's what started this whole dang mess!
The detail in the FSM you just gave me is better on the oil pan than what I have in my Chiltons, so thanks so much for that. It's going to be crazy going against the clock to get that thing back on, especically if I remove the pickup tube and have to re install it (you guys all recommend doing that right?)
Any input on coating the timing cover bolts with RTV when installing and how best to do that?
Thanks guys
Phil
Also the torque specs on the water pump bolts is 9 ft/lbs instead of the Chilton's 12 ft/lbs....maybe THAT's what started this whole dang mess!The detail in the FSM you just gave me is better on the oil pan than what I have in my Chiltons, so thanks so much for that. It's going to be crazy going against the clock to get that thing back on, especically if I remove the pickup tube and have to re install it (you guys all recommend doing that right?)
Any input on coating the timing cover bolts with RTV when installing and how best to do that?
Thanks guys
Phil
So today I got a full day to put into this project after a lot of time away from it.
Today I:
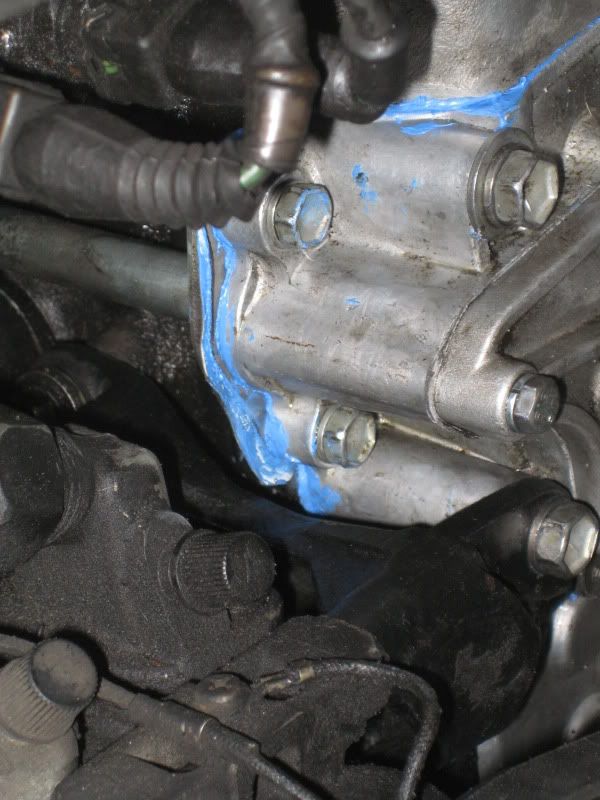
- cleaned the timing cover, front of block, oil pan and bottom og block.
- created gaskets from thin cardboard for the 2 water pipes that come off the back of the timing cover.
- Cleaned oil pickup tube
- Cleaned EVERY timing cover bolt down to metal, as well as all oil pan bolts.
- Put timing cover back on with new gaskets (plus the ones I created for the 2 pipes), using blue RTV, and torquing to spec right away.
- Put the A/C, power steering, fan, radiator, etc back on.
The only thing left to do now is get the oil pan back on, get the fluids back in, and get this thing on the road again.
Here's where I need help - THE OIL PAN.
I manned up and spent the money on the Toyota FIPG for the pan this time, to kill the leaks for good....but that stuff forms FAST, and I don't want to spend 30 minutes trying to shoe-horn that sucker in there.
I was able to get the steering stabilizer out of the way with little issue-just a 14mm nut and it swings away....but the tie rod ends and middle support remain in the way and I really want them gone.
I removed 6 castle nuts/cotter pins but cannnot get the hardware to budge. The truck is up on stands in the front on the crossmember, with wheels on (I did this before removing the castle nuts to take load off suspension.
So, how do I get this stuff off (and back on)?
Is it bad to let it sit suspended on stands on the crossmember with the nuts off?
If I lower the truck back down with the nuts off, will it hurt or help or not do anything?
What are my options to clear this space so the pan can glide right in there?
Here are the (nut free) areas I'm dealing with:
#1:

#2:

#3:

#4:

#5:

#6:

The homemade gasket in place on driver's side:

And the one on the passenger side:
The Darn bar in the way of where I want to snake the oil pan:

Did I mention I hate my tiny garage?

Thanks guys for all the input on this thread thus far, you've been great. If you have any recommendations on how to best approach this particular issue, I'd love to hear it!
Phil
Today I:
- cleaned the timing cover, front of block, oil pan and bottom og block.
- created gaskets from thin cardboard for the 2 water pipes that come off the back of the timing cover.
- Cleaned oil pickup tube
- Cleaned EVERY timing cover bolt down to metal, as well as all oil pan bolts.
- Put timing cover back on with new gaskets (plus the ones I created for the 2 pipes), using blue RTV, and torquing to spec right away.
- Put the A/C, power steering, fan, radiator, etc back on.
The only thing left to do now is get the oil pan back on, get the fluids back in, and get this thing on the road again.
Here's where I need help - THE OIL PAN.
I manned up and spent the money on the Toyota FIPG for the pan this time, to kill the leaks for good....but that stuff forms FAST, and I don't want to spend 30 minutes trying to shoe-horn that sucker in there.
I was able to get the steering stabilizer out of the way with little issue-just a 14mm nut and it swings away....but the tie rod ends and middle support remain in the way and I really want them gone.
I removed 6 castle nuts/cotter pins but cannnot get the hardware to budge. The truck is up on stands in the front on the crossmember, with wheels on (I did this before removing the castle nuts to take load off suspension.
So, how do I get this stuff off (and back on)?
Is it bad to let it sit suspended on stands on the crossmember with the nuts off?
If I lower the truck back down with the nuts off, will it hurt or help or not do anything?
What are my options to clear this space so the pan can glide right in there?
Here are the (nut free) areas I'm dealing with:
#1:
#2:
#3:
#4:
#5:
#6:
The homemade gasket in place on driver's side:
And the one on the passenger side:
The Darn bar in the way of where I want to snake the oil pan:
Did I mention I hate my tiny garage?
Thanks guys for all the input on this thread thus far, you've been great. If you have any recommendations on how to best approach this particular issue, I'd love to hear it!
Phil
Registered User
Woo hooo! Phil's back! lol.....
I aint the one, .....for this one, Homie! hahaha!
Have you thought about PM'ing Roger(aka 4Crawler), or Zuk, or Wabbit? I'm sure it wont be necessary, ....these guys are great, ...but just a thought. My buddy called 4WheelParts one time and this guy in the shop really helped him out for about 1/2 hour on the phone, dealing with an install on a 4" lift. I just thought, well, ....because those 'type' guys yank that stuff all day long....maybe you could get some tips from the Suspension/Fab guys on here, yeah?
YotaTech Milestone-Two Millionth Post
phil
https://www.yotatech.com/forums/f116...cement-212688/
i have alot of details in here about the oil pan
https://www.yotatech.com/forums/f116...cement-212688/
i have alot of details in here about the oil pan
Thanks 92Toy - I've read your build and just re-read the new thread (great work!) to cover the oil pan section.
I have a 4" lift already, so the diff really isn't the same problem as the stock trucks have. It's the getting it in there and out fast and clean (and accommodating for the oil pickup tube, which I'll need to re-fasten while doing so) that scares me. The FIPG dries FAST and I want this to smooth. It's not my first time doing it, but last time I was sloppy and let the RTV dry before it got a good seal (I also did a crappy job putting it on)....so I really want a clear pathway in/out for the pan this go-round.
Thanks - I do appreciate it and love your thread - it's just not going to help me this time :/ I do look forward to referencing your thread when I get around to addressing the intake side some day
Phil


Hi Philbert-
Got an email from you....my favorite method is a hammer and the castle nut threaded on upside down so as to not damage the nut too much.
But, you can also just remove the 3 or 4 bolts that hold the idler arm in the upper left corner of picture #2. That should let the rod drop enough to get the pan back on. good luck. ZUK
Thanks ZUK!
How did I miss that I could just drop the idler arm??? I'll have to check that out later when I get down to the garage again...sigh.
Is there any danger with:
1) Beating the parts apart, like ZUK suggests?
2) Letting it sit like it is in full droop, with the castle nuts removed?
3) Letting it come down to earth on the wheels with the castle nuts removed?
If it's as simple as just dropping the idler arm like ZUK says, that's going to be my approach.
And lastly, will I need an alignemnt after all this, assuming I don't move the wheels at all and bolt everything back up the way it was?


