Well, this is my trucks� restoration thread.I�m not one for sharing too much on the internet, but I�ll be needing tips and tricks along the way, and so hopefully others can correct me when I�m making mistakes.
So, Truck 1: I really wanted a 1985 4x4 with the SR5 package, that�s lived its life in California with no major rust issues, with the tach, A/C, bucket seats, hand crank windows (because I had a Chevy where they failed and I decided never again), and that most importantly was relatively stock; I didn�t want something that had been modified/butchered by someone else.
I found my diamond in the rough just outside of Kernville in 2015. It was almost everything I was pining for with two caveats: it was Blue, and it smelled bad. I was hoping for more of the tan or grey interior, with the white body. But, per the old man selling it, I was supposedly the 3rd owner, the engine had been replaced with a rebuilt 10,000 miles prior, and the A/C blew cold. The smell I can only describe as musky old man combined with clutch fluid. There was a few surface rust issues here and there on the body, but the chassis looked solid, the bed looked decent, and other than a winch mount and aftermarket horn, there was no screwing with it. The older gentleman selling it said it was his hunting rig, and that it wouldn�t pass smog without a new catalytic converter. $3,500 and I drove it home.
I replaced the cat, and she passed smog, and eventually redid the front axle with new bearings and seals from Marlin, and new clutch master & slave cylinders. I proceeded to put on another 15,000 miles over the next year and a half. Then in October of 2016, she started blowing coolant out of the tailpipe, and I parked it. I would have liked to have started restoring it sooner, but work got intense and the weather got cold. Well, work has lightened up, and the weather is warmer, so this is my restoration of it.
Truck 2 is a 1985 2wd factory turbo auto transmission that I picked up for $1,000. As the story goes on this, the original owner was driving down from Oregon to California and blew a head gasket around 10 years ago. He had bought the truck new back in 1985, and it was bone stock. A mechanic took the head off, but the owner died, so the mechanic never finished it. It sat around his yard with the head off for around 4 years, when a car enthusiast in Lamont, CA bought it from the mechanic shop in a lien sale and put it in an open field of his buddy�s. There it languished for another 6 years.
Somewhere in those 6 years outside, some kids broke the 2 door windows and the truck cabin collected rain, dirt, and who knows how many animals. Last year, he decided to get rid of it. He got 2 replacement windows, got the head back on and the engine running. He wanted it gone, and last September, I just happened to see it for sale. On a whim, I bought it after driving it around the block.
Anyway, for anyone wanting to follow along, I'll definitely be restoring the 4x4, and who know with the turbo 2wd.
So, first up in my restoration, I ripped out the carpet on the 4x4.As you can see, it�s ragged, and was the source of the stench (which was a collection of the leaking clutch master cylinder, along with who knows what). First identified problem with truck: the tack welds that hold the rail that holds the front of the driver�s seat bolts were gone.Plus, there was major cracking on the door side of the 3rd bolt hole. Only one good bolt was holding the seat in place. I�ll need to get those rewelded. The good news is there was no major rust going on in the floorboard.
My 2wd turbo has the same interior color scheme as the 4x4. However, you can see how dirty this thing is. All those years with broken windows has let in all kinds of dirt, leaves, and fur. I'm kind of scared to pull the carpet on this one; I can't imagine the floor boards survived without massive rust.
For my turbo 2wd, the interior included the neat tray that fits behind seats on the extra-cab trucks. I found it interesting because I'd seen that tray on other trucks on the web, but never one in person. It was a little disappointing how thin the particle board is.
It won't be any good for the usual items I travel with. For an older car, or camping, I like to travel with my toolbox (very heavy), a good aluminum jack, and extra coolant, brake fluid, and some oil. I like to store them inside the cabin so no one steals my stuff out of the truck bed. There's no way that particle board shelf will support that weight.
However, all that stuff behind the seats looks and is unorganized to a degree. And I always had to worry about any of the fluids tipping over. Eventually I'll create a custom box for that space on the 4x4 so nothing tips, and everything is organized.
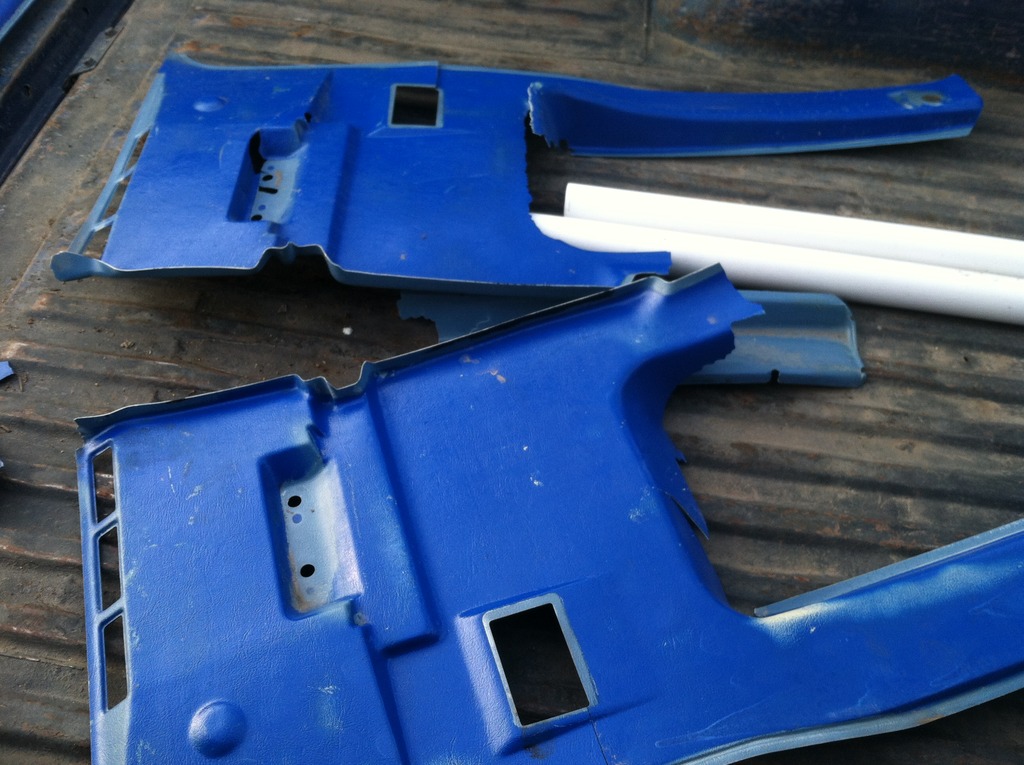
Now, and I don't know why, but the original 4x4 owner decided to spray paint the extra-cab trim interior pieces, as well as the back facade trim, all a dark blue.
The extra-cab trim interior pieces were already disintegrating when I got the truck, so I just ripped them out when I removed the carpet, as opposed to properly removing the extra cab windows. I ordered a new set from toyotafiberglass.com. I'm undecided what interior colors to go with, but would like more info on the original colors.
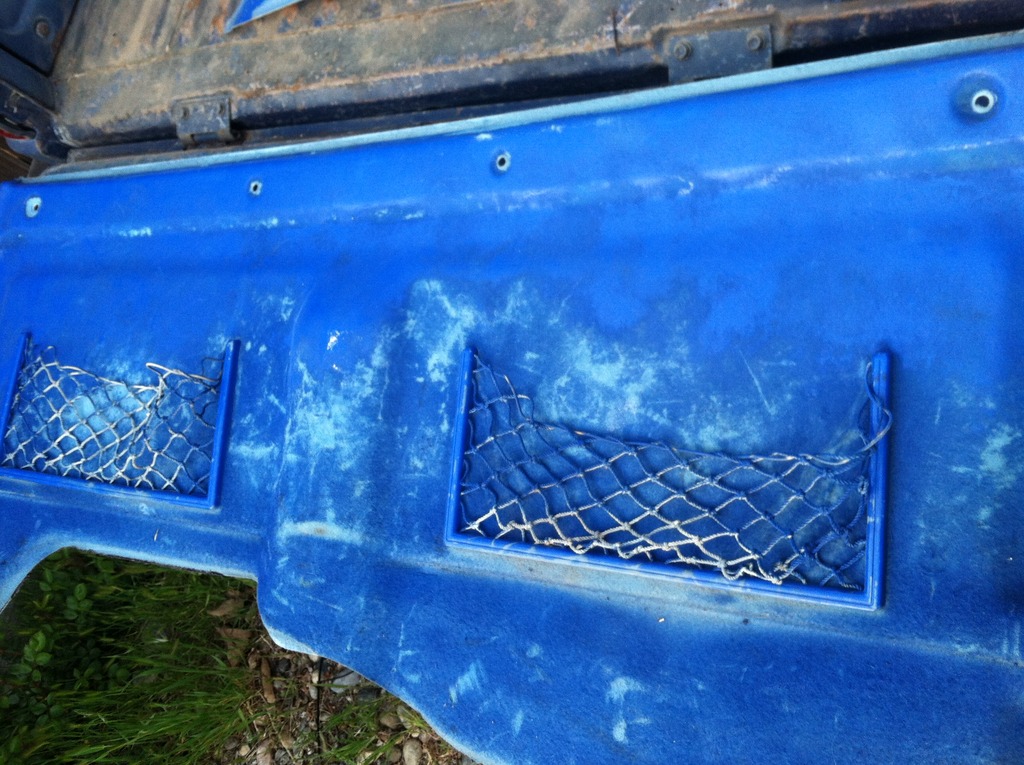
My 2wd turbo has the same interior color scheme, and I can see the light blue color of the rear facade trim, but the color of the extra-cab trim pieces is so badly faded, I can't tell if it was the same light blue or not. I've looked for pictures on the web, but I'm not getting a good look anywhere. The small portions of the 4x4 trim pieces that didn't get painted have a light blue look to them.
Is that the correct color? Anyone know what the extra-cab trim pieces color scheme was on the blue trucks for 1985? Did the color of the trim pieces match the back facade piece for the blue trucks in 1985?
So, this weekend I pulled the engine. It took longer than I expected. The picture below is where I was at by 1pm on Saturday, before I had to quit for the day.
Today, I stripped it to the long block. I made a short video on my phone each time before I took any bolts off or disconnected any wires. There were only 3 instances where I had questions because there was an electrical plug without a connection. I�ll study the service manual to see what�s going on. Here�s 2 of them, where there was no connection.
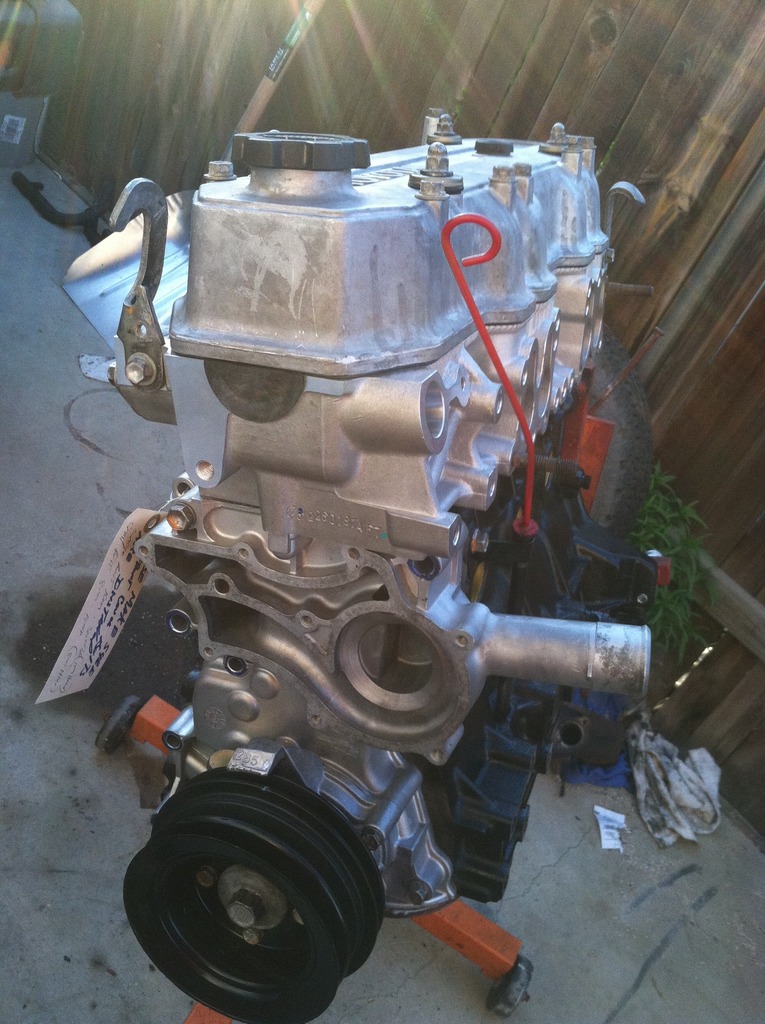
It was necessary to pull the engine because I had 3 issues. I did a leak down test and cylinder 4 was leaking pressure into the coolant system, cylinder 2 was leaking pressure in the engine sump, and worst of all, my oil looked like a milk shake. Debating right now on whether to rebuild the engine myself or have a machine shop do it. Adam's Metalizing in Lancaster, CA has some good reviews from the guys at church.
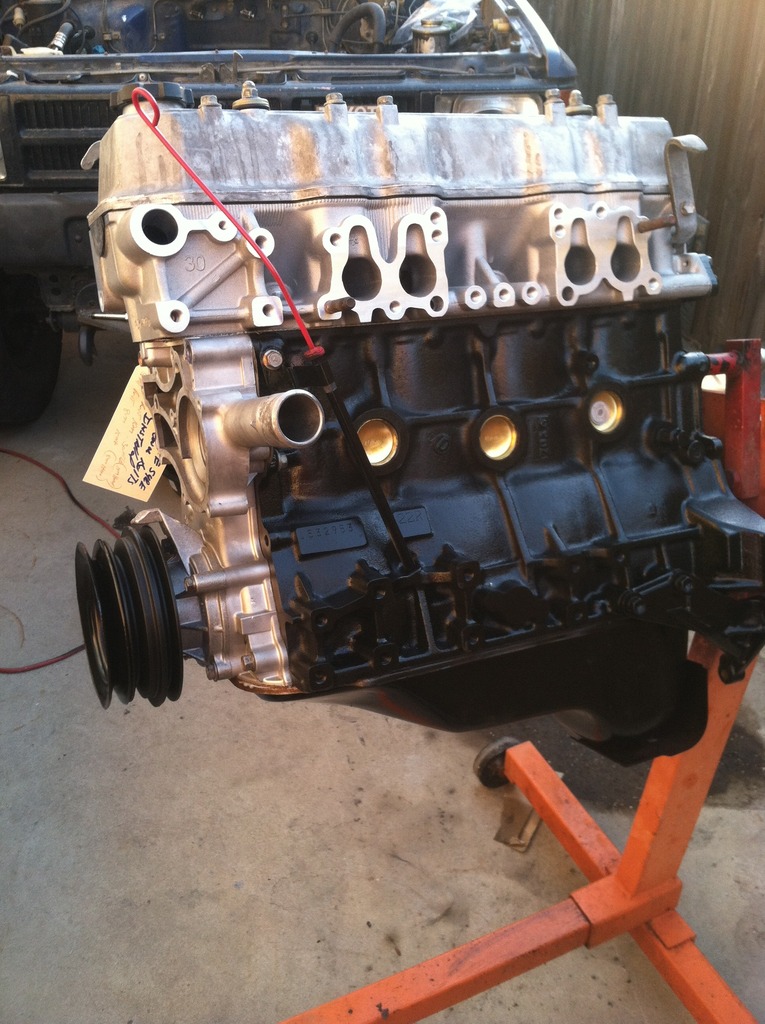
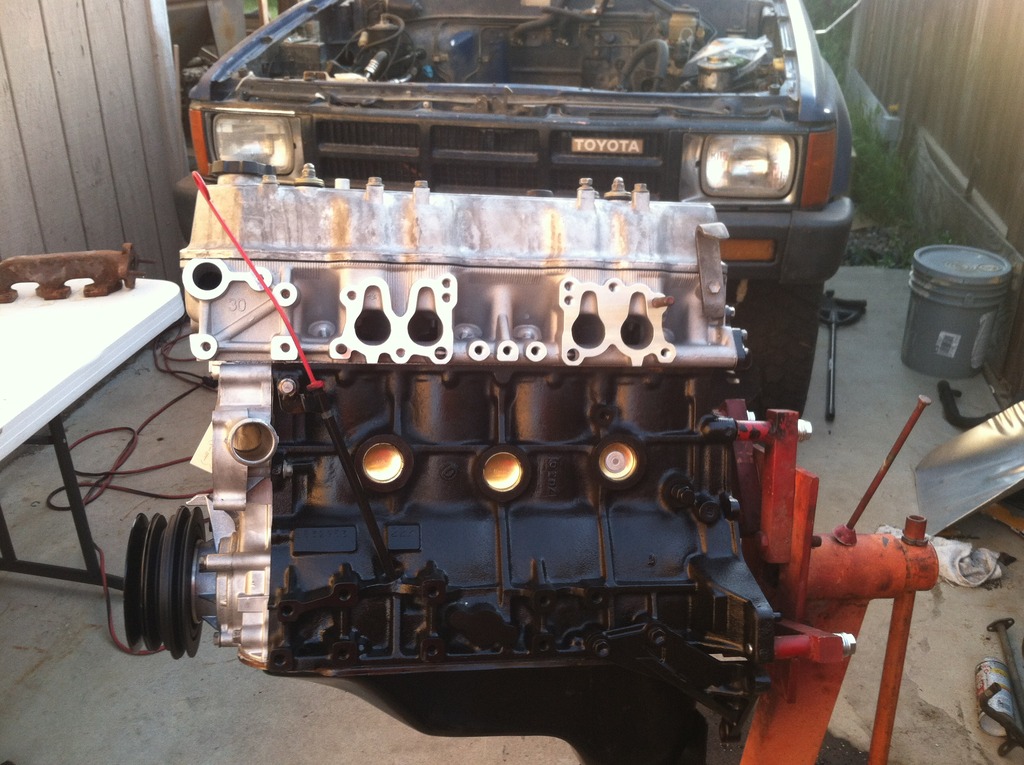
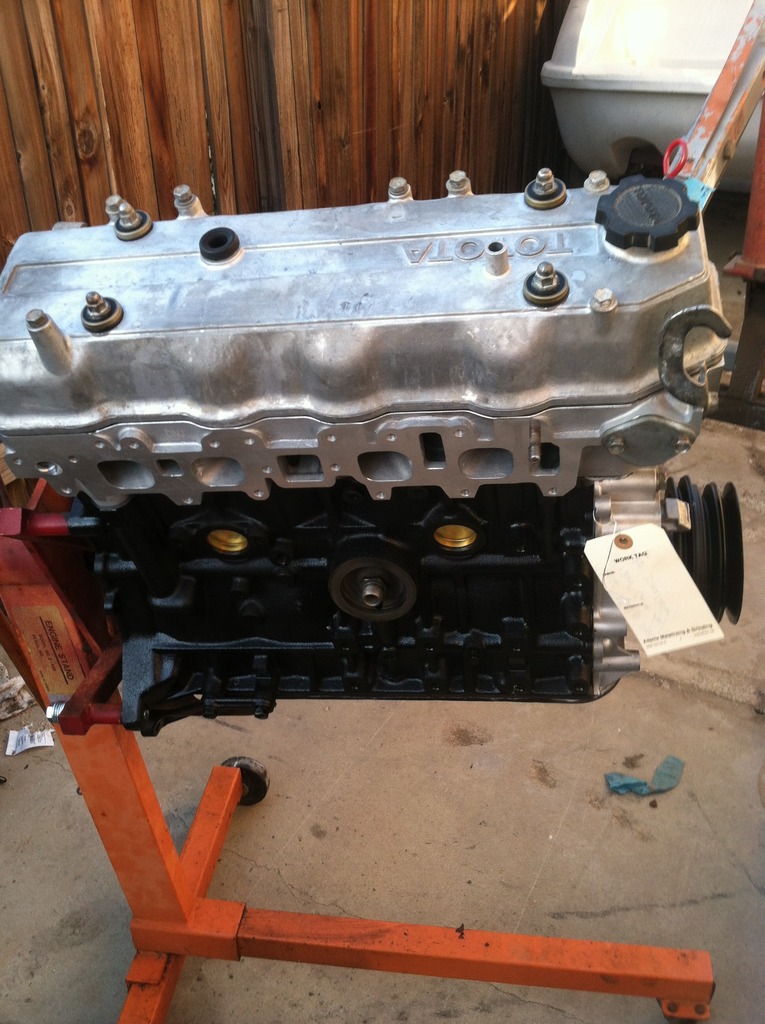
Well, I took the engine down to Adam's Metalizing in Lancaster, CA a couple of weeks ago. That did the long block. The cylinder head was toast, as well as the harmonic balancer. It cost more than I was hoping, but they're a reputable shop, and other than 90 miles in round trip gas, it didn't cost anything for shipping. Got it all back home yesterday. I won't have time to install for a couple of weeks, but at least it's home and ready for me to attach everything to it.
I don't know where the month of May went, but I finally got some time to work on the intake manifold. I should mention, I believe my blown head gasket was caused from a coolant leak that took place underneath the throttle body. From the idle air control (IAC) valve, it allows coolant to go from the IAC valve, to a nipple on the throttle body through the throttle body, and back to the coolant system. I guess it's to keep the throttle from getting iced in position. Well the metal nipple fell out of the throttle body.
I had seen the leak before the head gasket below last year, but it was a small leak, so I topped off the coolant and kept rolling. Well that came back to bite me! My real dilemma is finding affordable hoses for the fabricated coolant and air hoses that go to and from the IAC valve and throttle body. The only place I've found them is at 22RE Performance, and the combined price is almost $200!
I can't find them on any of the usual auto part store websites. I know some people use a later style 22re throttle body, but I'd like to keep this one original. However, $200 just for a few hoses has me thinking otherwise....
Well, I just had good luck from googling, and found the 5 hoses I need from Toyota Parts Overstock for just around $100. I guess I'll be ordering from there.
Well, I owe an apology to 22reperformance.com; it shows the same air and coolant hoses for the idle air control valve at only $114 combined. I think my shopping cart must have had other items inside it. That's fairly comparable to Toyota Overstock Parts.
Also, I went ahead and ordered the header from LC Engineering. Pricey, so hopefully it'll be worth it. I really want to be able to cruise the freeway in 5th gear, even with a slight incline.
Also, here's some pictures of the fruits of my labor from cleaning the intake manifold. I used 5 cans of Walmart "Great Value" brand oven cleaner (with a blue cap). I would spray, maybe run an old toothbrush to loosen the scales, and then use my cheapo pressure washer from Harbor Freight (I've been getting my money's worth out of that one). The inside of the upper intake plenum had a thick coating of oil sludge. I unfortunately didn't a good before picture. Anyway, cleaning up those parts occurred over the course of the weekend. I lost count of many times I sprayed on, waited, and sprayed off. I'm wondering how long the grass will be dead for.
Before:
And after:
The pictures don't really do it justice. I still need to get the rest of the gasket surfaces cleaned off of the upper plenum for the throttle body, the cold start valve, and the EGR valve. I'm still debating about painting it. If I do, it'll be a high quality aluminum paint, but honestly, mission creep has so saturated this project, I need to call it quits somewhere. So I'm doubting I'll get around to that level of detail. Buying the vehicle of your childhood dreams sure gets time consuming and expensive fast.
Wow, a whole year since I posted, and just about as long since I did anything to the truck, “life got in the way”. I decided I need to have this truck rolling by the end of summer so I can take my son camping in it. First update: Glasstite camper shell added! Glasstite Camper Shell on 1985 Toyota
It was for sale in Oregon, and a buddy and I just happened to be passing through. We fit it upside down in the back of his Dodge 2500 and brought it back to California. Fits perfect! It was specifically made for a 1986 extended cab Toyota. It has a pocket specifically for the rear deck light.
All in all, I like the look of it. The shell had been sitting outside for a long time, it’ll need some work. Here’s the picture from the Craigslist ad:
Next update: I removed the transmission.
The stench of gear oil forced my hand. This thing has oil caked on it. I don’t want to have it rebuilt just yet, everything was shifting fine when she was running. However, I do intend to change the gear oil with some new GL4 from Amsoil, plus a Marlin shifter seat, socket and some new boots. I want the smell of oil gone from the cabin.
Finally, I’ve cleaned and painted most all of the engine parts. I don’t have any pictures of those but will soon.
First order of business is to touch up the paint in the engine bay. I'm gonna degrease it either tomorrow or Sunday.
My friends think the idea of a camper shell diminishes from the utility nature of a truck. It does sort of, but I really want it on there for the camping trips I've got planned. The worst part of camping is setting up a tent. I always arrive past sunset, set up a tent in the dark, have to pack it away early in the morning when the tent is still damp, and then I get a mildew smell in the tent for the next time. I'm hoping this cures that.
I could technically pull a trailer, but that has draw backs as well. As to the Glasstite with it's 1970's styling, well.....it kinda of grew on me. My buddies describe it's looks as "funky looking, in an ugly sort of way". I'm honestly digging the look! Can't wait to start cruising it.
I took a sponge and soapy water to the engine bay this morning, very little success. I suspended the A/C and Power steering by a block of wood and started scrubbing.
Here's the before:
And the after:
The grease is just to thick on certain parts. As a result, after some internet sleuthing, I've bought a steam cleaner which I'm hoping will loosen up the thick grease. It'll be here Tuesday, so I'm hoping to get to use it Wednesday.
The two trouble areas in the engine bay are the battery area and the clutch. Both will need to get prepped and painted. I've already got some POR 15, black epoxy primer, and 8A1 paint code from PPG (single stage), and hopefully that will happen this coming weekend.