
YOTATECH gurus unite!!! Strange 82 22r power/ fuel consumption issue???
SubscribeRegistered User
I wonder if the cam timing is off with the crank. I know you have the adj cam gear on there but ....... Also the dizzy being off 1 tooth would act a little funny as well. I just wish I knew where that final timing should be. For some reason I am second guessing that 30 degrees and am thinking it should be 15. It's listed in the FSM though.

here is a little diddy....
Does this sound legit for the 32/36 DGEV Webber???
Carburetor Set Up and Lean Best Idle Adjustment
Base line Settings
Speed Screw 1 to 11/2 turns
Mixture Screw 2 turns
Your settings with engine running
Speed Screw______________
Mixture Screw______________
It is important to follow all linkage and lever installation instructions. The number one and two reasons for tuning errors are improper linkage installations and over tightened linkage nut, causing a binding in linkage assembly.
CALIBRATIONS MAY VARY DUE TO REGIONAL FUELS AND STATE OF ENGINE TUNE AND PERFORMANCE. POOR RUNNING QUALITY DOES NOT MEAN A DEFECT IN THE CARBURETOR. AN ADVANTAGE OF THE WEBER CARBURETOR IS ITS EASE OF ADJUSTMENT AND TUNING.
SET UP ADJUSTMENTS
Start set up by confirming carb base line settings. Do not depend on the factory delivered settings. Check them before the carb is installed.
All settings are done with choke disengaged or warmed up so that the choke is fully opened and disengaged. This is done on automatic choke carburetors by first opening the choke butterfly by hand and inserting a wood block or wedge of some kind to hold open while the linkage is cycled (linkage operated through its full movement ) to clear the choke cam. (You will hear a metallic click as the cam is released. You can check the fast Idle screw under the choke assembly to confirm that it is not in contact with the choke fast idle cam.)
Set the Idle stop screw (speed screw see fig 1) by backing out the Idle speed screw until it is not in contact with the throttle stop lever. Cycle the linkage again to be sure that the linkage comes to close without any assistance. (Checking for linkage bind) Now bring screw back into contact with the lever and continue to open or screwing in 1 turn no more than 11/2 turns.
Set the mixture screw (see Fig 1) by first screwing in until the screw stops, bottoms out. DO NOT FORCE OR BIND AS THIS WILL CAUSE DAMAGE TO THE SCREW AND IT’S SEAT IN THE BODY OF CARBURETOR. Back out the screw 2 full turns.
TUNING
1. BE SURE TO FOLLOW THE NEXT INSTRUCTIONS IN THE PROPER SEQUENCE, DEVIATION WILL CAUSE THE CARBURETOR TO NOT FUNCTION TO ITS IDEAL SPECIFICATIONS AND MAY NOT PROVIDE THE PERFORMANCE AND FUEL ECONOMY AS DESIGNED.
2. Start the engine, the engine will run very slowly more like a tractor. As long as the engine stays running idle speed is not important at this point.
3. The first thing to do is not set up the idle speed, but to set the Idle mixture screw to lean best idle setting. First, turn in the mixture screw until the engine dies or runs worse, then back out the screw (recommend turning � to � turn at a time). The engine should pick up speed and begin to smooth out. Back out � turn more, or until the screw does nothing or runs worse then turn back to the point where it ran its best.
4. Use your ear, not a scope or tuning instruments at this point. You want to tune the engine by sound. Adjust to best, fastest and smoothest running point.
5. Now that the mixture screw is at its best running location, you can adjust the Idle speed the screw. The screw will be sensitive and should only take � to � turns to achieve the idle speed you like.
6. Check and set idle to your driving preference. Put the car in gear and apply slight load, (AC on) and set the Idle as you like it. Don’t set it too high, as this will cause causes excessive clutch and brake wear. The Idle only needs to be 7 to 900 RPM with light load or AC on.
7. Recheck timing and vacuum hook ups. Recheck mixture screw to lean best idle again. If all is still best and smoothest idle then confirm and note the final settings.
8. To confirm settings with the engine running. Start by screwing in the mixture screw and count the number of turns it takes to bottom out and note if the engine dies. If Idle Mixture screws are with in � turn of base line setting then all is well and have fun. Also check the speed screw and note how many total turns from initial contact. You may have opened (turned in) the speed screw. Your final setting should be under 2 full turns. Reset the screws (back in) to the best final settings (Per your notes) and go on a test drive and have fun. If the settings are other than described then you may want to recalibrate the Idle circuit (low speed circuit) to your engines needs. This is done by following the rule of thumb BELOW.
Simple Rules for low speed calibration
If the mixture screw is more than 2 1/2 turns out turns then the Idle jet is too lean (too Small). When the mixture screw is less than 11/2 then the Idle jet is too rich (too large). These assumptions are based on the fact that the speed screw setting is not opened more than 11/2 turns. If the speed screw has to be opened 2 or more turns then this is also an indication of a lean condition usually requiring greater change. At times it may appear to be showing signs of richness or flooding it is really a lean condition. See pictures and notes in the tech 2 article supplied in the kit instructions, view and please understand the need to keep throttle plate as near to closed as possible so as not to prematurely expose the transition holes. This is what causes the visible rich condition, and confirms the need to increase the jet size. JET KITS are available if needed.
EXAMPLE With the speed screw set at no more than (1 1/2) turns in after contact with the stop lever; and the best idle occurring with the mixture screw set at 3 turns from bottom, indicates the need for a larger Idle jet. Achieving the best idle at under 2 turns indicates the need for a smaller idle jet.
The secret to understanding the critical nature of the carburetor set up and the advantages of a WEBER over other carburetors is the Idle circuit. Referred to as the low speed circuit by Weber, this circuit is responsible for 80% of the driving operation. This is the reason that the Weber should give a fuel economy improvement over most factory carbs along with significant performance gains. In the worst case you should not see a significant fuel economy loss over stock, while improving HP & Drivability.
The Weber Carburetor is a sequentially timed device to the motor like the distributor. Time taken in the setup will provide more fun later.
Quote:
Yes 15 is more like it. I read your post and thought you wrote 2200rpm instead of 1200. I changed that in the OPOriginally Posted by xxxtreme22r
I wonder if the cam timing is off with the crank. I know you have the adj cam gear on there but ....... Also the dizzy being off 1 tooth would act a little funny as well. I just wish I knew where that final timing should be. For some reason I am second guessing that 30 degrees and am thinking it should be 15. It's listed in the FSM though.
Registered User
yup that's the lean best idle method. https://www.yotatech.com/forums/f120...2-36-a-240521/
ok so we got 120 miles (cluster mileage) and about 132 miles corrected for tire size. (10% difference between stock and 31's) that's on 13.5 gallons. So about 10 MPG. I am getting roughly 13-14 MPG through town and 22-24 MPG highway. But that's with 33's and 4.10 on a different gen.
ok so we got 120 miles (cluster mileage) and about 132 miles corrected for tire size. (10% difference between stock and 31's) that's on 13.5 gallons. So about 10 MPG. I am getting roughly 13-14 MPG through town and 22-24 MPG highway. But that's with 33's and 4.10 on a different gen.
Is this correct for the weber setup?
I don't think mine is set up like the pic below>>>>
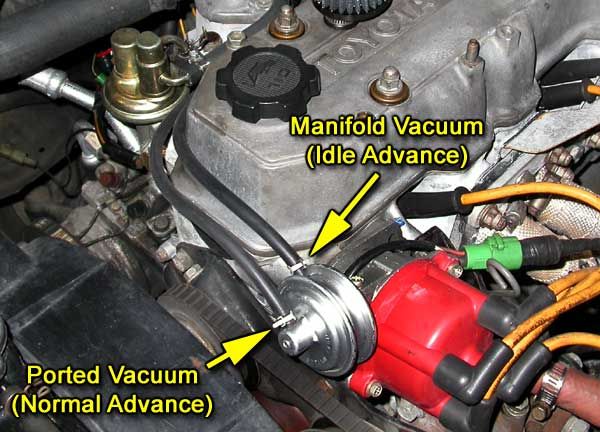
I dont have the "Manifold Vacuum" set up like this pic nor does my buddy
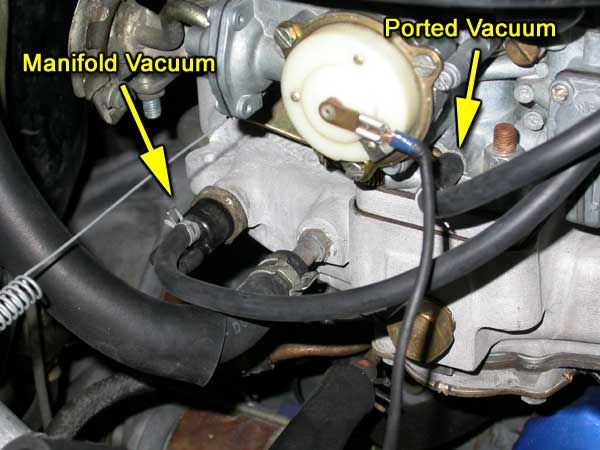
I don't think mine is set up like the pic below>>>>
I dont have the "Manifold Vacuum" set up like this pic nor does my buddy
Registered User
don't use that back vaccuum at all, where did you find that? I think it was here? http://www.4x4wire.com/forums/showfl...an=&page=&vc=1
I had always been told that port gets blocked. I had misinterpreted that back port as being a retard port but its not it's just a lower value vac advance. The vacuum ports are controlled by a VSV which is either vacuum to one or the other depending on cold/hot. Hot front, cold back. So hooking both those up at the same time is somewhat pointless. If that makes sense.
I had always been told that port gets blocked. I had misinterpreted that back port as being a retard port but its not it's just a lower value vac advance. The vacuum ports are controlled by a VSV which is either vacuum to one or the other depending on cold/hot. Hot front, cold back. So hooking both those up at the same time is somewhat pointless. If that makes sense.
Quote:
Can't remember. Just had it in a folder full of Weber pics.Originally Posted by xxxtreme22r
don't use that back vaccuum at all, where did you find that?
He told me he had trouble adjusting the idle speed screw and he wasn't sure he had that correct.
I can't imagine that being off would cause that great of a power loss or fuel consumption???
I can't imagine that being off would cause that great of a power loss or fuel consumption???
Quote:
ok so we got 120 miles (cluster mileage) and about 132 miles corrected for tire size. (10% difference between stock and 31's) that's on 13.5 gallons. So about 10 MPG. I am getting roughly 13-14 MPG through town and 22-24 MPG highway. But that's with 33's and 4.10 on a different gen.
WEll that is a damn site better milage than this guy is getting!!! He is pretty much stock!!!Originally Posted by xxxtreme22r
yup that's the lean best idle method. https://www.yotatech.com/forums/f120...2-36-a-240521/ok so we got 120 miles (cluster mileage) and about 132 miles corrected for tire size. (10% difference between stock and 31's) that's on 13.5 gallons. So about 10 MPG. I am getting roughly 13-14 MPG through town and 22-24 MPG highway. But that's with 33's and 4.10 on a different gen.
I need to figure this out for him. DAMN
Registered User
170 on compression with the block shaved and only 20 over. So my cam timing isn't perfect either. You said this guy was 60 over with a 260 cam. and adj gear?
Quote:
that is correct.Originally Posted by xxxtreme22r
170 on compression with the block shaved and only 20 over. So my cam timing isn't perfect either. You said this guy was 60 over with a 260 cam. and adj gear?
I called EB and discussed this issue with them. They told me it is possible when the motor was set up the lower crank gear may have been moved or bumped and it was not noticed. As a result the timing cover went on then the chain on the upper cam gear went on all the while the bottom was off a tooth down below. I can't seem to get this around my mind. I haven't assembled a motor in a while and I am wondering how this is possible. One interesting addition that bolsters this scenario is the distributer bottoms out at 0 on the pulley. When I pull the vac advance off and I plug the hose I turn the dizzy to set the timing at zero and it stops at zero because there is no more room in the gap on the dizzy. The dizzy is in correctly there is no doubt about that.
Before I go tearing off the entire front end I wanted to see if any YT's have heard of this.
Before I go tearing off the entire front end I wanted to see if any YT's have heard of this.
Registered User
One way to have the bottom off from the top is that when putting on the crank bolt it's torqued down before the cam gear is in place. Tightening down the crank gear will most likely turn the crank (clockwise), you don't think of it at the time and just put the cam gear on. Thus ending up with retarded (not advanced) cam timing.
This is why when doing a timing chain job, I only go hand tight with the crank bolt until I get the cam gear on.
And if 0 is not in the center of the distributor then the dizzy is 1 or two teeth off. That would cause issues as well.
This is why when doing a timing chain job, I only go hand tight with the crank bolt until I get the cam gear on.
And if 0 is not in the center of the distributor then the dizzy is 1 or two teeth off. That would cause issues as well.
Quote:
If 0 is not in the center and it is installed correctly it is possible the lower crank was off. Correct??Originally Posted by xxxtreme22r
And if 0 is not in the center of the distributor then the dizzy is 1 or two teeth off. That would cause issues as well.
And, unfortunately I would have to tear down the front end to see if this is the case.
Registered User
yes but....... I wouldn't assume that. Also correctly means that the dizzy is not pointing at #1 before its inserted into the head. It has to be closer to #4????? (I forget off hand) and then inserted, as the rotors moves counter clockwise as it's inserted it will eventually line up at #1 when fully in. I would move the distributor the 1 or two teeth it takes to put that adjustment in the middle first and see what happens before tearing off the timing cover to check the cam to crank timing.
Quote:
done it already. It will barely start and when it does it runs awful.Originally Posted by xxxtreme22r
yes but....... I wouldn't assume that. Also correctly means that the dizzy is not pointing at #1 before its inserted into the head. It has to be closer to #4????? (I forget off hand) and then inserted, as the rotors moves counter clockwise as it's inserted it will eventually line up at #1 when fully in. I would move the distributor the 1 or two teeth it takes to put that adjustment in the middle first and see what happens before tearing off the timing cover to check the cam to crank timing.
The dizzy is in correctly. There is absolutely no doubt.
Would the compression go down slightly if the cam to crank timing was off???
Registered User
then it probably is the cam timing then/ Didn't realize you already had the dizzy in where 0 was in the middle and it still ran like crap. Time to take the timing cover off. Just be careful putting it back in and not pinching the headgasket. 
Quote:
I think this is the case. I have gone over and over and over on this truck. Everything else has been checked and rechecked. Originally Posted by xxxtreme22r
then it probably is the cam timing then/ Didn't realize you already had the dizzy in where 0 was in the middle and it still ran like crap. Time to take the timing cover off. Just be careful putting it back in and not pinching the headgasket.
It's going to be a long day!!

Thanks again B for the help!! you rock

Registered User
you might see a slightly low compression with the cam timing off yes. Not as much as one would think though. It's more of a dynamic compression that is changed not static if that make sense. It's because effectively the valves are staying open for a shorter period of time allowing less air/fuel in. So in order to get the same reading on a compression gauge you might actually have to crank the engine longer to get the same psi at the gauge. If that makes sense to ya.
Registered User
hopefully you get this in "time"  anyway, Forgot this is the early 22r not the late. The early 22r's I think timing spec is 5 degrees or 8. I forget, but it's not like the later models where it is 0.
anyway, Forgot this is the early 22r not the late. The early 22r's I think timing spec is 5 degrees or 8. I forget, but it's not like the later models where it is 0.


